
Venue thinpar 64 Manuale utente

thinpar 64
OWnEr’S ManUaL
www.venuelightingeffects.com

THINPAR 64 USERS MANUAL
2
TABLE OF CONTENTS
1. BEFORE YOU BEGIN ............................................3
What is included ......................................................3
Unpacking instructions ............................................3
Manual conventions.................................................3
Icons........................................................................3
2. SAFETY INSTRUCTIONS......................................4
3. INTRODUCTION ....................................................5
Control features.......................................................5
Additional features...................................................5
Back Panel ..............................................................5
4. SETUP ....................................................................6
AC power.................................................................6
Power linking ...........................................................6
Mounting orientation................................................7
Rigging ....................................................................7
Signal linking ...........................................................8
5. OPERATING INSTRUCTIONS...............................8
Control panel functions............................................8
Menu map ...............................................................9
6. STANDALONE OPERATION ...............................10
Automatic...............................................................10
Sound-active..........................................................10
Preset colors .........................................................10
Custom static colors ..............................................10
7. DMX OPERATION ................................................11
Configuring the starting address ...........................11
Master/slave (standalone operating modes) .........11
7-Ch mode DMX operation....................................12
3-Ch mode DMX operation....................................12
8. APPENDIX............................................................13
DMX primer ...........................................................13
General troubleshooting ........................................13
Fixture linking ........................................................14
DMX data cable.....................................................14
Cable connectors...................................................14
3-Pin to 5-pin conversion chart..............................15
Setting up a DMX serial data link ..........................15
General maintenance ............................................15
9. TECHNICAL SPECIFICATIONS ..........................16
10. WARRANTY .........................................................16
INTRODUCTION
The Venue Thinpar 64 is a DMX intelligent LED Par Can. It is lightweight and compact which makes it a great light for
Houses of Worship, mobile DJs, clubs and parties. This unit can be used as a stand alone fixture in sound-activated
mode, or controlled via DMX controller.
www.venuelightingeffects.com 3
1. BEFORE YOU BEGIN
WHAT IS INCLUDED
• Thinpar64 • PowerCord
• WarrantyCard • UserManual
UNPACKING INSTRUCTIONS
Carefullyunpackthecarton,thencheckthecontentstoensurethatallpartsarepresentandhavebeenreceivedingood
condition.Notifytheshipperimmediatelyandretainpackingmaterialforinspectionifanypartsappeardamagedfrom
shipping, or the carton itself shows signs of mishandling. Save the carton and all packing materials. In the event that a
xturemustbereturnedtothefactory,itisimportantthatthexturebereturnedintheoriginalfactoryboxandpacking.
MANUAL CONVENTIONS
Venue®manualsusethefollowingconventionstodifferentiatecertaintypesofinformationfromtheregulartext.
CONVENTION MEANING
<Menu> Keytobepressedonthexture’sControlDisplay
1~512 Range of values
50/60 Setofvaluesofwhichonlyonecanbechosen
Settings Menu option not to be modified (for example, showing the operating mode/
current status)
MENU > Settings Sequence of menu options to be followed
ON Value to be entered or selected
ICONS
This manual uses the following icons to indicate information that requires special attention on the part of the user.
ICONS MEANING
This paragraph contains critical installation, configuration or operation
information.Failuretocomplywiththisinformationmayrenderthexture
partiallyorcompletelyinoperative,causedamagetothextureorcause
harm to the user.
This paragraph contains important installation or configuration information.
Failuretocomplywiththisinformationmaypreventthexturefrom
functioningcorrectly.
Thisparagraphremindsyouofuseful,althoughnotcritical,information.

THINPAR 64 USERS MANUAL
4
2. SAFETY INSTRUCTIONS
Pleasereadtheseinstructionscarefully.Itincludesimportantinformation
about the installation, usage and maintenance of this product.
• PleasekeepthisUserManualforfuturereference.
• Makesurethatyouareconnectingtothepropervoltage,andthatthelinevoltageyouareconnectingto
is not higher than that stated on the decal or rear panel of the fixture.
• Thisproductisintendedforindooruseonly!Topreventriskofreorshock,donotexposexturetorain
or moisture.
• Makesuretherearenoammablematerialsclosetotheunitwhileoperating.
• Theunitmustbeinstalledinalocationwithadequateventilation,atleast20”(50cm)fromadjacent
surfaces. Be sure that no ventilation slots are blocked.
• Alwaysdisconnectfromthepowersourcebeforeservicingorreplacingthefuseandbesuretoreplace
withsametypefuse.
• Securexturetofasteningdeviceusingasafetychain.
• Maximumambienttemperatureis104°F(40°C).Donotoperatethextureattemperatureshigher
than this.
• Intheeventofaseriousoperatingproblem,stopusingtheunitimmediately.Nevertrytorepairthe
unityourself.
• Neverconnectthedevicetoadimmerpack.
• Makesurethepowercordisnevercrimpedordamaged.
• Neverdisconnectthepowercordbypullingortuggingonthecord.
• Nevercarrythexturedirectlyfromthecord.Alwaysusethehanging/mountingbracket.
• Avoiddirecteyeexposuretothelightsourcewhileitison.
www.venuelightingeffects.com 5
3. INTRODUCTION
CONTROL FEATURES
• StaticcolorsandRGBcolormixingwithorwithoutDMXcontroller
• Built-inautomatedprogramsviamaster/slaveorDMXwithvariablespeed
• Built-insoundactivatedprogramsviamaster/slaveorDMX
• Pulseeffectwithadjustablespeed
• 3or7channelDMX-512operation
ADDITIONAL FEATURES
• 2.5”lowproledesign
• Powerlinking:40units@120V,60units@230V,10Acircuitmax
• Double-bracketyokedoublesasoorstand
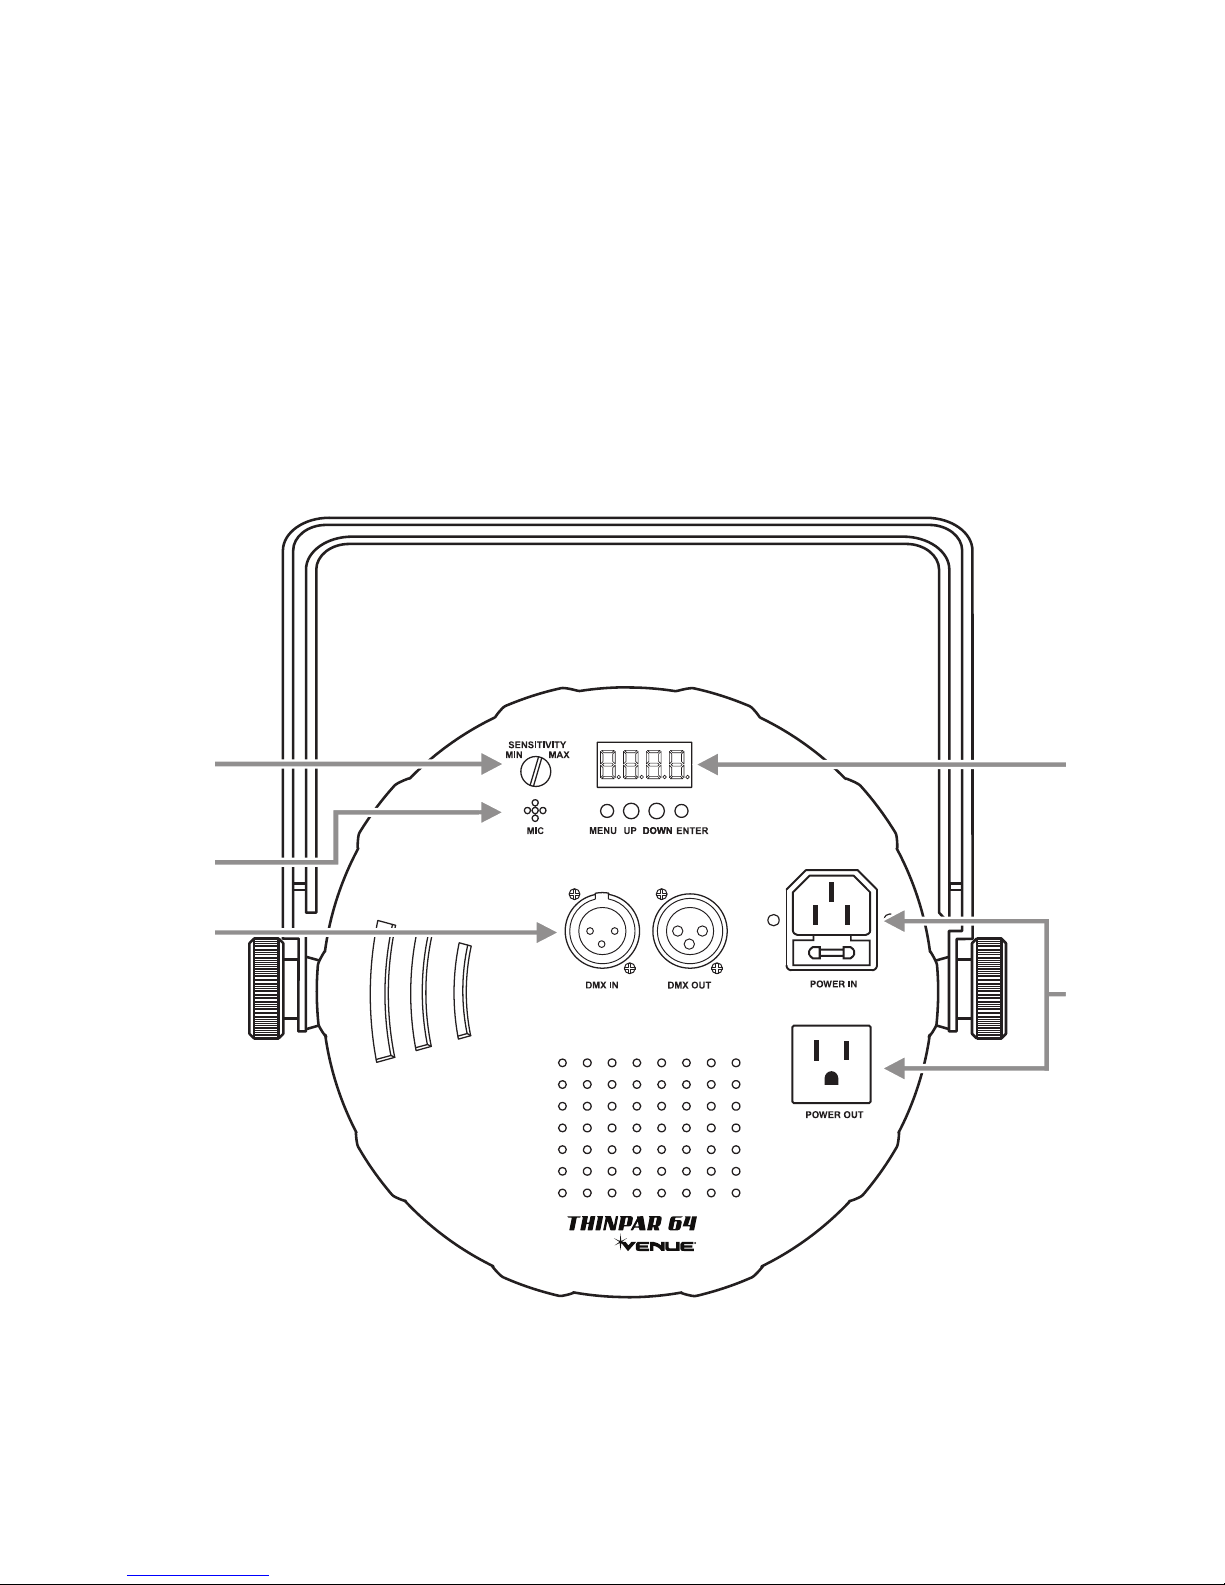
BACK PANEL
AUDIO
SENSITIVITY
ADJUSTMENT
(see pg 10)
MICROPHONE
(see pg 10)
POWER
LINKING
(see pg 6)
CONTROL
DISPLAY
(see pg 8)
DMX
CONNECTION
JACKS
(see pg 8)

THINPAR 64 USERS MANUAL
6
4. SETUP
AC POWER
This fixture runs on 100~240 VAC, 50/60 Hz. Before powering on the unit, make sure the line voltage is within the
range of accepted voltages.
To determine the power requirements for a particular fixture, see the label affixed to the back plate of the fixture
orrefertothexture’sspecicationschart.Axture’slistedcurrentratingindicatesitsaveragecurrentdrawunder
normal conditions.
Alwaysconnectthexturetoaswitchedcircuit.Neverconnectthexturetoarheostat(variableresistor)or
dimmercircuit,eveniftherheostatordimmerchannelisusedonlyasa0to100%switch.
Alwaysconnectthexturetoacircuitwithasuitableelectricalground.
POWER LINKING
This fixture contains power linking via the outlet located on the back panel. Please see the diagram below for
further explanation.
Themaximumquantityofxturesthatmaybelinkedis40units@120V,60units@230V,10Acircuitmax.

www.venuelightingeffects.com 7
MOUNTING ORIENTATION
ThelightweightThinPar64maybemountedinanyposition.
RIGGING
Besurethatthestructurecansupporttheweightofthexture.Pleaseseethe“TechnicalSpecications”sectionofthis
manualforadetailedweightlisting.Mountthexturesecurely.Thismaybedonewithascrew,nutandbolt,orahanging
clamp (not included).The hole in each bracket can fit a 13mm screw or bolt.When rigging, consider routine maintenance
and back panel access. Please see the following steps for installation.
• Ifthepowerlinkoutisintendedtobeusedwithmultiplextures,takeintoaccountthelengthofeachpower
cable, and mount the fixtures close enough to one another to account for this.
• Whenaimingthextures,youmayusethebracketangleknob.Loosentheknob,adjusttothedesiredangle,
andthentightentheknobbyturningclockwise.Donotusetoolsforthisstep,asitmaycausedamage.
• Thereisasecondarybracket,whichmaybeusedprimarilyforoorstandingpositions.
• Safetycablesmustalwaysbeused.
BRACKET ANGLE KNOB
Note: Do not use a tool on
the bracket angle knob.
Tighten or loosen by hand.
MOUNTING BRACKET
SECONDARY BRACKET
(use primarily for floor standing position)

THINPAR 64 USERS MANUAL
8
SIGNAL LINKING
InordertousethisxtureinaDMXormaster/slaveoperation,youmustdaisychainusingDMXcablestolinkfrom
one fixture to another.
5. OPERATING INSTRUCTIONS
CONTROL PANEL BUTTONS
AccessthesefunctionsusingthefourbuttonslocateddirectlyunderneaththeLEDControlDisplay.
BUTTON FUNCTION
<MENU> Scrolls through the current operating mode, as well as back out of
the current menu option
<UP> Selects increasing advancement in the value
<DOWN> Selects decreasing advancement in the value
<ENTER> Selectsavalueandstoreittomemory
AUDIO
SENSITIVITY
ADJUSTMENT
(see pg 10)
MICROPHONE
(see pg 10)
POWER
LINKING
(see pg 6)
CONTROL
DISPLAY
(see pg 8)
DMX
CONNECTION
JACKS
(see pg 8)

www.venuelightingeffects.com 9
The Control Display shows the current state of the unit. It is used to select the operating mode, as well as the
sub-features. For detailed functions, please see the section below.
CONTROL PANEL MENU SELECTIONS
MAIN FUNCTION SUB-FUNCTION SELECTION SUB-SELECTION INSTRUCTION
AUTO P--
P1 7 Color Switching
Select between 2
switching and 2 fading
built-in programs.
P2 7 Color Fading
P3 3 Color Switching
P4 3 Color Fading
SOUND
ACTIVE P-- P5 7 Color Sound Active Use the Audio Sensi-
tivityAdjustmentknob
located on the back
of the fixture.
Select between
2 sound active
programs.
P6 3 Color Sound Active
DMX
CONTROL
3-CH d 1-d512 Select 3-channel DMX
mode (RGB control).
7-CH d 1-d512
COLOR
PALLETTE C--
C1 Red
Select between
7 static colors.
Thedisplaywill
read C1~C7. The
colors that each of
these represent are
indicated to the left.
C2 Green
C3 Blue
C4 Cyan
C5 Magenta
C6 Yellow
C7 White
PRESET SPEED
(1-4) S-- 5 1-5100 (the default range is
5050)
This is the speed
range for the 4
switching and fading
built-in programs.
USER COLOR
MIXING U--
r--- Red
000-100
Combine red, green,
and blue to create a
custom, static color.
g--- Green
b--- Blue

THINPAR 64 USERS MANUAL
10
6. STANDALONE OPERATION
AUTOMATIC
Thisxturehaspreprogrammedchases.TheseareaccessedviatheControlDisplay(page5).Thespeedmaybe
adjustedforthechases.
1. Press <MENU> until “P--”appearsontheLEDscreen.
2. Press <ENTER>.
3. Using <UP> and <DOWN>, select the desired program (P1-P4).
4. Press <ENTER>.
5. Press <MENU> until “S--”appearsontheLEDscreen.
6. Using <UP> and <DOWN>, select the desired program speed (S 1-S100).
7. Press <ENTER> to confirm settings.
SOUND-ACTIVE
Thisxturehaspreprogrammedsoundtriggeredchases.TheseareaccessedviatheControlDisplay(page5).The
audiosensitivitymaybeadjustedusingtheAudioSensitivityAdjustmentknob.
1. Press <MENU> until “P--”appearsontheLEDscreen.
2. Press <ENTER>.
3. Using <UP> and <DOWN>, select the desired program (P5-P6).
4. Press <ENTER> to confirm settings.
PRESET COLORS
Thisxturehaspreprogrammedstaticcolorpresets.TheseareaccessedviatheControlDisplay(page5).
1. Press <MENU> until “C--”appearsontheLEDscreen.
2. Press <ENTER>.
3. Using <UP> and <DOWN>, select the desired color preset (C1-C7).
4. Press <ENTER> to confirm settings.
CUSTOM STATIC COLORS
Thisxturehastheabilitytoacceptcustomstaticcolorsettings.TheseareaccessedviatheControlDisplay(page5).
1. Press <MENU> until “U--”appearsontheLEDscreen.
2. Press <ENTER>.
3. Using <UP> and <DOWN>, select the desired color (r, g, b).
4. Press <ENTER>.
5. Using <UP> and <DOWN>, select the desired color value (000-100).Byselecting000, the color will remain off.
6. Press <ENTER> to continue to the next color (r, g, b).
7. Using <UP> and <DOWN>, select the desired color value (000-100).Byselecting000, the color will remain off.
8. Repeat steps 6 & 7 until the desired color is obtained. Press <ENTER> to save the final color setting. This will move
theselectiontothefollowingcolor;however,thisisnecessarytosavethemodication.
Thecolorsarerepresentedbythefollowinginthemenumap:
r = Red (000-100)
G = Green (000-100)
b = Blue (000-100)
Questo manuale è adatto per i seguenti modelli
1
Indice
Altri manuali Venue Proiettore


