Videocon VKB50QA-XSA Manuale utente

SOUTH ZONE
CENTRAL ZONE
HINDI ZONE
HYDERABAD: 040-32449623 WARANGAL: 0870-3293311/22
KURNOOL: 08518-275859 NIZAMABAD:08462-245666 VIJAYAWADA: 0866-3248833/55
VISHAKHAPATNAM : 0891-3260033/44/55 RAJAHMUNDRY : 9000990236
TIRUPATI: 0877-2270013/14 BANGALORE: 080-324491144/66/77
HUBLI : 0836-3246633/44/55 MANGALORE : 0824-3257994/96 DAVANGERE: 0819-2261337
MYSORE: 0821-2372616 COCHIN: 0484-3113155 / 66 / 77 CALICUT : 0495-3233511 / 22 / 33
CHENNAI: 044 – 26209378 MADURAI: 0452 - 3268877 /55/66
COIMBATORE: 0422 - 2333145/146 SALEM: 0427 - 2403199 TRICHY: 0431 – 2411045
MUMBAI: 022 – 42324545 THANE: 022 – 32162709 PUNE: 020 – 24260489, 020 – 24260329
NAGPUR: 0712-254307079 SANGLI: 0233 – 2276266 NASIK: 0253 – 2582703,0251 – 2582704
AURANGABAD: 0240 - 2471201 SOLAPUR: 0217 – 2357057 JALGAON: 0257 – 2020002
GOA: 0283-2462554 AHMEDABAD: 079 – 26400418, 079 – 40268555 SURAT: 0261 – 2461569
RAJKOT: 0281 – 2465041 INDORE: 0731 – 2544536, 0731 – 2544537 BHOPAL: 0755 – 4097500
JABALPUR: 0761 – 4218460,0761 – 4218472 RAIPUR: 0771 – 2445196
KOLKATA: 033 – 44031403 GUWAHATI: 0 9954746944 ASANSOL: 0341 – 2221017
BHUBNESHWAR: 0674 – 2597281
AGRA: 0562-4051151 CHANDIGARH: 0124-5042140 DEHRADUN: 0135-3243553
DELHI: 011-32062775 GHAZIABAD: 0120-4162000 JAIPUR: 0141-4085001
JALANDHAR: 0181-5020297 JAMMU: 0191-2434959 JODHPUR: 0291-2741661
KARNAL: 9254304822 LUCKNOW: 0522-4017315 LUDHIANA: 0161-5092741 / 50292752
VARANASI : 0542-2363383/6541202 GURGAON: 0124-4094358 RANCHI: 0651 – 2340362
PATNA: 0612-2200048 GWALIOR: 9009799125

MESSAGE FROM THE VICE CHAIRMAN & CEO
Dear Customer,
It gives me great pleasure to welcome you to the VIDEOCON DDB LCD/LED family.
Our sincere endeavour is to provide you with best quality products & impeccable
service, thus laying the foundation for a binding relationship with you. One that stands
the test of time to grow stronger with our every interaction.
At Videocon, we have set ourselves a goal to continuously challenge ourselves and
contribute towards good health, happiness and a bigger cause - a greener tomorrow.
Our initiative is to help create a tomorrow that promises clean air, pure water and a
green earth.
With extensive research, creativity and technology, we present a whole new range of
products - designed super efficient, built super sensitive to your needs. They forward
the urgent cause of environmental protection by becoming the machines of the
future, today.
That is the Videocon philosophy. That is Eco Logic.
Warm Regards,
(Vice Chairman & CEO)

13
14
10. INSTALLATION MENU...................................................................................
9. FEATURE MENU.........................................................................................
1
: Subscription of DTH service is subject to separate contract with DTH
NOTE : Pictures shown in this Owner's Manual are just for representation.
: Actual product may differ from the representation.
: Subscription of DTH service is not mandatory.
service provider.
16. STAND ASSY. & WALL MOUNTING INSTRUCTION................................. 24
12. INTERNET FEATURES (OPTIONAL)........................................................ 17
11. WIRELESS AND INTERNET SETTINGS ................................................. 15
5.1. RF QWERTY REMOTE..................................................................... 11
13. MULTIMEDIA FORMAT SUPPORT............................................................ 19
6. BATTERY INSTALLATION ....................................................................... 11
7. VIDEO MENU ........................................................................................... 12
8. AUDIO MENU ........................................................................................... 13
14. TECHNICAL SPECIFICATIONS................................................................. 22
15. TROUBLESHOOTING................................................................................ 23
CONTENTS
1. INTRODUCTION ........................................................................................ 2
2. WARNINGS AND SAFETY PRECAUTIONS.............................................. 2
3. ANTENNA AND EXTERNAL EQUIPMENT CONNECTION....................... 4
4. NAMES AND FUNCTION OF CONTROLS ON SET ................................. 6
5. NAMES AND FUNCTION OF CONTROLS ON REMOTE.......................... 7

2
ating manual.
The LCD/LED Screen is a high-te
moisture.
Do not rub or strike the Active matrix LCD/LED wit
or damage the active matrix LCD/LED per
Do not keep any magnetic object (i.e speaker etc.) near LCD/LED.
on or near the TV. g water,
Service :
ate properly, unplug it and call Customer Care.
and keep it somewhere you have
quick access to, if required.
Do not touch any pa
e the set in an enclosure or very
close to the wall.
Avoid excessively warm locations to preve
Ensure that the set is placed in a po
Location:

3
For safety, remove the Power plug from the power socket before cleaning the set.
Clean
Cleaning
Remove the Power plug from the power socket when the TV set is not used for a prolonged
Period of
No warranty claims are accepted for damage caused by incorrect handling.
This LCD/LED TV Set is designed to receive and display video and audio signals
and for use as PC monitor, any other use is prohibited.
Caution
the dust on set by wiping the screen and the
here the power cord is subject to damage.
and
the Aerial socket.
unplug the set in ca
Despite the high quality of the television, a random disturbances or interference may
cause occasional malfunctioning, in this case the correct function of the apparatus can
be restored by switching Off the TV through the main On/Off button or removing the
main plug, then switch ON only after the LED light disappears.
Note:
enzol, petroleum or chemicals.
For the purpose of recycling to facilitate effective utilization of resources, please
return this product to a nearby authorized collection center, registered dismantler,
recycler, service center when disposing of this product.
In case of further assistance, you may contact nearest authorized service center.
Or Please see the Company website for further information on collection centers etc.
Visit-http://www.videoconworld.com
( )
Product disposal Guidelines:

RF IN/ANT IN
VIDEO INPUT
1. Connect the composite output VIDEO out
of VCR/Cable receiver to AV1 & AV2.
2. Connect audio outputs (L, R) of a DVD player to the
audio input AV1and AV2 respectively.
3. Press the PLAY button on the VCR.
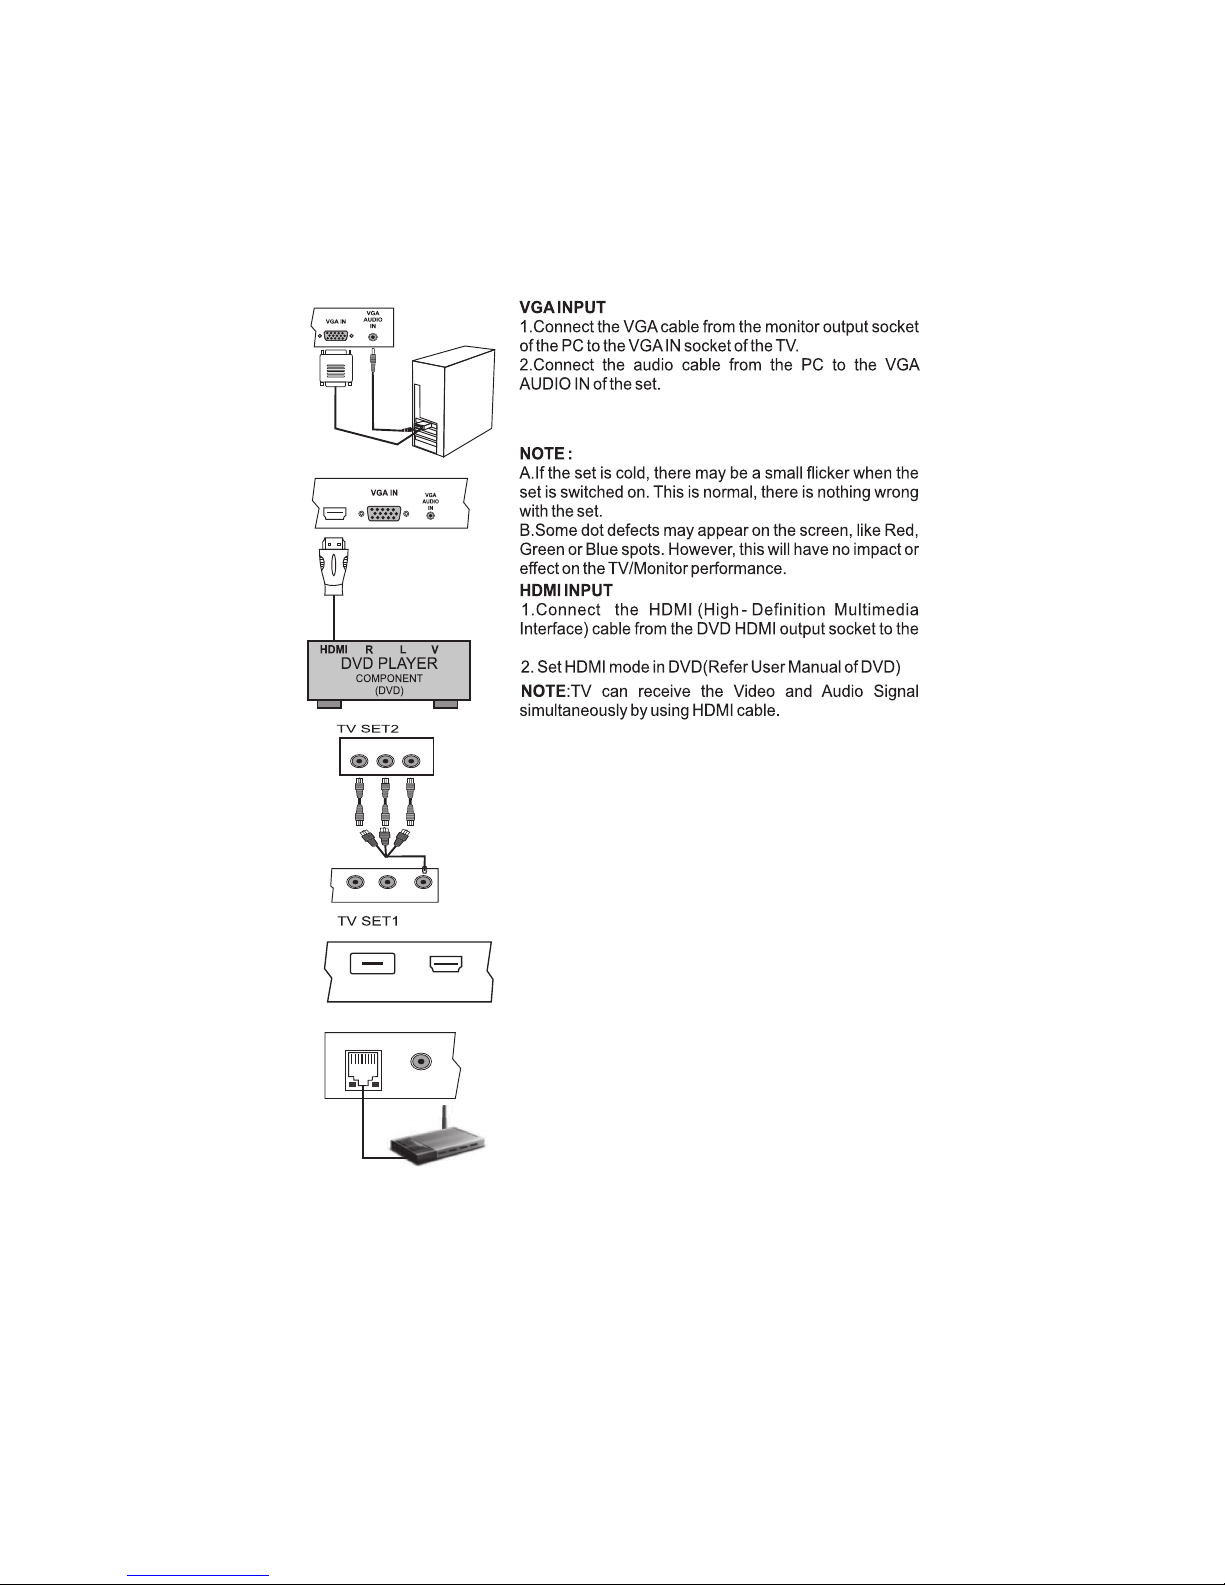
VGA AUDIO IN
AV OUT USB
YPbPr
AV 1 IN AV 2 IN YpbPr
1. The Aerial cable / IF Signal Cable should not be bundled to
- Connect RG-6 Cable in IF IN socket on rear of TV.
- For good operation of the set, angle of Reflector should
not be disturbed.
- Dont Disturb any Reflector connection unless & until advised
by authorised service person.
IF IN
COMPONENT (YCbCr/YPbPr) DVD INPUT
1. Connect the component outputs (YCbCr / YPbPr) of
DVD player to the component (YPbPr) input of the TV.
2. Connect audio outputs (L,R) of a DVD player to the
audio input component.
3. Press the PLAY button on DVD player.
Note :
1. While using component Source we need to provide
audio input through AV Source (L,R).
RF Antenna
Reflector
Connect Antenna cable to the RF IN / ANT IN socket on rear of the
TV For good operation of the set, good signal is required.
In the Strong area with the strong signal an indoor Antenna
A) RF Antenna Connection
B) DTH Reflector Connection
2. Installation of the Reflector & LNBF cabling must be done by
by authorised service person.
the power cord.
You can connect Antenna,external equipm
could be used but otherwise an outdoor Antenna
Note : Selecting a Source
Press TV/AV key on front panel keypad or SOURCE key on remote. A source OSD
will appear to select the required source navigate by pressing up/down key or Source
key repeatedly. After selecting the required source press “OK” key to confirm source.
4

3. Switch on the PC and PC screen appears on the set.
The set can be operated as PC monitor.
HDMI socket on the TV.
HDMI
USB
HDMI
5
Note :
1) Above sketch and connectivity are just for representation actual product may look
different as per model selection.
MULTIMEDIA
Connect / Insert any Standard Multimedia Device
through USB port. To view Source OSD press source
key on Remote or TV/AV key on the front panel. Select
Multimedia by pressing “OK” key on Remote, connected
multimedia device will be listed. Press “OK” to enter the
RLVIDEO
YpbPr
AV 2 IN AV OUT
This connection is used for connecting the TV/AV,
AV OUT
signal from TV SET 1 to TV SET 2.
Note- AV OUT functionality is not applicable for DTH
selected USB Multimedia.
source.
ETHERNET (Optional)
Connect / Insert LAN cable from Modem to
Ethernet socket to use Internet features.
To use the feature, press source key on remote and
navigate down to “Net Connect” and press “OK” key.
Then use “UP/DOWN” key to select the internet feature
on screen and press”OK”.
ETHERNET
AV1

6
Note :
1) Point 10 is Optional.
A) Front Panel Control/Keys
B) connecting your Unit:- (Optional)
2) Above sketch and connectivity are just for representation actual product may look
different as per model selection.
10
4. NAMES AND FUNCTION OF CONTROLS ON SET
1 2
98
76
54
3

7
NOTE : Above Sketch is just for representation. Actual Remote set may differ than this sketch.
ABC
1 2 3
DEF
TUV
89
WXYZ
7
PQRS
0
MNO
JKL
GHI
6
5
SHIFT
LANGUAGE
SOURCE
FAVOURITE
ACTIVE
RADIO VOD MOSAIC
MUTE SWAP
POWER
EXIT
BACK
DTH
ATV
HELP
DTV MENU
ATV MENU
S-LINK
SLEEP
STOP
REPEAT
ANGLE
P S
DTH
VOD
3D
4
d2h
OK
ACTIVE
RADIO VOD
NET CONNECT
P
S
ATV
VOD
STOP REPEAT
1
ABC
2
DEF
3
GHI
4
JKL
5
MNO
6
PQRS
7
TUV
8
WXYZ
9
0
SHIFT
S-LINK
d2h
ATV
HELP
DTV
MENU
INFO
ANGLE
A
3D
MOSAIC
SOURCE

8
NOTE : Above Sketch is just for representation. Actual Remote set may differ than this sketch.
RF QWERTY REMOTE :
ESC F1Web F2Pr Sn F3 F4 F5
Tab
123456
QW E R T
Caps
Lock
ASDFG
Shift ZXCVB
Ctrl Alt Space
YUIOP
HJKL
NM
Space Page up Page down
7&890=
[
Enter
F6
Vol-
F11 Vol+
F11
F10
F9
F8
F7
Questo manuale è adatto per i seguenti modelli
2
Indice
Altri manuali Videocon TV LCD


