ViewSonic VB-AUD-201 Manuale utente

VB-AUD-201
Conference Speakerphone
User Guide
Model No. VS19004
P/N: VB-AUD-201
IMPORTANT: Please read this User Guide to obtain important information on installing and using your product in
a safe manner, as well as registering your product for future service. Warranty information contained in this User
Guide will describe your limited coverage from ViewSonic®Corporation, which is also found on our web site at
http://www.viewsonic.com in English, or in specific languages using the Regional selection box in the upper right
corner of our website.

2
Thank you for choosing ViewSonic®
As a world-leading provider of visual solutions, ViewSonic® is dedicated to exceeding
the world’s expectations for technological evolution, innovation, and simplicity.
At ViewSonic®, we believe that our products have the potential to make a positive
impact in the world, and we are confident that the ViewSonic® product you have
chosen will serve you well.
Once again, thank you for choosing ViewSonic®!

3
Contents
Product Overview........................................................ 4
Package Contents ...................................................................................................4
Overview.................................................................................................................5
Making Connections.................................................... 6
USB Connection......................................................................................................6
Bluetooth Connection ............................................................................................6
Audio Output..........................................................................................................7
Using the Speakerphone.............................................. 8
Powering On/Off ....................................................................................................8
Button Control........................................................................................................9
Status LED Indicator................................................................................................9
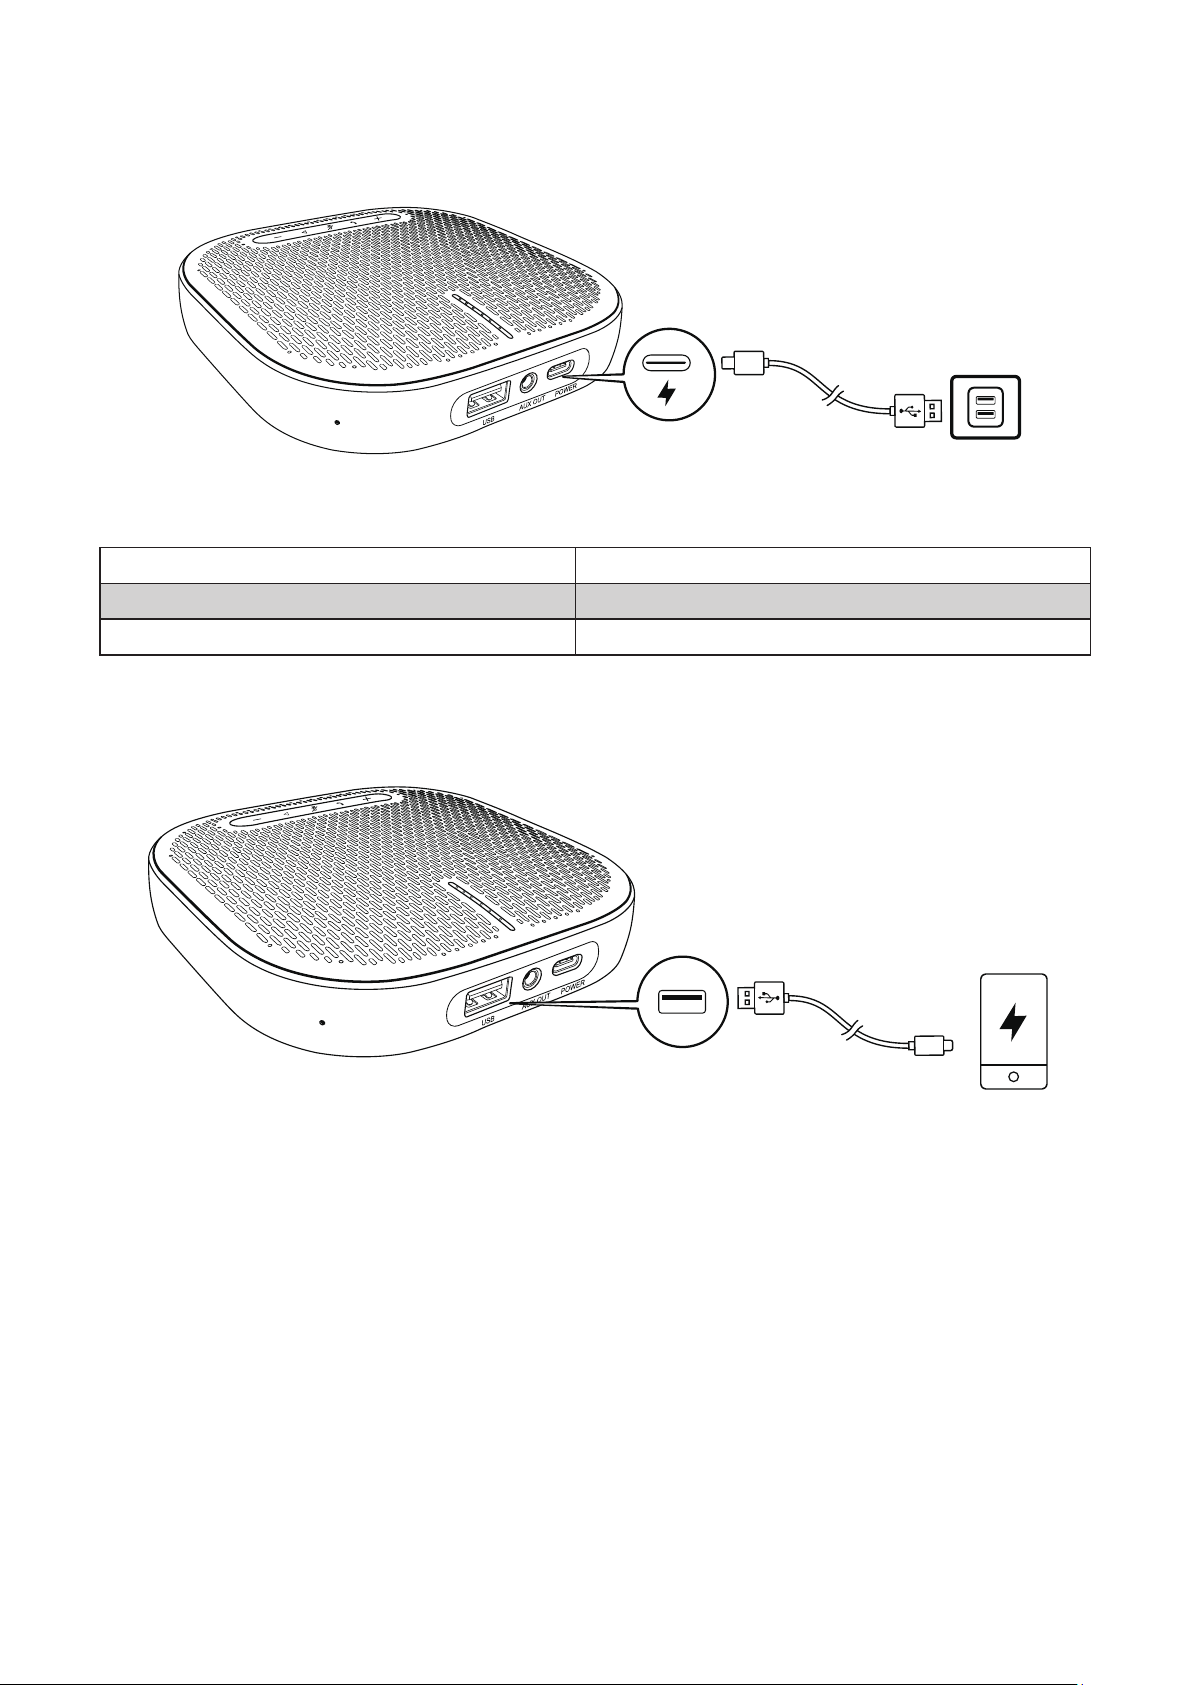
Charging................................................................................................................10
Charging the Speakerphone.................................................................................. 10
Charging External Equipment................................................................................ 10
Troubleshooting ........................................................ 11
Specifications ............................................................ 12
Regulatory and Service Information .......................... 14
Compliance Information.......................................................................................14
FCC Compliance Statement................................................................................... 14
FCC Radiation Exposure Statement....................................................................... 15
Industry Canada Statement Compliance............................................................... 15
CAN ICES-003(B) / NMB-003(B)............................................................................. 15
IC Warning Statement ........................................................................................... 15
Country Code Statement....................................................................................... 15
IC Radiation Exposure Statement.......................................................................... 16
CE Conformity for European Countries ................................................................. 16
Declaration of RoHS2 Compliance......................................................................... 17
Copyright Information ..........................................................................................18
Customer Service .................................................................................................. 19
Limited Warranty .................................................................................................. 20
Mexico Limited Warranty...................................................................................... 23

4
Product Overview
Package Contents
Please take a moment to check if all the necessary items are included in
the package. If anything is missing or damaged, please contact your dealer
immediately.
VB-AUD-201
VB-AUD-201 Converse
Conference Speakerphone
Quick Start Guide
Contents
1
/ŶƐƚĂůůĂƟŽŶ
Overview ŽŶŶĞĐƟŽŶ
2'ĞƫŶŐ^ƚĂƌƚĞĚ
3
67 8 9
12345
11 12
10
13
1. Volume up buƩon
2. Call buƩon
3. Mute buƩon
ϰ DƵůƟ-ĨƵŶĐƟŽŶďƵƩon
5. Volume down buƩon
6. Power buƩon
7. Power LED indicator
8. Bluetooth LED indicator
9. Bluetooth buƩon
10. Status indicator
11. USB port for charging output (Type-A)
12. Audio output port
13. USB port for charging input (Type-C)
a) Connect to the computer with a USB cable.
Warning: It is improper to connect the USB wire to a cellphone. Please don't try!
ŚĂƌŐĞ
ŚĂƌŐĞƚŚĞƉƌŽĚƵĐƚ
ďͿŽŶŶĞĐƚƚŽƚŚĞĐŽŵƉƵƚĞƌŽƌŵŽďŝůĞĞƋƵŝƉŵĞŶƚǀŝĂůƵĞƚŽŽƚŚƉĂŝƌŝŶŐ
tŚĞŶƚŚĞƉƌŽĚƵĐƚŝƐƉŽǁĞƌĞĚŽŶĨŽƌƚŚĞĮƌƐƚƟŵĞŝƚǁŝůůĂƵƚŽŵĂƟĐĂůůLJĞŶƚĞƌƚŚĞ
Bluetooth pairing mode.
USB-A
Charge or Connect to a computer
Connect More
Speakers
Quick Reverse Charging
USB-C
AUX OUT
VB-AUD-201 Converse
Conference Speakerphone
Quick Start Guide
Contents
1
VB-AUD-201Converse
ConferenceSpeakerphone
QuickStart Guide
Contents
1
VB-AUD-201Converse
ConferenceSpeakerphone
QuickStartGuide
Contents
1
Carrying case
USB 2.0 Type-C Male to USB Type-A Male 1M cable x 1
VB-AUD-201 Converse
Conference Speakerphone
Quick Start Guide
Contents
1
/ŶƐƚĂůůĂƟŽŶ
Overview ŽŶŶĞĐƟŽŶ
2'ĞƫŶŐ^ƚĂƌƚĞĚ
3
67 8 9
12345
11 12
10
13
1. Volume up buƩon
2. Call buƩon
3. Mute buƩon
ϰ DƵůƟ-ĨƵŶĐƟŽŶďƵƩon
5. Volume down buƩon
6. Power buƩon
7. Power LED indicator
8. Bluetooth LED indicator
9. Bluetooth buƩon
10. Status indicator
11. USB port for charging output (Type-A)
12. Audio output port
13. USB port for charging input (Type-C)
a) Connect to the computer with a USB cable.
Warning: It is improper to connect the USB wire to a cellphone. Please don't try!
ŚĂƌŐĞ
ŚĂƌŐĞƚŚĞƉƌŽĚƵĐƚ
ďͿŽŶŶĞĐƚƚŽƚŚĞĐŽŵƉƵƚĞƌŽƌŵŽďŝůĞĞƋƵŝƉŵĞŶƚǀŝĂůƵĞƚŽŽƚŚƉĂŝƌŝŶŐ
tŚĞŶƚŚĞƉƌŽĚƵĐƚŝƐƉŽǁĞƌĞĚŽŶĨŽƌƚŚĞĮƌƐƚƟŵĞŝƚǁŝůůĂƵƚŽŵĂƟĐĂůůLJĞŶƚĞƌƚŚĞ
Bluetooth pairing mode.
USB-A
Charge or Connect to a computer
Connect More
Speakers
Quick Reverse Charging
USB-C
AUX OUT
VB-AUD-201 Converse
Conference Speakerphone
Quick Start Guide
Contents
1
VB-AUD-201 Converse
Conference Speakerphone
Quick Start Guide
Contents
1
VB-AUD-201Converse
ConferenceSpeakerphone
QuickStartGuide
Contents
1
Quick start guide (QSG)
VB-AUD-201 Converse
Conference Speakerphone
Quick Start Guide
Contents
1
/ŶƐƚĂůůĂƟŽŶ
Overview ŽŶŶĞĐƟŽŶ
2'ĞƫŶŐ^ƚĂƌƚĞĚ
3
67 8 9
1234 5
11 12
10
13
1. Volume up buƩon
2. Call buƩon
3. Mute buƩon
ϰ DƵůƟ-ĨƵŶĐƟŽŶďƵƩon
5. Volume down buƩon
6. Power buƩon
7. Power LED indicator
8. Bluetooth LED indicator
9. Bluetooth buƩon
10. Status indicator
11. USB port for charging output (Type-A)
12. Audio output port
13. USB port for charging input (Type-C)
a) Connect to the computer with a USB cable.
Warning: It is improper to connect the USB wire to a cellphone. Please don't try!
ŚĂƌŐĞ
ŚĂƌŐĞƚŚĞƉƌŽĚƵĐƚ
ďͿŽŶŶĞĐƚƚŽƚŚĞĐŽŵƉƵƚĞƌŽƌŵŽďŝůĞĞƋƵŝƉŵĞŶƚǀŝĂůƵĞƚŽŽƚŚƉĂŝƌŝŶŐ
tŚĞŶƚŚĞƉƌŽĚƵĐƚŝƐƉŽǁĞƌĞĚŽŶĨŽƌƚŚĞĮƌƐƚƟŵĞŝƚǁŝůůĂƵƚŽŵĂƟĐĂůůLJĞŶƚĞƌƚŚĞ
Bluetooth pairing mode.
USB-A
Charge or Connect to a computer
Connect More
Speakers
Quick Reverse Charging
USB-C
AUX OUT
VB-AUD-201 Converse
Conference Speakerphone
Quick Start Guide
Contents
1
VB-AUD-201Converse
ConferenceSpeakerphone
QuickStartGuide
Contents
1
VB-AUD-201Converse
ConferenceSpeakerphone
QuickStartGuide
Contents
1

5
Overview
6 7 8 9 11 12
10
13
1 2 3 4 5
1Volume up buon 8Bluetooth LED indicator
2Call buon 9Bluetooth buon
3Mute buon 10 Status indicator
4Mul-funcon buon 11 USB port for charging output (Type-A)
5Volume down buon 12 Audio output port
6Power buon 13 USB port for charging input (Type-C)
7Power LED indicator
Warning
• Do not expose the product to a wet environment; and do not place liquid
containers (e.g., vases) on the product.
• Do not put uncovered sources of ignion (e.g., lit candles) on the product.
• Keep the product away from direct sunlight, an open re or other heat sources.
• If using a power adapter for power supply, please use a supported power
adapter that has CCC cercaon.

6
Making Connecons
USB Connecon
Warning: Do not connect the USB cable to a cellphone.
Bluetooth Connecon
When the speakerphone is powered on for the rst me, it will automacally enter
Bluetooth pairing mode.
Press once Enter pairing mode
Blue indicator is ashing Bluetooth pairing
Blue indicator is always on Bluetooth connected
NOTE:
• Every me the speakerphone is powered on, it will automacally connect
to previously connected devices (if available).
• To disconnect the Bluetooth connecon, press the Bluetooth buon again.

7
Audio Output
Connect an external speaker to the AUX jack of the speakerphone with an AUX
cable (not provided). The audio will be played through the external speaker.

8
Using the Speakerphone
Powering On/O
1. Press and hold the power buon for two (2) seconds to turn on the power; the
Status Indicator will light up from top to boom then turn o.
2. Press and hold the power buon for two (2) seconds to turn o the power; the
Status Indicator will light up from boom to top then turn o.
Power Indicator Status
White indicator is always on Power is on
Indicator is o Power is o
NOTE:
• Aer the speakerphone is connected to a computer, it will automacally
power on.
• Aer 30 minutes of no operaon or power supply, the speakerphone will
automacally power o.

9
Buon Control
Press or hold Volume up/down
Press Answer/end calls
Press and hold for 2 seconds Refuse calls
Press Turn the microphone o/on
Press Play/pause music
Status LED Indicator
White indicator is on for 2 seconds The USB cable has been connected to a
computer
Green indicator is ashing Calling
The blue LED indicators will move to
the boom with increasing levels and
to the top with decreasing levels
Turn volume up or down.
Turns red Mute
Green indicator is on Press the power buon to check the baery
level

10
Charging
Charging the Speakerphone
Power Indicator Status
Red indicator is always on Currently charging
White indicator is always on Fully charged
Red indicator is ashing Low baery
Charging External Equipment
NOTE:
• If the speakerphone is powered o or charging, charging output is not
available.
• If the remaining baery of the speakerphone is less than 10%, charging
output is not available
Altri manuali per VB-AUD-201
1
Questo manuale è adatto per i seguenti modelli
1
Indice


