VocoPro DA-7909RV Manuale utente

OWNER’S MANUAL

Welcome.
And Thank you for purchasing the DA-7909RV from VocoPro, your ultimate choice in
Karaoke entertainment! With years of experience in the music entertainment business,
VocoPro is a leading manufacturer of Karaoke equipment, and has been providing
patrons of bars, churches, schools, clubs and individual consumers the opportunity to
sound like a star with full-scale club models, in-home systems and mobile units. All our
products offer solid performance and sound reliability, and to further strengthen our
commitment to customer satisfaction, we have customer service and technical support
professionals ready to assist you with your needs. We have provided some contact
information for you below.
VocoPro
1728 Curtiss Court
La Verne, CA 91750
Toll Free: 800-678-5348
TEL: 909-593-8893
FAX: 909-593-8890
Customer Service & General Information
Tech Support
Remember Our Website
Be sure to visit the VocoPro website www.vocopro.com for the latest information on new
products, packages and promos. And while you’re there don’t forget to check out our
Club VocoPro for Karaoke news and events, chat rooms, club directories and even a
Service directory!
We look forward to hearing you sound like a PRO, with VocoPro, your ultimate choice in
Karaoke entertainment.
FOR YOUR RECORDS
Please record the model number and serial number below, for easy reference, in case of loss or theft.
These numbers are located on the rear panel of the unit. Space is also provided for other relevant information
Model Number .................................................................................................................................
Serial Number ..................................................................................................................................
Date of Purchase .............................................................................................................................
Place of Purchase ...........................................................................................................................

Table of Contents
Introduction
Safety Instructions 2
Listening for a Lifetime 3
FCC Information 4
Features & Specifications 5
Descriptions and Functions
Front Panel 6 - 7
Rear Panel 8 - 9
Remote 10
Getting Started
Getting Started 11
Getting Connected 12
Operations
Basic Operations 17
Advanced Operations 21
Troubleshooting 24

2
Safety Instructions
CAUTION
RISK OF SHOCK
CAUTION: To reduce the risk of electric shock, do
not remove cover (or back). No user-serviceable
parts inside. Only refer servicing to qualified service
personnel.
WARNING
To reduce the risk of fire or electric shock,
do not expose this unit to rain or moisture.
Explanation of Graphical Symbols
The lightning flash & arrowhead symbol,
within an equilateral triangle, is intended
to alert you to the presence of danger.
The exclamation point within an equilateral
triangle is intended to alert you to the
presence of important operating and
servicing instructions.
Read Instructions– All the safety and operating instruc-
tions should be read before the appliance is operated.
Retain Instructions– The safety and operating instruc-
tions should be retained for future reference.
Heed Warnings– All warnings on the appliance and in
the operating instructions should be adhered to.
Follow Instructions– All operating and use instructions
should be followed.
Attachments– Do not use attachments not recom-
mended by the product manufacturer as they may cause
hazards.
Water and Moisture– Do not use this unit near water. For
example, near a bathtub or in a wet basement and the
like.
Carts and Stands– The appliance should be used only
with a cart or stand that is recommended by the manu-
facturer.
7A. An appliance and cart combination
should be moved with care. Quick stops,
excessive force, and uneven surfaces may
cause an overturn.
Ventilation– The appliance should be
situated so its location does not interfere with its proper
ventilation. For example, the appliance should not be
situated on a bed, sofa, rug, or similar surface that may
block the ventilation slots.
Heat– The appliance should be situated away from heat
sources such as radiators, heat registers, stoves, or
other appliances (including amplifiers) that produce
heat.
Power Sources– The appliance should be connected to a
power supply only of the type described in the operating
instructions or as marked on the appliance.
Grounding or Polarization– Precautions should be taken
so that the grounding or polarization means of an
appliance is not defeated.
Power-Cord Protection– Power-supply cords should be
routed so that they are not likely to be walked on or
pinched by items placed upon or against them, paying
particular attention to cords at plugs, convenience recep-
tacles, and the point where they exit from the appliance.
Cleaning– Unplug this unit from the wall outlet before
cleaning. Do not use liquid cleaners or aerosol cleaners.
Use a damp cloth for cleaning.
Power lines– An outdoor antenna should be located
away from power lines.
Nonuse Periods– The power cord of the appliance
should be unplugged from the outlet when left unused
for a long period of time.
Object and Liquid Entry– Care should be taken so that
objects do not fall and liquids are not spilled into the
enclosure through openings.
Damage Requiring Service– The appliance should be
serviced by qualified service personnel when:
A. The power supply cord or plug has been damaged; or
B. Objects have fallen into the appliance; or
C. The appliance has been exposed to rain; or
D. The appliance does not appear to operate normally
or exhibits a marked change in performance; or
E. The appliance has been dropped, or the enclosure
damaged.
Servicing– The user should not attempt to service the
appliance beyond that described in the operating instruc-
tions. All other servicing should be referred to qualified
service personnel.
Note:
To CATV system installer’s (U.S.A.): This reminder is
provided to call the CATV system installer’s attention to
Article 820-40 of the NEC that provides guidelines for
proper grounding and, in particular, specifies that the
cable ground shall be connected as close to the point of
cable entry as practical.
1.
2.
3.
4.
5.
6.
7.
8.
9.
10.
11.
12.
13.
14.
15.
16.
17.
18.

3
Listening For A Lifetime
Selecting fine audio equipment such as the unit you’ve just purchased is only the start of
your musical enjoyment. Now it’s time to consider how you can maximize the fun and
excitement your equipment offers. VocoPro and the Electronic Industries Association’s
Consumer Electronics Group want you to get the most out of your equipment by playing it at
a safe level. One that lets the sound come through loud and clear without annoying blaring
or distortion and, most importantly, without affecting your sensitive hearing.
Sound can be deceiving. Over time your hearing “comfort level” adapts to a higher volume of
sound. So what sounds “normal” can actually be loud and harmful to your hearing. Guard
against this by setting your equipment at a safe level BEFORE your hearing adapts.
To establish a safe level:
• Start your volume control at a low setting.
• Slowly increase the sound until you can hear it comfortably and clearly, and without
distortion.
Once you have established a comfortable sound level:
• Set the dial and leave it there.
• Pay attention to the different levels in various recordings.
Taking a minute to do this now will help to prevent hearing damage or loss in the future.
After all, we want you listening for a lifetime.
Used wisely, your new sound equipment will provide a lifetime of fun and enjoyment. Since
hearing damage from loud noise is often undetectable until it is too late, this manufacturer
and the Electronic Industries Association’s Consumer Electronics Group recommend you
avoid prolonged exposure to excessive noise. This list of sound levels is included for your
protection.
Some common decibel ranges:
Level
30
40
50
60
70
80
Example
Quiet library, Soft whispers
Living room, Refrigerator, Bedroom away from traffic
Light traffic, Normal Conversation
Air Conditioner at 20 ft., Sewing machine
Vacuum cleaner, Hair dryer, Noisy Restaurant
Average city traffic, Garbage disposals, Alarm clock at 2 ft.
The following noises can be dangerous under constant exposure:
Level
90
100
120
140
180
Example
Subway, Motorcycle, Truck traffic, Lawn Mower
Garbage truck, Chainsaw, Pneumatics drill
Rock band concert in front of speakers
Gunshot blast, Jet plane
Rocket launching pad
-Information courtesy of the Deafness Research Foundation

4
FCC INFORMATION (U.S.A.)
1. IMPORTANT NOTICE: DO NOT MODIFY THIS
UNIT!: This product, when installed as indicated in
the instructions contained in this manual, meets FCC
requirements. Modifications not expressly approved
by Vocopro may void your authority, granted by the
FCC, to use this product.
2. IMPORTANT: When connecting this product to
accessories and/or another product use only high
quality shielded cables. Cable(s) supplied with this
product MUST be used. Follow all installation instruc-
tions. Failure to follow instructions could void your
FCC authorization to use this product in the U.S.A.
3. NOTE: This product has been tested and found to
comply with the requirements listed in FCC Regula-
tions, Part 15 for Class "B" digital devices. Compli-
ance with these requirements provides a reasonable
level of assurances that your use of this product in a
residential environment will not result in harmful
interference with other electronic devices. This equip-
ment generates/uses radio frequencies and, if not
installed and used according to the instructions found
in the owner's manual, may cause interference harm-
ful to the operation of other electronic devices. Com-
pliance with FCC regulations does not guarantee that
interference will not occur in all installations. If this
product is found to be the source of interference,
which can be determined by turning the unit "Off" and
"On", please try to eliminate the problem by using one
of the following measures:
Relocate either this product or the device that is
being affected by the interference.
Use power outlets that are on different branch (circuit
breaker or fuse) circuits or install AC line filter(s).
In the case of radio or TV interference,
relocate/reorient the antenna. If the antenna lead-in
is 300-ohm ribbon lead, change the lead-in to coaxial
type cable.
If these corrective measures do not produce satisfac-
tory results, please contact your local retailer autho-
rized to distribute Vocopro products. If you can not
locate the appropriate retailer, please contact Vocopro,
1728 Curtiss Court, La Verne, CA 91750.
1. To ensure the finest performance, please read this
manual carefully. Keep it in a safe place for future
reference.
2. Install your unit in a cool, dry, clean place - away from
windows, heat sources, and too much vibration, dust, mois-
ture or cold. Avoid sources of hum (transformers, v
motors). To prevent fire or electrical shock, do not expose
to rain and water.
3. Do not operate the unit upside-down.
4. Never open the cabinet. If a foreign object drops into
the set, contact your dealer.
5. Place the unit in a location with adequate air circulation.
Do not interfere with its proper ventilation; this will cause
the internal temperature to rise and may result in a failure.
6. Do not use force on switches, knobs or cords. When
moving the unit, first turn the unit off. Then gently discon-
nect the power plug and the cords connecting to other
equipment. Never pull the cord itself.
7. Do not attempt to clean the unit with chemical solvents:
this might damage the finish. Use a clean, dry cloth.
8. Be sure to read the "Troubleshooting" section on
common operating errors before concluding that your unit
is faulty.
9. This unit consumes a fair amount of power even when
the power switch is turned off. We recommend that you
unplug the power cord from the wall outlet if the unit is
not going to be used for a long time. This will save electric-
ity and help prevent fire hazards. To disconnect the cord,
pull it out by grasping the plug. Never pull the cord itself.
10. To prevent lightning damage, pull out the power cord
and remove the antenna cable during an electrical storm.
11. The general digital signals may interfere with other
equipment such as tuners or receivers. Move the system
farther away from such equipment if interference is
observed.
NOTE:
Please check the copyright laws in your country
before recording from records, compact discs, radio,
etc. Recording of copyrighted material may infringe
copyright laws.
CAUTION
The apparatus is not disconnected from the AC power
source so long as it is connected to the wall outlet,
even if the apparatus itself is turned off. To fully insure
that the apparatus is indeed fully void if residual
power, leave unit disconnected from the AC outlet for at
least fifteen seconds.
CAUTION:
READ THIS BEFORE OPERATING YOUR UNIT

5
Features and Specifications
Amplifier
Power Output ......................................................................................... 100W x2 (RMS 8 Ω, THD 1%)
......................................................................................... 120W x2 (RMS 4 Ω, THD 1%)
Total Harmonic Distortion ................................................................. (8 Ω 10W) 0.1%
S/N Ratio ............................................................................................... 78dB
Pre Music Channel
Input Sensitivity ..................................................................................... 240mV
Over Load Power (1KHz) ................................................................... 3.7V
Sensitivity ................................................................................................ 6mV
Frequency Response ........................................................................... 20 Hz ~ 20 KHz (-3dB ~ +1dB)
Pre Microphone Channel
Input Sensitivity ..................................................................................... 14mV
Over Load Power (1KHz) ................................................................... 200mV
Frequency Response ........................................................................... 50 Hz ~ 10 KHz (±1.5dB)
General
Power ....................................................................................................... AC ~ 120V, 60Hz
Max power .............................................................................................. 500W
Dimensions ............................................................................................. 17.1”(L) x 14.1”(W) x 5.2”(H)
Weight ...................................................................................................... 19.2 lbs.
• 300W (RMS) and 600W (MAX) power output
• 3 microphone inputs (¼”) with individual volume controls plus 2 additional ¼” inputs
• DSP vocal Echo with Repeat and Delay controls
• DSP vocal Reverb with Time and Level controls
• 4 programmable custom effects
• Vocal Cancel removes the vocal track on Multiplex formatted CD+G discs
• ± 5-step Digital Key Control
• C-MODE function toggles between Mic-only and Music-only for the Center Out channel
• Connect up to 4 external A/V players (RCA)
• Automatic input selector
• Feedback eliminator with 3 available strength levels
• Master Music and Microphone volume controls
• Music Bass and Treble tone controls
• Vocals Bass and Treble controls
• Master Effect Level control
• Inputs: 4 RCA AV (DVD, CD, CDG, AUX), Digital RS232, 1 External EQ L/R RCA in
• Outputs: 2 L/R banana plug Speaker outs , 1 L/R RCA Record out, 1 RCA video out,
1 L/R Center out, 1 External EQ L/R RCA out
• Full-function remote control
Features
Specifications

6
Front Panel
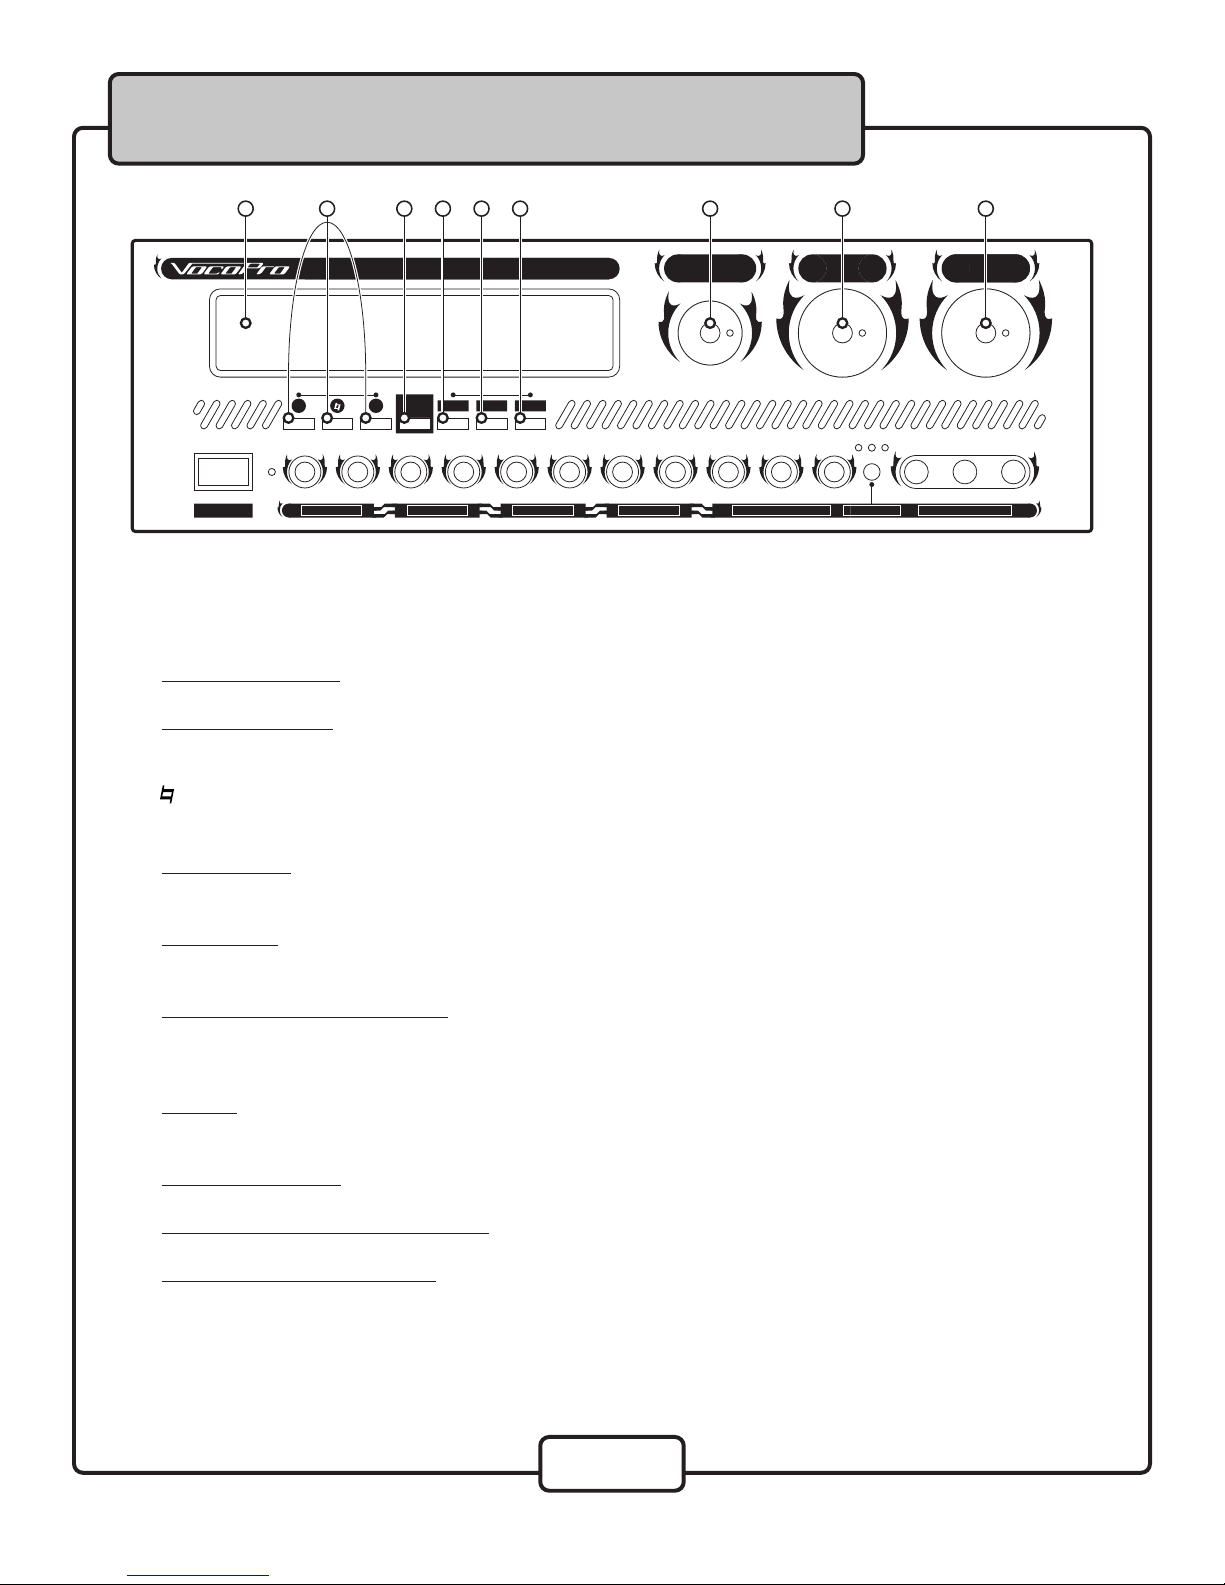
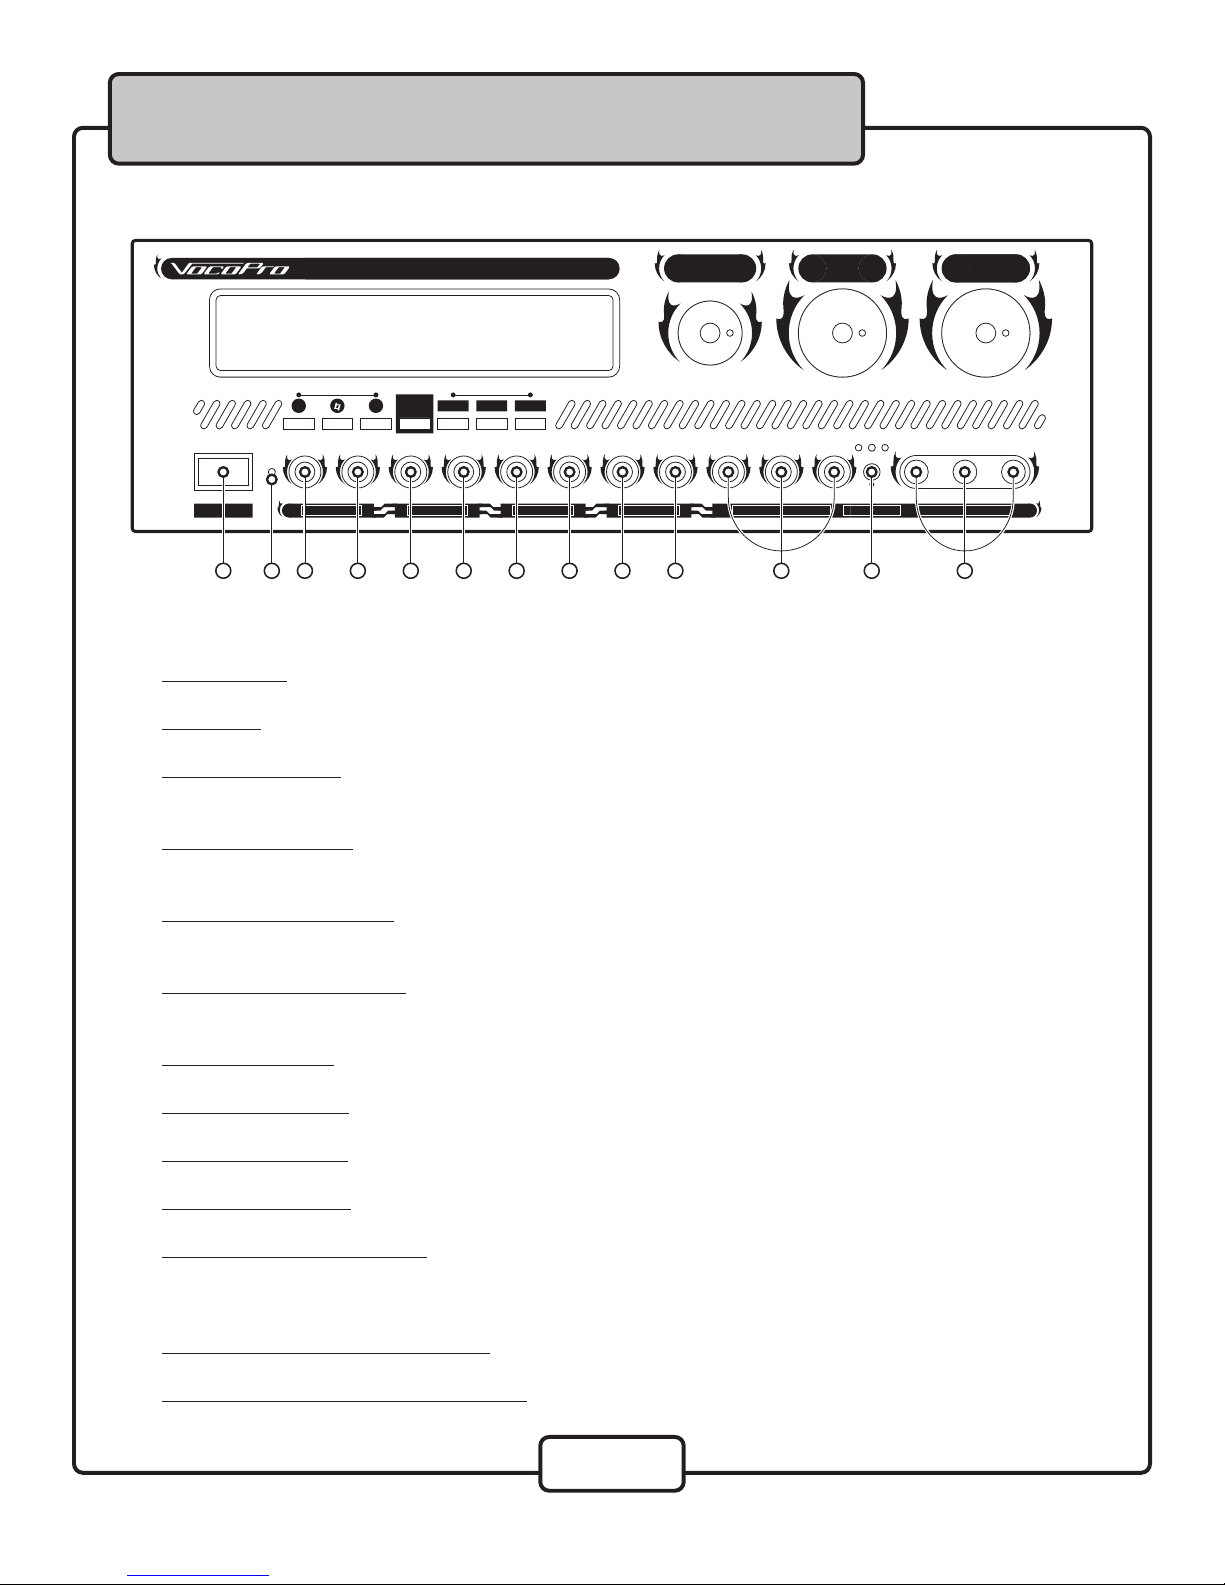
1. VFD Display Screen - Displays the amplifier’s operation status and settings
2. Digital Key Control - Adjusts the musical key of the music to fit the singer’s vocal range
b (flat) - Lowers the musical key
(natural) - Returns to the original key
# (sharp) - Raises the musical key
3. Input Selector - Select between the 4 available A/V input channels or set the selector to AUTO.
NOTE: In AUTO mode the amp will switch the channel with an active audio signal.
4. Vocal Cancel - Removes the vocal track from Multiplex formatted karaoke CD+G discs.
NOTE: Vocal cancel will only work on discs that are Multiplex formatted.
5. Center Mode (C. MODE) Button - Cycles through 5 setup menus: C-MODE output mode, Set maximum
Master Volume, set maximum Microphone Volume, set New password and Password Lock/Unlock. See
the Operations section for detailed instructions on changing these settings.
6. FB ELIM - Cycles through 4 different settings for feedback eliminator: 0 - Off, 1- Weak, 2 -Medium,
3 - Strong.
7. Effect Level Control - Adjusts the master effect level
8. Master Microphone Volume Control - Adjusts the overall microphone output volume.
9. Master Music Volume Control - Controls the overall music output volume.
789
13456
2

7
Front Panel
10. Power Switch - Turns the DA-7909RV On and Off.
11. Power LED - Indicates the DA-7909RV’s power status by lighting up when the power is on
12. Music Bass Control - Adjusts the bass for the music. Turn clockwise to increase and counter-clockwise
to decrease.
13. Music Treble Control - Adjusts the treble for the music. Turn clockwise to increase and counter-clockwise
to decrease.
14. Microphone Bass Control - Adjusts the bass for the microphone vocals. Turn clockwise to increase and
counter-clockwise to decrease.
15. Microphone Treble Control - Adjusts the treble for the microphone vocals. Turn clockwise to increase and
counter-clockwise to decrease.
16. Echo Delay Control - Adjusts the delay time for the Echo effect from 0 - 250ms.
17. Echo Repeat Control - Adjusts the amount of repeat present in the echo effect.
18. Reverb Time Control - Adjusts the amount of time that the reverb will hold out.
19. Reverb Level Control - Adjusts the Reverb level.
20. Microphone Volume Controls - Adjusts the volume for each mic channel.
NOTE: MIC 1/4 controls the volume for mic input 1 on the front panel and mic input 4 on the rear panel.
MIC 2/5 controls the volume for mic input 2 on the front panel and mic input 5 on the rear panel.
21.
Vocal Effect Off Button (MIC 3 Only) - Turns the vocal effect on and off for microphone channel 3.
22. Microphone Input 1, 2 and 3 Jacks (¼”) - Connect microphones here using a ¼” microphone cable.
7
12 16
15 17
14
13 20
18 19 21 22
10 11

8
Rear Panel
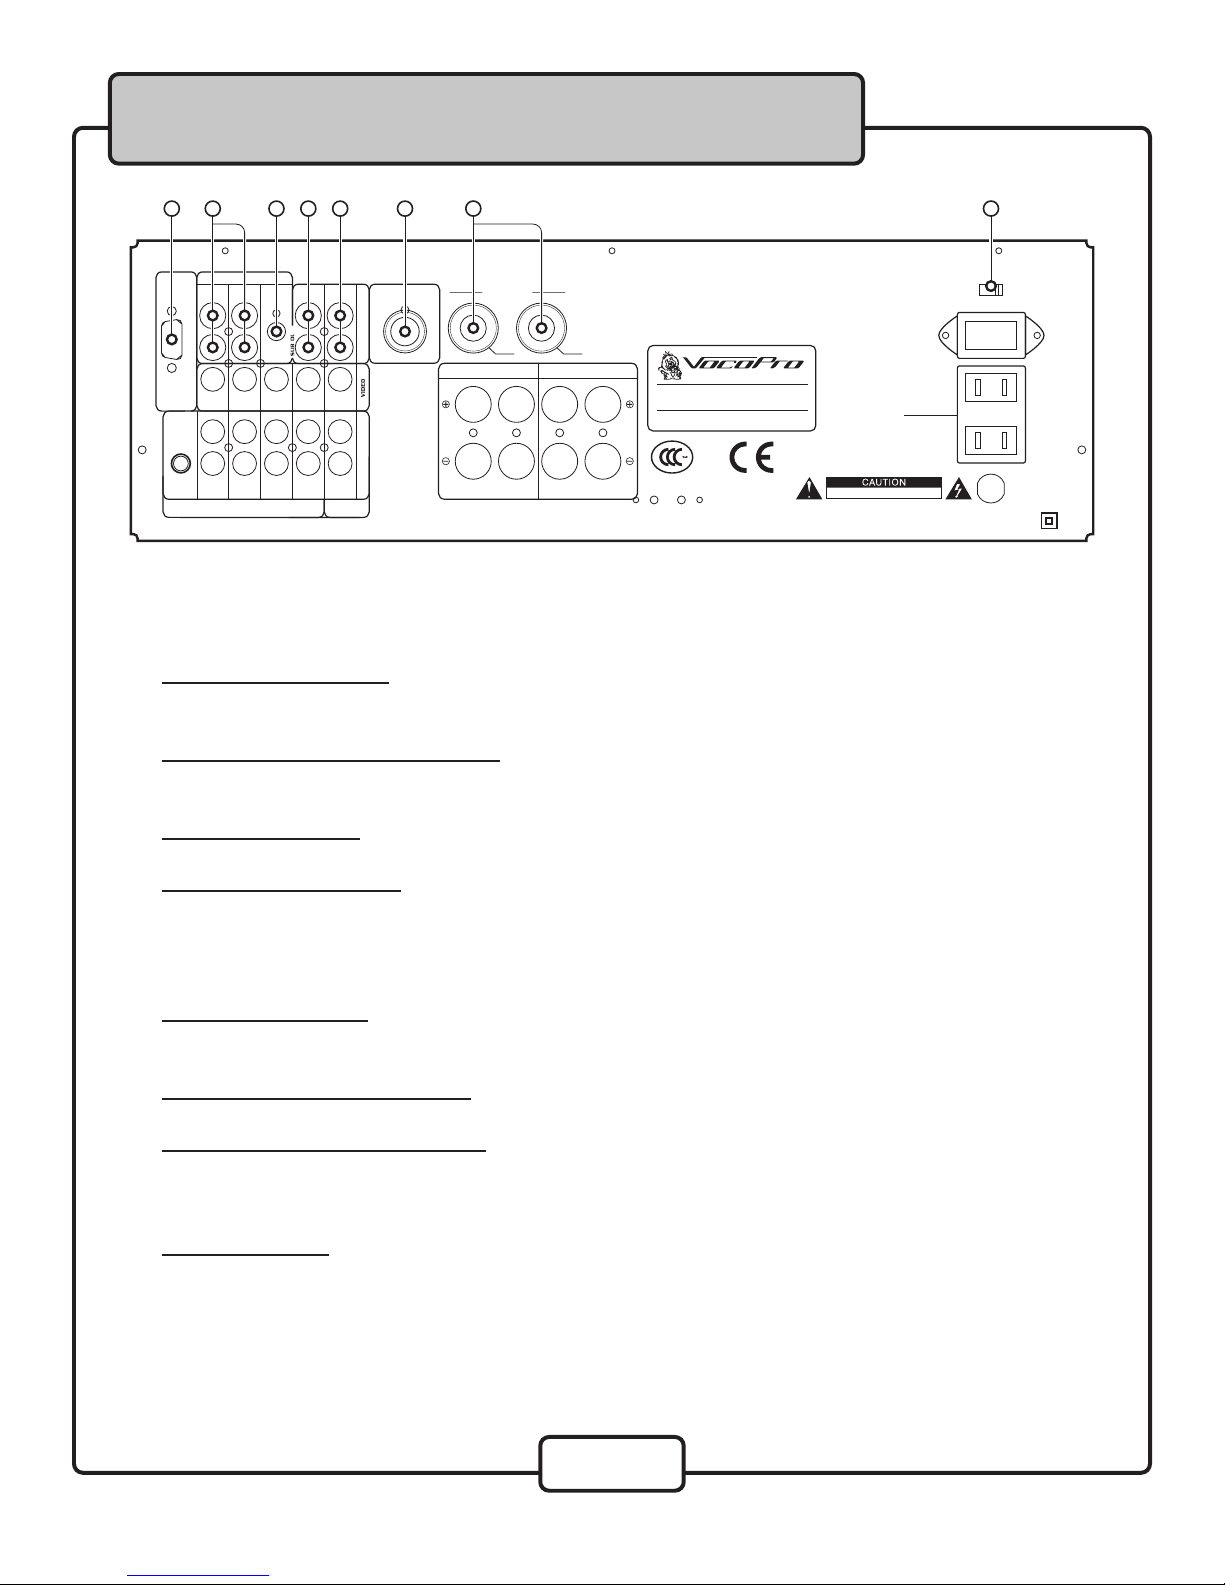
1. RS 232 Interface Jack - This jack is used by the factory in the event of future firmware
upgrades.
2. Effects Loop IN/OUT Jacks (RCA) - Connect to an external equalizer or effects unit with L/R
RCA Ins and Outs.
3. Loop On/Off Switch - Use this to turn on or bypass the Effects Loop IN/OUT channel.
4. Center Out Jacks (RCA) - Acts as a monitor output and must be connected to a powered
speaker/monitor or amplifier. The center out channel can be set to either Mic Only or Music
Only. See the operations section for detailed instructions on switching between Mic Only and
Music Only.
5. Pre Out Jacks (RCA) - This channel outputs both microphone vocals and music to a non-powered
audio input device with L./R RCA audio inputs.
6. External Controller Connection - For use with an external controller (not included).
7. Microphone Input Jacks 4 and 5 - Connect 2 additional microphones here using ¼” microphone
cables. NOTE: MIC 4 volume is controlled by the MIC 1/4 control on the front panel and MIC 5 is
controlled by the MIC 2/5 control.
8. Voltage Selector - This selector toggles between 110-120V and 220-240V power settings.
NOTE: Please ensure that this switch is set to the correct position, matching the receiving
AC outlets power supply before plugging it in an operating it. Failure to do so may cause severe
damage to the unit and void your product warranty.
55
LA VERNE, CA — USA
MODEL: DA 7909RV
www.vocopro.com
6
35
24
18
7
Indice
Altri manuali VocoPro Amplificatore

VocoPro
VocoPro CASAMAN Manuale utente

VocoPro
VocoPro DTX-9900K Manuale utente

VocoPro
VocoPro DA-3900K Manuale utente

VocoPro
VocoPro VP-300 PRO Manuale utente

VocoPro
VocoPro HV-1200 Manuale utente

VocoPro
VocoPro DA-8900 PRO Manuale utente

VocoPro
VocoPro CDG-7000RV Manuale utente

VocoPro
VocoPro CDG-6000RV Manuale utente

VocoPro
VocoPro FEATHER AMP FA-500 Manuale utente

VocoPro
VocoPro DAX-9900RV Manuale utente