Vulcan-Hart 176-6799 Manuale utente

Instruction Manual
Manual de instrucciones
Manuel d’instruction
ITEM NO.
ARTÍCULO No.
176-6799
v080103
2.5 HP 8 Gallon Air Compressor
Compresseur d’air 8 gallons 2,5 HP

2
THANK YOU for your purchase of this Vulcan Air Tool. With proper care and
use you can expect your purchase to provide years of trouble free service!
SHOULD YOU HAVE A QUESTION OR A PROBLEM WITH YOUR
VULCAN TOOL, PLEASE CALL OUR CUSTOMER SERVICE
DEPARTMENT TOLL FREE AT:
1-800-482-0131
Please have the tool, model number and instruction manual at hand before calling.
ONE YEAR LIMITED CONSUMER WARRANTY
If you have a question or should you have a problem with any Vulcan Air Tool, call
the Vulcan Customer Service line at 1-800-482-0131.
This product is warranted to be free from defects to material and workmanship
for a period of ONE YEAR from date of purchase. If defective the product will be
repaired or replaced. Call the Vulcan Power Tool customer service line at 1-800-
482-0131 and a customer representative will attempt to help resolve any issue. If
directed by a representative, return the product along with proof of purchase to
your dealer. Normal wear, damage due to abuse or mishandling or unauthorized
repair is not covered. This warranty does not apply to accessories. This warranty
gives you specic legal rights that vary from state to state.
This tool is intended for consumer use and is not a commercial tool. In the event
the tool is used commercially, the warranty should be for a period of 30 days.
VULCAN AIR TOOLS ARE MADE EXCLUSIVELY FOR:
Memphis, TN 38101

3
Work Area
Keep work area clean. Cluttered areas invite
injuries.
Consider work area environment. Don’t use
power tools or equipment in damp, wet, or poorly
lit locations. Don’t expose your to rain. Keep the
work area well lit. Don’t use in the presence of
ammable gases or liquids.
Keep children and bystanders away. All
children should be kept away from the work
area. Don’t let them handle machines, tools or
extension cords. Visitors can be a distraction and
are difcult to protect from injury.
Electrical Safety
Grounded tools must be plugged into an outlet
that itself is properly installed and grounded.
Grounding provides a low-resistance path to
carry electricity to the ground and away from the
operator, should the tool malfunction electrically.
Do not remove the grounding prong from the
plug or alter the plug in any way. If in doubt as to
whether the outlet is properly grounded according
to code, check with a qualied electrician.
Observe proper precautions regarding double
insulation. This unit is double insulated. It is
equipped with a polarized plug. One blade is
wider than the other, so it will t into a polarized
SAFETY RULES FOR ALL TOOLS
Read and understand all instructions. Failure to follow all instructions listed
below may result in serious personal injury.
SAVE THESE INSTRUCTIONS
When using electric tools, machines or equipment, basic safety precautions should
always be followed to reduce the risk of re, electric shock, and personal injury.
WARNING
!
outlet only one way. If you have difculty
inserting the plug, try reversing it. If it still
doesn’t t, do not alter the plug; have a qualied
electrician install a polarized outlet.
Guard against electric shock. Prevent body
contact with grounded surfaces: pipes, radiators,
ranges, and refrigerator enclosures. When your
body is grounded the risk of electric shock
increases. When working wherever “live”
electrical wires may be encountered, try to
ascertain whether there is a danger of shock.
Even so, DO NOT TOUCH ANY METAL PARTS
OF THE TOOL while using it. Hold the tool only
by the plastic grip to prevent electric shock if you
contact a live wire.
Do not abuse the cord. Never carry your
power equipment by the cord or pull on the cord
to unplug it. Protect the cord from potential
sources of damage: heat, oil & solvents, sharp
edges, or moving parts. Replace damaged cords
immediately.
When working outdoors, use an outdoor-rated
extension cord. An extension cord rated for
outdoor use must be marked “w-a” or “w”.
Do not expose electrical power tools to
moisture. Rain or wet conditions can cause water
to enter the tool and lead to electric shock.
Recommended Minimum Wire Gauge for Extension Cords
Amps 25’ long 50’ long 75’ long 100’ long 150’ long 200’ long
0 - 5 16 ga. 16 ga. 16 ga. 14 ga. 12 ga. 12 ga.
5.1 - 8 16 ga. 16 ga. 14 ga. 12 ga. 10 ga. Do Not Use
8.1 - 12 14 ga. 14 ga. 12 ga. 10 ga. Do Not Use Do Not Use
12.1 - 15 12 ga. 12 ga. 10 ga. 10 ga. Do Not Use Do Not Use
15.1 - 20 10 ga. 10 ga. 10 ga. Do Not Use Do Not Use Do Not Use
WARNING
!

4
Ensure the extension cord you use is of
sufcient gauge for its length.
Personal Safety
Dress properly. Don’t wear loose clothing or
jewelry; they can be caught in moving parts.
Protective, non-electrically conductive gloves
and non-skid footwear are recommended when
working. Wear protective hair covering to contain
long hair and keep it from harm.
Use eye protection. Use a full-face mask if the
work you’re doing produces metal lings, dust
or wood chips. Goggles are acceptable in other
situations. Wear a clean dust mask if the work
involves creating a lot of ne or coarse dust.
Don’t overreach. Keep proper footing and
balance at all times. Do not reach over or across
machines that are running.
Stay alert. Watch what you are doing & use
common sense. Don’t operate any tool when you
are tired.
Compressed air cautions: compressed air from
this unit may contain carbon monoxide. The air
produced is neither suitable for breathing nor
food processing without ltering and testing to all
applicable legal standards.
Breathing protection: always use a respirator
when spraying paint or chemicals.
Tool Use and Care
Maintain tools with care. Keep tools sharp and
clean for better and safer performance. Follow
instructions for lubricating and safe performance.
Follow instructions for lubricating and changing
accessories. Keep handles dry, clean and free
from oil and grease.
Avoid unintentional starting. Be sure the
switch is in the off position before plugging in.
Always check and make sure to remove any
adjusting keys or wrenches before turning the
tool on. Left attached, these parts can y off a
rotating part and result in personal injury.
Do not use the tool if it cannot be switched on
or off. Have your tool repaired before using it.
Disconnnect the plug from power before
making any adjustments. Changing attachments
or accessories can be dangerous if the tool could
accidentally start.
Store idle equipment. Store equipment in a dry
area to inhibit rust. Equipment also should be in
a high location or locked up to keep out of reach
of children.
Don’t force the tool. It will do the job better and
more safely at the rate for which it was intended.
Use the right tool. Don’t force a small tool or
attachment to do the work of a larger industrial
tool. Don’t use a tool for a purpose for which it
was not intended.
Secure work. Use clamps or a vise to hold the
work. It’s safer than using your hands and it frees
both hands to operate the tool.
Check for damaged parts. Before using this
tool, any part that is damaged should be carefully
checked to determine that it will operate properly
and perform its intended function. Check for
alignment of moving parts, binding of moving
parts, breakage of parts, mountings, and other
conditions that may affect its operation. Inspect
screws and tighten any ones that are loose. Any
part that is damaged should be properly repaired
or replaced by an authorized service center unless
otherwise indicated elsewhere in the instruction
manual. Have defective switches replaced by an
authorized service center. Don’t use the tool if
switch does not turn it on and off properly.
Never use this equipment if it is leaking air; has
missing or damaged parts, guards, or shields; or
requires repair. Make sure all screws and caps are
securely tightened.
Do not use the air hose to move the compressor.
Release the pressure in the storage tank before
moving.
Maintain tools with care. Keep tools clean for
better and safer performance. Follow instructions
for lubricating and changing accessories. Keep
dry, clean and free from oil and grease.
Do not attempt any maintenance or adjustment
with the compressor in operation, the power
connected, or air under pressure in the system.

5
Service
Check for damaged parts. Make frequent
inspections for the correct function of components
and safety mechanism.
Replacement parts. When servicing, use
only identical replacement parts and fasteners
recommended by us.
Service and repairs should be made by qualied
repair technicians at an authorized repair centre.
Improperly repaired tools could cause serious
shock or injury.
Employers must enforce compliance with the
safety warnings and all other instructions in this
manual. Keep it available for use by everyone
assigned to use this equipment.
Safety precautions for compressor components
Air only: use this compressor for compressing air
only. Do not compress other gases.
Tank safety valve: this valve prevents damage to
the air receiver if a malfunction in the compressor
pump occurs. It is factory pre-set at a limit
specic to your particular model and adjustment.
Do not tamper with it. This will automatically
void your warranty.
Pressure switch: the air pressure switch is factory
pre-set for optimum performance. Do not bypass
or remove this switch. Serious damage to
equipment or personal injury could result from
too high an air pressure.
Motor and compressor pump: air compressors
get hot during operation. Do not touch the
motor, discharge tubing, or compressor while
it is running. The compressor turns itself on
automatically while the power is connected.
Air tanks: over-pressurizing the air receivers,
piping or tanks could cause it to explode or burst.
To protect from over-pressurizing, the compressor
is equipped with a factory preset safety valve. Do
not remove, make adjustments to or substitutions
for this valve. Perform a test of the valve from
time to time: pull the ring on the valve to make
sure that it operates freely. If the valve does not
operate freely, replace it before further use. Never
weld to, drill into, or change the air receivers in
any way.
Tampering: if any of the components above are
found to have been changed or tampered with, the
warranty will be made void. When servicing, we
recommend using only identical replacement parts
and any replacement parts used must have the
same specication as the original equipment.
The warnings, cautions, and instructions detailed in this manual cannot
cover all possible conditions and situations that occur. It must be understood
by the operator that COMMON SENSE AND CAUTION ARE FACTORS
that cannot be built into this product, but MUST BE SUPPLIED BY THE
OPERATOR.
WARNING
!

6
Nomenclature for No. 176-6799 2.5 HP Air Compressor

7
Nomenclature for No. 176-6799 2.5 HP Air Compressor
KEY
ARubber-tired wheel
BFixed 4 gallon air tank
CInput hose for portable tank
DInput shut-off valve for portable tank
ECompressor on/off switch
FLifting handle
GRemoveable 4 gallon portable air tank
HRubber hold-down strap for portable
tank
IFold-out rolling transport handle
JQuick change coupler
KPortable tank pressure gauge
LPortable tank carry handle
MTire chuck output tting for portable
tank
NTool tray
ORegulated output pressure gauge
POil ll plug/breather cap
QRegulator knob
RQuick-connect air couplers
STank pressure gauge
TAir lter / mufer
UPortable tank cradle bracket
VOil level sight gauge
WReset button
SPECIFICATIONS
l2.5 HP – 8 gallon
2 x 4 gal. stacked tanks
lOil lubricated for durability and
long life
lExtremely quiet operation
lRubber grip rolling handle
lIncludes air line regulator & 2 gauges-
allows setting exact line pressure
lOil ll plug/breather cap (may require
attachment to compressor)
l2 Quick-connect air line ttings
lTough powder coated nish
lRemoveable and portable air tank with
separate gauge & tire ll hose
l120 volt, 60 Hz, 14.4 Amp
l1,750 rpm
l4.1 cfm @ 90 psi, 5.2 cfm @ 40 psi
lMaximum pressure: 150 psi
lWeight: 80.5 lbs
lPackage weight: 84.9 lbs

8
FUNCTIONAL DESCRIPTION
Your new air compressor can be used for operating paint, weed killer, and insecticide
sprayers, air tools, grease & caulking guns, sandblasters, ination, etc. A tool with a higher air
demand than this compressor can produce may either not function, or not function well. It may
also cause the compressor to run without stopping for long periods of time, trying to maintain
pressure in the tank. This can cause either the motor or compressor pump to overheat and
damage them. Be sure the requirements of your tools can be met by the compressor.
To compress air, the piston in the pump moves up and down in the cylinder. On the down
stroke, air is drawn in through the inlet valve. Since the discharge valve remains closed, as the
piston goes up, the air in the cylinder is compressed. The inlet valve closes and compressed
air is forced out into the air receiver. A check valve prevents it from going back into the pump.
Working air is not immediately available. The pump continues to add air until the air receiver
pressure builds to above that required at the regulator.
SET-UP
After removing it from the carton, and before you can use your compressor, you must perform
some work preparatory to using your compressor:
You will need:
l at blade screwdriver
l 8 .oz. SAE-20 or SAE-10 non-detergent compressor oil
l Pipe thread sealant tape
OIL
WARNING
!
This compressor requires oil of the correct type and quantity to run. Do not
start it without rst following all the steps in this
section.
1. Be sure the compressor is on a level surface.
2. With the screwdriver, pry off and remove the shipping
plug from the top of the crankcase (g.3) revealing the
oil ll hole.
3. Through this hole, ll the oil reservoir with SAE-20
(API CG/CD heavy duty), non-detergent compressor
oil. In extreme winter conditions, use lighter SAE-10
weight.
4. The reservoir capacity is approximately 8 .oz. There
may be some oil left over from the manufacturing
process already in the reservoir. Be careful not to
overll.
5. Check the oil level sight glass (V in g.2 & 4). The oil
should show level with the red dot in the centre of the
viewing window.
6. Find the oil ll plug/breather cap (P in g.1, 2 & 4). It is
usually shipped separately from the compressor and
enclosed with this manual. Be sure there is a rubber
O-ring on the threaded end.
7. Put a little pipe thread sealing tape on the threaded
end of the oil ll plug/breather cap.

9
8. Gently screw the oil breather cap into the oil ll hole. Do not cross-thread or overtighten.
NOTE Before installing and using this unit, inspect carefully for damage and corrosion. Make
sure the tank, compressor, motor and pump are undamaged and that all screws and caps
are securely tightened.
INSTALLATION AND LOCATION
Locate the compressor in a clean, dry and well-ventilated area; on a rm, level surface. It
should be located 12 to 18 inches from a wall or any other obstruction that would interfere with
the air ow. It is equiped with heat dissipation ns that allow for proper cooling. Keep them and
other parts free of dust or dirt that could interfere with cooling. A clean compressor runs cooler
and provides longer service. Do not place anything on top of the compressor.
WARNING
!
Do not use lead-tin solder to join pipes and ttings. It can melt at the
temperatures of the compressor’s air discharge and cause the piping to burst.
ELECTRICAL REQUIREMENTS
l Check the specication label and be sure the
compressor’s voltage and amperage requirements
match the electrical supply capabilities.
l Plug your compressor into an electrical outlet on
dedicated 15 amp household circuit. The closer the
outlet is to the circuit panel, the more reliable the
compressor starting and performance will be. Other
devices running on the same circuit may cause
starting problems.
l Slow starting may cause the compressor’s internal
overload protection to trip. Press the compressor’s
reset button (W, g.2 & 5) to allow it to restart.
l Ideally, the electrical supply circuit should be protected
by a circuit breaker rather than a fuse. If a fuse is
necessary, a dual element time delay fuse should be
used.
EXTENSION CORDS
If you plan to use an extension cord when operating your
air compressor, please note:
l Maximum length: not to exceed 50 ft.
l Minimum wire size: 14 gauge.
l If the extension cord is too long or the wire size is too
small, the air compressor will not start.
COMPRESSOR LUBRICATION
1. CHECK THE OIL quantity and quality every time before operating the compressor. Do
not add or change oil while the compressor is in operation. Use only oil with the correct
specications

10
2. With the air compressor on level surface, the oil level should be at the red dot on the oil
level sight glass.
3. If oil level is low, remove oil ll plug/breather cap, add enough oil to bring level to the red
dot. Do not over-ll.
4. Replace oil ll plug/breather cap before starting compressor.
DRAINING THE OIL
1. Remove the oil drain plug (oil level sight glass). Allow oil to drain completely.
2. Replace the oil drain plug (we recommend the use of a sealing compound or teon tape
to avoid leakage). Do not over-tighten.
3. Rell with the recommended oil to the red dot in the oil level sight glass.
OPERATION
BEFORE OPERATING:
1. Check that all nuts and bolts are all snug.
2. Check the quantity and quality of oil (see compressor lubrication, above).
INITIAL BREAK-IN
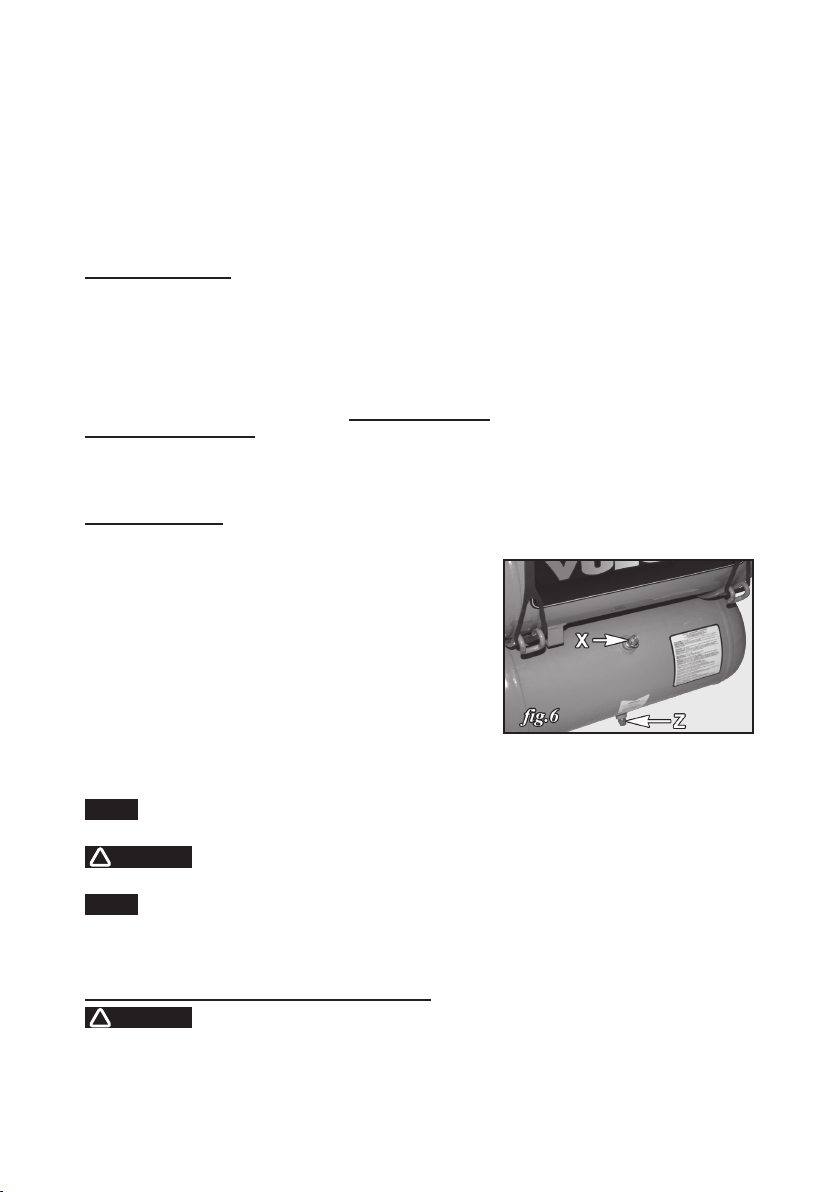
1. Open (turn the knurled brass knob out, counter-clockwise) the Moisture release petcock
(Z, g.6) on the bottom of the lower air tank to permit
air to escape, so no air pressure builds up in the air
tank.
2. Plug power supply cord into correct power source.
3. Pull up on the On/Off switch lever (E, g.1 & 7) to
start the compressor.
4. Run the compressor in this no-load condition for 15
to 20 minutes to lubricate the bearings and pistons.
5. Close (turn the knurled knob in, clockwise) the air
tank Moisture release petcock.
6. Pressure will build in the tank and the Pressure switch will stop the pump when it reaches
the pressure set on the regulator. Your compressor is now ready for use.
NOTE During the break-in period, there may be a slight smell as the electrical motor brushes
seat themselves. This may last for about 5 minutes and is normal.
CAUTION
!
If the compressor does not run properly after 15 minutes of the break-in or if
you notice any abnormalities, please contact the service center.
NOTE If the Pressure switch fails to shut off the compressor for any reason, each of the
tanks has a safety valve (pictured at X, g.6 on the lower tank; and at Y, g.8 on the
portable) which will open automaically when pressure in that tank becomes too great.
PORTABLE TANK REMOVAL / INSTALLATION
WARNING
!
Before removing or installing the portable air tank, be sure to disconnect air
compressor unit from power source.
Indice
Lingue:
Altri manuali Vulcan-Hart compressore d'aria