Walker W-300 Manuale utente

Walker W300
E
S
P
A
Ñ
O
L
F
R
A
N
Ç
A
I
S
E
N
G
L
I
S
H
User Guide
www.mywalker.com
W300_UGD_REVD_7.29.02 8/1/02, 6:29 AM1

SAFETY INSTRUCTIONS: .................................. 3
INSTALLATION:..................................................... 7
FEATURES: ............................................................. 11
• Clarity® Power ControlTM. ....................................... 12
• Boost Control ....................................................... 12
• Clarity®Effect ....................................................... 12
• Boost Reset Switch .............................................. 12
• Ringer Controls .................................................... 13
• Visual Ringer ........................................................ 13
• Tone / Pulse Selection .......................................... 13
• Last Number Redial .............................................. 14
• Flash ..................................................................... 14
• Hold....................................................................... 15
• Surge Protection .................................................. 15
• Headset Port ........................................................ 15
• Neck Loop/Auxillary Port...................................... 16
• Backlite Keypad ................................................... 16
• Nite Lite ................................................................ 16
OPERATION:........................................................... 16
• To Place or Receive a Call ................................... 16
• Programming Frequently-Dialed Numbers .......... 17
• Change a Stored Number .................................... 18
• Delete Programmed Numbers ............................. 18
CARE: ....................................................................... 18
Trouble-shooting Guide........................................... 19
FCC Requirements ................................................. 22
Warranty and Service.............................................. 24
Table of Contents
W300_UGD_REVD_7.29.02 8/1/02, 6:29 AM2

E
N
G
L
I
S
H
3
SAFETY INSTRUCTIONS
• Unplug this product from the wall
outlet before cleaning. Do not use liquid
cleaners or aerosol cleaners. Use a
damp cloth for cleaning.
• Do not use this product near water, for
example, near a bath tub, wash bowl,
kitchen sink, or laundry tub, in a wet
basement, or near a swimming pool.
• Do not place this product on an unstable
cart, stand or table. The product may fall,
causing serious damage to the product.
• Slots and openings in the cabinet and
the back or bottom are provided for venti-
lation, to protect it from overheating.
These openings must not be blocked or
covered. The openings should never be
blocked by placing the product on the
bed, sofa, rug, or other similar surface.
This product should never be placed
near or over a radiator or heat register.
This product should not be placed in a
built-in installation unless proper ventila-
tion is provided.
• Do not allow anything to rest on the
power cord. Do not locate this product
where the cord will be abused by persons
walking on it.
➤
Read and Understand
All Instructions
1.Never install telephone wiring during a
lightning storm.
2. Never install telephone jacks in wet
locations unless the jack is specifically
designed for wet locations.
3. Never touch uninsulated telephone
wires or terminals unless the line has been
disconnected at the network interface.
4. Use caution when installing or modifying
telephone lines.
➤
Important Safety
Instructions
When using your telephone equipment,
basic safety precautions should always
be followed to reduce the risk of fire,
electric shock and injury to persons,
including the following:
• Read and understand all instructions.
• Follow all warnings and instructions
marked on the product.
SAVE THESE INSTRUCTIONS
W300_UGD_REVD_7.29.02 8/1/02, 6:29 AM3

Walker W300
4
SAFETY INSTRUCTIONS
• Never push objects of any kind into this
product through cabinet slots as they may
touch dangerous voltage points or short
out parts that could result in a risk of fire or
electric shock. Never spill liquid of any
kind on the product.
• To reduce the risk of electric shock, do
not disassemble this product. Opening or
removing covers may expose you to
dangerous voltages or other risks. Incor-
rect reassembly can cause electric shock
when the appliance is subsequently used.
• Unplug this product from the wall outlet
and refer servicing to the manufacturer
under the following conditions:
A. When the power supply cord or plug is
damaged or frayed.
B. If liquid has been spilled into the
product.
C. If the product has been exposed to rain
or water.
D. If the product does not operate nor-
mally by following the operating instruc-
tions. Adjust only those controls that are
covered by the operating instructions
because improper adjustment of other
controls may result in damage and will
often require extensive work by a qualified
technician to restore the product to normal
operation.
E. If the product has been dropped or the
cabinet has been damaged.
F. If the product exhibits a distinct change
in performance.
• Avoid using a telephone (other than a
cordless type) during an electrical storm.
There may be a remote risk of electric
shock from lightning.
• Do not use this telephone to report a gas
leak in the vicinity of the leak.
SAVE THESE INSTRUCTIONS
W300_UGD_REVD_7.29.02 8/1/02, 6:29 AM4

E
N
G
L
I
S
H
5
The following items are included as part of
the CS-03 Requirements.
The Load Number of the equipment is 20.
The standard connecting arrangement
code for the equipment is CA11A.
NOTICE: The Canadian Department of
Communications label identifies certified
equipment. This certification means that
the equipment meets certain telecommuni-
cations network protective operational and
safety requirements. The Department
does not guarantee that the equipment will
operate to the user’s satisfaction.
Before installing this equipment, users
should ensure that it is permissible to be
connected to the facilities of the local
telecommunications company. The equip-
ment must also be installed using an
acceptable method of connection. In some
cases, the company’s inside wiring associ-
ated with a single line individual service
may be extended by means of a certified
connector assembly (telephone extension
cord). The customer should be aware that
compliance with the above conditions may
not prevent degradation of service in some
situations.
Repairs to certified equipment should be
made by an authorized Canadian mainte-
nance facility designated by the supplier.
Any repairs or alterations made by the
user to this equipment, or equipment
malfunctions, may give the telecommuni-
cations company cause to request the
user disconnect the equipment.
Users should ensure for their own protec-
tion that the electrical ground connections
of the power utility, telephone lines and
internal metallic water pipe system, if
present, are connected together. This
precaution may be particularly important in
rural areas.
Caution: Users should not attempt to make
such connections themselves, but should
contact the appropriate electric inspection
authority, or electrician, as appropriate.
The Load Number (LN) assigned to each
terminal device denotes the percentage of
total load to be connected to a telephone
loop which is used by the device to pre-
vent overloading. The termination on a
loop may consist of any combination of
devices subject only to the requirement
that the total of the load numbers of all the
devices does not exceed 100.
SAFETY INSTRUCTIONS
SAVE THESE INSTRUCTIONS
W300_UGD_REVD_7.29.02 8/1/02, 6:29 AM5

Walker W300
6
C
G
AB
F
D
E
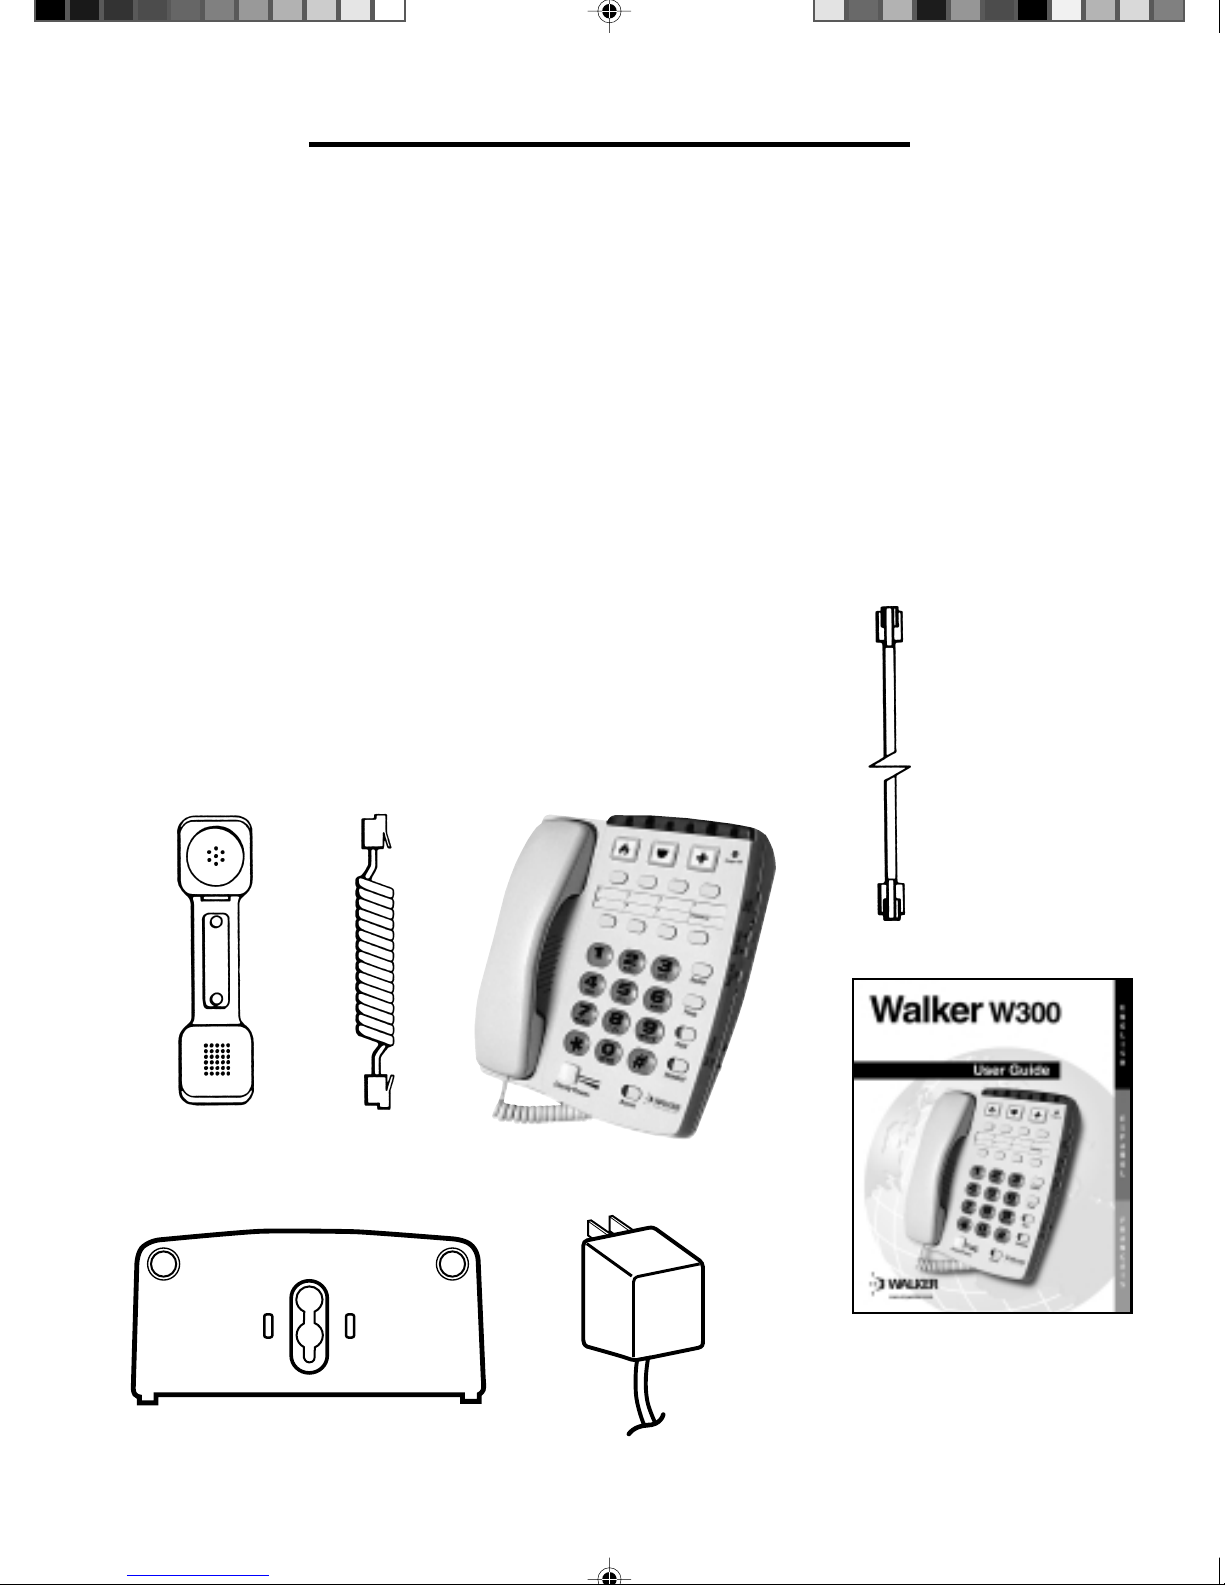
Inside you will find the following items:
A. Handset
B. Handset Line Cord (Coiled, 10 ft.)
C. Base Unit
D. Phone Line Cord (long, flat)
E. Desk/Wall-Mounting Bracket
F. AC Adapter
G. This User’s Guide
Carefully remove all of the contents from
the package. If there is any visible dam-
age, or any of the contents are missing, do
not attempt to operate this equipment.
Please call 1-800-552-3368 to exchange
UNPACKING THE WALKER W300
this unit for a factory-fresh replacement. In
addition to the items listed above, you will
need one of the following to complete
installation of this unit:
• Modular Wall Jack, or
• RJ-11C Modular Jack Adapter (if you
have an older 4-prong jack)
W300_UGD_REVD_7.29.02 8/1/02, 6:29 AM6

E
N
G
L
I
S
H
7
Warning: To prevent electrical shock,
always remove the telephone line cord
from the wall jack before removing the
cord from the telephone. Never leave the
line cord connected to the wall jack if it is
not also connected to the telephone.
AC adapter should be unplugged when not
in use.
➤
Select a Location:
• This unit requires a modular phone jack
and a standard 120 volt outlet.
• The unit should be located in an area
where it is easy to see the lighted ringer.
• The unit can be used as a desk top
phone or a wall mount phone.
➤
Connecting Your
Walker W300
The Walker W300 can be used as a desk
or wall telephone.
To install as a Desk Unit:
• Insert AC Adapter into the jack located
on the top side of the telephone.
INSTALLATION
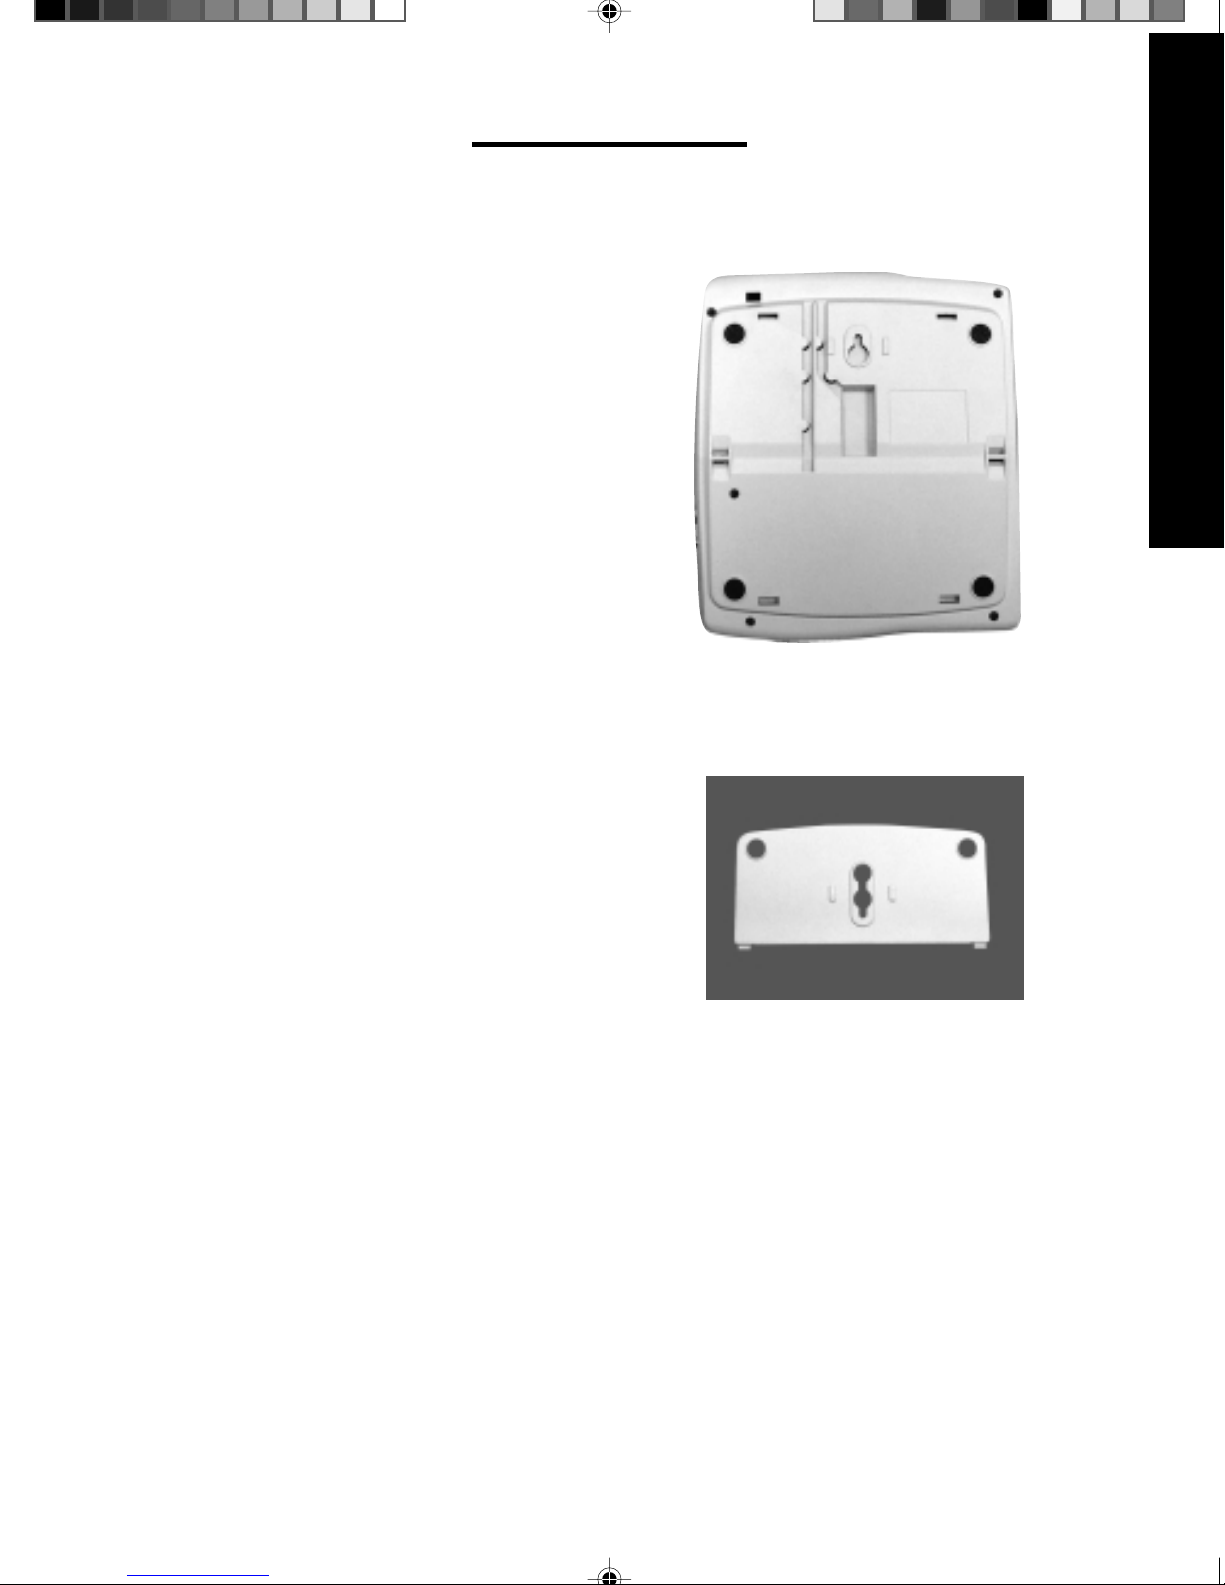
• Locate the hinge slots located on the
right and left side of the back of the
telephone.
• Turn wall mount bracket so the wide end
(end with rubber feet) of the bracket is
towards the top.
• Install bracket by inserting the tabs on
the bracket into the hinge slots.
• Press down on the top of the bracket to
lock into place.
• Plug AC Power Adapter directly into
standard 120 volt outlet.
• Plug one end of the telephone line
cord (flat) into the back of the Walker
telephone.
• Plug the other end of the telephone line
cord into the wall jack.
• Plug one end of the handset cord (coiled)
into the bottom of the handset.
• Plug other end of handset cord into the
jack located on the lower left side of the
telephone and hang up receiver.
• The unit should sit on an angle when
used as a desk phone.
W300_UGD_REVD_7.29.02 8/1/02, 6:29 AM7

Walker W300
8
INSTALLATION
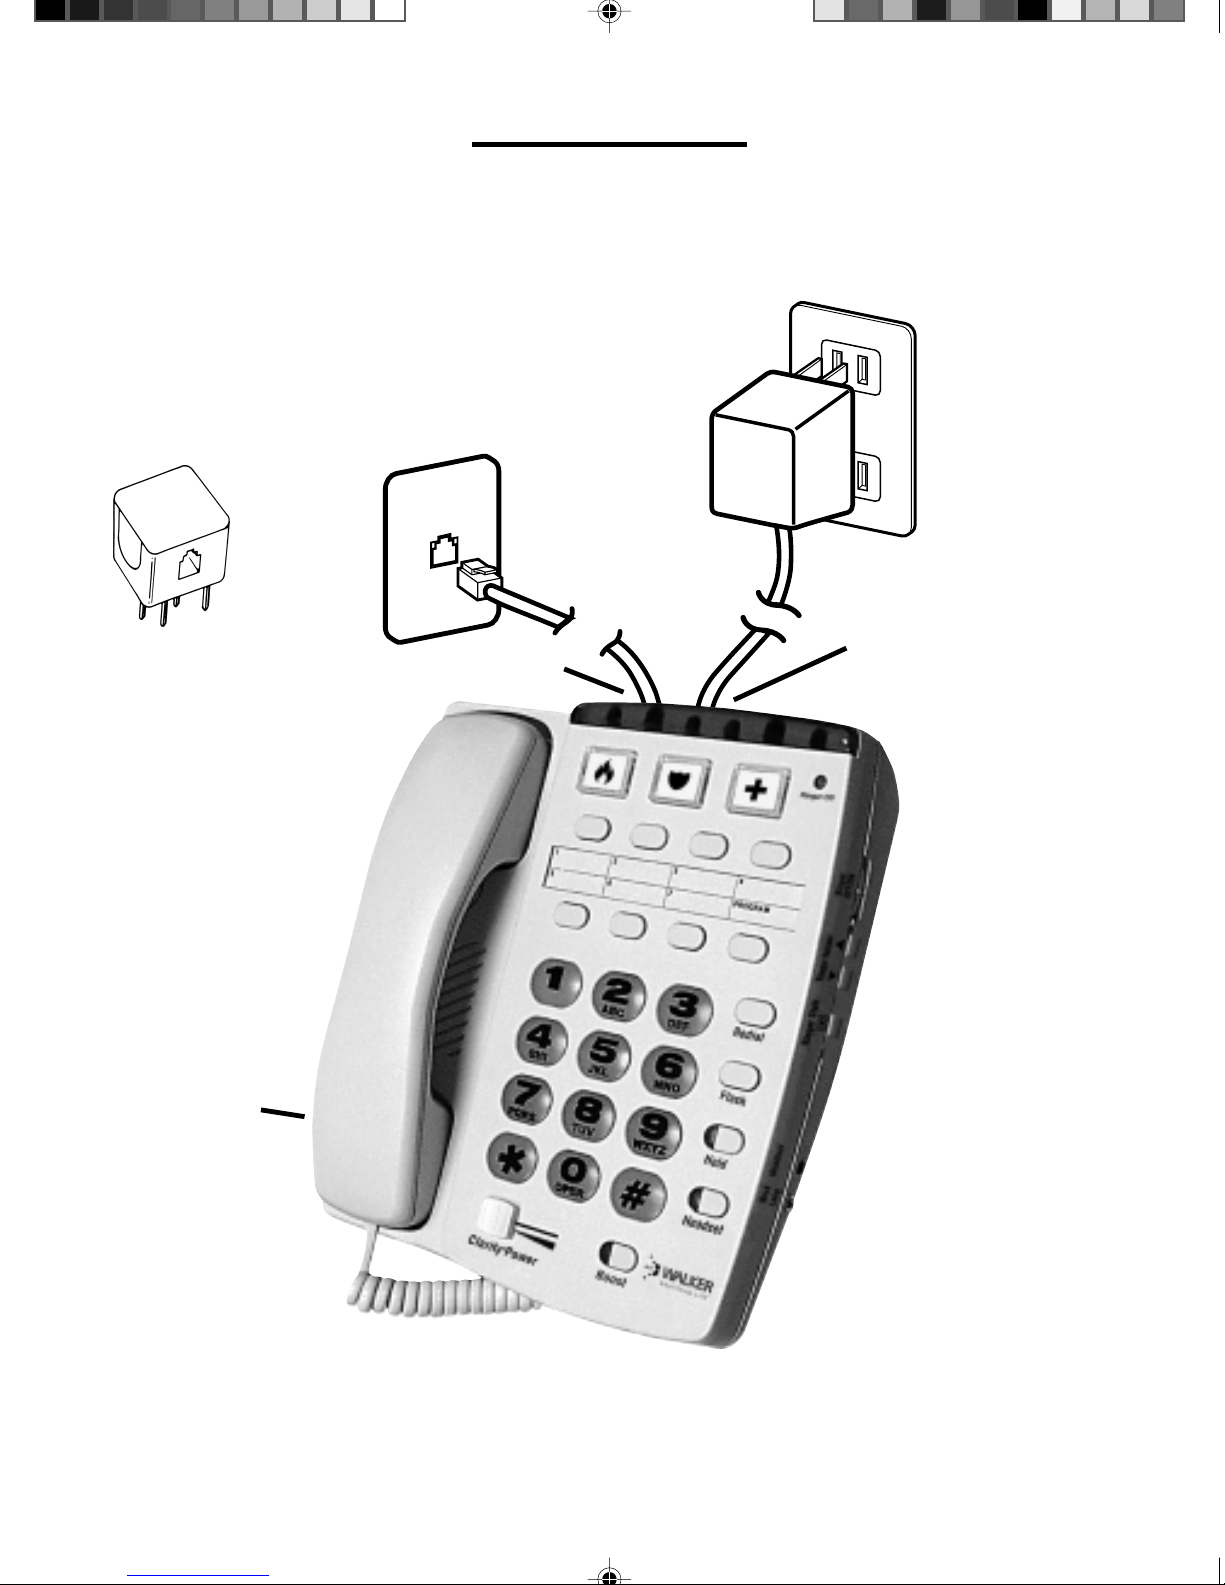
Note: If you are
plugging the
phone into an
older 4-prong
jack, use an
RJ11C adapter
RJ-11C
➤
Installation View
Flat cord here
Coiled cord
plugs-in on this
side of phone
AC adapter 120 volt
outlet
AC adapter
plugs-in here
W300_UGD_REVD_7.29.02 8/1/02, 6:29 AM8

E
N
G
L
I
S
H
9
INSTALLATION
Mounting Bracket
Back of phone
To Install As a Wall Unit:
Important: A modular wall jack with raised
mounting pins is required for installation as
a Wall Unit.
• Insert AC Adapter into the jack located on
the top side of the telephone.
• Locate the hinge slots located on the right
and left side of the back of the telephone.
• Insert AC Power cord into the straight
groove located on the back of the tele-
phone.
• Turn bracket so that the wide end (end
with rubber feet) of the bracket is towards
the bottom.
• Install bracket by inserting the tabs on the
bracket into the hinged slots.
• Feed power cord through opening at the
bottom of the bracket. The cord will run
underneath the bracket.
• Press down on the bottom of the bracket
to lock into place.
• Plug AC adapter directly into standard
120 volt outlet.
• Plug one end of the telephone line cord
into the back of the Walker telephone.
• Plug the other end of the telephone line
cord into the wall jack.
W300_UGD_REVD_7.29.02 8/1/02, 6:29 AM9

Walker W300
10
• When wall mounting the telephone feed
the line cord into the angled groove on
the back of the telephone and plug into
wall jack.
• Hold the Walker Clarity so that the holes
on the mounting bracket line up with the
raised mounting pins on the modular wall
jack. Once the holes are lined up, push
the phone in towards the wall jack and
then slide the phone downward until it is
securely seated on the wall jack.
• Plug one end of the handset cord
(coiled) into the bottom of the handset.
• Plug the other end of the handset cord
into the jack located on the lower left
edge of the Walker telephone and hang
up receiver.
INSTALLATION
• When the phone is wall mounted the
handset knob will need to be reversed to
hold the handset in place. To reverse, pull
up on the knob and turn a quarter turn
clockwise. The knob will hold the handset
in place when you hang up.
• To convert phone from one mounting
position to the other simply depress the
tabs located above the feet on the mount-
ing plate and lift bracket off base of the
phone. Follow the instructions above for
positioning the bracket.
Avoid placing the unit where it will be
exposed to excessive heat or humidity.
W300_UGD_REVD_7.29.02 8/1/02, 6:29 AM10
Indice
Lingue:
Altri manuali Walker Telefono