
West Marine AE3032 Manuale utente

IMPORTANT!
PLEASE READ THIS MANUAL CAREFULLY BEFORE PROCEEDING. AFTER READING
THIS MANUAL, SAVE THESE INSTRUCTIONS FOR FUTURE REFERENCE.
Scamper 2™
Inflatable Kayak
Owner’s Manual
MODEL AE3032
ADVANCED ELEMENTS, INC. 2011 REV 11-2010
1 OR 2 PERSON KAYAK
PATENTED AND OTHER PATENTS PENDING

It is our goal, at Advanced Elements, to develop new and unique paddles-
ports products that enhance our customers’ outdoor experience. Our focus is
on designing and manufacturing “Inatable kayaks with cuing edge tech-
nology”. Our kayaks incorporate many dierent materials and components
and deliver high performance at a very reasonable price. We are the makers
of the AdvancedFrame™ Inatable kayaks, Lagoon™ Inatable kayaks and
StraitEdge™ Canoe and Kayaks. The AdvancedFrame™ Kayaks are a hy-
brid of a folding frame kayak and an inatable kayak. Its bow slices through
water like a knife and rivals the tracking of hard-shell kayaks. The stern acts
as a skeg increasing the tracking performance. The Lagoon™ kayaks are
durable and lightweight. They have built-in rigid forms that increase the
performance once it is fully inated. You can take our inatables with you
anywhere in the world and no roof rack is needed! Keep it in the trunk of
your car and paddle whenever you want or pack it into a remote wilderness
area and paddle where no one has paddled before. Simply inate with a foot
pump and hit the water in minutes. Please visit our website for more infor-
mation on our products or to nd a dealer near you.
INTRODUCTION
inflatable
kayaks with cutting
edge
technology

3
TABLE OF CONTENTS
1. Caution/Safety .................................................................. 4
1.1 Boating Safety ........................................................ 5
2. Specification ...................................................................... 6
2.1 Capacity ................................................................. 6
2.2 Features .................................................................. 7
3. Assembly/Inflating/Deflation Instruction .................... 7
3.1 Assembly ............................................................... 7
3.2 Understanding Your Valves................................ 8
3.3 Inflating ................................................................ 10
3.4 Over Inflation ...................................................... 10
3.5 Deflation ............................................................... 11
3.6 Folding ................................................................. 11
4. Guidelines for Usage ..................................................... 12
5. Proper Care and Storage ............................................... 12
6. Repairs ............................................................................. 13
6.1 Repairing Small Punctures and Cuts ............... 13
6.2 Repairing Pinholes ............................................. 13
7. Troubleshooting ............................................................. 14
8. Statement of Origin ....................................................... 17
9. Declaration of Conformity ........................................... 18
10. Warranty and Registration ........................................... 19

4
1. CAUTION - SAFETY WARNING
Users of this product agree by their use to accept the inherent risks involved in this paddlesports
activity and agree to follow all instructions, cautions, and warnings carefully before using this
Kayak.
(PLEASE READ CAUTION STATEMENT CAREFULLY)
SAFETY WARNING
PADDLESPORTS CAN BE VERY DANGEROUS AND PHYSICALLY DEMAND-
ING. THE USER OF THIS PRODUCT SHOULD UNDERSTAND THAT PARTICI-
PATION IN PADDLESPORTS MAY INVOLVE SERIOUS INJURY OR DEATH.
OBSERVE THE FOLLOWING SAFETY STANDARDS WHENEVER USING THIS
PRODUCT.
· GET PADDLESPORTS INSTRUCTIONS SPECIFIC TO THIS TYPE OF CRAFT.
· OBTAIN CERTIFIED FIRST AID TRAINING AND CARRY FIRST AID AND
RESCUE/SAFETY EQUIPMENT.
· ALWAYS WEAR A NATIONALLY APPROVED PERSONAL FLOTATION DEVICE.
· ALWAYS WEAR A HELMET WHERE APPROPRIATE.
· DRESS APPROPRIATELY FOR WEATHER CONDITIONS; COLD WATER AND/OR COLD
WEATHER CAN RESULT IN HYPOTHERMIA. CHECK YOUR EQUIPMENT PRIOR TO
EACH USE FOR SIGNS OF WEAR OR FAILURE.
· NEVER PADDLE ALONE.
· DO NOT PADDLE IN FLOOD CONDITIONS.
· BE AWARE OF APPROPRIATE RIVER WATER LEVELS, TIDAL CHANGES, DANGEROUS
CURRENTS, WEATHER CHANGES, AND STRONG OFF SHORE WINDS.
· SCOUT UNFAMILIAR WATER; PORTAGE WHERE APPROPRIATE.
· DO NOT EXCEED YOUR PADDLING ABILITY; BE HONEST WITH YOURSELF.
· CONSULT YOUR PHYSICIAN PRIOR TO BEGINNING YOUR PADDLESPORTS TRAINING.
· YOU MUST NOT USE ALCOHOL OR MIND ALTERING DRUGS PRIOR TO USING THIS
PRODUCT.
· FOLLOW THE MANUFACTURER’S RECOMMENDATIONS FOR THE USE OF THIS
PRODUCT.
· IF ADDITIONAL OUTFITTING IS REQUIRED, USE MANUFACTURER’S APPROVED
MATERIALS ONLY; DO NOT IMPAIR ENTRY OR EXIT ACCESS.
· READ OWNER’S INFORMATION PACKET PRIOR TO USING THIS PRODUCT.
THE USER OF THIS PRODUCT ACKNOWLEDGES BOTH AN UNDERSTANDING AND AN
ASSUMPTION OF THE RISK INVOLVED IN PADDLESPORTS.
CAUTION
ADVANCED ELEMENTS, INC.
TOLL FREE 866-262-9076
Please read this entire manual for additional safety information. Please pay close aention to items
marked DANGER, WARNING, CAUTION, IMPORTANT, NOTICE, NEVER, and ALWAYS.

Scamper2™ Inatable Kayak Owner’s Manual
5
1.1 Boating Safety
This is the safety alert symbol. It is used to alert you to potential personal injury
hazards. Obey all safety messages that follow this symbol to avoid possible injury or
death.
DANGER
Indicates an imminently hazardous
situation which, if not avoided, will
result in death or serious injury or
substantial property damage.
WARNING
Indicates a potentially hazardous
situation which, if not avoided, could
result in death or serious injury or
property damage.
CAUTION
Indicates a potentially hazardous
situation which, if not avoided, may
result in property damage.
CAUTION
Used without the safety alert symbol
indicates a potentially hazardous
situation, which, if not avoided, may
result in property damage.
NOTICE
Indicates installation, operation or
maintenance information which is
important but not hazard-related.
The precautions listed in this manual and on the cra are not all-inclusive. If a procedure,
method, tool or part is not specically recommended, you must satisfy yourself that it is safe
for you and others, and that the cra will not be damaged or made unsafe as a result of your
decision. REMEMBER - always use common sense when paddling YOUR KAYAK!

6
2. SPECIFICATION
Dimensions:
Length: 12’
Width: 35”
Weight: 31 lbs (14 kg)
Max. Person Capacity: 350 lbs (159 kg)
Max. Persons & Gear Capacity: 350 lbs (159 kg)
Recommended Pressure:
Main chambers: 2.0 psi (0.14 bar)
2.1 Capacity
The person/load capacity is determined by the availability of proper seating on the kayak.
Acceptable seating determines the number of passengers, not the overall load capacity.
MAXIMUM CAPACITIES
350 LBS PERSONS, GEAR
PRESSURE = 2.0 psi (main chambers)
MANUFACTURER: ADVANCED ELEMENTS, INC. CONCORD, CA USA 94524
MODEL AE3032-WM - SCAMPER2™ KAYAK
COMPLIANCE
WITH
ISO 6185-1
TYPE III, B
0123
2+ = 159 kg
0,14 bar (main chambers)
2 PERSON OR 350 LBS.
THIS BOAT COMPLIES WITH NMMA STANDARDS OF EFFECT
ON THE DATE OF CERTIFICATION
NATIONAL MARINE MANUFACTURES ASSN.
NOT INTENDED FOR MECHANICAL PROPULSION
2010
NOT INTENDED FOR MECHANICAL PROPULSION
Scamper2™ Kayak Capacity Label
WARNING: Do not exceed the certied maximum capacities under any circumstances.
Overloading will reduce freeboard and increase the likelihood of swamping, especially in heavy
seas. Overloading causes handling to become sluggish, making it dicult to react quickly.
Scamper2™ Inatable Kayak Owner’s Manual
7
2.2 Features
SPECIAL FEATURES:
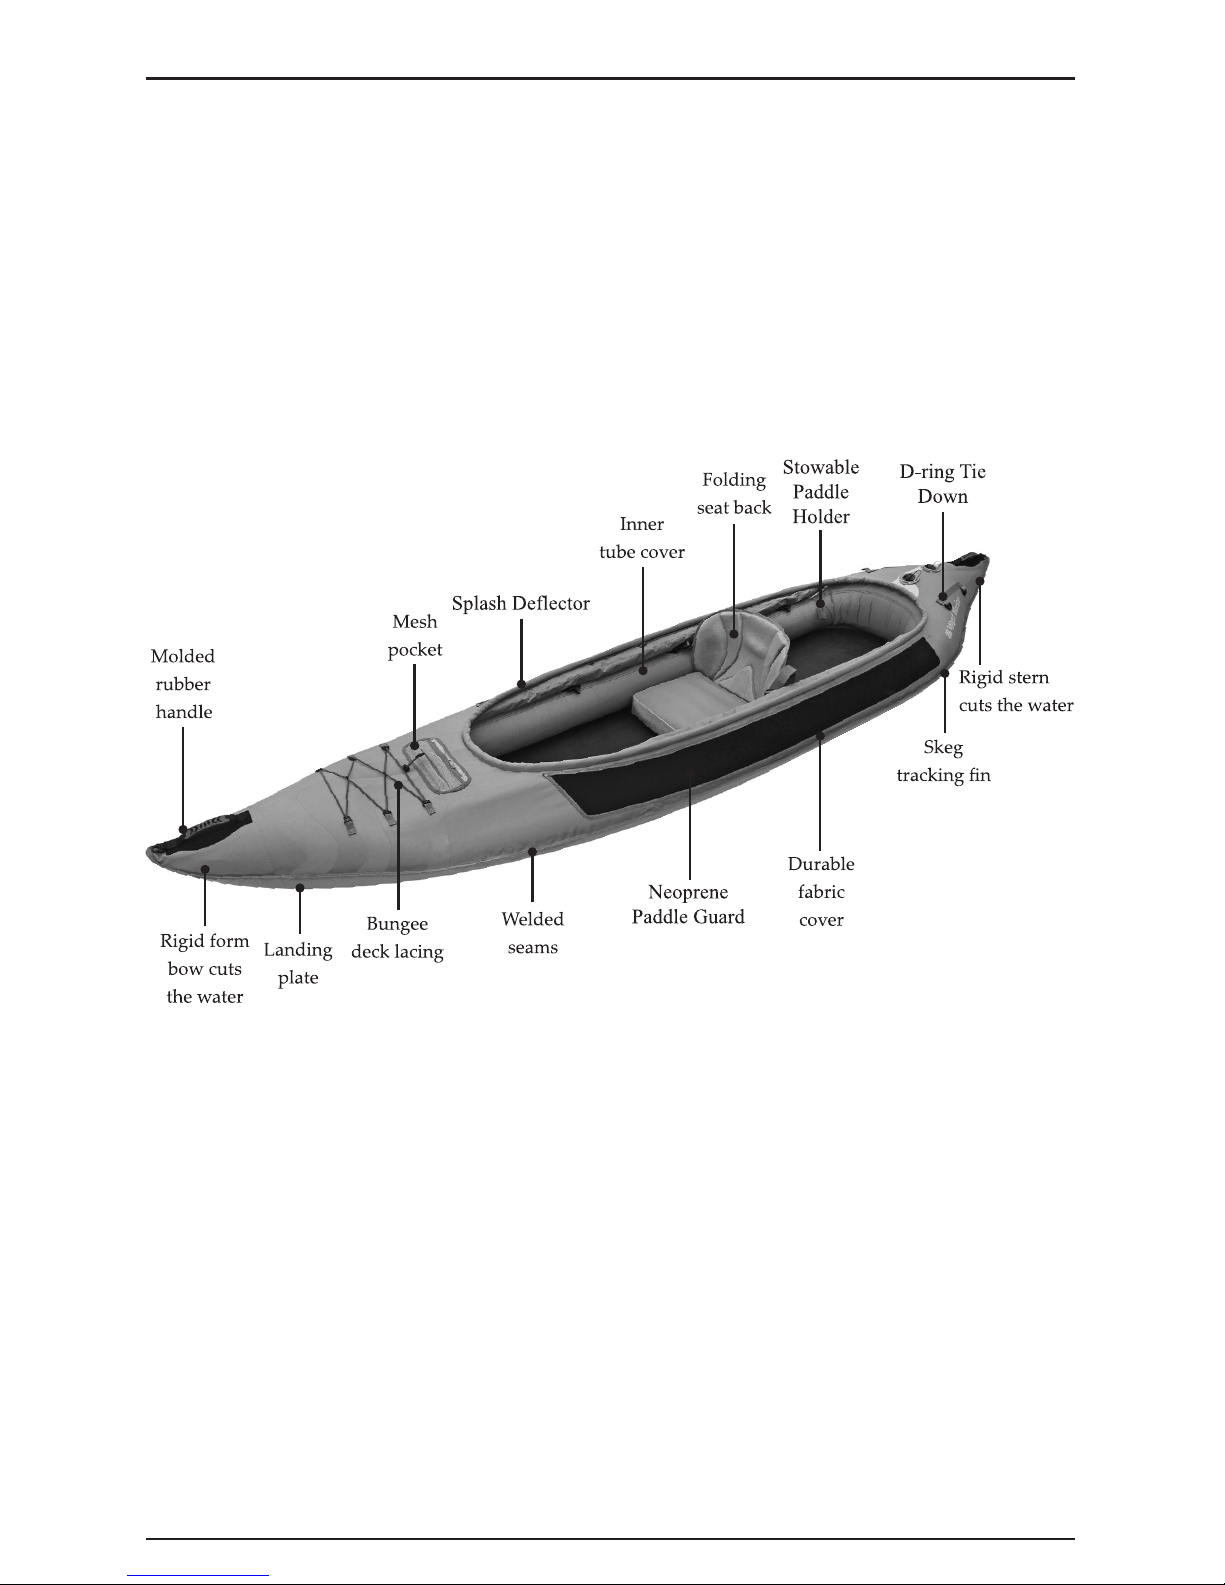
Design: Inner tube covers add stiness and abrasion protection.
Rigid Bow and Stern: Built-in rigid panels dene the bow and stern and improve tracking.
Durable and Light: Unique outer cover provides durability in a lightweight design.
Easy to Set Up: New Twist valves and high ow Spring valves allow for quick setup time.
Comfortable: High support seat provides comfort for hours of paddling.
Hull Design: Landing plate and tracking n improve performance.
3. ASSEMBLY/INFLATING/DEFLATION INSTRUCTION
The Scamper2™ Kayak has a rigid bow and stern that enhances its performance.
3.1 Assembly
Your kayak comes from the factory pre-assembled. The only assembly you should need to do is
aach the adjustable seats.

8
3.2 Understanding Your Valves
Advanced Elements Scamper2™ kayak uses the following valves. The Advanced Elements
spring valve has the function and durability of other military type valves and is compatible with
most standard pumps. The lock nut holds the valve in place with the cover for easy ination.
The following gures will have details on how to operate the valves.
To Inate: The valve’s plunger stem should be in the up/outward position ush with the valve
threading.
To Deate: The valve’s plunger stem should be set in the down/inward position recessed in the
valve threading.
In order to switch the valve from inate to deate or vice-versa, simply use your nger to
press the valve stem down/inward and rotate it a 1/4 turn to either lock it down for deate, or
unlock it (stem will spring up) for inate.
How the Spring Valve Works:
When the valve is in the inate (up/outward) position, the air being pumped in pushes the
spring-loaded plunger open, allowing air to enter the air chamber, but not leing it escape.
When the valve is in the deate (down/inward) position, the spring loaded plunger is wide open
allowing the air to come rushing out of the air chamber. If the valve is in the inate position, the
valve’s plunger stem will be ush with the rim of the valve. If the valve is in the deate position,
the valve’s plunger stem will be inside, or lower than, the rim of the valve. To change the valve
from the inate position to the deate position, simply use your nger to press the valve plunger
stem down/inward, and give it a 1/4 turn. This will lock the plunger open and allow the air to
rush out. Use the same procedure in reverse to unlock the valve plunger, allowing it to spring up
into the inate position.
Special Note: If you are using a 12v inator, like those that come with most inatable maresses
or those that plug into car cigaree lighters, you may need to have the valve in the deate (down/
inward) position because these types of pumps typically do not provide enough air pressure
to press the plunger open to allow air into the air chamber. Additionally, 12v inators do not
provide enough pressure to fully inate the kayak, so you will need a secondary pump to nish
the job.
Using the NEW “Screw-on” Spring Valve Adaptor:
The screw-on Spring Valve Adaptor was designed to enable the pump hose to securely connect to
the Advanced Elements Spring Valve without falling o during ination, making ination easier.
The valve adaptor also has a semi-circle protrusion that depresses the valve stem, opening the
valve slightly to allow pumps with pressure gauges to take a constant reading. When inating
the kayak using the Spring Valve Adaptor, the valve should be in the inate position.

Scamper2™ Inatable Kayak Owner’s Manual
9
Special Note: The Spring Valve Adaptor comes with all current Advanced Elements pumps,
with the exception of the 12v inator, and will aach to any Advanced Elements pump that
does not have the adaptor already included, with the exception of the 12v inator. The Spring
Valve Adaptor will also aach to some other manufacturer’s pumps, but you must check the
aachment style at the end of the pump hose to be sure it will t.
Figure 1. Inate/Deate Spring Valve
OPERATINGTHE“TWIST”VALVES
TWIST TO OPEN / INFLATE / THEN CLOSE
TWIST VALVE
PUMP HOSE
INSERT
1
2
Figure 2. Inate/Deate Twist Valve
To begin inating your kayak, you will need a Bellows Foot Pump or a Double Action Hand
Pump. Never use compressors, CO2 or compressed air as they may damage you kayak.

10
Diagram of Ination Chambers
3.3 Inating
IMPORTANT: Inate your kayak in the following order. Failure to follow these instructions
may cause damage to your kayak. Do not over inate. Be sure to read directions on
operating the spring valves and twist valves located in the section “Understanding your valves”.
Before inating please be sure that the foam oor is positioned inside the kayak seating area,
underneath the side ination tubes. When the kayak is inated it will hold the foam oor in
place.
1. Inate chamber 1 “main1” until the kayak looks about half way inated.
2. Inate chamber 2 “main2” until the kayak feels rm to touch. 2 psi max (DO NOT OVER
INFLATE)
3. Inate chambers 3 and 4 “deck li tubes” until rm. 1 psi max (DO NOT OVER
INFLATE)
4. Inate seat cushion to desired rmness and aach to kayak using provided strap.
5. Make sure all valves are closed tightly and properly.
NOTE: Ideally you want to put about half of the air in Chamber 1 and half into chamber 2. This
way if you were to loose pressure in one chamber then you would have the other chamber to
oat the kayak.
Questo manuale è adatto per i seguenti modelli
2
Indice
Altri manuali West Marine Barca


Manuali Barca popolari di altre marche


PURSUIT
PURSUIT OS 335 Manuale utente

Boston Whaler
Boston Whaler CONQUEST 345 Manuale utente

Jeanneau
Jeanneau SUN ODYSSEY 41 DS Manuale utente

Meridian
Meridian 490 Pilothouse Manuale utente

Advanced Elements
Advanced Elements AdvancedFrame Expedition AE1009 Manuale utente

Robo Marine Indonesia
Robo Marine Indonesia GEOMAR Manuale utente


