Wintal PVR-X10 Manuale utente

PVR-X10
Personal Video Recorder

SAFETY INSTRUCTIONS
About this manual
Please observe the following safety instructions carefully before putting the unit into opera-
tion. Take note of the warnings on the unit and in this manual.
Always keep the instruction manual near at hand. If you sell or pass on the product, make
sure you include this manual together with the unit.
Electrical devices do not belong in the hands of children!
Do not let children use electrical devices unattended.
Swallowing batteries could be fatal. Always keep the unit and any batteries inaccessible to
young children. If a battery has been swallowed, consult a medical doctor immediately.
Also, keep any plastic packaging out of the reach of children to avoid danger of suffocation.
Setting the product up safely
Choose a flat, firm surface to set the product up on. Make sure that:
–the ventilation slots are not covered (ensure at least 10cm distance from any walls)
–no foreign bodies or fluid gets into the unit (e.g., do not place vases on the unit)
–the unit does not come into contact with dripping water, splash water or humidity,
–the unit is not exposed to sunlight or other direct heat (e.g. from radiators)
–no open fire sources, such as candles, are placed on the unit
Keep the mains connections accessible
Connect the unit to an easily accessible power socket (90 – 265 V ~ 50/60 Hz) close to the
unit. In case the unit has to be disconnected quickly, the plug has to be within easy reach.
In order to avoid tripping, do not use an extension lead.
Do not carry out repairs
In case the power supply cord or the unit is damaged, pull out the AC mains plug immedi-
ately.
Under no circumstances should you attempt to open or repair the unit yourself. There is
danger of electric shock!
PVR-X10 1

Your PVR-X10 has passed inspection and testing before leaving the factory, if handled
correctly it is unlikely to become faulty.
Refer all servicing to our Service Centre or to a qualified workshop.
After unpacking
Please check the following items have been included with delivery:
Receiver unit
Remote control
This manual
Recording & Playback guide
2 alkaline batteries (LR03, Size AAA)
3-RCA cable
Operating ambient temperature range
The operating ambient temperature range is 5°C – 40°C (41°F – 104°F) with humidity of
20 – 80%. When using the unit in a system rack, be sure to keep the ambient temperature
inside the rack does not exceed the temperature range.
Thunderstorms
When you leave the unit unattended for a long period of time, i.e. on holiday or during an
electrical storm disconnect the unit from both the mains and the aerial.
Battery disposal
Empty batteries do not belong with the household refuse. The batteries must be disposed
of at a designated disposal/recycle point. Contact your local authorities to locate your
nearest battery disposal point. Please care for our environment.
Cleaning the unit
Always disconnect the AC mains plug before cleaning the unit.
When cleaning the unit, only use a moistened, soft cloth. Do not apply chemical solvents or
cleaning agents, as they may damage the surface and/or labelling of the unit.
2 PVR-X10

Contents
SAFETY INSTRUCTIONS 1
Contents 3
Recording & Playback of your PVR-X10 4
Connecting the receiver 5
Optional devices 6
Operating the receiver 7
Basic Settings 8
General operation of the receiver 9
Operation front panel buttons 10
Channel selection 11
Channel list 12
EPG - Electronic program guide 13
OSD Teletext 14
Timer 15
Selection of audio-/ radio channel 16
Games 17
Configuration of the receiver 18
Editing the channel list 19
Automatic search 21
Signal strength indicator/ Specifications 23
Use of the RX/TX port 24
PVR-X10 3

Recording & Playback of your PVR-X10
Hard disk Functions
The hard disk record or playback functions are controlled from the PVR menu.
Press the PVR key to enter the PVR menu.
Press the EXIT key to return to the normal receiver operation.
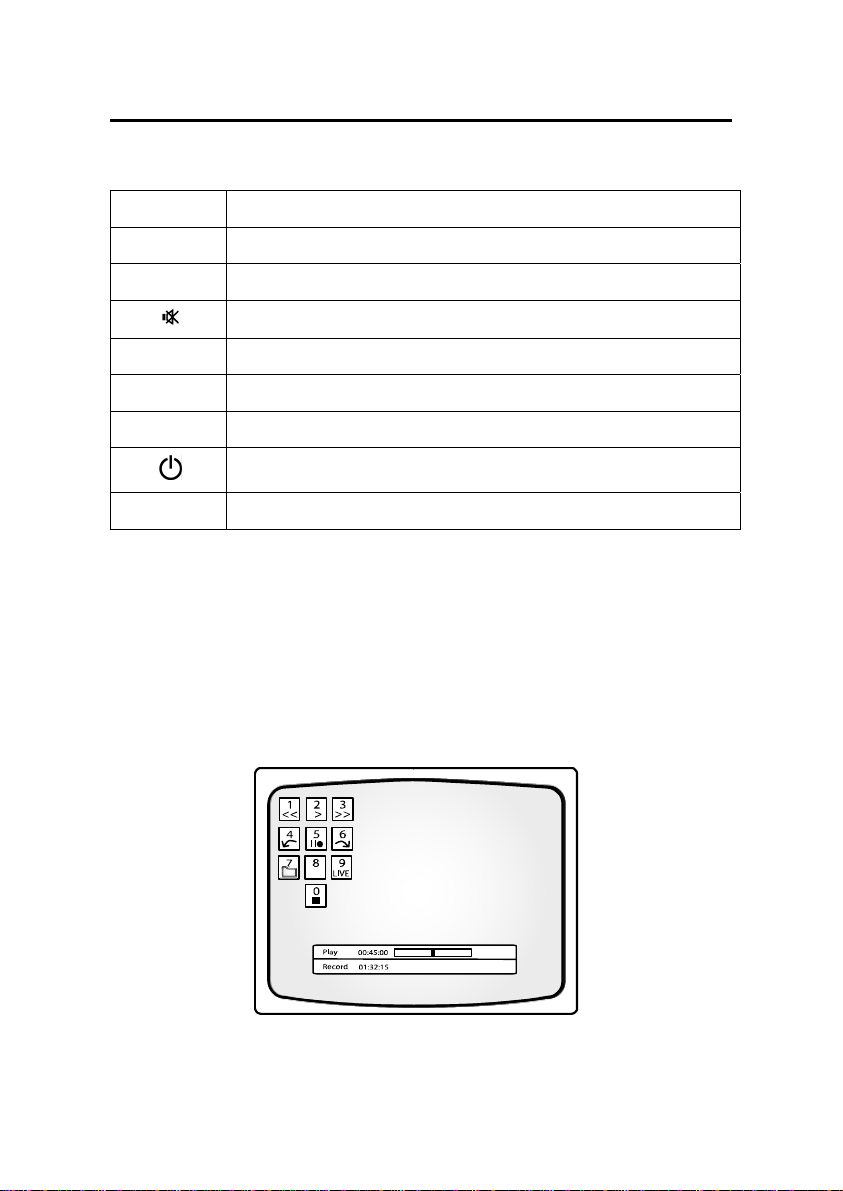
When the PVR menu is active a picture in the upper left corner of the screen shows all
functions that are available at the moment. These functions can be activated by pressing
the corresponding numeric buttons on the remote control.
Press the OK key to switch between different views of the PVR menu.
Press the +/– keys to control the volume from inside the PVR menu.
Recording
Playback
Key Symbol Description
0 Start recording.
5 Start recording and stop the visible video.
0 Stop recording.
Key Symbol Description
7
Opens the record list. From the record list you can play back recordings or
delete them.
2
Starts playback at the beginning of the current record session or returns
to normal playback speed from fast reverse/forward or pause.
1, 3
Fast reverse/forward. Plays the recording at increased speed. By pressing
the keys 1 and 3 multiple times you select from six different speeds.
4, 6 Skips 5 minutes in the recording (forward or backwards).
5 Pauses the playback.
9 Quits playback and returns to the live video of the current channel.
Playback and recording work simultaneously and independently in the receiver.
You can record the currently selected channel. In parallel you can either play back a
recording that was made earlier or you can play back the active recording session
(time-shift).
Therefore at the bottom of the PVR menu one or two status bars show the status of the
record function and the playback function. If both functions are inactive the word “LIVE” is
displayed. If recording is active a bar with the word “REC” is displayed together with the
elapsed recording time. If playback is active a bar with “PLAY”, “FF” (fast forward), “FR”
(fast reverse) or “PAUSE” is displayed. This bar also shows the current position in the re-
corded stream as numbers and as progress bar. To the right of the progress bar the total
length of the stream is displayed (except for time-shifted playback where the total length
changes constantly and can be seen in the “REC”-bar).
4 PVR-X10

Connecting the receiver
The following connections must be made before you can use the receiver unit to watch
digital TV. On the rear of the receiver you will find the following markings. Please follow
these steps for the correct setup of the receiver unit:
VIDEO,
AUDIO L/R
Connect your TV AV Input to the Video & Audio L/R connectors on the
rear of your PVR-X10
RF-IN Connect the cable of your regular terrestrial TV aerial to this connector.
power cable Connect this moulded power cable and socket to an available power
socket.
PVR-X10 5

Optional devices
SPDIF For the best possible sound reproduction – Digital audio output. Con-
nect your amplifier with an S/PDIF IN socket using this connection. Use
a shielded S/PDIF cable for best results (not included).
TV For best possible video reproduction, S Video quality is available via
SCART adaptor (not included). To select S Video, press MENU twice >
Edit settings > Signal output > Video format > press +/– to select “Y/C”
> EXIT > Save settings > confirm with OK.
RF-OUT If you wish to send the regular terrestrial aerial signal to your TV or VCR
connect the RF cable here. RF cable not included.
RX/TX Serial Interface to a PC. Connect your receiver to a PC to load software
updates or new channel lists.
6 PVR-X10

Operating the receiver
Operating the receiver is done using the supplied remote control. Navigation within the on
screen menu (OSD) is carried out using the buttons shown below:
P+ / P– Moves the selection in the menus up- and down.
– / + In lists: pages up- and down
In input fields: changes between the entry options
OK Open, submit or edit the currently marked entry.
EXIT Leave the active menu
SWAP In menus with more than one window you can change between the win-
dows using SWAP.
MENU Press MENU once for menu options to current event.
Press MENU twice to open the main menu.
INFO/EPG Press once to open the EPG for information on the current program.
Press INFO/EPG twice for information on all programs transmitted today.
LIST Press LIST for the TV channel list.
PVR Opens the PVR menu to control the hard disk recording functions
PVR-X10 7

Basic Settings
After switching on your PVR-X10 for the first time, or after using the factory defaults func-
tion you will be asked to choose your OSD language and your geographical location, the
PVR will also offer you the choice to perform a channel search, which takes a few min-
utes, when all channels are scanned the first received channel will appear.
Press the list button to view all the channels available.
1. Open the main menu
2. Go to Edit Settings
3. Go to “Signal output” if you wish to control the volume via the PVR set the volume
bypass to OFF
4. If you wish to control the volume of the TV signal by an Amplifier or TV, set the
volume level of the connected device to the minimum then select bypass to ON.
5. Leave the “Signal Output” menu by pressing EXIT and move to the heading “Save
Settings” Press OK and wait until the menu disappears.
8 PVR-X10
General operation of the receiver
You can choose the following remote control functions in normal TV viewing mode:
P+ / P– Change to previous or next channel in the channel list
TV / RADIO Change between TV and radio mode
– / + Volume down/up
Mute on/off
OK Display the status panel or use the quick help function
SWAP Change to the last chosen TV or radio channel
MENU Make an adjustment to the current program
Stand-by mode on/off
TEXT Display the OSD-Teletext
By pressing the OK button you will get a short help screen explaining the main functions of
the receiver. This function can be deactivated in the main settings (“OSD/EPG”, parameter
“Short help with OK”). After deactivating, the OK button opens the status window with
information relating to the current event.
By pressing the PVR button, you can access the PVR menu which allows you to control the
Record and Playback functions.
PVR-X10 9
Altri manuali per PVR-X10
1
Indice
Altri manuali Wintal Registratore digitale


