Wirepath WPS-500-DOM-A-WH Manuale utente

WPS-500-DOM-A-BL
WPS-500-DOM-A-WH
CAMERA
DOME
INSTALLATION MANUAL
Review manual thoroughly before installation.
Retain for future reference.


3
WPS-500-DOM-A Installation Manual
© 2012 Wirepath Surveillance
CONTENTS
Safety Instructions...............................................................................4
Features............................................................................................... 5
Package Contents............................................................................. 6
Installation Instructions....................................................................... 6
Set-Up...................................................................................................8
1. Operating The OSD Menu..................................................... 8
2. OSD Menu Structure...............................................................8
3. OSD Menu Settings................................................................. 12
3.1 Lens.......................................................................12
3.2 Exposure...............................................................12
3.3 White Balance.....................................................13
3.4 Backlight...............................................................14
3.5 Day & Night......................................................... 15
3.6 DPC.......................................................................16
3.7 Special................................................................. 16
3.8 Comm Adj........................................................... 20
3.9 Reset.....................................................................21
3.10 Exit.......................................................................21
RS485 System Diagram.......................................................................22
Troubleshooting................................................................................. 23
Specications......................................................................................25
Dimensions...........................................................................................26
Warranty.............................................................................................. 27
3

4
WPS-500-DOM-A Installation Manual
SAFETY INSTRUCTIONS
This information is provided to ensure your safety and to prevent
physicalornancialloss.Pleasereadthisdocumentcarefullybefore
installing and operating the camera.
1. Handle with care.
Use caution when handling to avoid damage to sensitive internal
components.
2. Do not install camera under extreme temperatures.
This camera only operates under temperature conditions between
14˚F~140˚F.
3. Do not mount the camera directly facing bright light sources.
Exposing the camera to strong light over long periods of time will
damage the camera’s sensor.
4. Do not supply voltage other than 12~30V DC or 24V AC.
This camera regulates power within this range. Higher voltages will
damage the camera’s electronic components.
5. Do not install camera in environments with extreme humidity.
Installing camera in environments with extreme humidity may cause
moisture to condense on the surface of the lens or dome cover,
which can affect picture quality.

5
WPS-500-DOM-A Installation Manual
© 2012 Wirepath Surveillance
FEATURES
• 1/3” Sony Super-HAD II CCD
The Sony Super HAD II CCD is ideal for low lux illumination, resulting
in a clear and crisp image.
• Varifocal Auto-Iris Lens
This camera features a varifocal lens with a focal length of 3.7-12
mm. The auto-iris function intuitively manages the amount of
light passing through the lens for consistent image brightness.
• DWDR (Digital Wide Dynamic Range)
DWDR is ideal for high contrast environments, improving the
contrast between very dark and very bright areas in a scene
and producing a more balanced image.
• 2D Digital Noise Reduction
Digital noise reduction produces clear images in low light
conditions. Not only does it help to reduce image noise,
but it also minimizes objects from becoming blurred when
in motion, producing extremely clear picture quality even
under low-light conditions.
• RS-485 Connection and OSD
This camera features an OSD (on-screen display) for initial setup
and settings adjustment. Remote control is possible using a
compatible DVR or PTZ controller connected to the camera’s
RS485 wire leads.
• 3-Axis Gimbal
A 3-axis gimbal provides a wide range of camera positioning
angles through mechanical adjustment.
• Weatherproof Housing
The IP66-rated weatherproof housing makes this camera ideal for
outdoor surveillance.

6
WPS-500-DOM-A Installation Manual
PACKAGE CONTENTS
(1) Camera
(1) AC/DC plug
(3) Screws
(3) Wall fasteners
(1) 3mm Allen Key
(1) Foam gasket
Manual
NOTE 1: A POWER SUPPLY IS NOT INCLUDED WITH THIS CAMERA.
The PS-12DC-1A is recommended.
NOTE 2 : A Silica Gel package is mounted inside the dome housing. This package
should remain inside the housing after installation.
INSTALLATION INSTRUCTIONS
1. Recommended cabling includes solid copper RG59 or RG6 for
video, 18AWG two-conductor for power, and a CAT5 for RS485
control of the OSD.
2.Open the camera by using
the provided 3mm Allen key
to remove the three screws
on the dome cover.
3.Prior to installation, it is recommended to pre-adjust the camera’s
3-axis bracket angle so the lens points in the desired direction. The
lensangleshouldnotexceed50˚offofthecenteraxis(seepage
26 for details). It is also recommended to connect the camera to a
display and pre-adjust the zoom and focus
(see step 6). If the RS485
function will be utilized,
congureandtestthe
settings prior to camera
placement. Taking
these steps will speed
installation time.

7
WPS-500-DOM-A Installation Manual
© 2012 Wirepath Surveillance
4. Use the provided foam gasket as
a template to pre-mark mounting
hole locations. Position the camera
base at the desired location and
use the provided screws to attach
the camera base to the wall
or ceiling.
5. Using the supplied AC/DC plug,
connect the power supply jack
to 12-30 VDC or 24 VAC
and the BNC Video Output to
the desired video line.
WARNING – DO NOT CONNECT
POWER TO THE RS485 LEADS.
6. Once the camera is
installed, check the
viewing angle, zoom
and focus settings. To
adjust the zoom and
focus, loosen (but do
not remove), the set
screws. Using the set screws rotate the lens until you achieve the
desired setting. Once you have correctly set the zoom and focus,
tighten the set screws. Ensure the rubber lens gasket is in place.
7. Replace the dome cover to the dome base,
and make sure the screws on the dome cover
are tightened securely. Doing so seals the
dome from the elements, and creates a tight
taroundtherubberlensgaskettoprevent
theIRLEDsfromreectingintothelens.
12-30 VDC
or 24 VAC Power
BNC Video Output
RS485 Leads
White (+), Green(─)
AC/DC Plug
FOCUS
(Near-Far)
Rubber
Lens Gasket
ZOOM
(Tele-Wide)
NOTE : DO NOT remove the Silica Gel package

8
WPS-500-DOM-A Installation Manual
SET-UP
Operating the OSD Menu
•ToviewtheOSD,thecameramust
be connected to a display monitor.
•Thebuttonfoundonthe
rear circuit board of the
cameraprovidesve
separate actions: UP,
DOWN, EXIT, ENTER
and MENU.
•Pressthebuttontoenter
into the OSD MENU page.
•PressUP,DOWN,EXIT(Left)
or ENTER (Right) to select
items on the menu and
beginconguration.
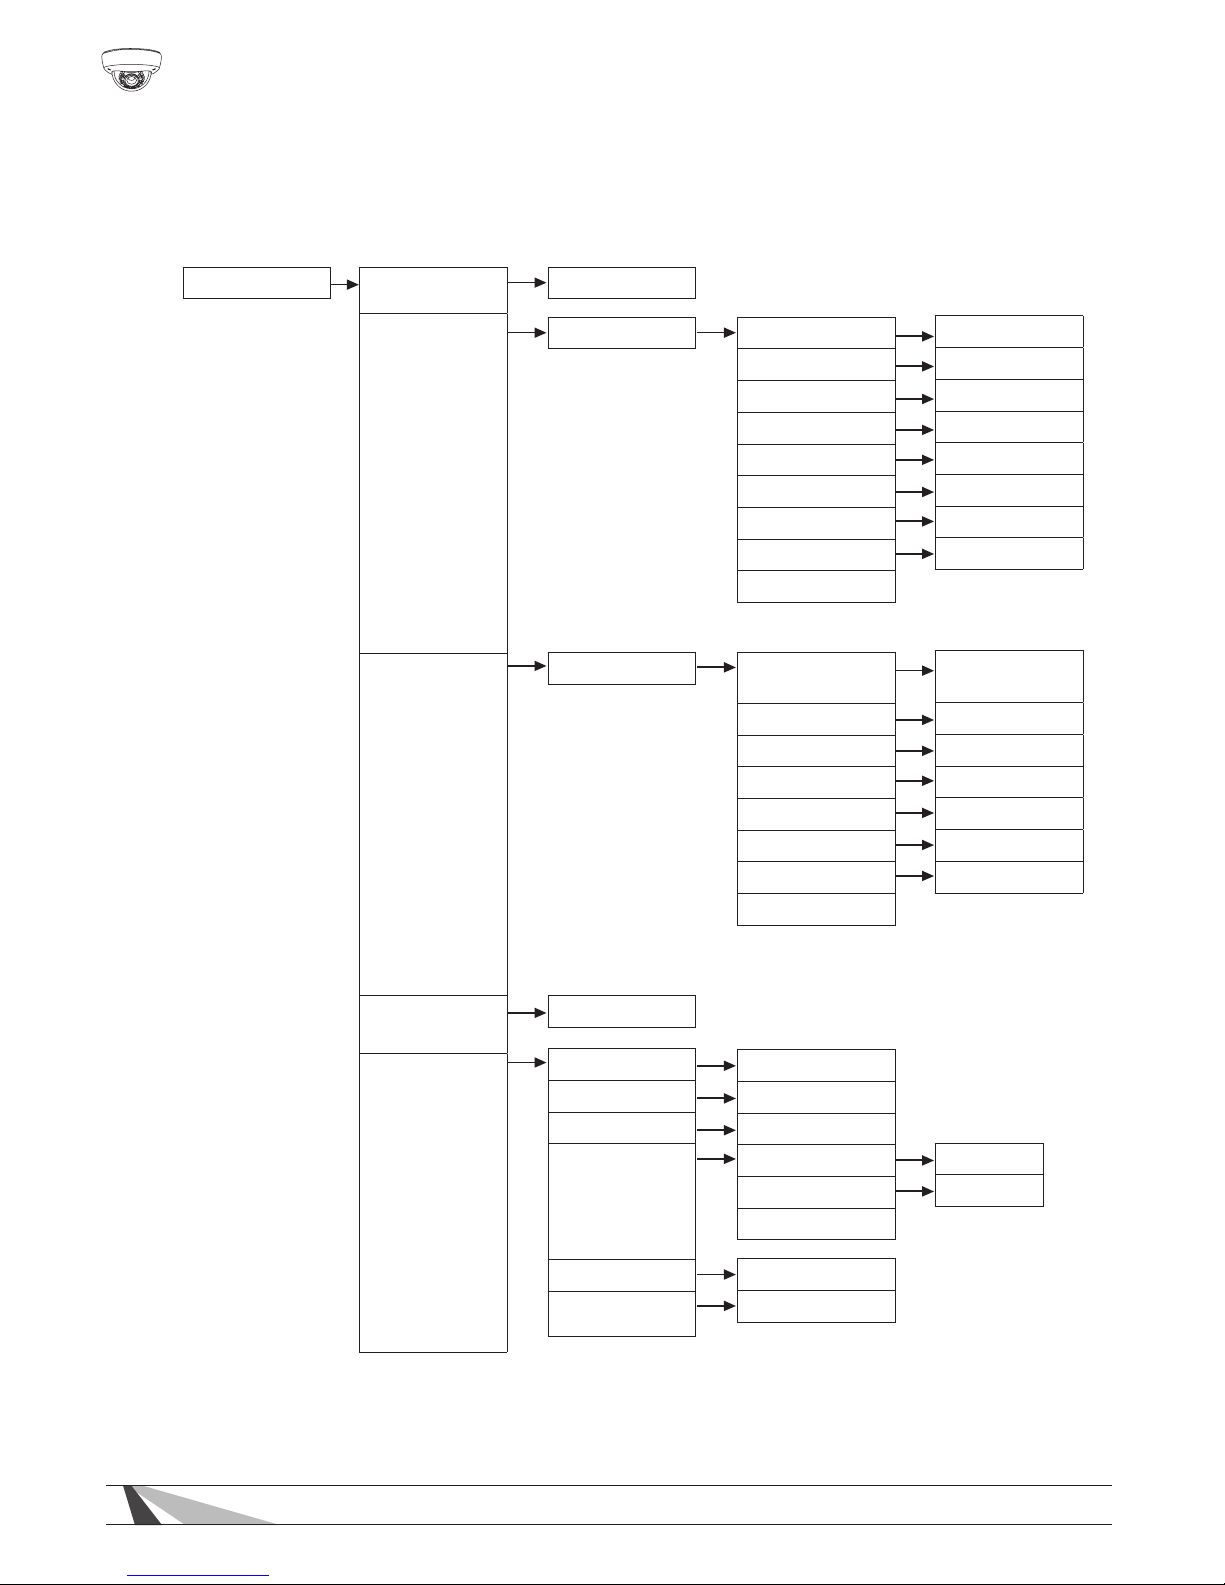
OSD Menu Structure
Settingshavebeenpreconguredforoptimalperformanceinmost
applications. If adjusting the settings produces a poor picture,
factory reset the camera to restore the original settings (see p.21)
Bold indicates factory preset
LENS
EXPOSURE
DC, MANUAL
SHUTTER
BRIGHTNESS
AGC
DWDR
RETURN
ON, OFF LEVEL
RETURN
0~63(29)
AUTO, 1/60(1/50), FLK, 1/250, 1/500, 1/1000, 1/2000,
1/4000, 1/5000, 1/10000, 1/100000
000~255 (40)
OFF, LOW, MIDDLE, HIGH
OSD Menu
Button

9
WPS-500-DOM-A Installation Manual
© 2012 Wirepath Surveillance
OSD Menu Structure cont. (bold indicates factory preset)
DAY/NIGHT
DPC
COLOR
AUTO
EXT
B/W
See Page 16 for instructions
DN LEVEL
DN DELAY
ND LEVEL
ND DELAY
RETURN
BURST
IR SMART
IR LEVEL
RETURN
ON, OFF
ON, OFF
LOW, HIGH
100
1 SEC
35
5 SEC
BACKLIGHT BLC
HLC
OFF
AREA SEL
AREA STATE
GAIN
HEIGHT
WIDTH
LEFT/RIGHT
TOP/BOTTOM
RETURN
LEVEL
MODE
RETURN
0-255
All Day, Night Only
Area1, Area2
ON, OFF
0-255 (138)
0-15 (10)
0-15 (3)
0-15 (6)
0-15 (5)
WHITE BAL ATW1
ATW2
AWCSET
MANUAL COLOR TEMP
BLUE
RED
RETURN
INDOOR, OUTDOOR
-100~100(0)
-100~100(0)
10
WPS-500-DOM-A Installation Manual
OSD Menu Structure cont. (bold indicates factory preset)
SPECIAL CAM TITLE
MOTION
PRIVACY
PARK. LINE
IMAGE ADJ.
ON, OFF
LENS SHAD
2DNR
MIRROR
FONT COLOR
CONTRAST
SHARPNESS
ON, OFF
ON, OFF
ON, OFF
AREA SEL
AREA STATE
HEIGHT
WIDTH
LEFT/RIGHT
TOP/BOTTOM
DEGREE
VIEW
RETURN
AREA SEL
AREA STATE
HEIGHT
WIDTH
LEFT/RIGHT
TOP/BOTTOM
COLOR
RETURN
ON, OFF
ON, OFF
ON, OFF
FONT
ID & TITLE
RETURN
0-255 (119)
0-31 (26)
0~15
0~15
AREA 1, 2, 3, 4
ON, OFF
0-15 (4)
0-15 (4)
0-15 (2)
0-15 (2)
0-255 (38)
ON, OFF
AREA 1, 2, 3, 4,
5, 6, 7 , 8
ON, OFF
0-255 (32)
0-255 (32)
0-255 (20)
0-255 (16)
0-15 (0)
Questo manuale è adatto per i seguenti modelli
1
Indice
Altri manuali Wirepath Telecamera di sicurezza

Wirepath
Wirepath WPS-365-DOM-A Manuale utente

Wirepath
Wirepath WPS-300-CUB-IP-WH Manuale utente

Wirepath
Wirepath WPS-100-DOM-A-WH Manuale utente

Wirepath
Wirepath WPS-500-BUL-A-WH Manuale utente

Wirepath
Wirepath WPS-750-DOM-IP Manuale utente

Wirepath
Wirepath WPS-750-BUL-IPH Manuale utente

Wirepath
Wirepath WPS-565-BUL-A Manuale utente

Wirepath
Wirepath WPS-350-DOM-A-WH Manuale utente

Wirepath
Wirepath WPS-700-DOM-A-WH Manuale utente

Wirepath
Wirepath WPS-100-BUL-A-SL Manuale utente


