
Wolfen 9505568 Manuale utente
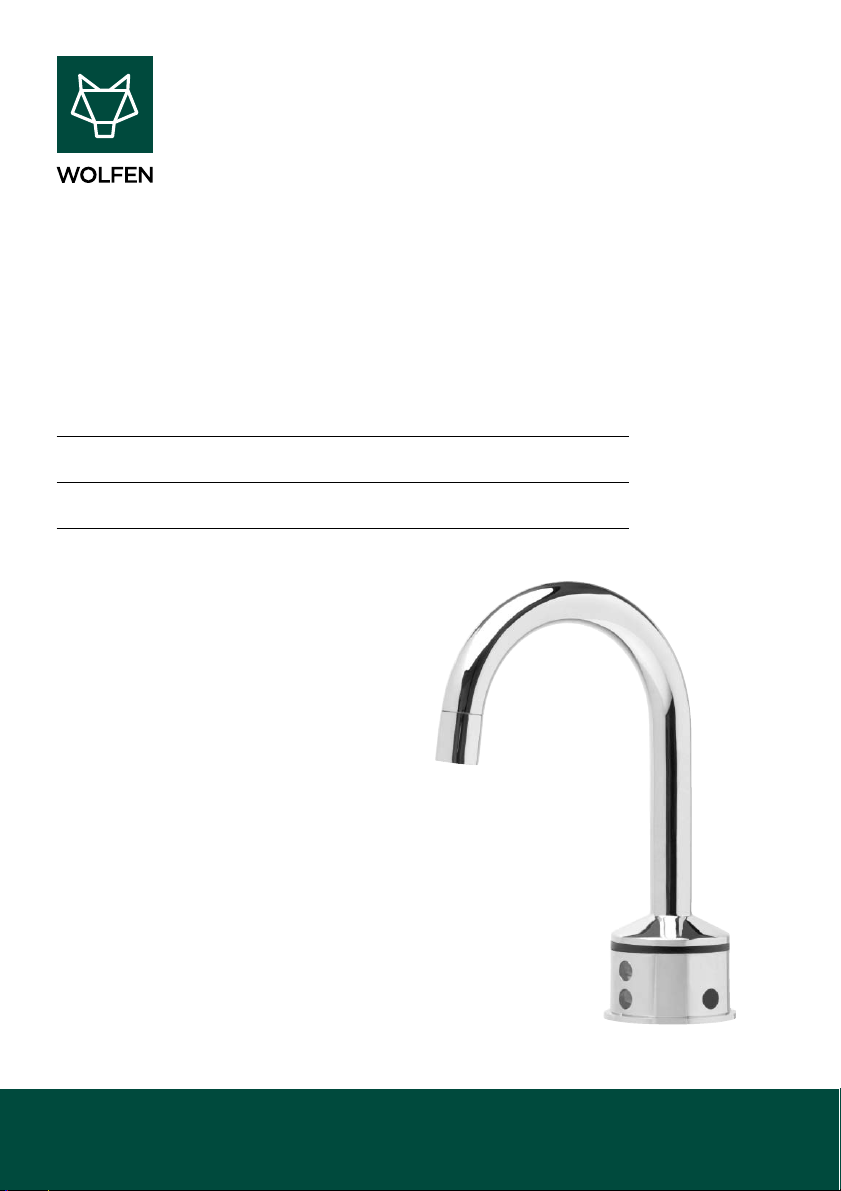
INSTALLATION
MANUAL
9505568 Wolfen Sensor Operated Gooseneck Tap
9506217 Wolfen Sensor Operated Gooseneck Tap with LED
Installation Details | Warranty
TM

WOLFEN INSTALLATION MANUAL | Technical Information
2WOLFEN INSTALLATION MANUAL | Wolfen Sensor Operated Gooseneck Tap
Intro 03
Technical Information 04
Unit Components 06
Installation Instructions 08
Warranty 10
CONTENTS
TM
3
Delivering unrivalled quality
Designed for absolute performance, Wolfen’s commercial Sensor Operated
Gooseneck Tap sets new standards in quality and durability. Ergonomic design
combined with precision engineering ensures that every Wolfen product is easy-to-use
and made to last. Here are just some of the many innovative features that make
the Wolfen Sensor Operated Gooseneck Tap the smart solution.
Infection control
• Touch-free operation
Commercial durability
• Waterproof electronics
• Protective shield to prevent
cable damage
Installation and servicing
• Fixed 1/2" BSP thread provides
a fast and stable installation point
• Integrated dress ring creates a larger
mounting platform
• Easy side access sensor range
adjustment
• Light indicator on power pack
self diagnoses effective power
supply to unit
Usage features
• Reflection proof sensor prevents
false triggering
• Distinctive LED light feature
indicates operation (9506217)
Anti-vandal features
• Aerator cannot be easily unscrewed
Application
• Hospital and health care
• Commercial food premises
TM
Suitable for High Pressure applications
(minimum 150kPa)
AS/NZS 3718
WM022306
WaterMark
TM
The more
stars the more
water efficient
WATER R ATI NG
www.waterrating.gov.au
In accordance with AS/NZS 6400
Licence No. 1386
Autoflo Pty Ltd
7.0 litres per
minute
WOLFEN INSTALLATION MANUAL | Technical Information
4WOLFEN INSTALLATION MANUAL | Wolfen Sensor Operated Gooseneck Tap
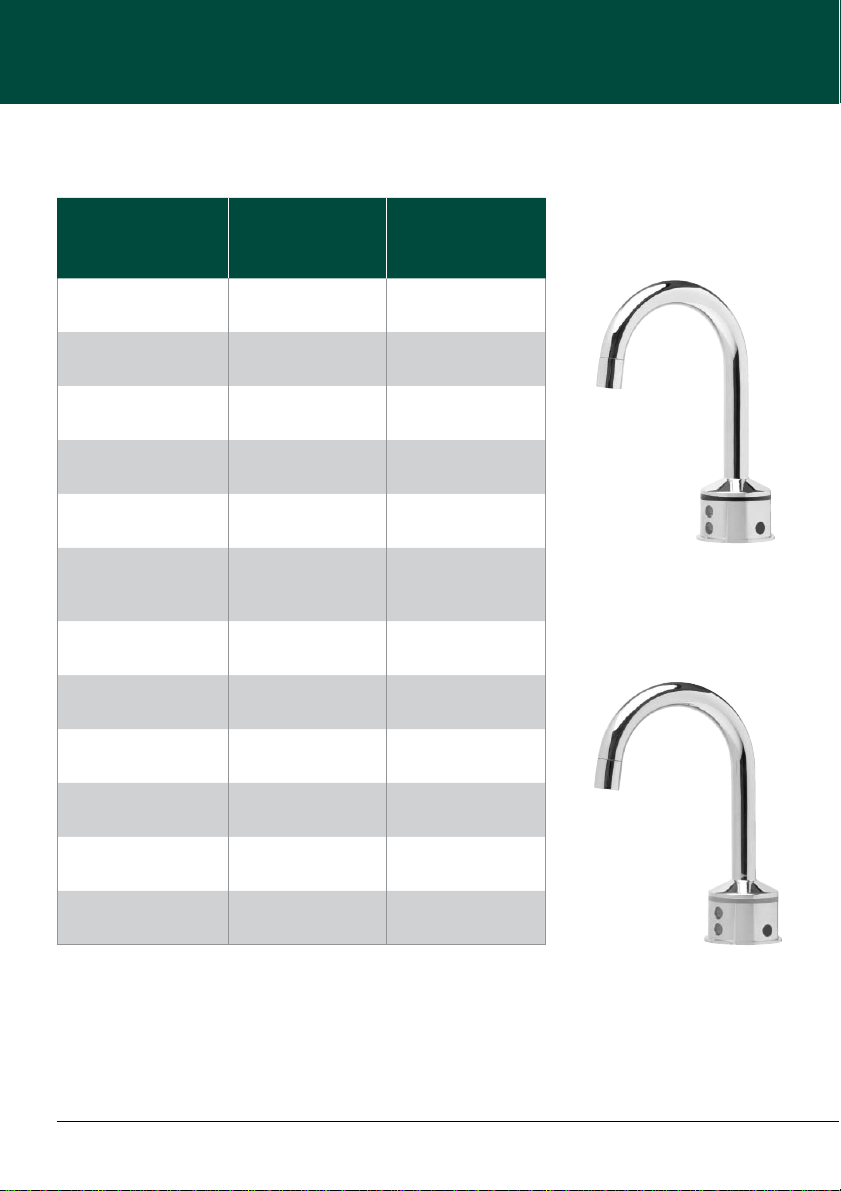
Model
Wolfen
Sensor Operated
Gooseneck Tap
Wolfen
Sensor Operated
Gooseneck Tap
with LED
Product Code 9505568 9506217
Product Type Kitchen Sensor
Tapware
Kitchen Sensor
Tapware
Colour Chrome Chrome
Finish Polished Polished
Material Brass Brass
Power Supply 240V AC 240V AC
Max Continuous Flow
Working Pressure 500kPa 500kPa
Min Continuous
Working Temperature 2°C 2°C
Max Continuous
Working Temperature 50°C 50°C
Max Static Pressure 500kPa 500kPa
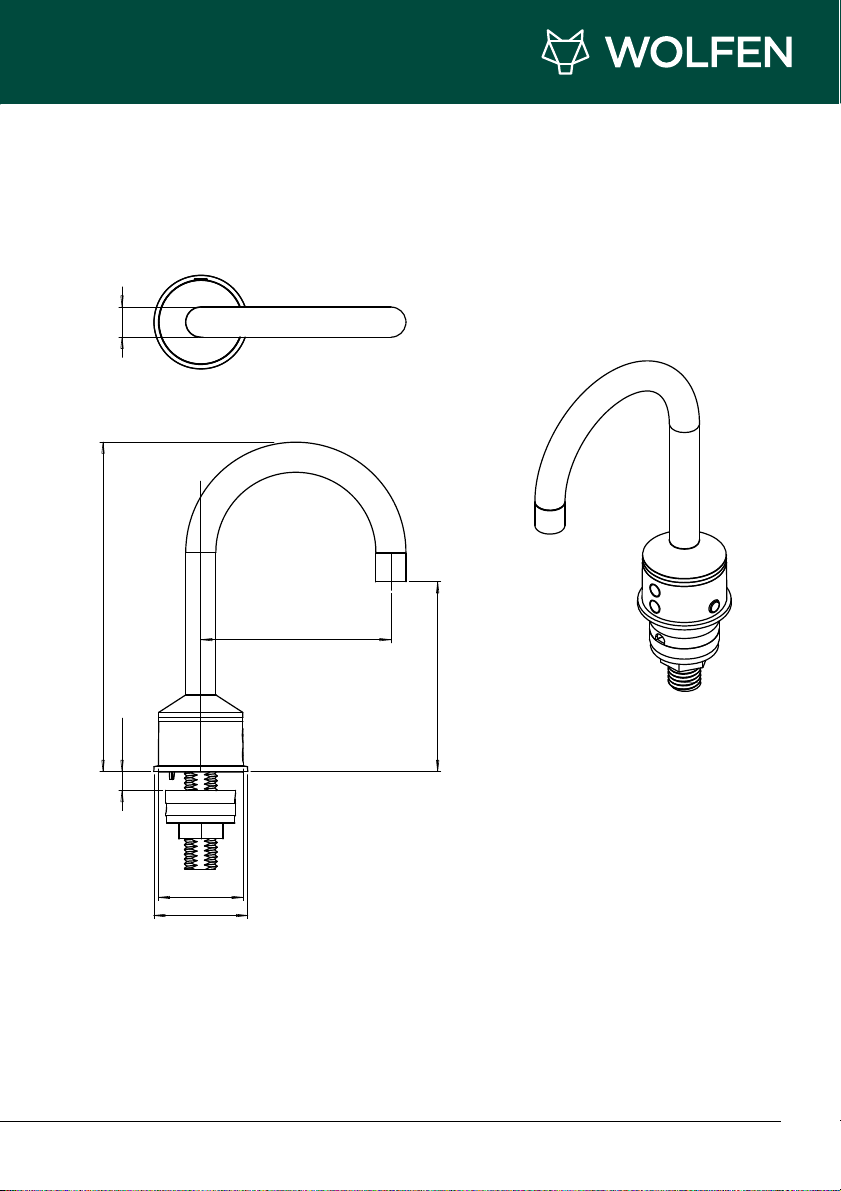
Height 200mm 200mm
Reach 115mm 115mm
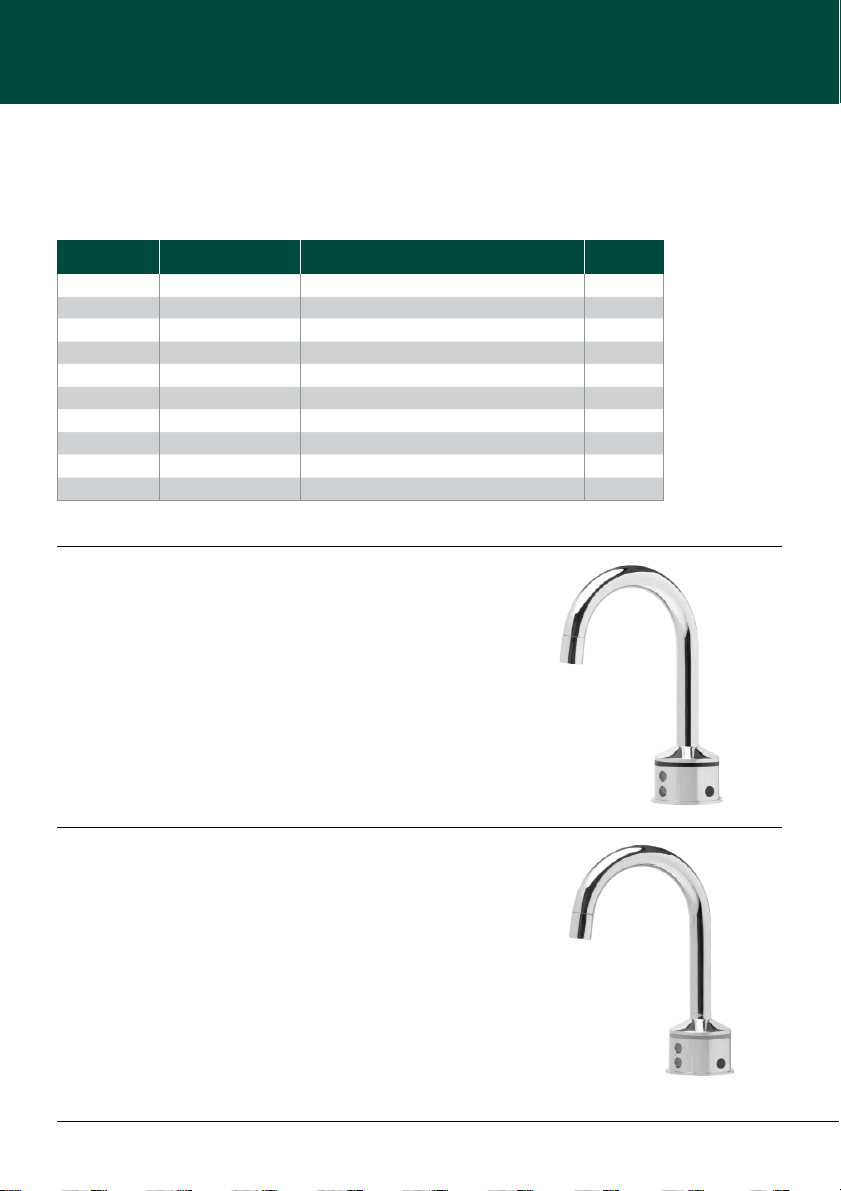
TECHNICAL INFORMATION
Wolfen Sensor Operated
Gooseneck Tap with LED
950617
Wolfen Sensor Operated
Gooseneck Tap
9505568
TM
5
ø59
ø53
XAM52
511
115
002
91
6WOLFEN INSTALLATION MANUAL | Wolfen Sensor Operated Gooseneck Tap
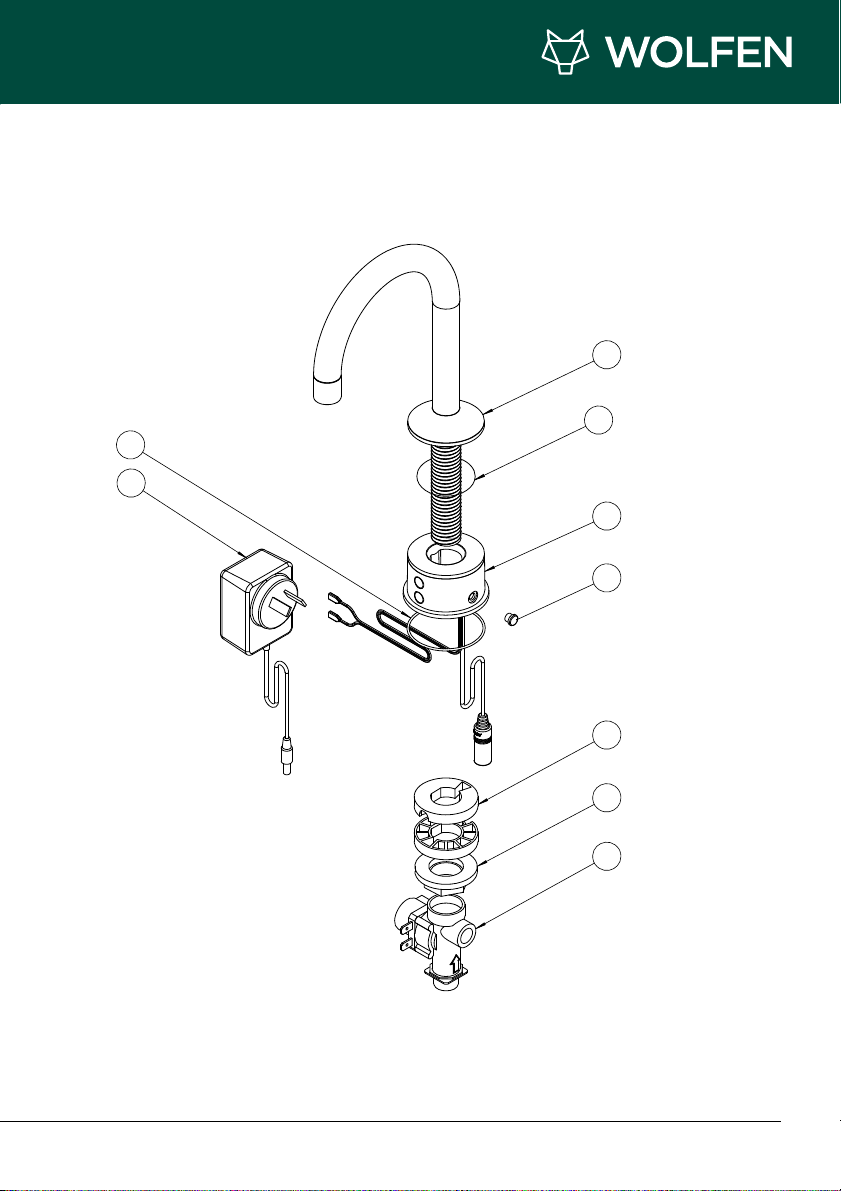
UNIT COMPONENTS
Wolfen Sensor Operated Gooseneck Tap
Item No. Part Number Description Qty
1 300-0113 Sensor Eyebody 1
1300-0015 LED Light Sensor Eyebody 1
2 600-0180 Gooseneck Spout 1/2 Inch BSP Tail 1
3 600-0112 Sensor Range Adjustment Cap 1
4 300-0105 Cable Spacer Black 2
5 600-0102 Plastic Nut 1/2" BSP 1
6 600-0183 Plastic Solenoid 24V AC 1
7 600-0124A Powerpack 24V AC 1
8 600-0107 Adhesive Pad 1
9 600-0116 Square Rubber Ring 1
WOLFEN INSTALLATION MANUAL | Unit Components
Wolfen Sensor Operated Gooseneck Tap
9505568
Wolfen Sensor Operated Gooseneck Tap with LED
950617
TM
7
1
2
3
7
9
8
6
5
4
8WOLFEN INSTALLATION MANUAL | Wolfen Sensor Operated Gooseneck Tap
INSTALLATION INSTRUCTIONS
Wolfen Sensor Operated Gooseneck
Installation Instructions:
1. Please flush out new pipe work prior
to connecting the unit.
2. The product should be installed with isolating
stop cocks (Arco brand recommended).
3. This tap is suitable for high pressure
applications where cold water supply pressures
are at 150kPa or above.
4. It is recommended that the tap be installed
with an approved tempering valve before
the solenoid.
5. For installations where water pressure exceeds
880kPa, an approved pressure reducing valve
must be fitted.
6. Drill a 32mm diameter hole on the sink/basin.
Clean sharp edges on any stainless
steel surface.
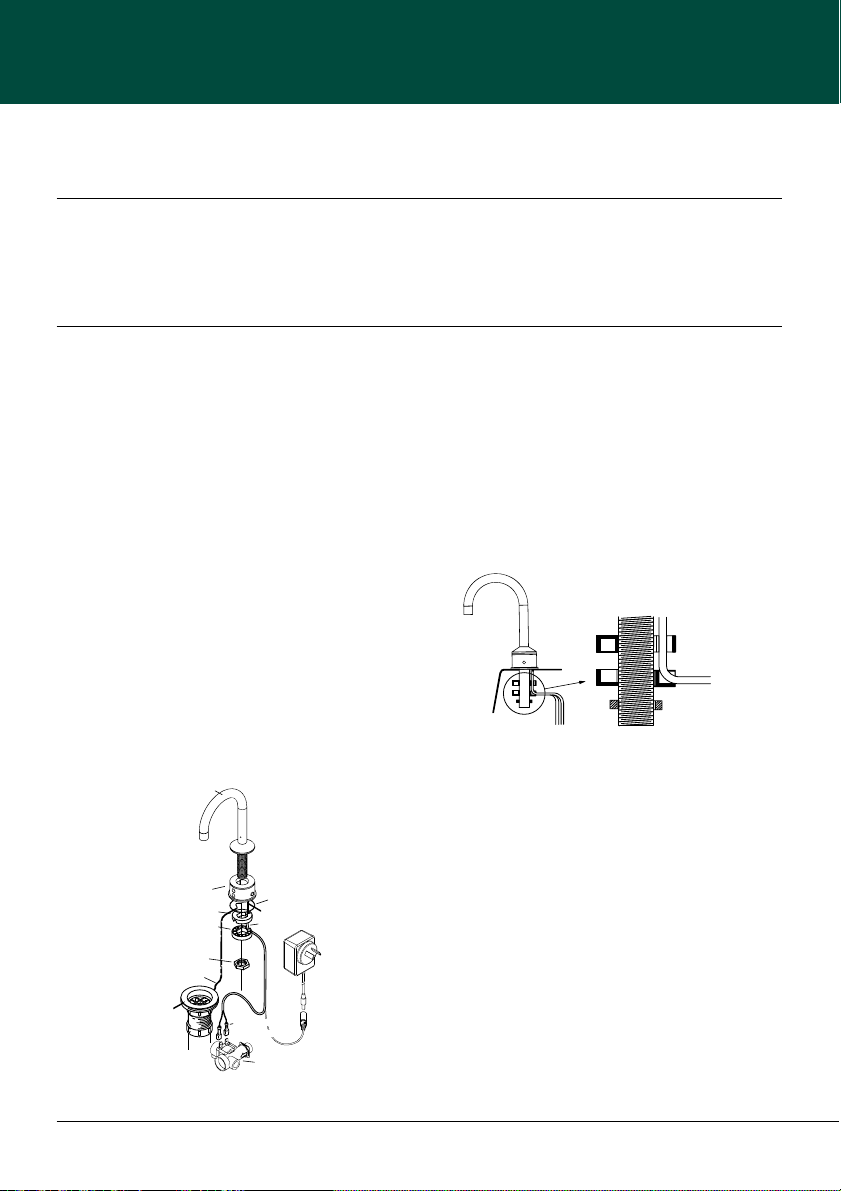
7. Feed the cable through the two spacers as
shown on the diagram. One spacer faces down
and the second faces upwards. Together they
protect and lead the cable out safely, under
the fixing nut.
8. Ensure that the solenoid is installed the correct
way, with the arrow on the solenoid indicating
the water flow direction.
9. Hot water should be adjusted to no more
than 42ºC.
10. Only after all plumbing and electrical
connections are completed should the
unit be powered-up.
11. Observe three bursts of water through
the spout, indicating the unit is ready
for use before assuming normal operation.
Important Note
The product must be installed to the requirements of AS/NZS 3500 by a qualified plumber. The product
comes to you already factory assembled and tested. We do not recommend the dismantling of any internal
part of the product. The product is factory tested and sealed so as to give the best performance.
WOLFEN INSTALLATION MANUAL | Installation Instructions
Gooseneck Outlet
Sensor
O-ring
Cable
Plug Pack
Upper Cable Spacer
Lower Cable Spacer
Outlet Fixing Nut
Basin Cut Away
Solenoid
Solenoid
Connection
Cable
Upper Cable Spacer
Lower Cable Spacer
Basin Nut
Outlet
TM
9
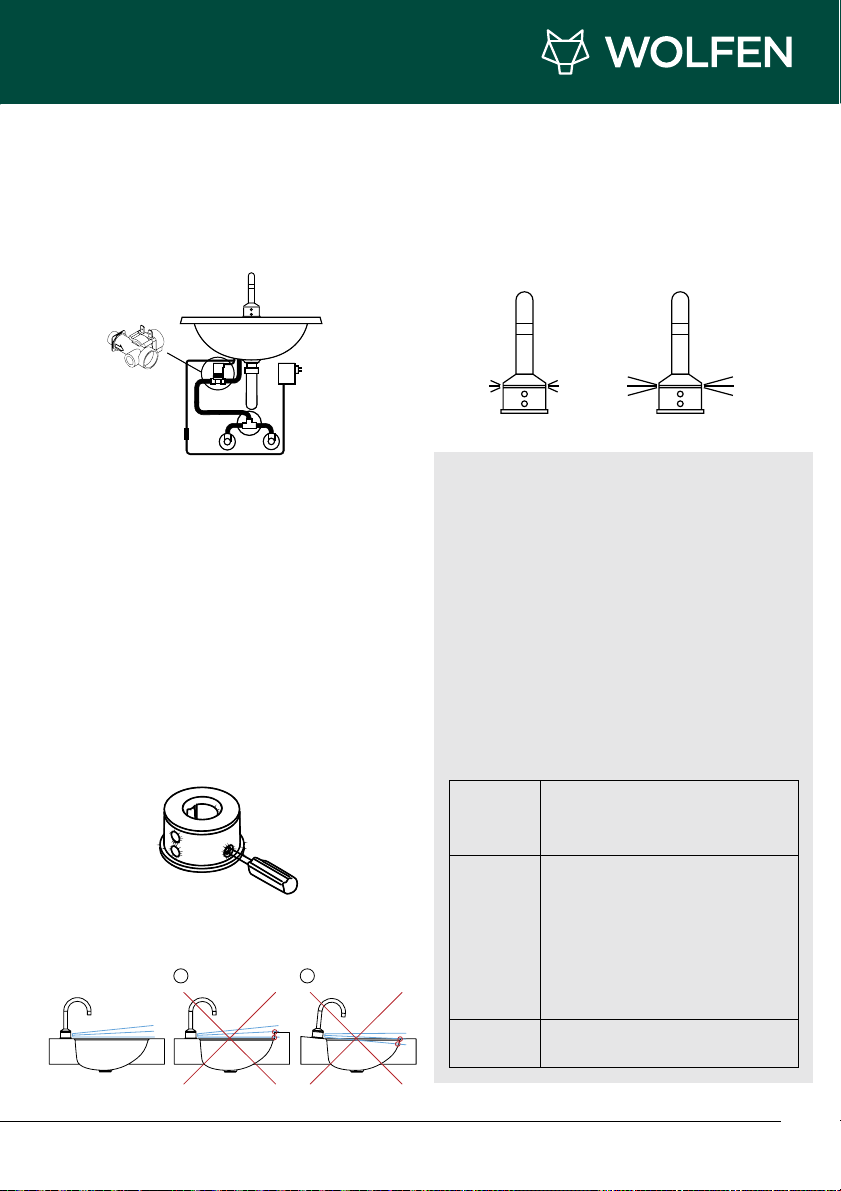
LIGHT RING INDICATOR (for LED model only,
Reece code 9506217):
IMPORTANT INFORMATION:
• The warranty is void if cables on unit or
power pack are cut.
• The power pack must be mounted in an area
away from likely water contact or physical
damage to case. Solenoid connectors must
not be allowed to short, as this will cause
damage to the eye-body. The supply cord
cannot be replaced, if the cord is damaged,
the equipment should be discarded.
• Ensure all connections are securely made
before turning on power.
If unit fails to work:
WATER IN
WATER OUT
If water fails
to flow
Turn power OFF and back ON after
a few seconds.
Check power point for failure.
If water flows
continuously
after
installation
Check that no foreign matter has become
lodged in the solenoid.
Ensure that the flow direction of the solenoid
has been installed the right way round.
(Check IN/OUT on solenoid body).
Check the installation of eye-body. Unit may
be picking up off other side of the basin.
If problem still persists, the solenoid may be
faulty. In this case, a replacement is required.
Infrared
range is not
great enough
See installation instruction for
detection range.
Plumbing Installation Instructions:
Infrared Detection Range:
The infrared detector has been factory set
to suit the supplied outlet and should not
need adjustment. If it is necessary to adjust,
proceed as follows.
1. Remove the cap from the side
of the eye-body.
2. Using a small screwdriver, turn screw
in a clockwise direction to increase range,
and anti-clockwise to decrease the range.
3. Replace cap.
Correct sensor installation when mounted level
on basin/sink.
S
OFT GLOW = STANDBY
B
RIGHT GLOW = OBJECT DETECTE
D
SENSOR LINE
RAI
S
ED FR
O
NT
O
N BA
S
I
N
A
SENSOR LINE
SENSOR LINE
FORWARD SLOPING
REAR OF BASIN
B

10 WOLFEN INSTALLATION MANUAL | Wolfen Sensor Operated Gooseneck Tap
REECE PRODUCT
QUALITY GUARANTEE
You have purchased a quality product from Reece
Australia Pty Ltd ABN 84 004 097 090 (“Reece”).
This product is covered by a 5 year replacement
product warranty and a 12 month warranty over
spare parts and labour.
5 YEAR WARRANTY
This warranty covers faults in the product
construction, material and assembly. Products
which are within 5 years from the date of purchase,
found upon inspection by an authorised Reece
representative, to be defective in construction,
material or assembly, will be repaired or exchanged
with an equivalent product free of charge.
Replaced items become Reece’s property.
All replacement products will be available for
collection without charge to the customer at the
nearest Reece branch to the customer’s location,
or elsewhere as agreed between the customer
and Reece.
Labour and Spare Parts
The labour for the replacement of products
and spare parts to which this warranty applies
will be supplied by Reece or relevant supplier
using licensed plumbers engaged by Reece or
relevant supplier within 1 year from the date of
purchase. Spare parts other than those listed in
the Manufacturer’s Provisions above, which are
within 1 year from the date of purchase found upon
inspection by an authorised Reece representative
to be defective in construction, material or
assembly, will be replaced free of charge.
Warranty Conditions
This warranty will apply only under all of the
following conditions:
• The item has been installed by
a licensed plumber
• Failure is due to a fault in the manufacture
of the product
• Proof of purchase (including the date
of purchase) is provided
• The installation of the product is in
accordance with the instructions provided
This warranty does not cover products purchased
as an ex-display without being fully checked and
tested for sale by the manufacturer.
This warranty does not include faults caused by:
• Unsuitable or improper use
• Incorrect installation or installation not in
accordance with the instructions provided
• Installation or part installation by the
purchaser or any person other than a
LICENSED PLUMBER
• Normal wear and tear
• Inadequate or complete lack
of maintenance
• Chemical, electrochemical or
electrical influences
• Harsh detergents or abrasive cleaners
used on product finishes
EXCLUSIONS
To the fullest extent permitted by law, Reece
excludes all liability for damage or injury to any
person, damage to any property, and any indirect
consequential or other loss or damage.
CLAIM PROCEDURE
For all warranty queries customers are to contact the
branch where the product was purchased. These
details can be found on your purchase invoice.
Our goods come with guarantees that cannot
be excluded under the Australian Consumer Law.
You are entitled to a replacement or refund for
a major failure and for compensation for any other
reasonably foreseeable loss or damage. You are
also entitled to have the goods repaired or replaced
if the goods fail to be of acceptable quality and the
failure does not amount to a major failure.
Don’t risk it, use a licensed plumber.™
products purchas
ed
5
YEAR
Q
U
A
L
I
T
Y
G
U
A
R
A
N
T
E
E
WOLFEN INSTALLATION MANUAL | Warranty
Questo manuale è adatto per i seguenti modelli
1
Indice
Altri manuali Wolfen Prodotto idraulico


