Acer AL2671W Manuale utente

Acer LCD TV
AL2671W
User’s Guide
01-lcd-tv_en_uk.indd 1 2005/5/4 ¤W¤È 08:58:44

Acer and the Acer logo are registered trademarks of Acer Incorporated. SRS WOW technology is incorporated under license from SRS Labs,
Inc. Other company’s product names or trademarks are used herein for identification purposes only and belong to their respective companies.
Copyright © 2005. Acer Incorporated.
All Rights Reserved.
Acer LCD TV AL2671W User’s Guide
Original Issue: May 2005
01-lcd-tv_en_uk.indd 2 2005/5/4 ¤W¤È 11:37:13

Contents
Important safety instructions 5
Taking care of your remote control 6
Cleaning and servicing 6
First things first 7
Basic features and benefits 7
Packing Checklist 7
Your LCD TV overview 8
Front panel view 8
Rear panel view 9
Bottom view 9
Remote control 10
Basic connection 12
Connecting the power cord 12
Connecting an antenna 12
Connecting VCR/DVD/AV equipment with a SCART-SCART cable 13
Connecting VCR/DVD/AV equipment with a SCART-component/
AV cable 13
Connecting a camera, camcorder or video game 14
Connecting a headphone 14
Getting started watching your TV 15
Power On 15
Setup Wizard 15
Changing channels 15
Adjusting the volume 15
OSD Navigation 16
Navigating the OSD with Remote Control 16
Teletext 17
Advanced Features 18
PIP/PBP/POP 18
Parental Control 18
Empowering Key: Scenario Mode and Favorite Channels 19
Troubleshooting 21
Product specifications 22
01-lcd-tv_en_uk.indd 3 2005/5/4 ¤W¤È 08:58:44

01-lcd-tv_en_uk.indd 4 2005/5/4 ¤W¤È 08:58:46
English
5
Important safety instructions
Read these instructions carefully. Save them for
future reference.
1 Follow all warnings and instructions marked on
the product.
2 Unplug this product from the wall outlet
before cleaning. Do not use liquid cleaners or
aerosol cleaners. Use a damp cloth for cleaning.
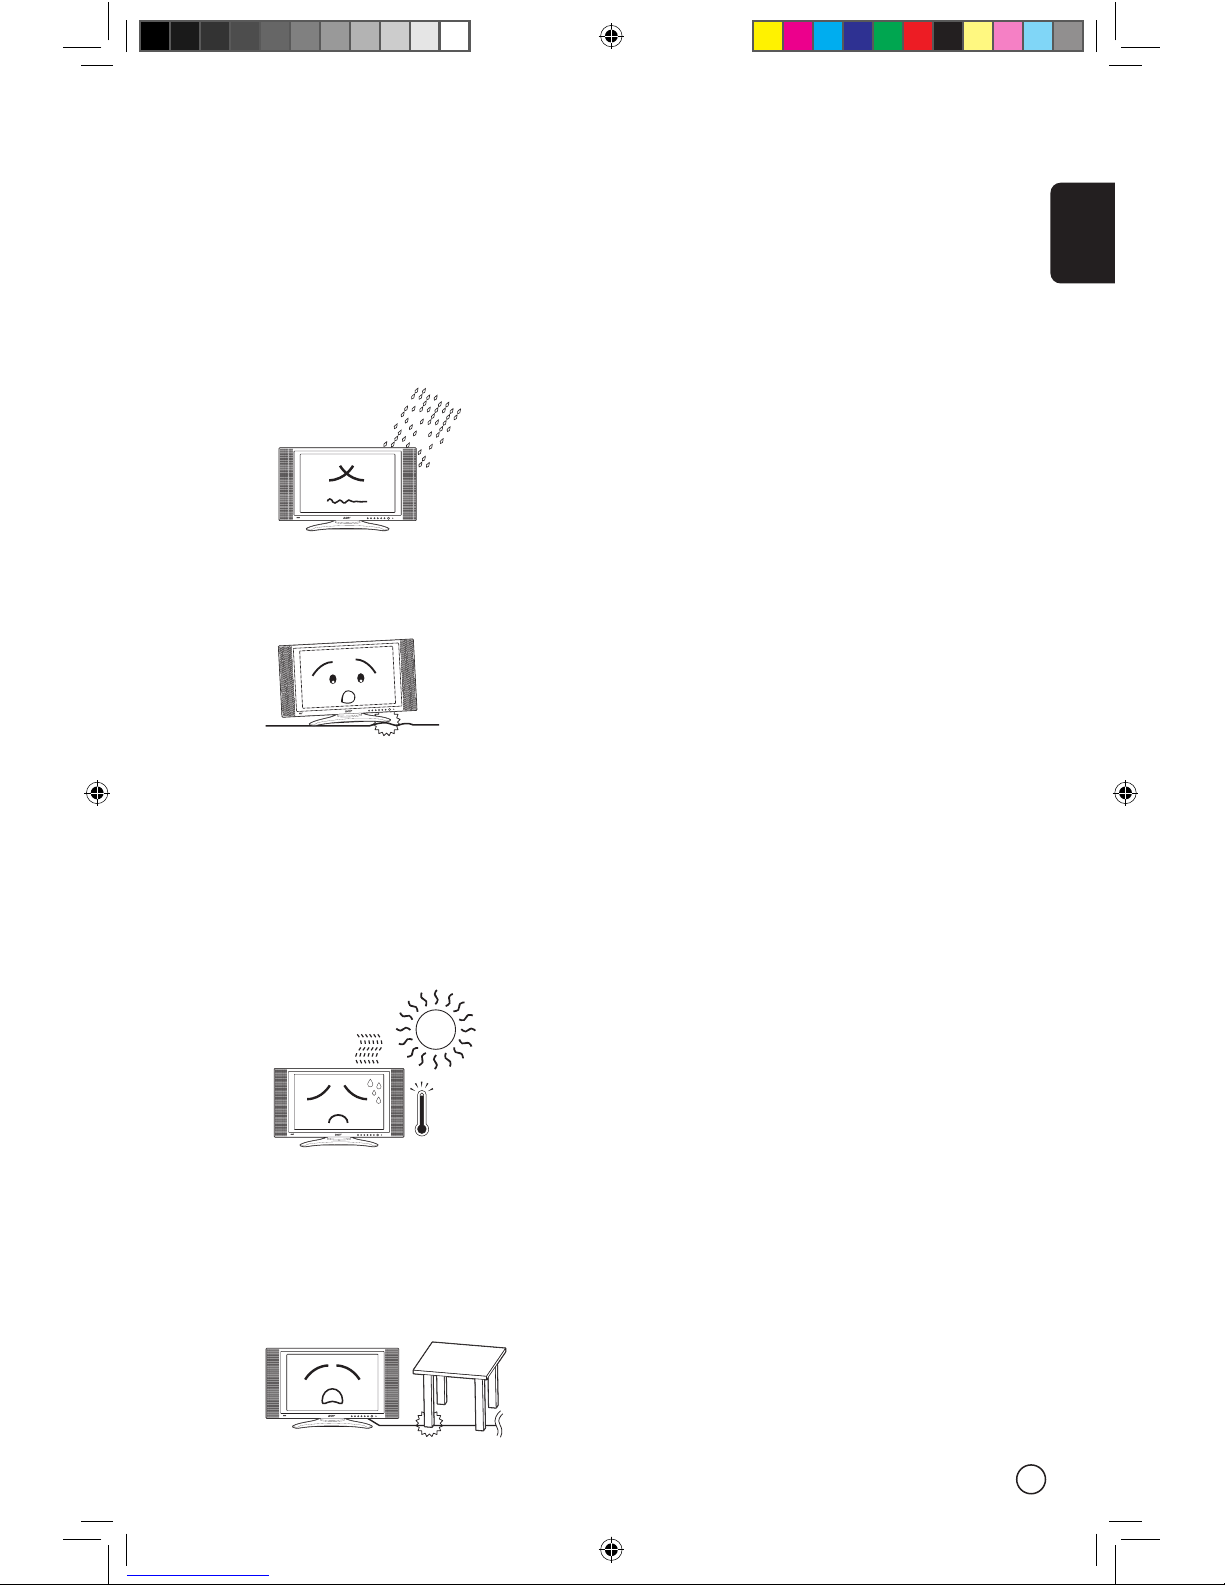
3 Do not use this product near water.
4 Do not place this product on an unstable cart,
stand, or table. The product may fall, causing
serious damage to the product.
5 Slots and openings are provided for ventilation;
to ensure reliable operation of the product and
to protect it from overheating. These openings
must not be blocked or covered. The openings
should never be blocked by placing the product
on a bed, sofa, rug, or other similar surface.
This product should never be placed near or
over a radiator or heat register, or in a built-
in installation unless proper ventilation is
provided.
6 This product should be operated from the type
of power indicated on the marking label. If you
are not sure of the type of power available,
consult your dealer or local power company.
7 Do not allow anything to rest on the power
cord. Do not locate this product where persons
will step on the cord.
8 If an extension cord is used with this product,
make sure that the total ampere rating of the
equipment plugged into the extension cord
does not exceed the extension cord ampere
rating. Also, make sure that the total rating of
all products plugged into the wall outlet does
not exceed the fuse rating.
9 Never push objects of any kind into this
product through cabinet slots as they may
touch dangerous voltage points or short out
parts that could result in a fire or electric shock.
Never spill liquid of any kind on the product.
10 Do not attempt to service this product yourself,
as opening or removing covers may expose you
to dangerous voltage points or other risks. Refer
all servicing to qualified service personnel.
11 Unplug this product from the wall outlet and
refer servicing to qualified service personnel
under the following conditions:
a. When the power cord or plug is damaged or
frayed.
b. If liquid has been spilled into the product.
c. If the product has been exposed to rain or
water.
d. If the product does not operate normally
when the operating instructions are fol-
lowed. Adjust only those controls that are
covered by the operating instructions since
improper adjustment of other controls may
result in damage and will often require
extensive work by a qualified technician to
restore the product to normal condition.
e. If the product has been dropped or the case
has been damaged.
f. If the product exhibits a distinct change in
performance, indicating a need for service.
12 Use only the proper type of power supply
cord set (provided in your accessories box)
for this unit. Always disconnect the power
cord from the wall outlet before servicing or
disassembling this equipment.
INPUT - VOLUME + - CHANNEL + MENU POWER
INPUT- VOLUME +- CHANNEL +MENUPOWER
INPUT - VOLUME + - CHANNEL + MENU POWER
INPUT - VOLUME + - CHANNEL + MENU POWER
01-lcd-tv_en_uk.indd 5 2005/5/4 ¤W¤È 08:58:48

English
6
Taking care of your remote control
Here are some ways to handle your remote control:
• Dropping, wetting or placing the remote control in the sunlight may cause damage. Handle the
remote control with care.
• Do not tamper with batteries. Keep them away from children.
• When you anticipate that the remote control will not be used for an extended period, remove the
batteries to prevent possible damage to the remote control in a result of battery leakage.
• Dispose of used batteries according to local regulations.
Recycle if at all possible.
Cleaning and servicing
When cleaning your LCD TV, follow these steps:
1 Power off the TV.
2 Disconnect the power cord.
3 Use a soft cloth moistened with water. Do not use liquid or aerosol cleaners.
01-lcd-tv_en_uk.indd 6 2005/5/4 ¤W¤È 08:58:52
English
7
First things first
We would like to thank you for making the Acer AL2671W your choice. Your new Acer TV will provide
you with years of entertainment, versatility, and satisfaction.
This User’s guide introduces you to the various features your LCD TV can offer, and provides clear and
concise information about the product, so please read it thoroughly and retain it for future reference.
Basic features and benefits
• Wide Display with 1280x768 Resolution - HDTV Ready Display
• Simultaneous Pre-Viewing of Programs with 4 different Picture-In-Picture Modes
• Excellent Sound Enhancement with SRS WOW Technology
• Elegant Remote Control
• Brilliant Color with Gamma Correction
• Minimized Motion Artefacts thru Noise Reduction
• Sharp and Accurate Image with De-interlacing and Comb Filter
• Best DVD Video Quality with 3:2/2:2 Pull Down Recovery
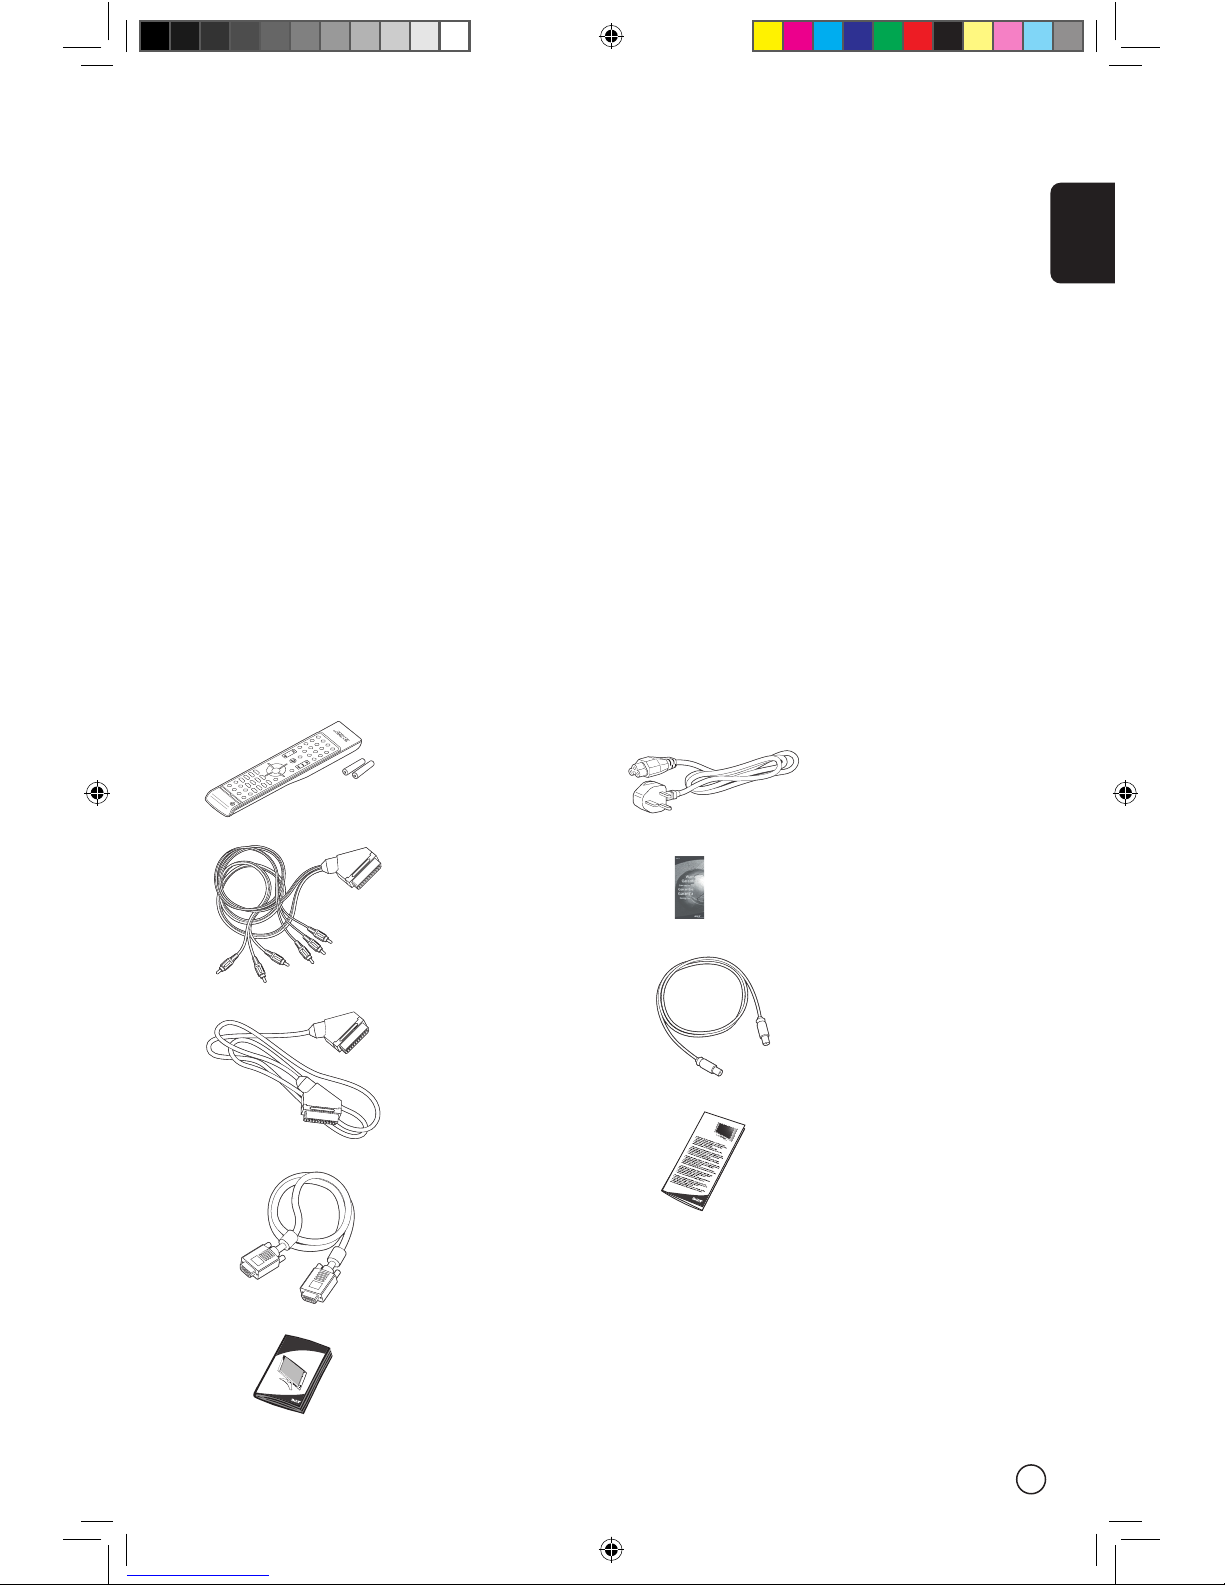
Packing Checklist
Your LCD TV package should contain the following accessories, in addition to the accessory box. Please
ensure that they are all present.
Remote Control (X1)
AAA Batteries (X2)
Acer LCD TV
AL2671WL
SCART-Component/
AV Cable (X1)
(Component for SCART 2 only)
SCART-SCART Cable (X1)
(for SCART 1 & 2)
User Manual
TV cable (X1)
Power cord-UK (X1)
D-Sub cable (X1)
Warranty Card
Quick Guide
01-lcd-tv_en_uk.indd 7 2005/5/4 ¤W¤È 08:58:54

English
8
Your LCD TV overview
Front panel view
# Item Description
1 LCD Screen
2 Input Select source.
When OSD is on: Press this button to confirm selection
3 Vol Down Volume Down.
When OSD is on: Also functions the same as Left directional arrow
4 Vol Up Volume Up.
When OSD is on: Also functions the same as Right directional arrow
5 Channel Down Channel Down.
When OSD is on: Also functions the same as Down directional arrow
6 Channel Up Channel Up.
When OSD is on: Also functions the same as Up directional arrow
7 Menu Turn OSD menu ON/OFF
8 Power Power ON/OFF
9 Remote Control Window Infrared Sensor (Do not block)
INPUT - VOLUME + - CHANNEL + MENU POWER
1 2 3 4 5 6 7 8 9
01-lcd-tv_en_uk.indd 8 2005/5/4 ¤W¤È 08:58:58

English
9
Rear panel view
# Item Description
1 RF Connector Connects to the antenna or cable service
(TV Tuner) Input
2 AV1/SCART 1 In Supports external VCR, DVD player with the SCART cable
(for RGB, S-Video, CVBS, Audio left/right input)
AV1/SCART 1 Out In TV mode, connect your VCR In or PVR In with the SCART cable to
record TV programs
3 AV2/SCART 2 In Supports external VCR, DVD player with the SCART cable
(for RGB, S-Video, CVBS, YPbPr/YCbCr, Audio left/right input)
Component (YPbPr/YCbCr) for SCART 2 only
AV2/SCART 2 Out In TV mode, connect your VCR In or PVR In with the SCART cable to
record TV programs
1
2
3
1a 1b 2a 3a 3b 3c 42b 2c 2d
Bottom view
# Item Description
1a AC Switch Turns AC In power ON/OFF
1b AC In Connects to a power source
2a DVI-D In Connects to PC DVI Out
2b D-Sub In Connects to PC VGA Out
2c Audio In In PC mode, connect to audio output of your PC or other devices with
DVI or VGA connector
2d Audio Out Connects to another speaker
3a/b AV3/Audio In (R/L) Connect to the audio output(R/L) of your camera, camcorder or video
game
AV3/Audio Out (R/L) In TV mode, connect the audio(R/L) input of your VCR or PVR to record
TV programs (Please set AV3 to "Out" in OSD)
3c AV3/Video In Connect the composite output of your camera, camcorder or video
game
AV3/Video Out In TV mode, connect the composite input of your VCR or PVR to record
TV programs (Please set AV3 to "Out" in OSD)
4 Headphone Connect headphone
01-lcd-tv_en_uk.indd 9 2005/5/4 ¤W¤È 08:59:00

English
10
Remote control
DISPLAY MUTE
TV
RECALL
MENU
MPX
SWAP ACTIVE POSITION
SIZE/
MODE
INDEX SUBTITLE TELETEXT REVEAL
SIZE MIX SUBPAGE HOLD
VOL
PIP/PBP/POP
CH
OK
ENTER
AV SCART PC
SLEEP WIDE
ZOOM SRS
1 2 3
4 5 6
7 8
0
9
1 2
3
4
5
6
7 8
9
RE
C
AL
L
0
ENTER
S
IZE
MIX
SU
BPA
G
E H
O
L
D
O
K
Power
Directional pad
Volume
PIP/PBP/POP keys
Sources
Number keys
Channel
Teletext keys
01-lcd-tv_en_uk.indd 10 2005/5/6 ¤W¤È 09:27:10
Altri manuali per AL2671W
4
Indice
Altri manuali Acer TV LCD

Acer
Acer M190HQD Manuale utente

Acer
Acer AT1927ML Manuale utente

Acer
Acer AT2701W Manuale utente

Acer
Acer AT2635B Manuale utente

Acer
Acer AT1935 Manuale utente

Acer
Acer AT4250-DTV Manuale utente

Acer
Acer AT3705 Manuale utente

Acer
Acer AT3201W Manuale utente

Acer
Acer AT3705-DTV Manuale utente

Acer
Acer AT3705-MGW Manuale utente

Acer
Acer AT3705-DTV Manuale utente

Acer
Acer AT3201W Manuale utente

Acer
Acer AT2645 Manuale utente

Acer
Acer AT2326ML Manuale utente

Acer
Acer AT3705-DTV Manuale utente

Acer
Acer AT2617MF Manuale utente

Acer
Acer AT2245 Manuale utente

Acer
Acer AT3245 Manuale utente

Acer
Acer AT3720A Manuale utente

Acer
Acer AT2635B Manuale utente


