ACTi A1D-220-V3.14.19-AC Manuale utente

1
Encoder Firmware
A1D-220-V3.09.14-AC
User’s Manual
Encoder Firmware
A1D-220-V3.14.19-AC
User’s Manual

2
Table of Contents
1. INSTALLATION _________________________________________________3
1.1 Minimum System Requirements _____________________________________ 3
1.2 Preparation before setup ___________________________________________ 4
1.2.1 Setup your PC network __________________________________________________4
1.3 Configuring the IP device___________________________________________ 9
1.3.1 Video Display _______________________________________________________11
1.3.2 PTZ (PTZ Camera only) ________________________________________________15
1.3.3 Host Setting __________________________________________________________20
1.3.4 WAN Setting _________________________________________________________22
1.3.5 Date Setting __________________________________________________________25
1.3.6 Video Setting_________________________________________________________27
1.3.7 Video Adjustment _____________________________________________________30
1.3.8 OSD / Privacy Mask ___________________________________________________33
1.3.9 Camera Setup (HQ1 CCD camera models) __________________________________35
1.3.10 Camera Setup (CMOS camera models) __________________________________38
1.3.11 Camera Setup (PTZ camera models) ____________________________________40
1.3.12 UPnP_____________________________________________________________41
1.3.13 Bonjour___________________________________________________________42
1.3.14 IEEE 802.1x _______________________________________________________42
1.3.15 IP Address Filtering _________________________________________________43
1.3.16 Event_____________________________________________________________45
1.3.17 User Account ______________________________________________________62
1.3.18 System Info________________________________________________________63
1.3.19 Firmware Upgrade __________________________________________________65
1.3.20 Profile ____________________________________________________________67
1.3.21 Factory Default _____________________________________________________68
1.3.22 Save Reboot _______________________________________________________68
1.3.23 Logout____________________________________________________________69

3
1. INSTALLATION
1.1 Minimum System Requirements
The IP device provides access through an embedded web server. To access the device,
your PC needs to meet minimum requirements to perform satisfactorily.
CPU
Pentinum 4 2.4GHz and above
Memory
256 MB or above
Operating System
Windows XP with SP2 or above. Windows Vista / Windows 2003 /
Windows 7
Internet Explorer 6.0 SP2 / Internet Explorer 7.0 / Internet Explorer 8.0
Video Resolution
SVGA or XGA with 1024x768 resolution
1

4
1.2 Preparation before setup
Our IP device provides access through Internet Explorer. You need to
set up the network settings and the IP address for the IP device. Please make
sure all connections are properly connected, then follow the procedures
below.
1. Setup your PC network
The IP address for your PC must be within the same subnet as the IP
device. You need to match the TCP/IP settings between PC and IP device
before you can access it via IE.
2. Setup IP device’s IP address
This IP device’s IP address can be assigned manually or acquired
automatically by network service (DHCP). If it acquires the IP address by
using the DHCP service, please use the IP utility software bundled in the
product CD to find the IP address for all IP devices.
1.2.1 Setup your PC network
To set up the network of IP device via a PC, you have to change the
TCP/IP settings of the PC.
The following are the default network settings of IP device.
IP Address: 192.168.0.100
Subnet Mask: 255.255.255.0
To access the IP device, the IP address of the PC should match the
address below.
IP Address: 192.168.0.xxx
Subnet Mask: 255.255.255.0
5
The procedures below is the setup procedure on Windows XP. If you
use operating system other than Windows XP, please refer to OS manuals for
proper setup procedures.
STEP1
Start up your PC.
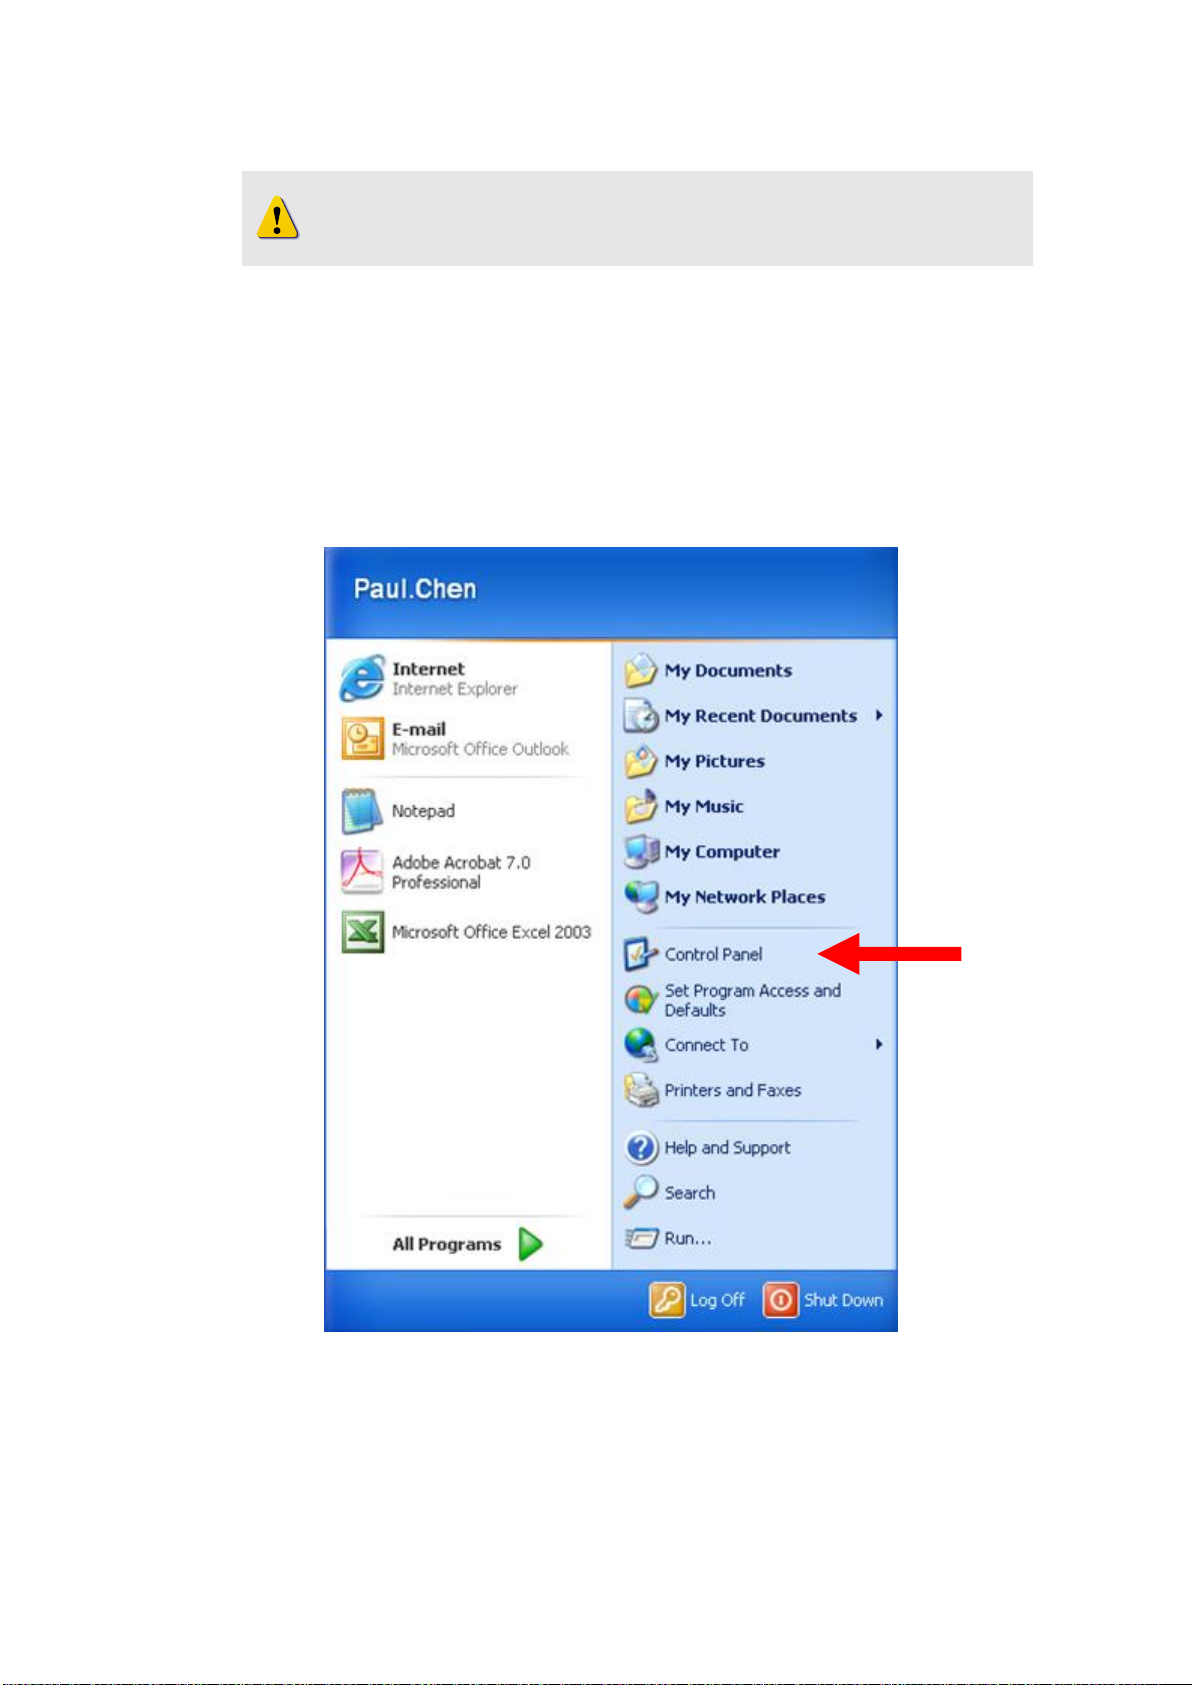
STEP2
Click the [Start] and select the "Control Panel"
NOTE: xxx should be a number from 1 to 254 except 100, which is
used by the IP device. Please also make sure that no two equipments
use the same IP address in the same network.

6
STEP3
Double-click the "Network and Internet connections" icon.
STEP4
Double-click the "Network connections" icon

7
STEP5
Click “Local Area Connections”, and then click “Change settings of
this connection” in the network Task menu.
STEP6
Click “Internet Protocol (TCP/IP)”, and then click the [Properties]
button. If you have both IPv4 and IPv6, choose IPv4.

8
STEP7
Click the “Use the following IP address” radio button and enter the IP
address and the subnet mask.
STEP8
Click the [OK] button and the window dialog box closes.
Please set the settings as below.
IP address: 192.168. 0.xxx
Subnet mask: 255.255.255. 0
(NOTE: xxx should be a number
from 1 to 254 except 100, which
is used by the IP device. Please
also make sure that no two
equipments use the same IP
address in the same network..)

9
1.3 Configuring the IP device
This section describes how to configure the IP device. The
administrator has unlimited access to all settings, while the normal user can
only view live video. The IP device is configured under a standard browser
(Microsoft IE6 / IE7 / IE8).
Follow the procedures below to configure the IP device.
STEP1: Open a browser
STEP2: Enter the IP address of the IP device.
The default IP address is “192.168.0.100”
You need to allow the Active X install in IE to properly access this
device. If you encounter any issues, please modify your security setting and
allow ActiveX from this device.
Please see this knowledge base article for details link.
The “Login Page”is now displayed as below.
STEP3: Enter account name (factory default: Admin) and password
(factory default: 123456).
STEP4: Select the language of the IP device user interface. You can
NOTE: Internet Explorer 6.0 / 7.0 / 8.0 is highly recommended. You
may download it from
http://www.microsoft.com/windows/ie/downloads/default.mspx

10
select from English, Traditional Chinese, Simplified Chinese, Japanese,
Spanish, Italian, German, Portuguese, Czech, French, Finnish,
Hungarian and Danish. This user interface setting will disappear once
you log out, if you want to change the default user interface language,
please change the setting of [Host setting] after login.
STEP5: Click the button to login or click the button
to re-enter account and password.
Once you log in successfuly, the “Video Display page”will be shown
as below.
Indice
Altri manuali ACTi Software


Manuali Software popolari di altre marche


PS Audio
PS Audio PowerPlay Manuale del proprietario

Brady
Brady LOCKOUT PRO 3.0 Manuale di servizio

Avaya
Avaya Interaction Center Manuale utente

Texas Instruments
Texas Instruments TI-83 Plus Silver Edition Manuale

Novell
Novell GROUPWISE 8 - INTERNET AGENT Manuale utente

Oracle
Oracle Application 9i Manuale utente

Acer
Acer RDM Manuale utente

Canon
Canon Vixia HF21 Manuale utente

Canon
Canon ZR950 Manuale utente

Samsung
Samsung Auto Backup Manuale utente

Polycom
Polycom Vortex EF2201 Istruzioni per l'installazione e il funzionamento

Brocade Communications Systems
Brocade Communications Systems Brocade 8/12c Manuale utente