ADA INSTRUMENTS TEMPRO 650 HYGRO Manuale utente
Infrared thermometer
OPERATING MANUAL
TEMPRO 650 HYGRO
adainstruments.com

2English
1 2
34
1
8
9
1
7
11
6
2
5
42
3
3
4
10
56
7
8
9
10
11
38mm@
300mm
75mm@
900mm
132mm@
1500mm
1.5"@
12"
3.0"@
36"
5.3"@
60"
D:S=12:1
䢧
MODE
C/ F
H

3
INTRODUCTION
Infrared pyrometer ADA TemPro 650 Hygro is used for measuring the tem-
perature of the object’s surface, which is applicable for various hot, hazardous
or hard-toreach objects without contact safely and quickly. This unit consist
of Optics, Temperature Sensor Signal amplier, Processing circuit and LCD
Display. The Optics collected the infrared energy emitted by object and focus
onto the Sensor. Then the sensor translates the energy into an electricity
signal. This signal will be turned out to be digital shown on the LCD after
the signal amplier and processing circuit.
SPECIFICATIONS
LCD ............................................................
Temperature measurement range ....
Temperature display accuracy ..........
Temperature measurement error ....
K-type thermocouple
measurement range ..............................
Repeatability ...........................................
Reponse time ..........................................
Emissivity .................................................
D:S ..............................................................
Response wavelength ...........................
Laser .........................................................
English
Colorful LCD
50°С~650°С (-58°F~1202°F)
0.1°С
-50°С~0°С(-58°F~32°F):±3°С(±5°F)
0°С~650°С(32°F~1202°F):±1.5% rdg
or±1.5°С(±2.7°F)Take the bigger
value
-40°С~500°С (-40°F ~ 932°F)
1% rdg or 1°С Take the bigger value
0.5s, 95% Response
0.10~1.00Adjustable(preset as 0.95)
12:1
5um~14 um
Ring light spot

4English
Flashlight .....................................
Ambient temperature
measurement range .................
Ambient temperature
measurement accuracy ...........
Relative humidity
measurement accuracy ...........
Dew point temperature
measurement .............................
Mildew alarm indicator ...........
Batteries ......................................
Low power indicator ................
Overload indicator ....................
Weight/dimensions ...................
SPECIFICATIONS OF K-TYPE THERMOCOUPLE
Measurement range ..................
Measurement error ...................
Thermal response time ............
WARNING
To avoid the potential situation may cause harm or damage to people, please
pay attention to the following items:
1. Do not point laser directly at eye or indirectly off reflective surfaces.
2. The unit cannot measure through transparent surfaces such as glass
UV light
-20°С~60°С (-4°F ~ 140°F)
±1°С(2°F)
±5% RH
-10°С~ 50°С(14°F~ 122°F):±1.5°С /3°F
v
1.5V AAA battery*2
Low power indicator for power below 2.4V
“Hi”/”Lo” displayed on LCD
202g(including batteries) /108*49*177 mm
0°С~250°С (300°С for short time)
±2.5°С or 0.75% rdg Take the bigger value
<10s

5English
or plastic. It will measure the surface temperature of these materials
instead.
3.
Steam, dust, smoke, or other particles can prevent accurate
measurement by obstructing by the units optics.
CAUTIONS
Infrared thermometer should be protected for the following:
1. EMF (electro-magnetic fields) from arc welders, induction heaters.
2.
Thermal shock (cause by large or abrupt ambient temperature changes
allow 30 minutes for unit to stabilize before use).
3. Do not leave the unit on or near objects of high temperature.
DISTANCE TO SPOT SIZE
1. When take measurement, pay attention to the Distance to Spot Size.
As the Distance (D) from the target surface increases, the spot size (S)
of the area measured by theunit becomes larger. The Distance to Spot
size of the unit is 12:1.(Figure 1)
2. Field of view: Make sure the target is larger than the unit’s spot size.
The smaller the target the closer measure distance. When accuracy is
critical, make sure the target is at least twice as large as the spot size.
EMISSIVITY
Emissivity: Most organic materials and painted or oxidized surfaces have
an emissivity of 0.95(preset in the unit). Inaccurate readings will result from
measuring shiny or polished metal surfaces.
To compensate for this, adjust the units emissivity reading or cover the surface
to be measured with masking tape or flat black paint. Measure the tape or
painted surface when the tape or painted reach the same temperature as
the material underneath.

6English
EMISSIVITY
Marterial Emissivity Marterial Emissivity
Aluminum ...............
Asbestos .................
Asphalt ...................
Basalt ......................
Brass .......................
Brick ........................
Carbon ....................
Ceramic ..................
Concrete..................
Copper ....................
Dirt ..........................
Frozen food ...........
Hot food .................
Glass (plate) ...........
Ice ............................
OPERATION
Operating the unit:
1. Open battery door and load two 1.5V AAA batteries.
2. Pull the trigger to turn on the unit.
3.
Aim at the target surface and pull the trigger, then temperature will be shown
on the LCD. This unit is equipped with a laser, which is only used for aiming.
Locating a Hot Spot:
To find a hot spot, aim the thermometer outside of interest, then scan
across with an up and down motion until you locate the hot spot. (Figure 2).
3. LCD DISPLAY
Infrared thermometer-50 C ~ 650 C (-58 F ~ 1202 F)
WT323C
0.30
0.95
0.95
0.70
0.50
0.90
0.85
0.95
0.95
0.95
0.94
0.90
0.93
0.85
0.98
0.70
0.50
0.98
0.94
0.93
0.95
0.95
0.95
0.90
0.98
0.90
0.80
0.94
0.93
0.94
Iron .......................
Lead ......................
Limestone ............
Oil .........................
Paint .....................
Paper ....................
Plastic ...................
Rubber .................
Sand .....................
Skin .......................
Snow ....................
Steel .....................
Textiles .................
Water ....................
Wood ....................

7English
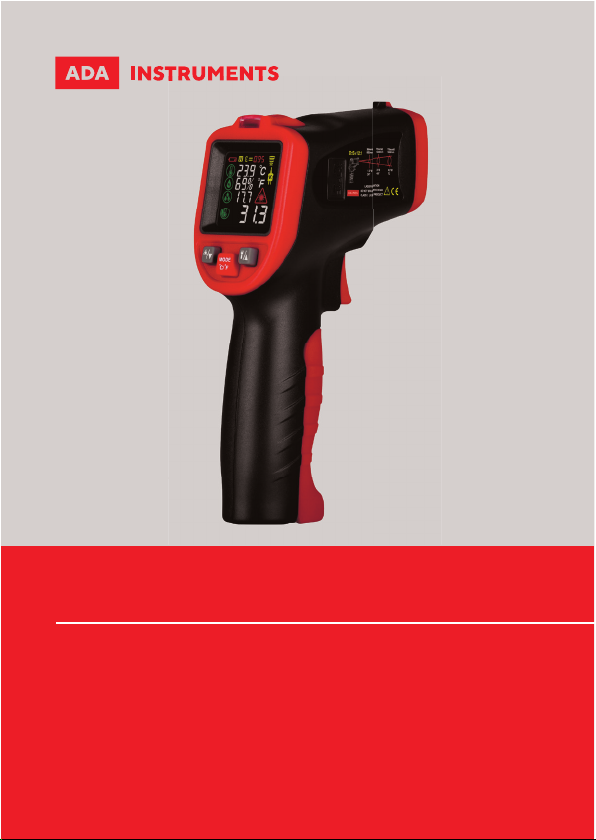
1. Turning on state indicator of laser positioning
2. Temperature measurement units
3. K-type thermocouple
4. Data reading indicator
5. Emissivity
6. Data holding indicator
7. Low power indicator
8. Ambient temperature value
9. Ambient humidity value
10. Dew point temperature value
11. Surface temperature value (infrared temperature measurement)
4. NAMES AND FUNCTIONS OF PARTS
1. Measurement switch (trigger).
Pull trigger to display temperature value, and “SCAN” appears on screen at
the same time; when trigger is released, temperature reading is displayed,
and data is automatically maintained. The instrument automatically shut
down after about 30 seconds of operation.
2. Laser switch/Down button.
3. MODE (mode switch button) / temperature unit switch button
Press MODE button to cycle through four modes, MODE 1—MODE 2—MODE
3—MODE 4.
• Mode 1: Mildew alarm mode. Under this mode, the current ambient
temperature, humidity, dew point temperature and surface temperature
are displayed. Pull trigger to measure surface temperature.
•
Note: The instrument decides whether the measured object is easy
to mildew according to the surface temperature of the measured
object and the dew point temperature of the current environment.
Indicator light turns green for normal state. If the measured object
tend to mildew, the indicator light turns yellow; if already mildew,
the indicator light turns red.
• Mode 2: Temperature difference alarm mode. Unde this mode, pull
trigger to display the current ambient temperature and the surface
temperature of the measured object. When the surface temperature of
the measured object is close to ambient temperature, the indicator light
turns green; if much higher than or lower than ambient temperature,
the indicator light turns red. Otherwise, the indicator light turns yellow.

8English
•
Mode 3: K-type thermocouple temperature measurement mode.Under
this mode, the temperature of the K-type thermocouple is measured
and thermocouple icon is displayed. Before the measurement, insert
K-type thermocouple probe into thermocouple socket. Pull and hold
trigger, thermometer displays both surface emperature and K-type
thermocouple temperature.
•
Mode 4: Emissivity setting mode. Under this mode, press up/down
button to to set missivity within range of 0.10~1.00 by decreasing or
ncreasing value.
• Temperature units switch: Pul and hold trigger, then press this button
to switch units.
4. UV light button / Up button. Press this button to turn on/off UV light,
which can be used for fluorescent leakage detection.
5. Alarm light indicator
6. UV light
7. K-type thermocouple socket
8. Infrared temperature sensing area
9. Laser (assisted positioning)
10. Temperature/humidity sensing area
11. Battery door
MAINTENANCE
1.
Lens Cleaning: Blow off loose particles using clean compressed air.
Gently brush remaining debris away with a moist cotton swab. The
swab may be moistened with water.
2.
Case cleaning: Clean the case with a damp sponge/cloth and mild soap.
Note: Do not use solvent to clean plastic lens. Do not submerge the
unit in water.
WARRANTY
This product is warranted by the manufacturer to the original purchaser to
be free from defects in material and workmanship under normal use for a
period of two (2) years from the date of purchase. During the warranty pe-
riod, and upon proof of purchase, the product will be repaired or replaced
(with the same or similar model at manufactures option), without charge
for either parts of labour.

9
English
In case of a defect please contact the dealer where you originally pur-
chased this product. The warranty will not apply to this product if it has
been misused, abused or altered. Without limiting the foregoing, leakage
of the battery, bending or dropping the unit are presumed to be defects
resulting from misuse or abuse.
EXCEPTIONS FROM RESPONSIBILITY
The user of this product is expected to follow the instructions given in op-
erators’ manual. Although all instruments left our warehouse in perfect
condition and adjustment the user is expected to carry out periodic checks
of the product’s accuracy and general performance.
The manufacturer, or its representatives, assumes no responsibility of re-
sults of a faulty or intentional usage or misuse including any direct, indi-
rect, consequential damage, and loss of prots.
The manufacturer, or its representatives, assumes no responsibility for
consequential damage, and loss of prots by any disaster (earthquake,
storm, ood ...), re, accident, or an act of a third party and/or a usage in
other than usual conditions.
The manufacturer, or its representatives, assumes no responsibility for
any damage, and loss of prots due to a change of data, loss of data and
interruption of business etc., caused by using the product or an unusable
product.
The manufacturer, or its representatives, assumes no responsibility for
any damage, and loss of prots caused by usage other thsn explained in
the users’ manual.
The manufacturer, or its representatives, assumes no responsibility for
damage caused by wrong movement or action due to connecting with oth-
er products.

10
WARRANTY DOESN’T EXTEND TO FOLLOWING CASES:
1. If the standard or serial product number will be changed, erased, re-
moved or wil be unreadable.
2. Periodic maintenance, repair or changing parts as a result of their nor-
mal runout.
3. All adaptations and modications with the purpose of improvement
and expansion of normal sphere of product application, mentioned in the
service instruction, without tentative written agreement of the expert pro-
vider.
4. Service by anyone other than an authorized service center.
5. Damage to products or parts caused by misuse, including, without lim-
itation, misapplication or nrgligence of the terms of service instruction.
6. Power supply units, chargers, accessories, wearing parts.
7. Products, damaged from mishandling, faulty adjustment, maintenance
with low-quality and non-standard materials, presence of any liquids and
foreign objects inside the product.
8. Acts of God and/or actions of third persons.
9. In case of unwarranted repair till the end of warranty period because
of damages during the operation of the product, it’s transportation and
storing, warranty doesn’t resume.
Indice
Lingue:
Altri manuali ADA INSTRUMENTS Termometro

ADA INSTRUMENTS
ADA INSTRUMENTS BODYTESTER Manuale utente

ADA INSTRUMENTS
ADA INSTRUMENTS TemPro VISION 256 PROFESSIONAL Manuale utente

ADA INSTRUMENTS
ADA INSTRUMENTS TemPro-pocket Manuale utente

ADA INSTRUMENTS
ADA INSTRUMENTS TemPro-1200 Manuale utente

ADA INSTRUMENTS
ADA INSTRUMENTS TEMPRO VISION 120 Manuale utente


