Adena RADA A-TC01 Manuale utente


1
Precautions
This manual details functions, installation, operation principles and methods of
A-TC01 AI Tracking Camera. Please read this manual carefully before
installation and use.
1. How to use
In order to prevent this product or products connected to it from being damaged,
please use it within its prescribed scope of use.
1) Keep the device away from rain or moisture;
2) To prevent electric shock, do not open the main case; only qualified
technicians are allowed to install or maintain the device;
3) Do not use the device beyond scope of its temperature, humidity or power
supply specification;
4) When cleaning the camera lens, swipe it with dry soft cloth. If dirt is hard to be
removed, please swipe clean gently with mild detergent. Do not use strong or
corrosive detergent, for it may scratch the lens and thus affect image result.
2. Electrical safety
Installation and use of this product shall be in strict accordance with safety
standards for electricity.
3. Careful handing
Avoid damage to product caused by heavy pressure, strong vibration or
immersion during transportation, storage and installation.
4. Power supply polarity
This product applies DC 12V power supply. Power plug polarity is shown as
follows:

2
5. Install with caution
1) Do not rotate the camera head violently, otherwise it may cause mechanical
malfunction;
2) This product should be placed on a stable desktop or other horizontal surfaces. Do
not install the product obliquely, otherwise it may display inclined image;
3) When installing the camera on top of TV or personal computer, use four double faced
adhesive pads at the bottom for fixing;
4) This product shell is made of organic materials. Do not expose it to any liquid, gas or
solids which may corrode the shell.
5) During installation, ensure that there are no obstacles within rotation range of the
holder;
6) Do not power on before finishing installation.
6. Do not dismantle the product without permission
This product contains no parts which can be maintained by users. Any damage
arising from dismantling the product by user without permission will not be covered
by warranty.
7. Magnetic field interference
Magnetic field under specific frequency may affect this product image; this is a Class
A product. Application in domestic environment may cause radio interference.
Therefore, user should take corresponding measures.
If it is needed to extend power line of the camera, extend it from terminal 1
(220V/110V) rather than terminal 2 (DC12V), otherwise it will prevent the device
from functioning!

3
Table of Contents
1. System overview........................................................................................................................4
1.1. System introduction..........................................................................................................4
1.2. Product advantages ..........................................................................................................4
1.3. Product features ................................................................................................................5
2. Port Introduction ...........................................................................................................................6
3. Dimensions.....................................................................................................................................8
4. Configuration tools........................................................................................................................9
4.1. Set IP address of the tracking camera...........................................................................9
4.2. Configure tracking parameters .......................................................................................9
4.3. Other Tracking Parameters............................................................................................12
4.4. Network update................................................................................................................14
5. Description of recording and broadcasting host....................................................................15
5.1. Auto tracking control.......................................................................................................15
5.2. Action code docking........................................................................................................16
6. Description of the remote controller........................................................................................17
6.1. Description of keys..........................................................................................................17
7. Set menu.......................................................................................................................................18
7.1. Main menu ........................................................................................................................18
7.2. System parameter settings............................................................................................19
7.3. Camera parameter settings ...........................................................................................20
7.4. P/T/Z..................................................................................................................................24
7.5. Video format.....................................................................................................................24
7.6. Version ..............................................................................................................................25
7.7. Restore default.................................................................................................................25
8. VISCA protocol command list ...................................................................................................27
9. Pelco-D protocol command list.................................................................................................34
10. Pelco-P protocol command list ..............................................................................................35
11. Maintenance and troubleshooting..........................................................................................37
11.1. Maintenance...................................................................................................................37
11.2. Troubleshooting.............................................................................................................37

4
1. System overview
1.1. System introduction
A-TC01 AI Tracking Camera is a dual camera system that allows presenter
tracking without any additional devices. Its dual system means that users can
engage both cameras at the same time – wide angle shot from the lower camera,
and presenter tracking shot from the upper PTZ camera.
A-TC01 AI Tracking Camera features built-in high-speed processor and
advanced image processing and analytical algorithm, which allows it to track and
detect teachers, presenters, students, or other targets in pan-tracking only mode,
as well as board-writing accurately and quickly through either of its cameras. It
fully satisfies plenty of potential scenarios of use in education, corporate,
governmental, and other markets.
A-TC01 AI Tracking Camera adopts advanced ISP processing technique and
algorithm, producing vivid images which feature balanced brightness, distinct
layering, high definition and colour reducibility. This camera is characterized by
its quality tracking, high performance, reliable operation, simple use and easy
maintenance.
1.2. Product advantages
Free installation: The camera supports both front installation and upside-down
installation.
All-in-one design: Capture content with the wide-angle camera and track
presenter with the presenter camera simultaneously.
Sophisticated tracking algorithm: The camera applies sophisticated human
detection, locking and tracking image processing and analytical algorithm (smart
image recognition library, scene adaptive algorithm) and achieves stable, fast
and accurate target tracking.
High resistance to interference: Diversified and flexible recognition shield
settings ensure that once the tracking target is locked, it will not be affected by
other moving objects or projector.
Stable tracking: Movement sensitivity is adjustable. Users can define if they want
tracking to reflect slight movement of target.
Self-adaptive image: A-TC01 can maintain different zoom levels for default view
and tracking view, making sure that presenters are always clearly visible.
High environmental suitability: Tracking effectiveness works equally well
regardless of the classroom shape or seat arrangement.

5
Super wide dynamic exposure: It solves the issue that a tracking object dims
under strong light such as projector.
Networked control interface: Control information of all products is transmitted
via network, and it is suitable for product layout for all scenarios.
1.3. Product features
Full HD image: With 1/2.8 inch high quality image sensor, A-TC01 maximum
resolution ratio reaches 1920x1080.
High zoom level: 20X optical zoom lens makes it possible to use the camera in
medium and large size rooms. The lens features 72.5° distortion-less wide
viewing angle.
Advanced focusing technique: The advanced automatic focusing algorithm
allows automatic focusing to be done quickly, accurately and steadily.
Low noise high signal to noise ratio: Low noise CMOS ensures super high signal
to noise ratio of video taken by the camera. With advanced 2D and 3D noise
reduction technology, noise is reduced and image resolution is guaranteed.
Audio input port: It supports 16000, 32000, 44100, 48000 sampling frequency
and AAC, MP3 and G.711A audio coding.
Super quiet holder: High precision stepping motor and precision motor driven
controller ensure the holder operate at low and stable speed without noise.
Multiple video compression standards: It supports H.265/H.264 video
compression.
Multiple networking protocol: It supports ONVIF, GB/T28181, RTSP, RTMP
protocol and RTMP push mode.
Sleep mode: It supports low-power consumption sleep/wake up mode. Power
consumption in sleep mode is lower than 400mW.
Multiple control protocol: It supports VISCA, PELCO-D, PELCO-P protocol,
automatic recognition protocol and all command VISCA control protocol.

6
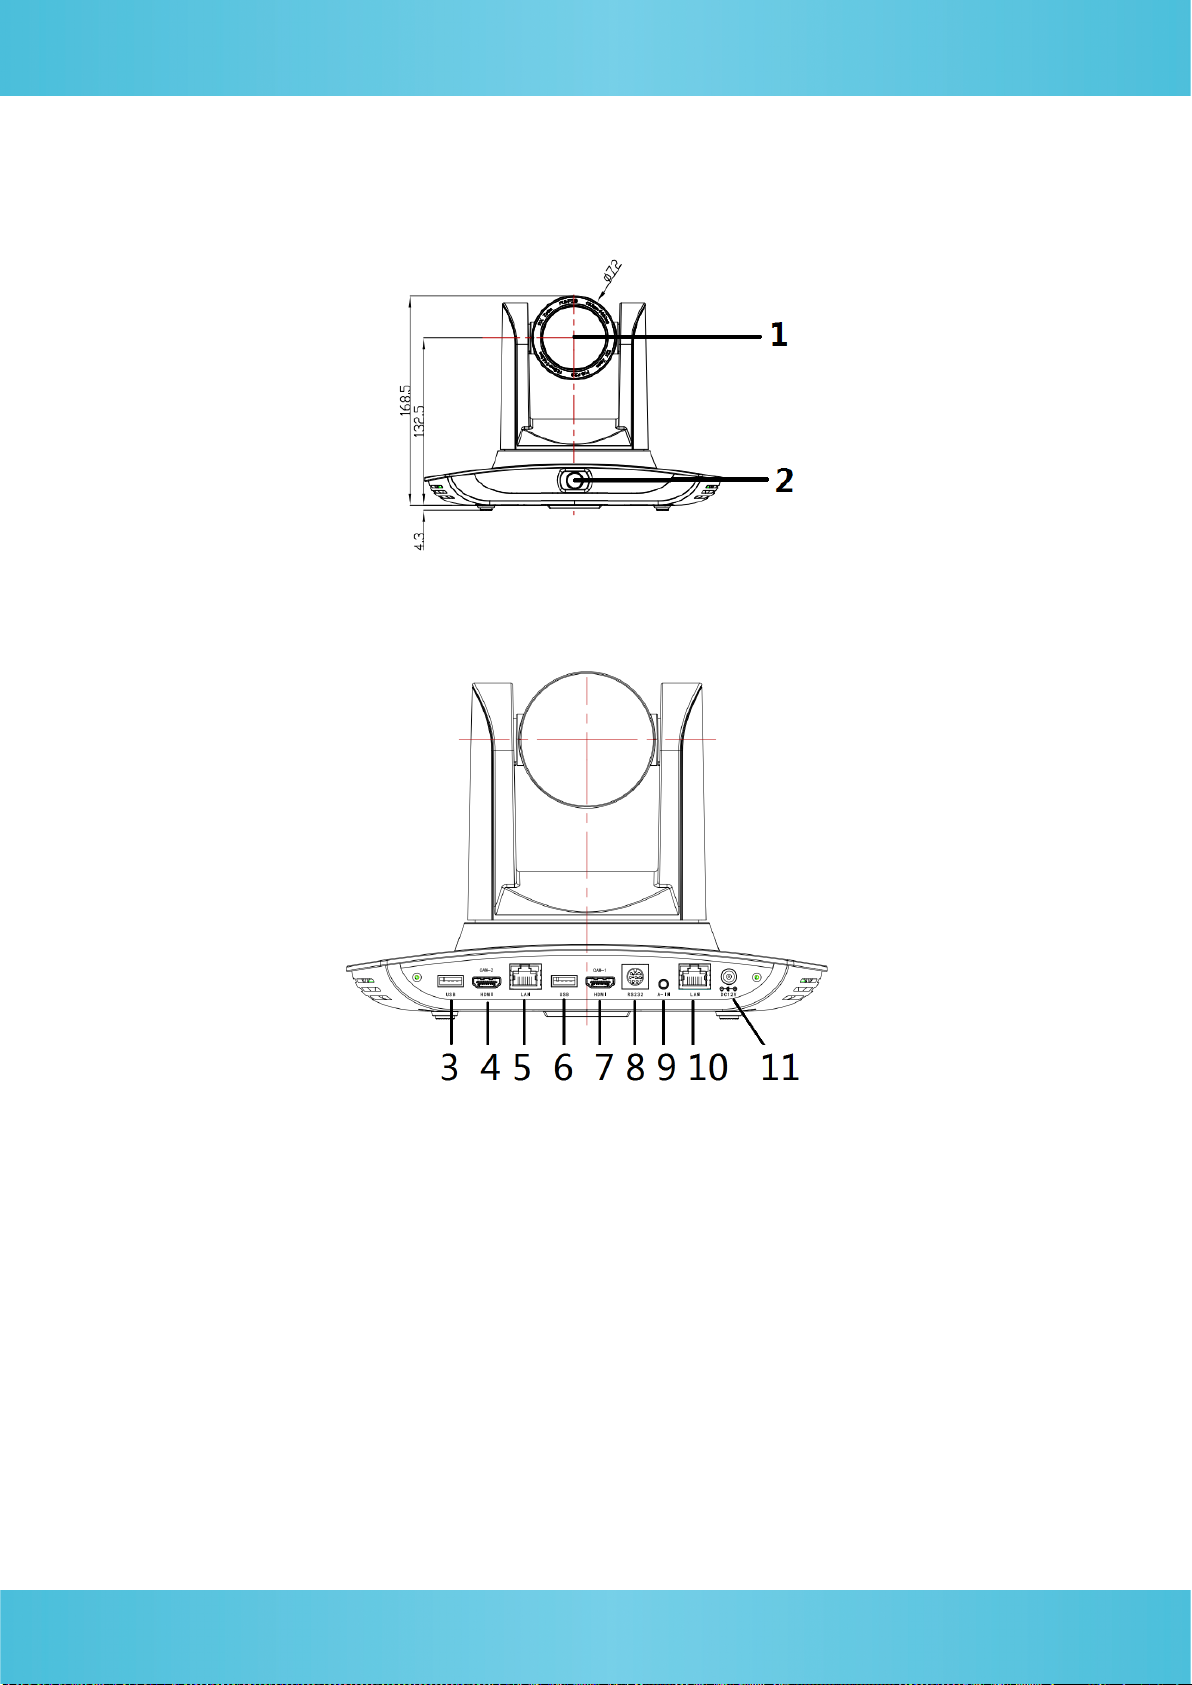
2. Port Introduction
Front view
Rear view
1. Close-up lens
2. Panorama lens
3. USB3.0 output 1 (panorama lens output)
4. HDMI output 1 (panorama lens output)
5. LAN network port for panorama lens
6. USB3.0 output 2 (close-up lens output)
7. HDMI output 2 (close-up lens output)
8. RS-232 control port
9. Audio input port
10. LAN network port for close-up lens
11. Power supply port (DC12V)

7
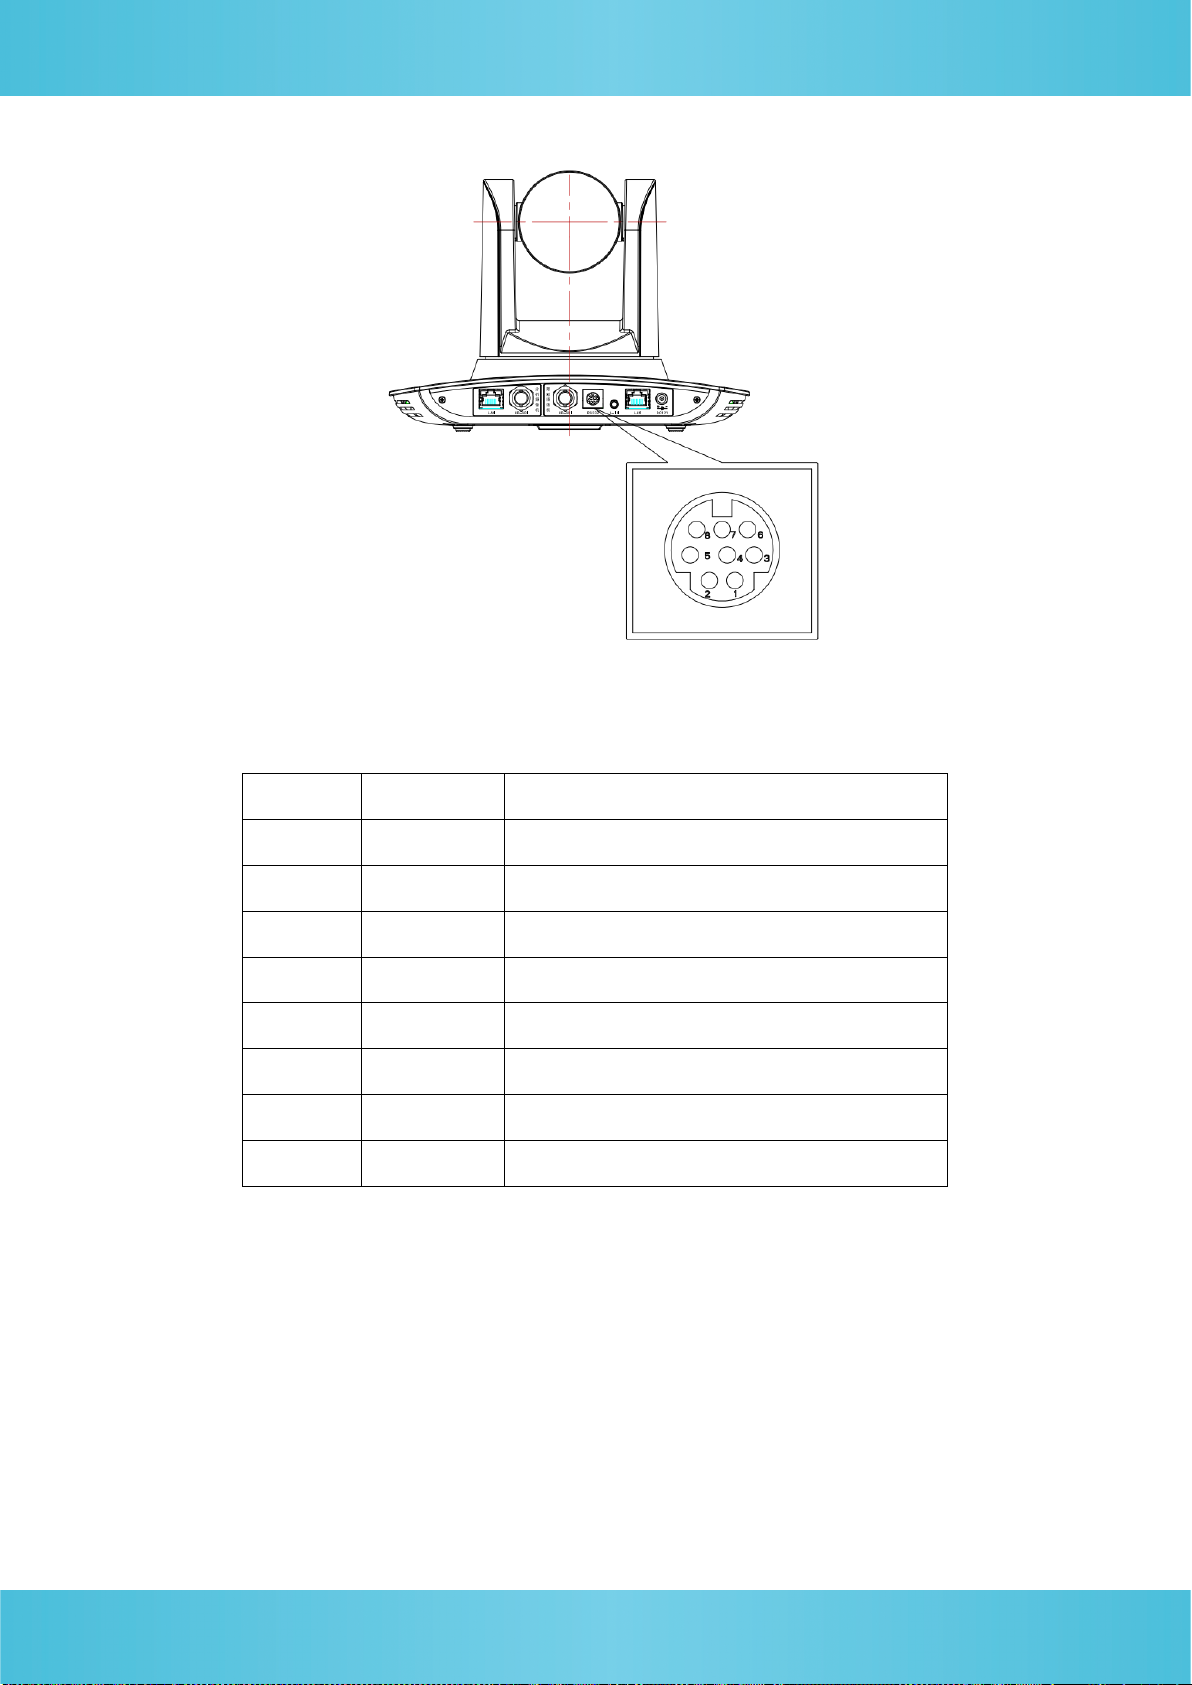
Pin definition:
No.
Port
Definition
1
DTR
Data Terminal Ready
2
DSR
Data Set Ready
3
TXD
Transmit Data
4
GND
Signal ground
5
RXD
Receive Data
6
GND
Signal ground
7
IR OUT
IR Commander Signal IR
8
NC
No Connection

8
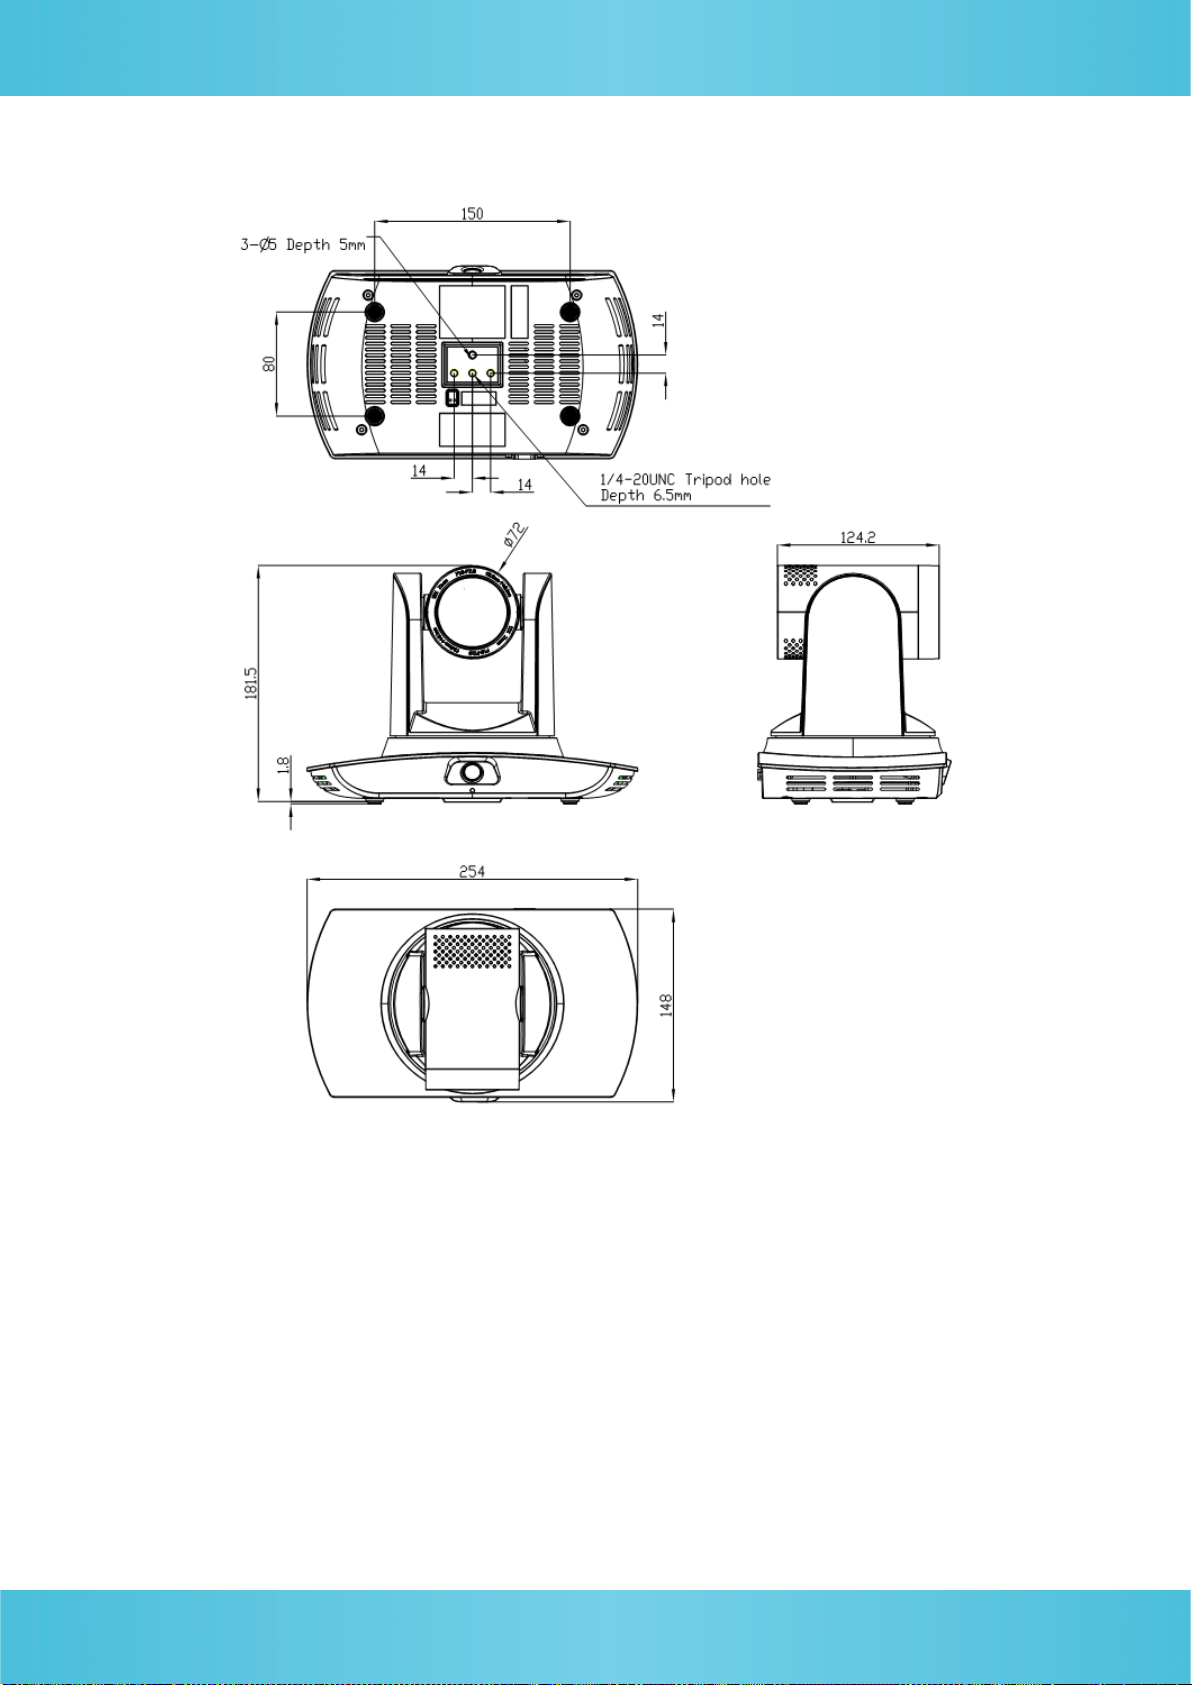
3. Dimensions

9
4. Configuration tools
4.1. Set IP address of the tracking camera
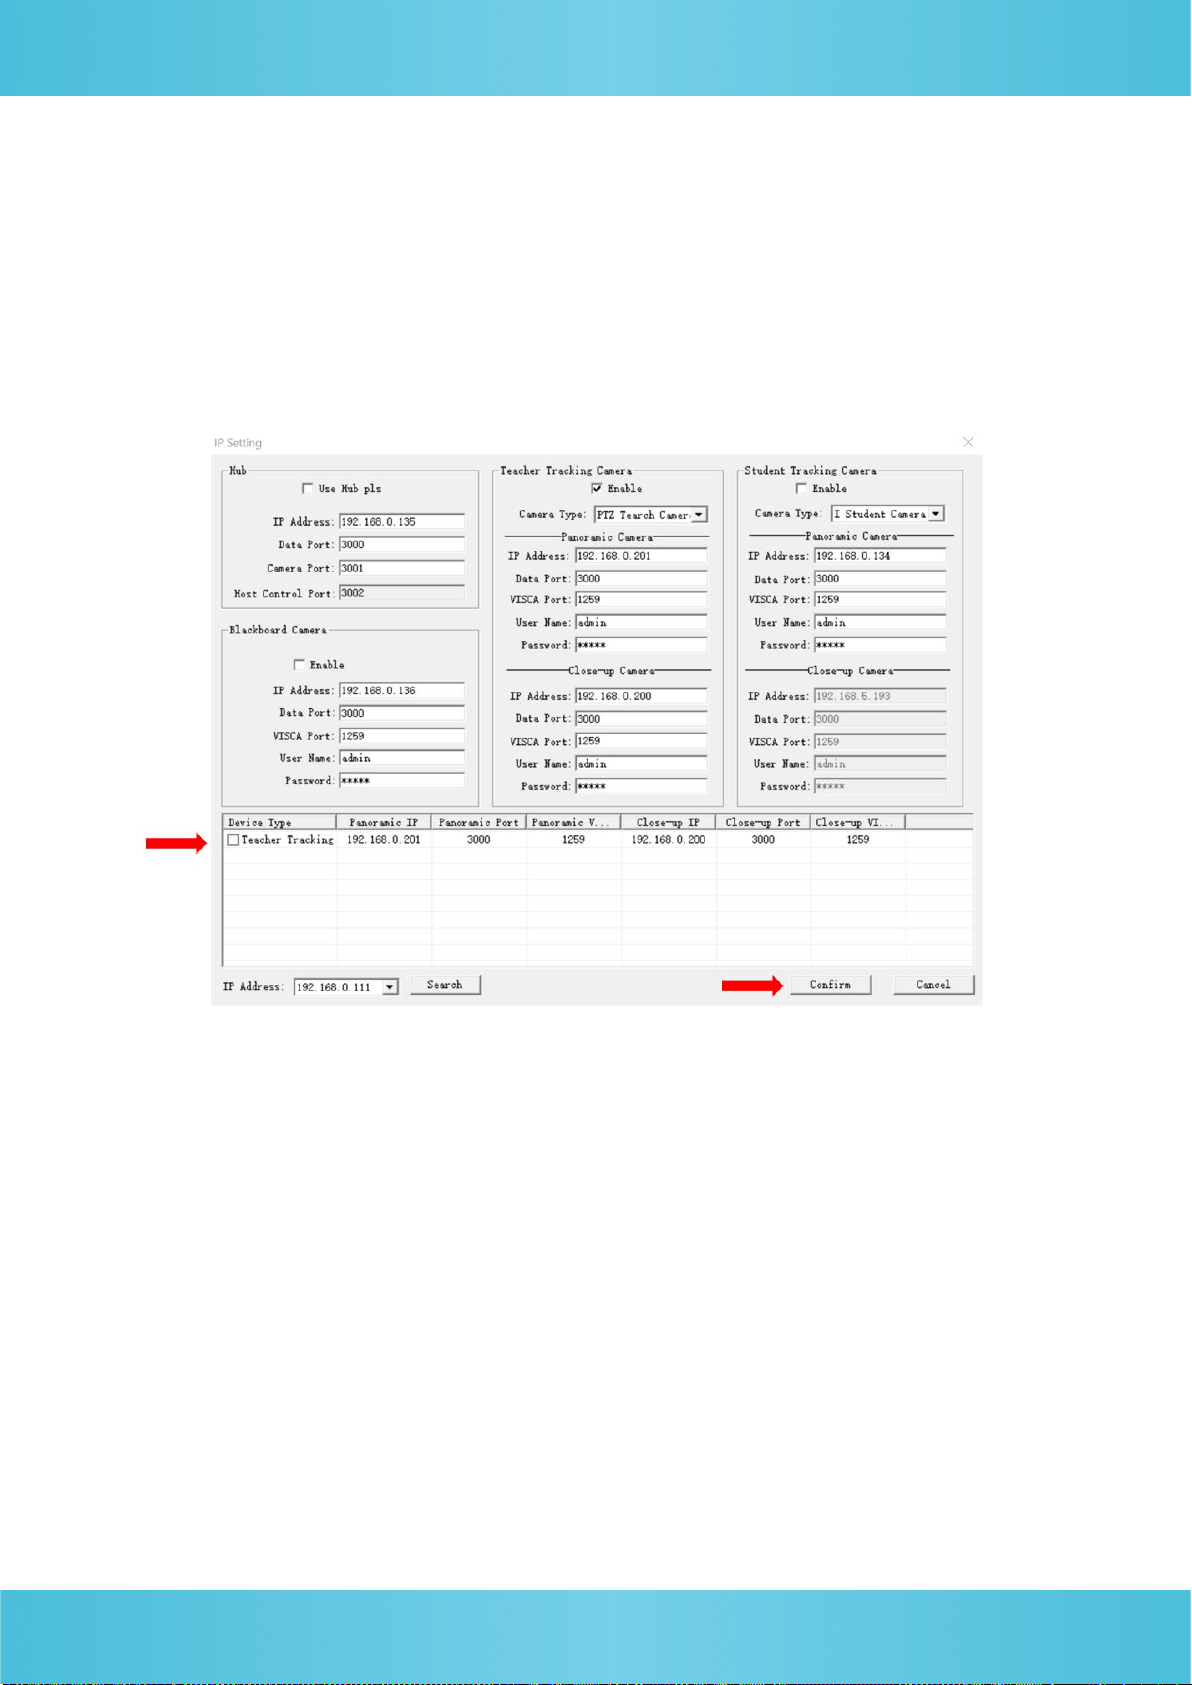
Open IVESmart configuration tool, click “Settings” -> “IP address” -> “Search”
(refer to Figure 5.1-1 for details), the configuration interface will display all valid
devices in the LAN, check only “Teacher Tracking Camera” and click Confirm.
Note: Computer with IVESmart tool should be in the same LAN with the camera to
be configured.
Figure 4.1.1 Found Device List
4.2. Configure tracking parameters
1. Before configuring the camera, press “Stop” to pause tracking.
2. Press “Config” afterwards.
Indice