AmazonBasics B07BNGPWT4 Manuale utente

B07BNGPWT4
Adjustable Oscillating Standing Pedestal Fan - 16-Inch
Ventilador De Pedestal Oscilante Ajustable, 40,6 cm
(16 Pulgadas)
Ventilateur Sur Pied à Oscillation Réglable - 40,6 cm
(16 Pouces)

English ..................................... 3
Español.................................. 15
Français ................................. 27

3
Welcome Guide •English
Contents:
Before getting started, ensure the package contains the following components:
Ax1 Fx1
Bx1 Gx1
Cx1 Hx1
Dx1 I
TimerOsc
Mode
Speed
On/Off
x1
Ex1

4
IMPORTANT SAFEGUARDS
Read these instructions carefully and retain them for future use. If this product is
passed to a third party, then these instructions must be included.
WARNING – TO REDUCE THE RISK OF FIRE, ELECTRIC SHOCK, OR INJURY TO PERSONS,
OBSERVE THE FOLLOWING:
• WARNING! Risk of injury! Avoid contacting moving parts. Wait until all components have
completely stopped before touching them.
• Before connecting the product to the power supply, check that the power supply voltage and
current rating corresponds with the power supply details shown on the product’s rating label.
• Do not insert fingers or foreign objects in any opening of the product and do not obstruct the
air vents.
• If the supply cord is damaged, it must be replaced by the manufacturer, its service agent or
similarly qualified persons in order to avoid a hazard.
• Do not use outdoors.
• Do not expose the product to water.
• Do not use in a bathroom.
• Never use the product without the safety guard or with a damaged safety guard.
• Do not place any clothes or curtains on the product as they could be sucked into the fan during
operation and damage the product.
• During use, keep hands, hair, clothing and utensils away from the safety guard to avoid injuries
and damage of the product.
• Unplug or disconnect the appliance from the power supply before servicing.
• This product employs overload protection (fuse). A blown fuse indicates an overload or
short-circuit situation. If the fuse blows, unplug the product from the outlet. Replace the fuse
according to the instructions in this manual (follow product marking for proper fuse rating)
and check the product. If the replacement fuse blows, a short-circuit may be present and the
product should be discarded or returned to an authorized service facility for examination and/or
repair.
Battery Warnings
• Always insert batteries correctly with regard to polarity (+ and –) marked on the battery and the
product.
• Exhausted batteries should be immediately removed from product and properly disposed.

5
Polarized Plug
• This appliance has a polarized plug (one blade is wider than the other). To reduce the risk of
electric shock, this plug will fit outlet only one way. If the plug does not fit fully in the outlet,
reverse the plug. If it still does not fit, contact a qualified electrician. Do not modify the plug in
any way.
SAVE THESE INSTRUCTIONS
DESCRIPTION OF SIGNAL WORDS
DANGER The signal word that indicates a hazard with a high level of
risk which, if not avoided, will result in death or serious injury.
WARNING
The signal word that indicates a hazard with a medium level
of risk which, if not avoided, could result in death or serious
injury.
CAUTION
The signal word that indicates a hazard with a low level of
risk which, if not avoided, could result in minor or moderate
injury.
NOTICE Indicates a practical tip, advice or practice not related to
personal injury.
Intended Use
• This product is intended to produce a cooling airflow.
• This product is intended for household use only. It is not intended for commercial use.
• This product is intended to be used in dry indoor areas only.
• No liability will be accepted for damages resulting from improper use or non-compliance with
these instructions.

6
Before First Use
• Check for transport damages.
• Clean the product before first use.
Risk of suffocation! Keep any packaging materials away from children – these
materials are a potential source of danger, e.g. suffocation.
Inserting batteries (remote control)
• Open the battery compartment.
• Insert two 1.5 V AAA batteries in accordance with the polarity markings inside the battery
compartment.
• Close the battery compartment.
Assembly
Step 1:
Remove the protection bracket from the rear guard (B), and the protection
sleeve from the main body’s (E) pin.
• Connect the leg (F) with the base (G).
• Secure the connection with the knob screw (H).
DANGER
NOTICE
F
G
H

7
Assembly
Step 2:
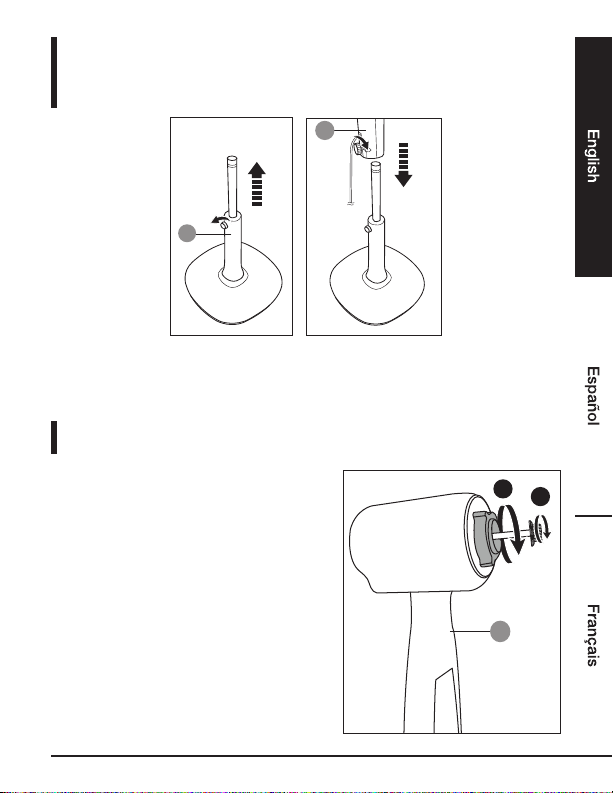
F
E
• Loosen the knurled screw on the leg (F) by turning it counter-clockwise.
• Extend the inner rod to its maximum length, then secure it with the knurled screw.
• Connect the main unit (E) with the rod. Fasten both parts with the knurled screw on the main
unit.
Step 3:
• Unscrew the cap nut in the clockwise direction
from the main unit’s (E) front.
• Unscrew the fixing ring in the counter-clockwise
direction.
E
1
2

8
Assembly
Step 4:
The product features a timer, which lets the
user to set an automatic switch off time. You
can choose from 0.5 to 7.5 hours.
• Connect the rear guard (B) with the main unit (E). Align the rear
guard’s small round holes with the 3 pins on the main unit’s
front.
• Secure the rear guard (B) with the fixing ring.
Step 5:
Remove the plastic tube
from the shaft before
installing the blades (C)
and (D).
• Place the large blade (C) on the shaft. Align
the cross pin on the shaft with the groove
on the rear side of the large blade (C).
• Place the small blade (D) on the shaft.
Align the pin on the rear side of the small
blade with one of the three holes on the
large blade (C).
• Hold the large blade (C) with one
hand and screw on the cap nut in the
counter-clockwise direction to secure the
blades.
CD
B
E
NOTICE
NOTICE

9
Assembly
Step 6:
BA
1
BA
23
Loosen the screw of the locking ring and open the locking bracket before
connecting the front guard (A) with the rear guard (B).
• Clip the rear guard (B) into the front indent of the locking ring on the front guard (A).
• Close the locking bracket.
• Secure the guards with the locking screw.
NOTICE

10
Operation
Control Panel/Remote Control
TimerOsc
Mode
Speed
On/Off
On-Off
Speed
0.5
1 2
4
Timer
Mode
Osc
On-Off Turning on/off
(remote control only)
On-Off
Speed
Turning on/off;
Speed adjustment
(main unit only)
Speed Speed adjustment
(remote control only) Osc Oscillation setting
Mode Mode selection Timer Timer setting
Turning on/off
• To turn on the product, press On-Off Speed button on the main unit (E), or press On/Off on
the remote control (I). The product starts operation at speed set to 1.
• To turn off the product, press On/Off on the remote control again, or press
On-Off Speed button repeatedly on the main unit (the product toggles between the 3 speed
modes and then turns off).
Timer
The product features a timer, which lets the user to set an automatic switch off
time. You can choose from 0.5 to 7.5 hours.
• To turn on the timer, press the Timer button. An indicator next to the number 0.5 lights up on
the main unit (E).
NOTICE
Indice
Altri manuali AmazonBasics Fan