American Standard GZ16B Manuale utente
BECAUSE
JUST ADD WATER
IS
PRETTY MUCH THE INSTRUCTIONS
FOR A WONDERFUL LIFE.
Thank you for buying an American Standard faucet.
We’re so grateful you did, and you will be too. Because faucets don’t just bring
us water—they’re called upon to clean up brownie pans, luxuriated under by
sleepy not-morning-people, and spit on by teeth-brushing kids. How do we
know? Just like you, we’ve lived with that same beautiful chaos called life for
almost 150 years. We believe that while every home should appreciate in
value, we never forget the sentimental value that grows from enjoying life in
the heart of home—your kitchen and bath. That’s why we love your stories
and ideas; they help us innovate with products that make your life easier.
Or, visit americanstandard-us.com/bathroom/sink-faucets
to watch video, view/download installation manuals
or learn more about your product.
Have a question or need help on install?
For questions or help on installation call us at 855-815-0004.
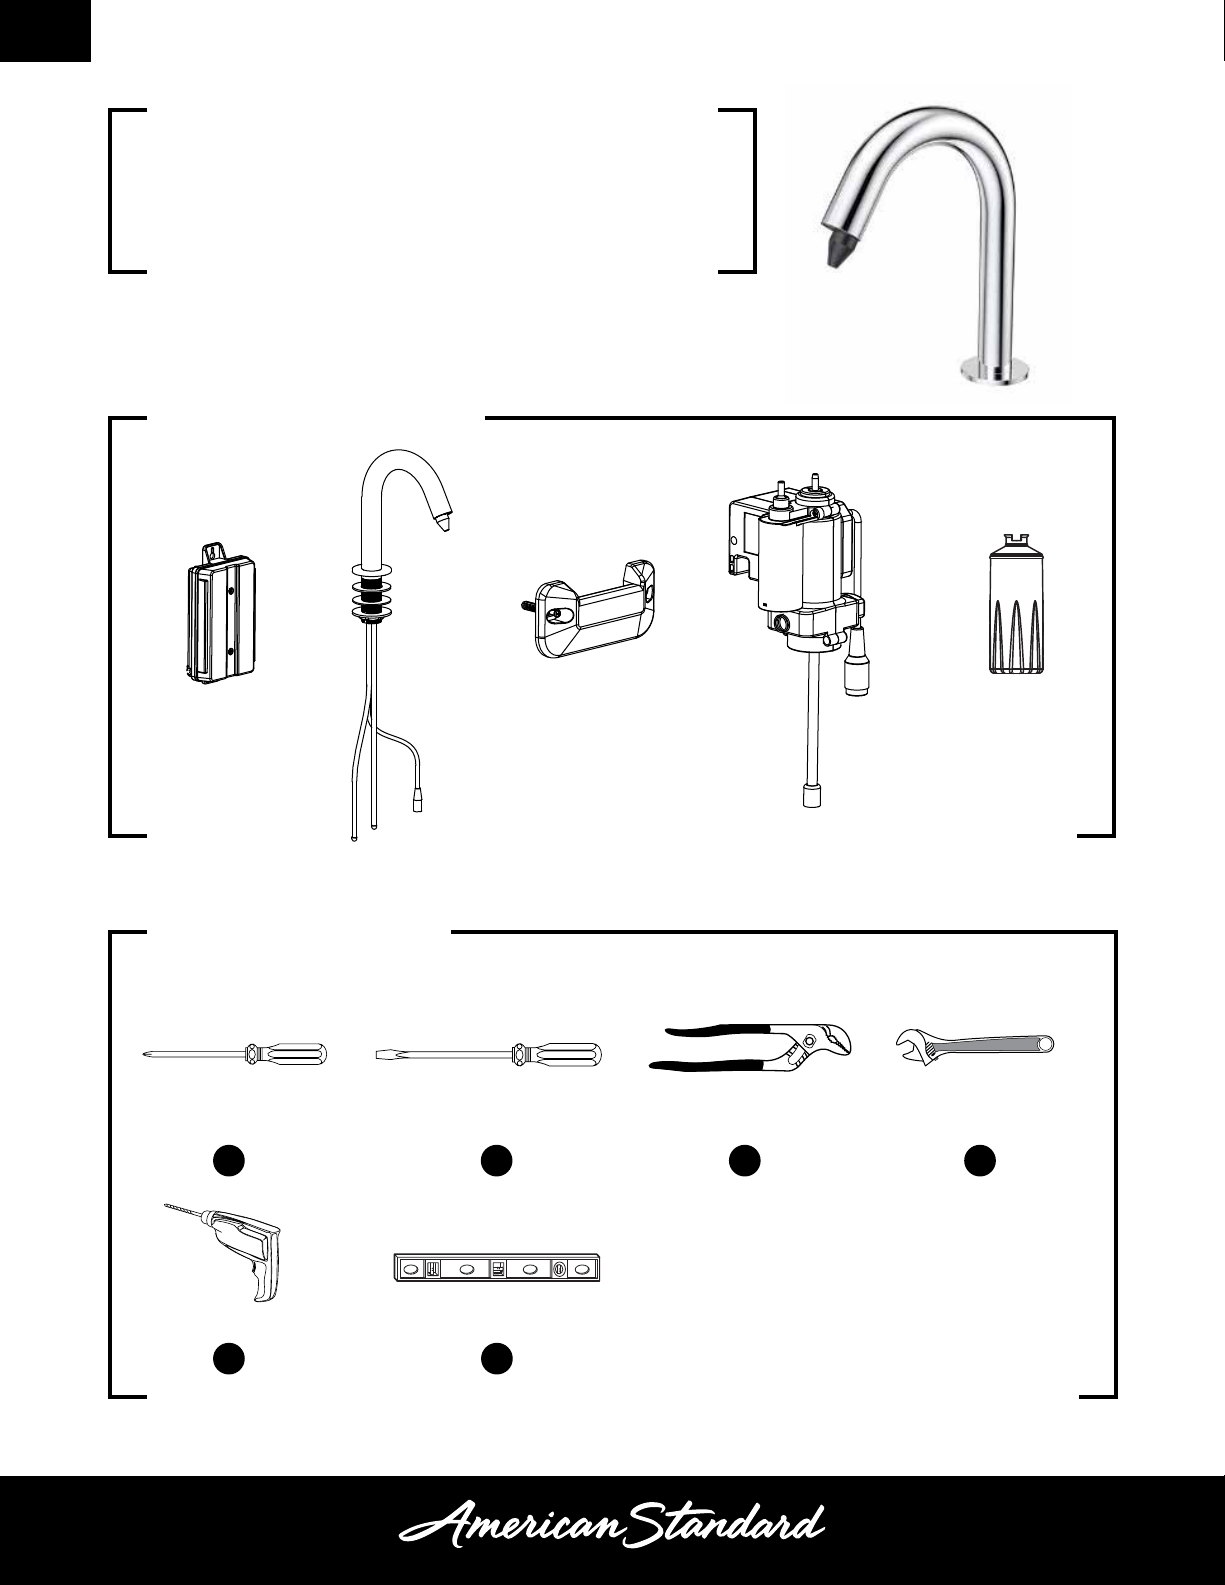
INSIDE THE BOX
RECOMMENDED TOOLS
Phillips
Screwdriver
Installation steps will indicate which tools should be used with asscociated letter
Flat Blade
Screwdriver
Channel
Locks
Adjustable
Wrench
Soap Bottle
Control Box
Pendant
Battery Pack
A B C D
Soap Dispenser
& Mounting Kit Control Box
Drill
E
OWNERS MANUAL
Touchless Soap Dispenser
GZ16B
Image shown may vary from product purchased.
Level
F
INSTALLATION INSTRUCTIONS
DECK
1
2
3
4
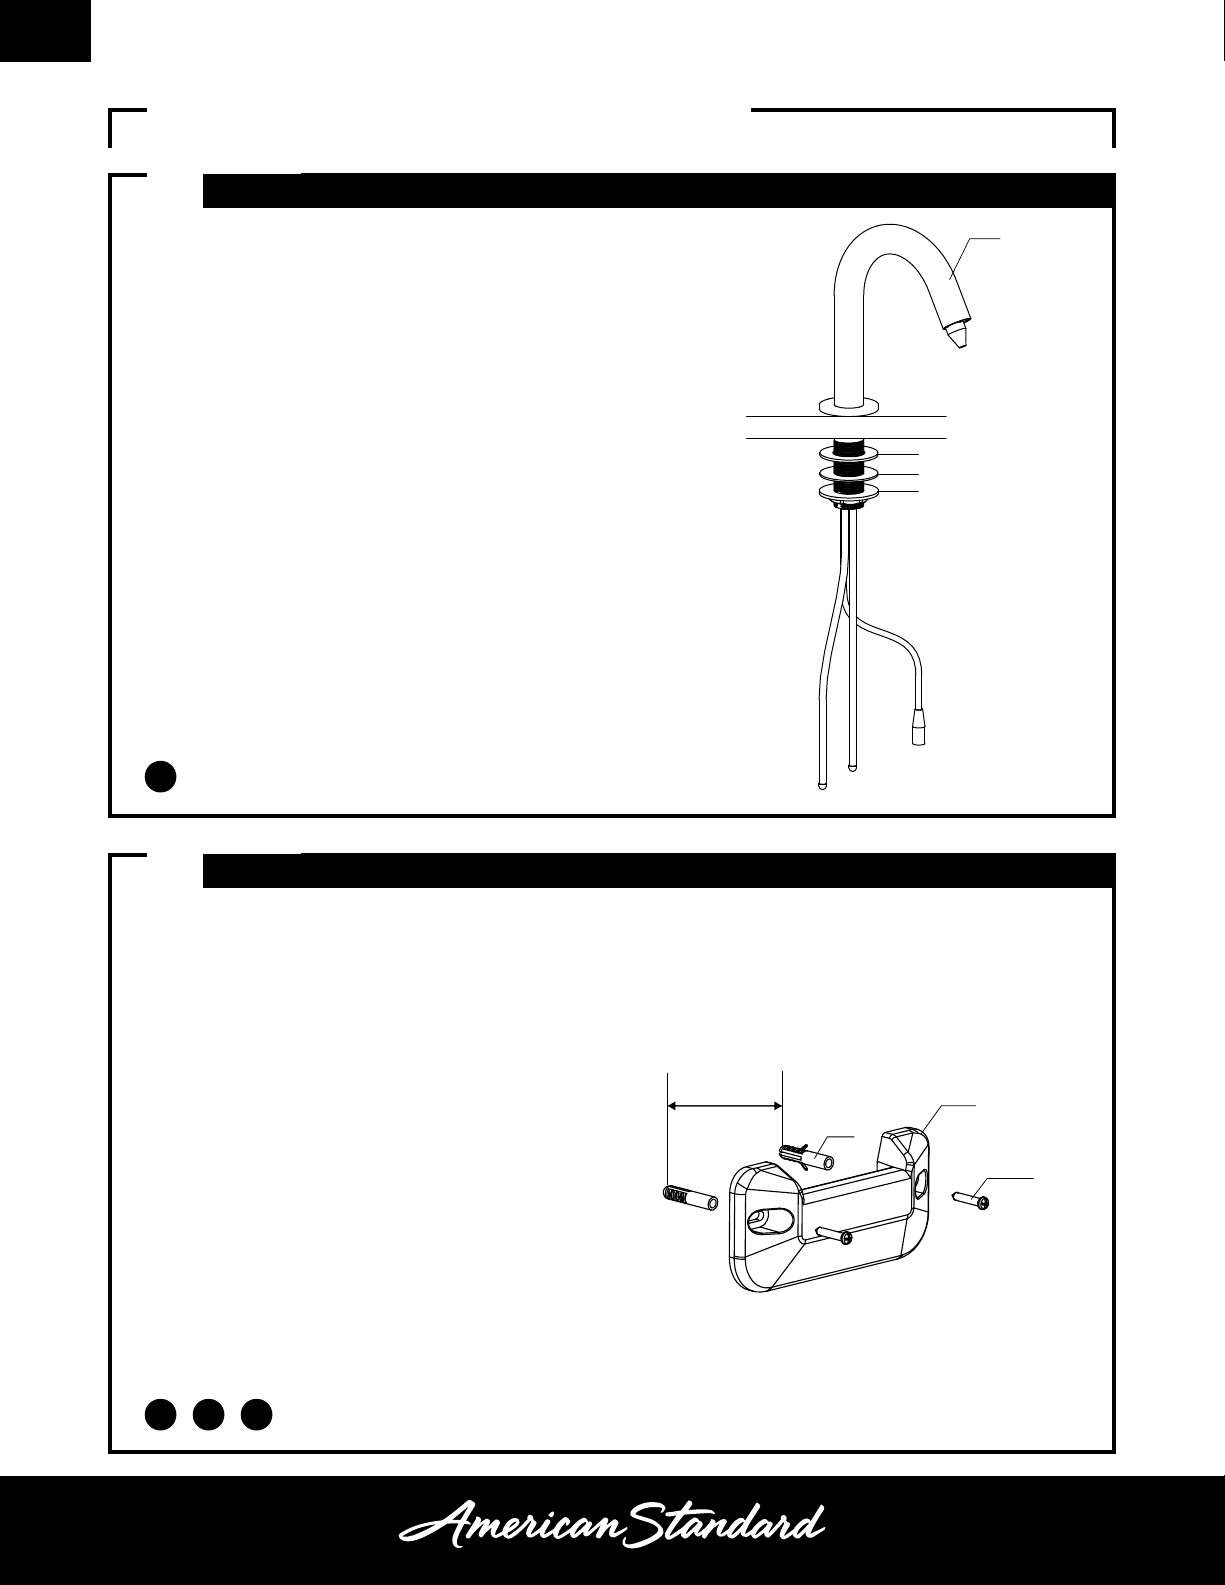
1INSTALL SPOUT
C
• Insert the SPOUT and HOSES (1) through the deck
hole.
NOTE: Deck thickness - 8 mm to 50 mm
NOTE: Deck hole diameter - 25 mm to 28 mm
• Install RUBBER WASHER (2) and METAL
WASHER (3).
• Thread the MOUNTING NUT (4) on to the shank
and tighten to secure the faucet.
94 mm 3
2
1
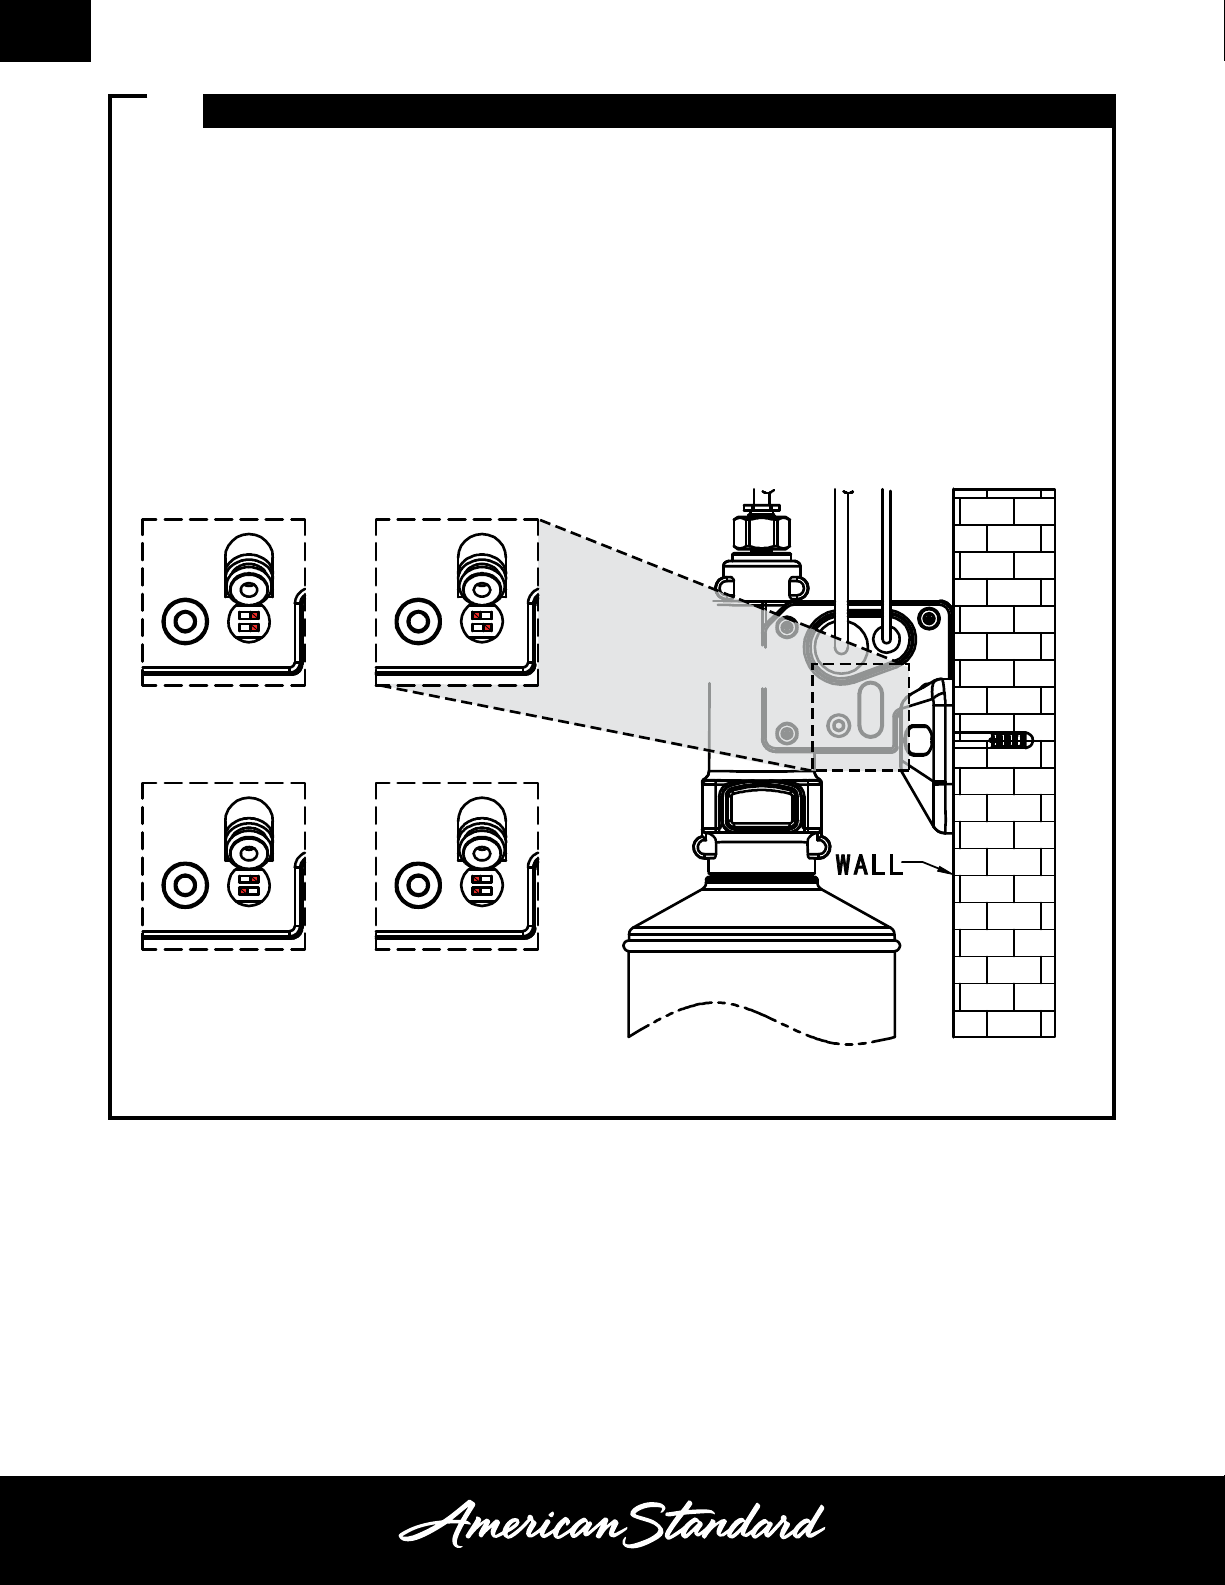
2INSTALL CONTROL BOX PENDANT
A
• Drill holes in the wall under the sink 94 mm apart.
NOTE: Recommended height is 350 mm above the
floor to avoid interference with the soap bottle and
300 mm below the counter top to provide overhead
clearance for installing the control box.
• OPTIONAL: Use DRY WALL ANCHORS (2) if
applicable.
• Thread the SCREWS (1) through the CONTROL
BOX PENDANT (3) and in to the wall to secure it.
E F
3
4
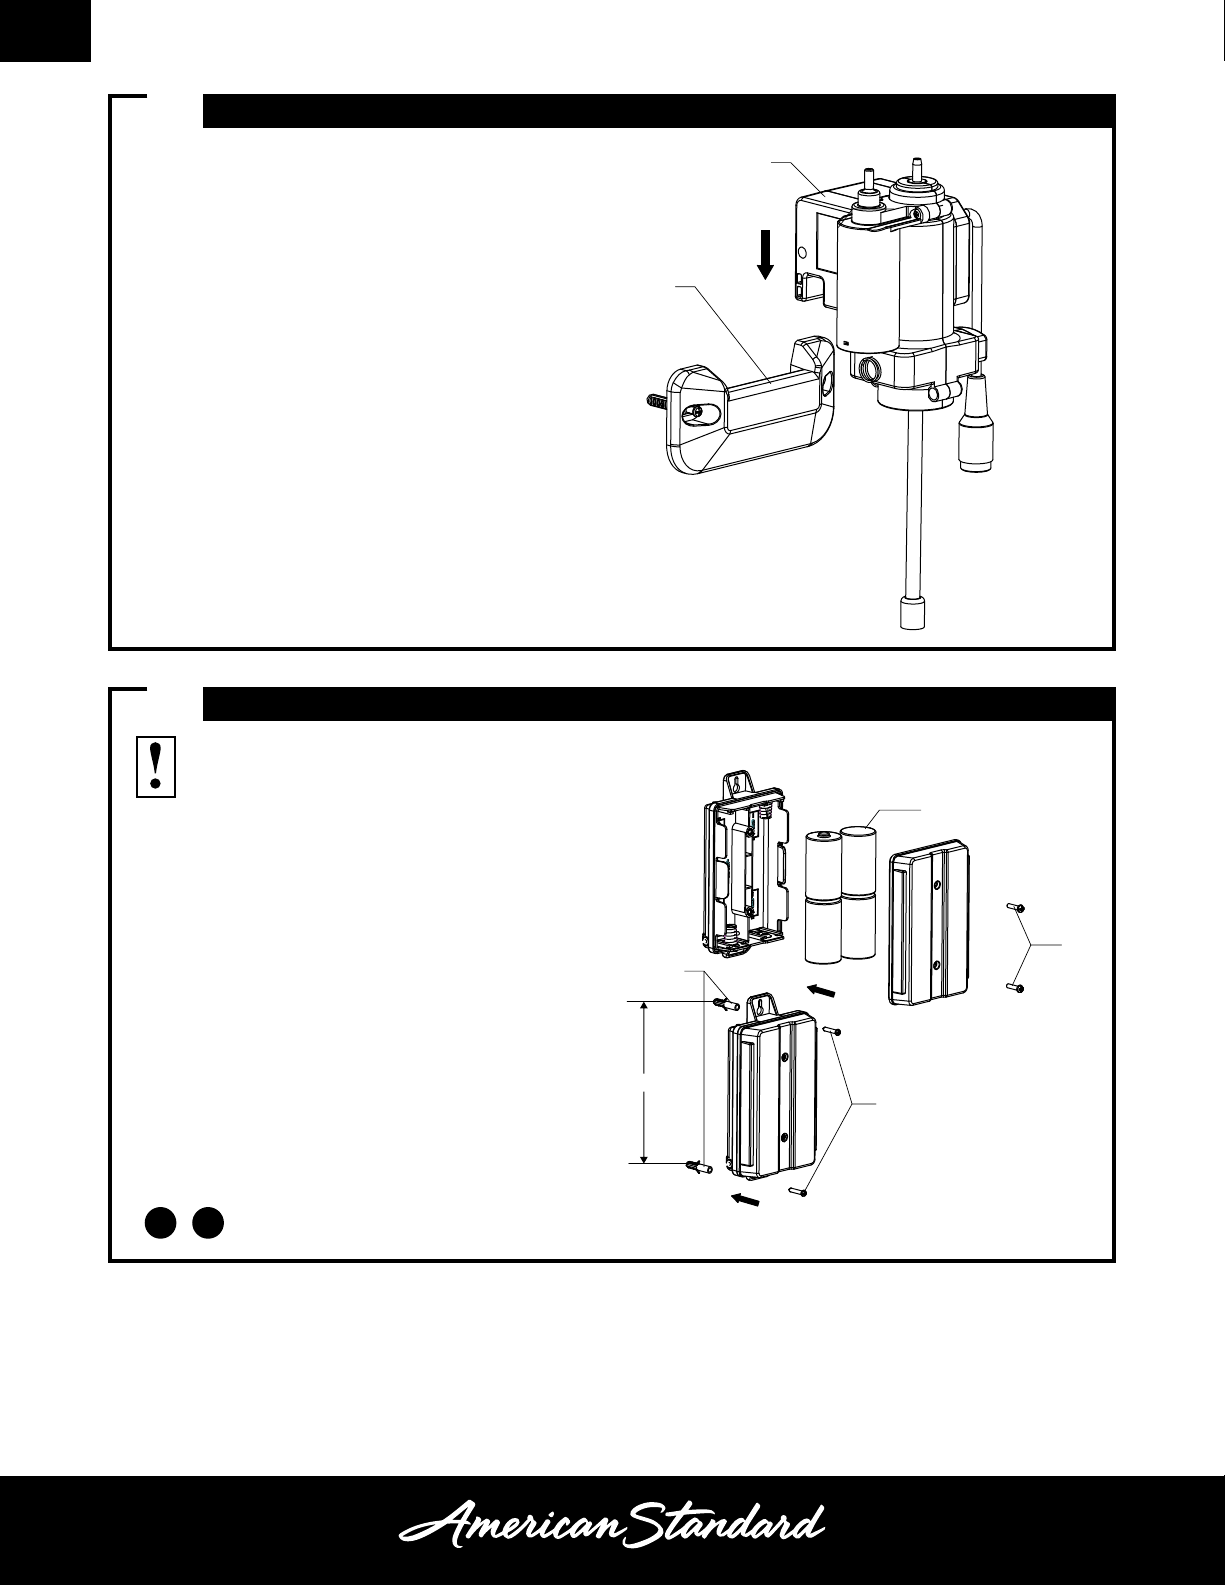
INSTALL CONTROL BOX
INSTALL BATTERY PACK
A E
• Insert the CONTROL BOX (1) in to the CONTROL
BOX PENDANT (2).
• Unscrew the SCREWS (1) on the battery pack.
• Insert four BATTERIES (2) and reinstall the battery
pack cover.
• Drill holes in the wall under the sink 162 mm apart.
NOTE: the battery pack can be used as a hole
template.
NOTE: Recommended height is 350 mm above
the floor.
• OPTIONAL: Use DRY WALL ANCHORS (3) if
applicable.
• Thread the SCREWS (1) through the battery pack
and in to the wall to secure it.
For DC powered Soap Dispensers
only.
1
2
162 mm
1
1
2
3
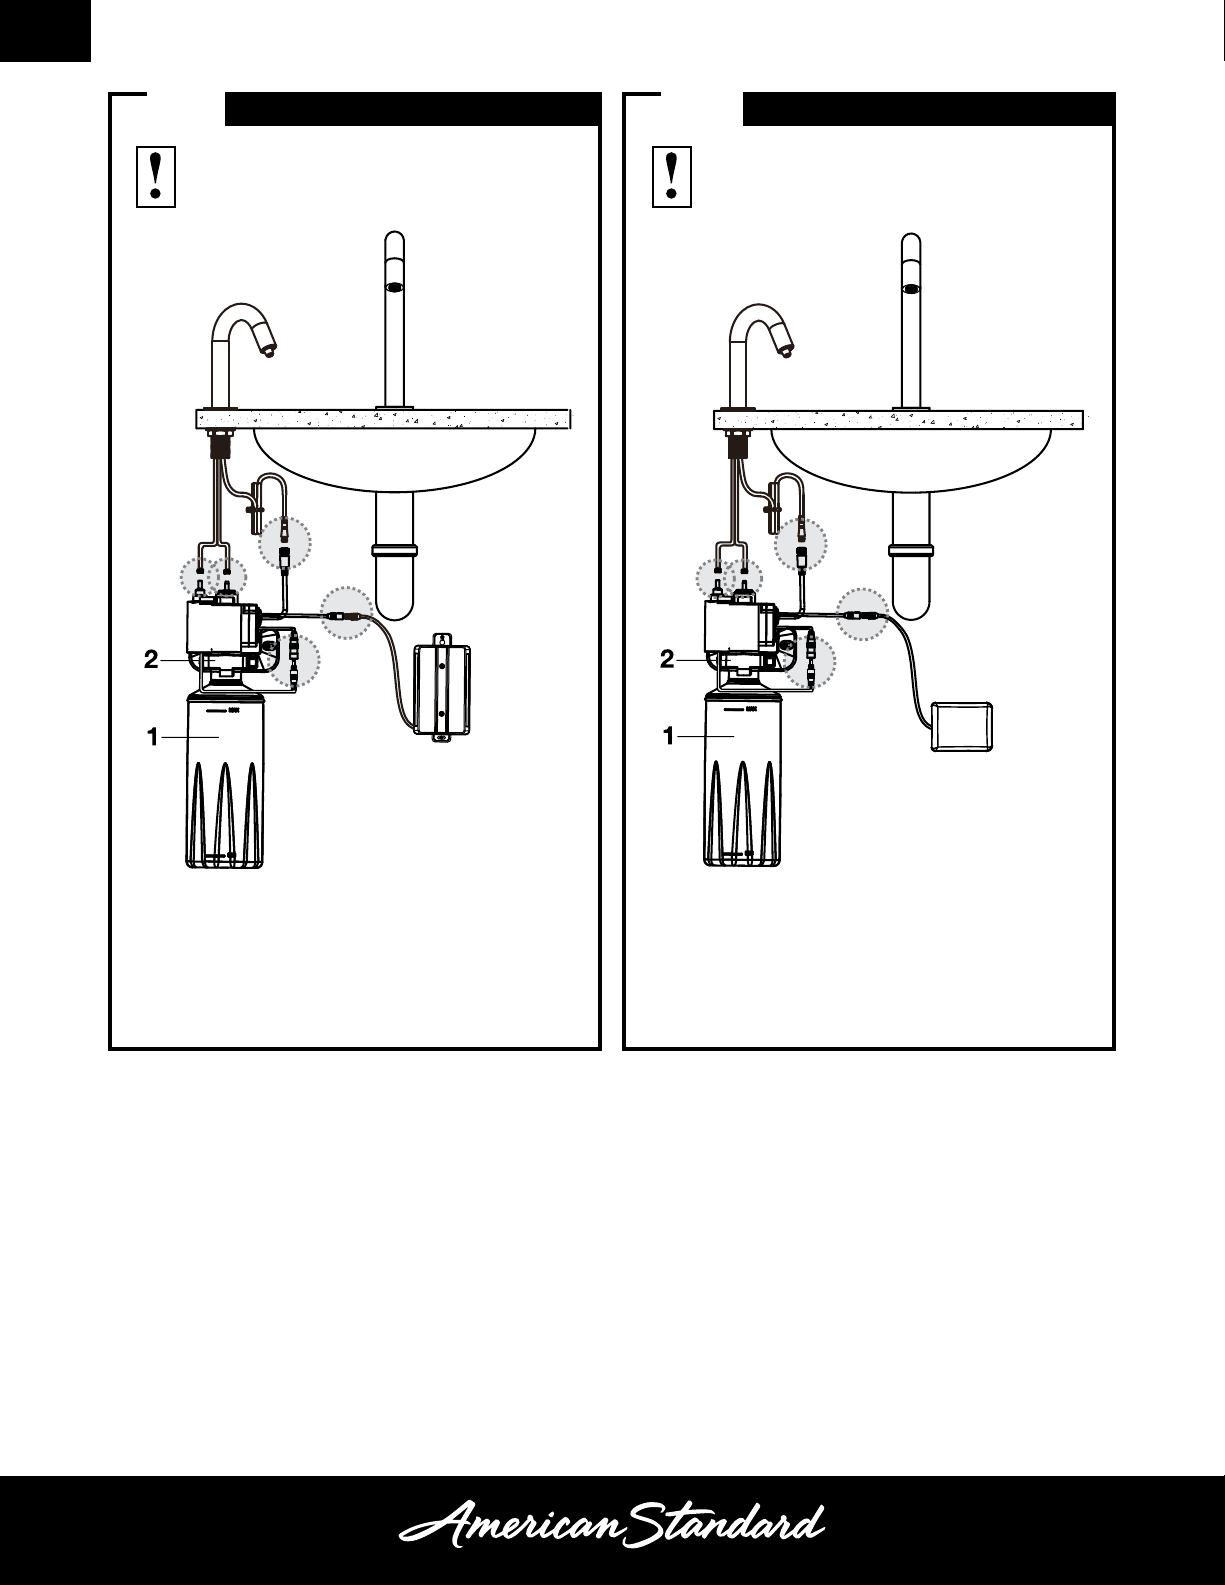
5A 5B
• Connect the wiring as shown in the image.
• Install the SOAP BOTTLE (1) on to the
CONTROL BOX (2).
CONNECT WIRING CONNECT WIRING
For DC powered Soap Dispensers
only.
• Connect the wiring as shown in the image.
• Install the SOAP BOTTLE (1) on to the
CONTROL BOX (2).
For AC powered Soap Dispensers
only.
6INITIALIZE SOAP DISPENSER
• Fill the soap bottle with liquid soap.
• Press and hold the dispenser button on the control box. Release when soap begins to
dispense from the spout.
• Activate the soap dispenser by placing hand in front of the spout tip.
NOTE: It has four soap dispense volume adjustment:
1. Low
2. Medium
3. High
4. Extra High
Low Volume Medium Volume
High Volume Extra High Volume
1.Turn the nozzle
anticlockwise
2.Pull out the
rubber plug
3.Remove the filter screen
from the rubber plug and
clean it. Re-install
after cleaning.
nozzle rubber plug filter screen
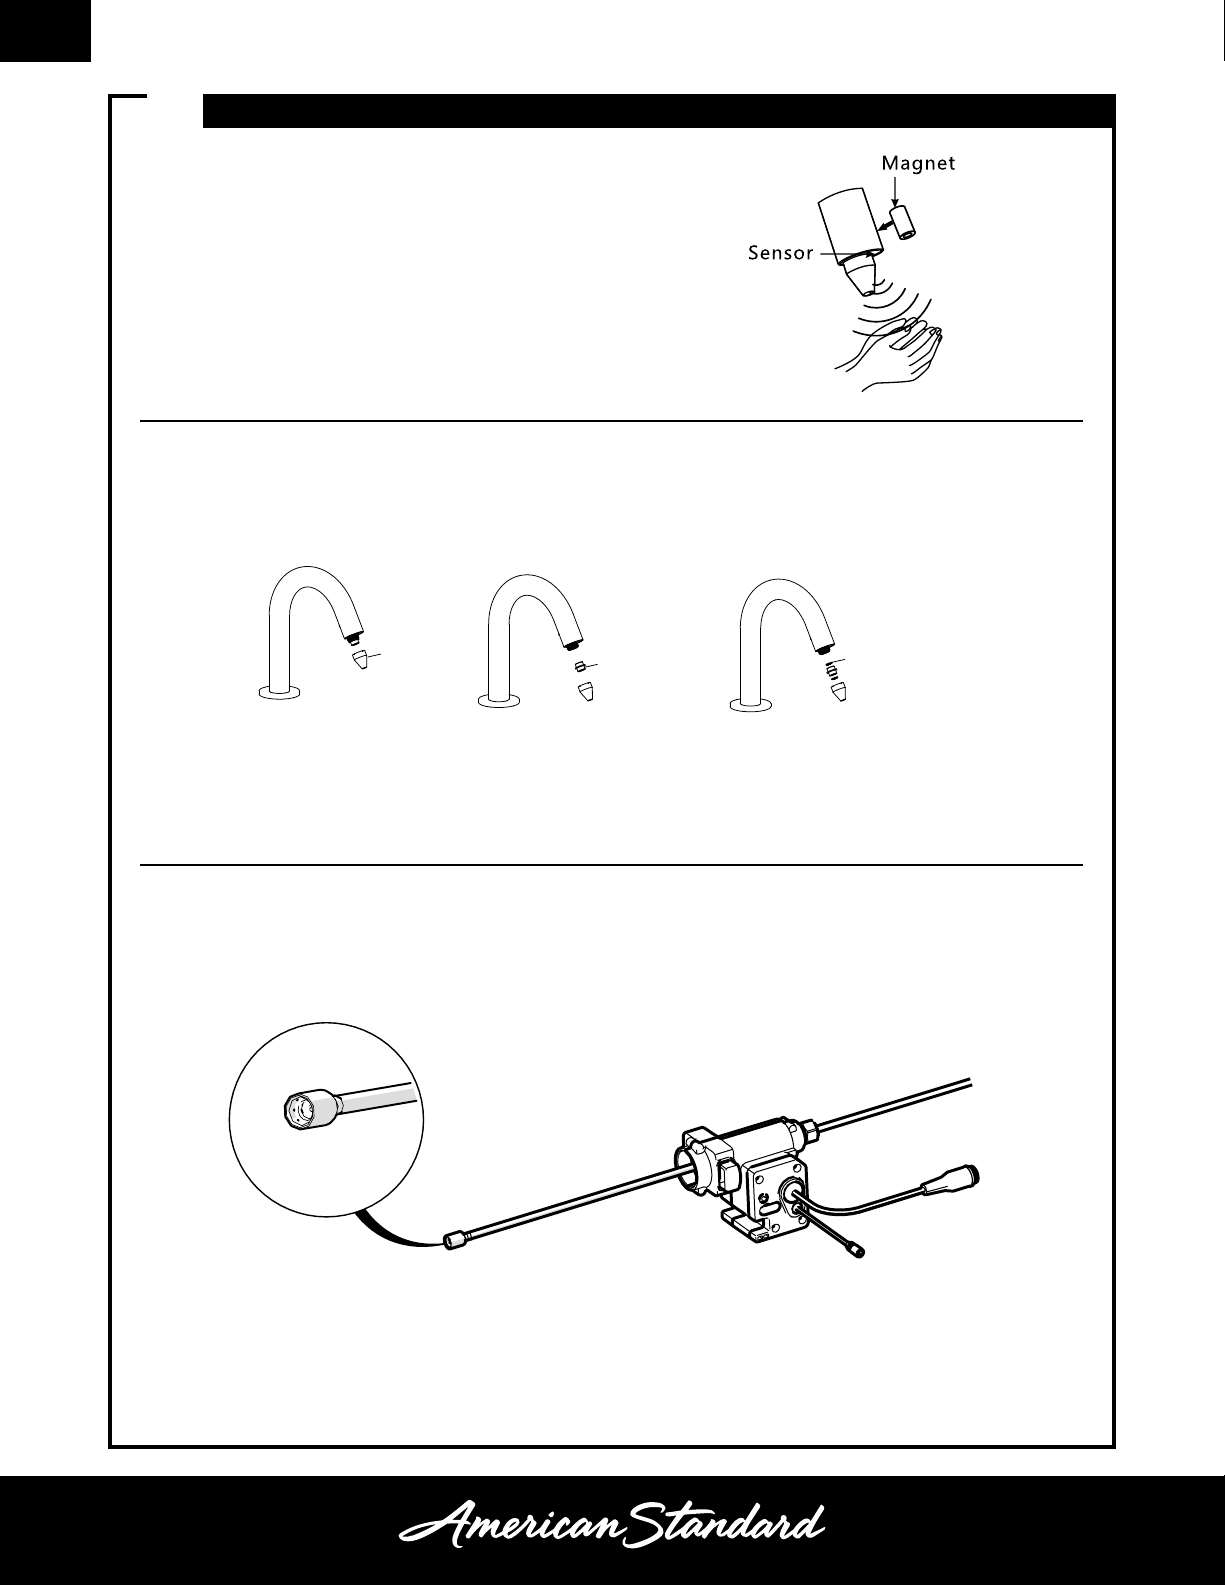
7SERVICE AND MAINTENANCE
Sensor Adjustment:
• Move a magnet close to the sensor at the top of the
faucet. An LED light will flash continuously during the
adjustment. When the light stops flashing, the sensor
is now adjusted to its surroundings and should
operate normally when a hand/object is moved within
the sensor range.
Nozzle Cleaning:
• After a week of not being used there is a risk of soap build up in the nozzle. Follow these
steps to clean the nozzle after being idle:
Pump Maintenance:
• The soap pump may not be able to pump any liquid due to the machine being idle or the soap being
completely depleted before replacing the bottle.
1. Turn the nozzle
anticlockwise
2. Pull out the
rubber plug
3. Remove the filter screen
from the rubber plug and
clean it. Re-install after
cleaning.
1. Remove the soap connector as shown on the left
and ensure that the check valve is not clogged
due to soap.
2. Place the controller leveled, connect the power supply and press the start button on the
controller. After starting the motor to fill the gear pump with liquid, the controller can be
installed back into the soap bottle for normal use.

8
1
2
1
Refilling Soap:
• Refill the soap bottle when the soap reaches
20 mm from the bottom of the bottle. Do not
let it completely deplete.
• Press the BUTTON (1) to unlock the soap
bottle.
Note: Hold the soap bottle when unlocking it
as the soap bottle detaches quickly.
• Clean the soap bottle periodically with water
to prevent buildup.
• Do not use abrasive soaps with particles as
this can lead to clogs.
• Push the refilled soap bottle back in to the
locking mechanism.
Recommended Soap:
• Clean Revolution®Foaming Hand Soap
• Foam Soap with 1-20 cps Viscosity Range
SERVICE AND MAINTENANCE (CONTINUED)
A
• Replace the batteries when a light in the sensor
window blinks.
• Unscrew the SCREWS (1) on the battery pack.
• Insert four BATTERIES (2) and reinstall the battery
pack cover.
For DC powered Soap Dispensers
only.
Replacing Batteries:
9SERVICE AND MAINTENANCE (CONTINUED)
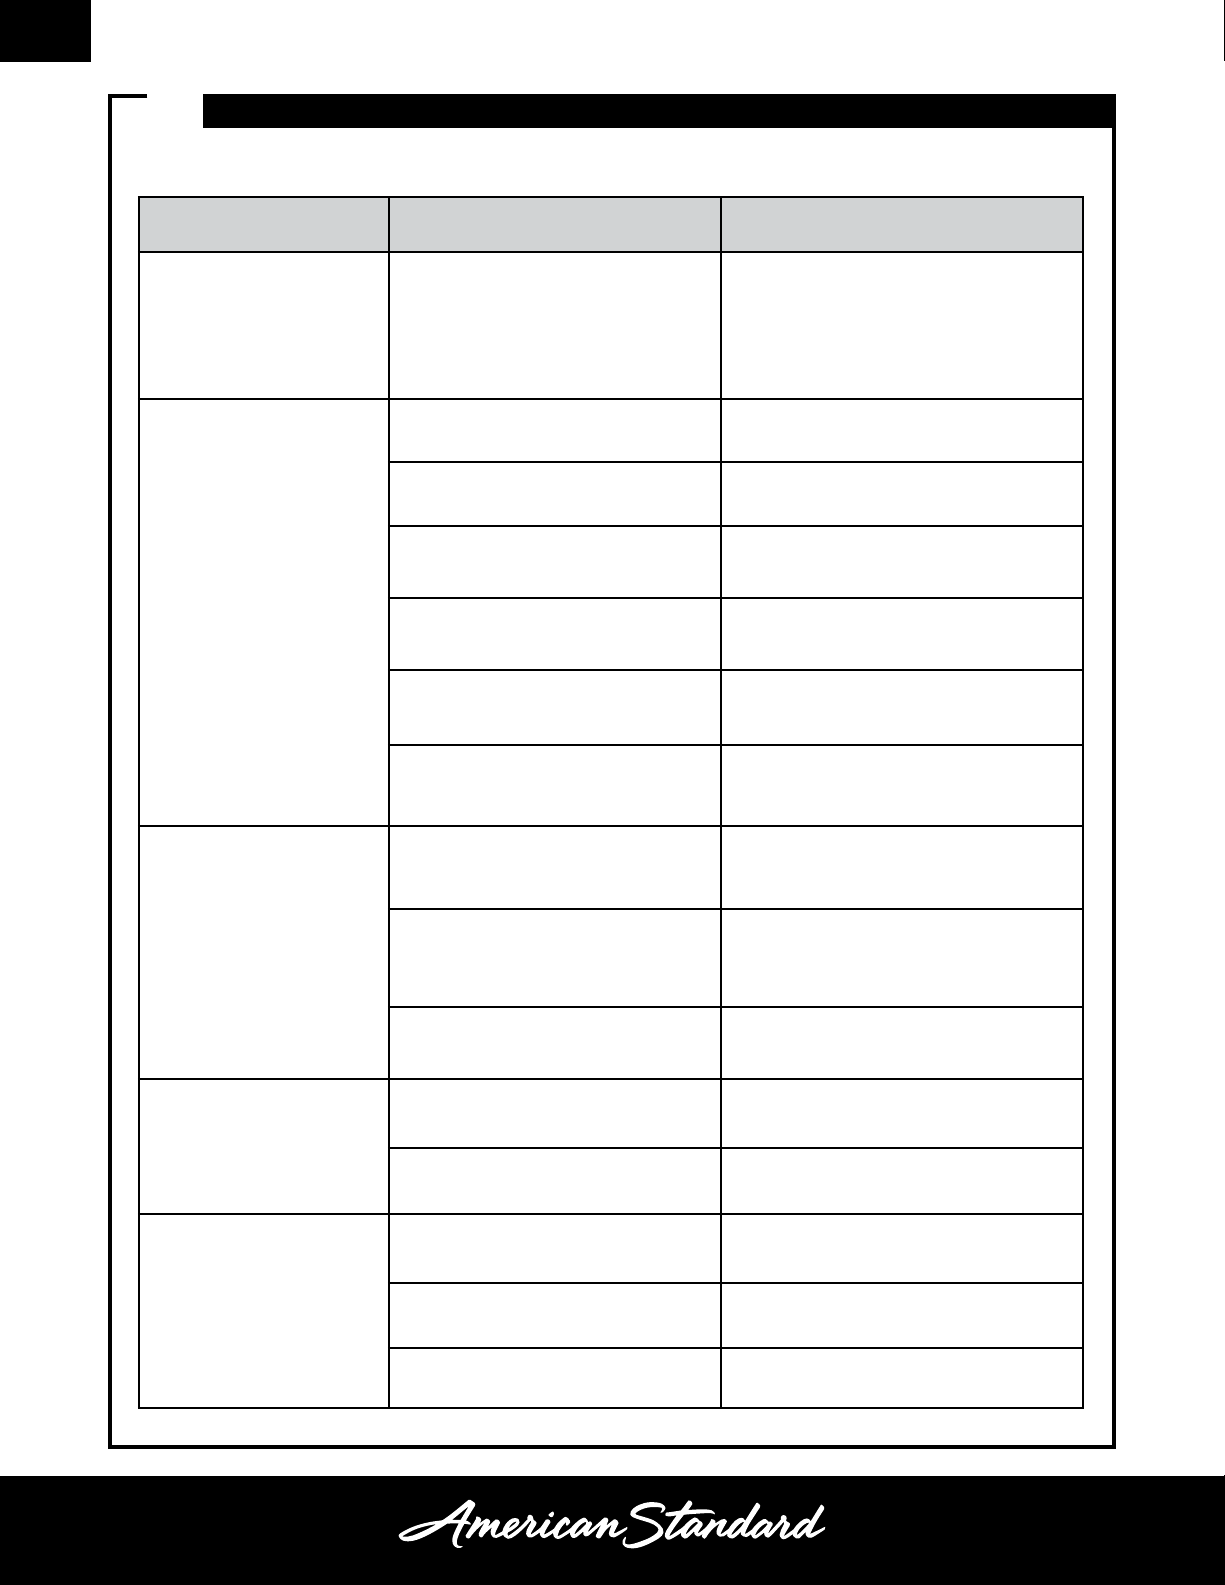
SYMPTOMS PROBABLE CAUSE RECOMMENDED ACTION
An LED light flashes at
the base of the soap
dispenser twice every
2-3 seconds.
Low battery is out of power (lower
than 3.9 volts)
Replace the batteries and prime the
soap dispenser
No soap dispenses.
The sensor lens is dirty Wipe the sensor lens with a clean,
dry, soft cloth
The sensor cable is disconnected Reconnect the sensor cable
The tube (soap and air) is
disconnected Reconnect the tube to the control box
No power supply or wrong
connection Check the power supply connection
The soap pump is not primed after
refilling Prime the pump
The dispensing tube/check valve is
blocked
Clean the dispensing tube/check valve
with warm water
Insufficient amount of
soap dispensed.
The nozzle is clogged Remove the nozzle and foaming
assembly. Clean with warm water
The check valve is clogged Remove the check valve from
dispensing tube. Clean with warm water
The soap pump is not working
correctly Order and install a new soap pump
Only air bubbles are
dispensing.
The soap pump outlet is clogged Remove the soap pump tubing
The soap pump is leaking Order and install a new soap pump
No foam is dispensing.
Only liquid soap is
dispensing.
The air pump is disconnected Check the air pump connection and
reconnect the tube to the control box
The air pump/tube is clogged Remove the air pump tubing. Clean the
air pump outlet with warm water
The air pump is not working Order and install a new air pump
Troubleshooting
WARRANTY
FAUCET LIMITED LIFETIME FUNCTION AND FINISH WARRANTY
FOR RESIDENTIAL INSTALLATIONS: AS America, Inc. (“American Standard®”) warrants this product to
be free from defects in materials or workmanship for as long as the original consumer purchaser owns this
product. Proof of purchase (original sales receipt) from the original consumer purchaser must be made
available to American Standard for all warranty claims. This warranty is non-transferable. It does not apply in
the event of product damage due to the use of other than genuine American Standard replacement parts,
installation error, abuse, misuse or improper care and maintenance (whether performed by a plumber,
contractor, service provider or member of the purchaser’s household). The warranty excludes damage
due to aggressive air or water conditions, or harsh or abrasive cleaners and/or materials.
FOR COMMERCIAL INSTALLATIONS: For all industrial, commercial and business usage the warranty
period is five years, from date of purchase and except for duration, all other aforementioned warranty terms
apply. For both Residential and Commercial warranties, batteries are not included in the warranty.
FOR ELECTRONIC FAUCETS, VALVES AND CONTROLS: American Standard warrants its electronic faucets,
valves and controls to be free from manufacturing defects in material and workmanship under normal use
for five (5) years from the date of purchase by or for the original consumer owner. American Standard will
provide free of charge, at it’s sole option, replacement part(s) or product (or if no longer available, a
comparable product) to replace those which have proven defective in materials or workmanship.
This warranty does not cover labor charges incurred and/or damage sustained in installation, repair or
replacement, nor incidental or consequential damages. This warranty is effective for all faucets sold after
March 1, 2018.
THIS WARRANTY IS EXCLUSIVELY IN LIEU OF ALL OTHER WARRANTIES, INCLUDING ANY IMPLIED
WARRANTIES OF MERCHANTABILITY OR FITNESS FOR A PARTICULAR PURPOSE.
This warranty gives the original consumer purchaser of an American Standard faucet specific legal rights
which may vary from state to state or from province to province. In some states or provinces the exclusion or
limitation of incidental or consequential damages is not allowed, so those exclusions may not apply to you.
UNITED STATES
American Standard Brands
1 Centennial Ave
Piscataway, New Jersey 08854
Attention: Director of Customer Care
For residents of the United States,
warrantyinformation may also be obtained
by calling the following toll free number:
(800) 442-1902
www.americanstandard.com
PLEASE COMPLETE AMERICAN STANDARD WARRANTY REGISTRATION PROCESS AND SAVE THIS WARRANTY INFORMATION
IMPORTANT: Registration of the faucet must be completed for this warranty to become effective. Your registration will make it easier
to contact you in the event of a product recall.*
INSTRUCTIONS: Register your faucet at www.americanstandard.com. Please save your proof of purchase (sale receipt).
If you need assistance or do not have access to our website, please contact American Standard Customer Care at: (800) 442-1902.
An American Standard representative will assist in completing the warranty registration.
*In California, your warranty rights remain intact even if you do not complete the registration process.
THIS WARRANTY IS NOT TRANSFERABLE FROM ORIGINAL CONSUMER PURCHASER.
CANADA
LIXIL Canada, Inc.
5900 Avebury Rd.
Mississauga, Ontario
Canada L5R 3M3
Toll Free: (800) 387-0369
www.americanstandard.ca
MEXICO
American Standard B&K Mexico
S. de R.L. de C.V.
Via Morelos #330
Col. Santa Clara
Ecatepec 55540 Edo. Mexico
Toll Free: 01-800-839-1200
www.americanstandard.com.mx
Indice
Lingue:


