AODELAN E3+ Manuale utente

1
Wireless Flash Trigger Transmitter
无线电引闪发射器

2
1
The product is classied
as Class 3R laser product,
according to the following
standards IEC/EN 60825-1
"Radiation Safety of Laser
Products."
Class 3R: A Class 3R laser
is considered safe if handled
carefully, with restricted beam
viewing. With a class 3R laser,
the MPE can be exceeded,
but with a low risk of injury.
Visible continuous lasers in
Class 3R are limited to 5 mW.
For other wavelengths and
for pulsed lasers, other limits
apply.

2
Thank you for purchasing an Aodelan product
Note: Before using the E3+Wireless Trigger for Canon, please read this
instruction manual carefully. Please also note to upgrade its rmware to the
latest version following the instructions provided on www.aodelan.net. (To
check the rmware version, please see page 10).
Warnings
1. This product is a precise electronic instrument. Do not expose to damp
environments or dust.
2. Please shut down the power of all devices when installing the wireless
trigger.
3. Do not drop or crush.
4. Do not use the wireless trigger at ammable, explosive or high temperature
environment.
5. Do not use harsh chemicals or solvents to clean the body. Use a soft cloth
or lens paper.
6. Remove batteries from the wireless trigger if not being used for an extended
period.
7. Interference: The E3+ wireless trigger transmits radio signals at 2.4GHz.
Its performance can be affected by electrical current, magnetic elds, radio
signals, wireless routers, cellular phones, and other electronic devices.
Environmental objects, such as large buildings or walls, trees, fences, or cars
can also affect transmission performance. If your wireless trigger can’t be

3
triggered, move its location slightly.
FCC Interference Statement:
This device complies with part 15 of the FCC Rules. Operation is subject to the
followingtwo conditions: (1) This device may not cause harmful interference,
and (2) this device must accept any interference received, including
interference that may cause undesired operation.
FCC Radiation Exposure Statement:
This equipment complies with FCC RF radiation exposure limits set forth for
an uncontrolled environment. This device and its antenna must not be co-
located or operating in conjunction with any other antenna or transmitter.
NOTE:
This equipment has been tested and found to comply with the limits for a
Class B digital device, pursuant to Part 15 of the FCC Rules. These limits
are designed to provide reasonable protection against harmful interference
in a residential installation. This equipment generates, uses and can radiate
radio frequency energy and, if not installed and used in accordance with
the instructions, may cause harmful interference to radio communications.
However, there is no guarantee that interference will not occur in a particular
installation. If this equipment does cause harmful interference to radio or
television reception, which can be determined by turning the equipment off and
on, the user is encouraged to try to correct the interference by one or more of
the following measures:
-- Reorient or relocate the receiving antenna.

4
-- Increase the separation between the equipment and receiver.
-- Connect the equipment into an outlet on a circuit different from that to
which the receiver is connected.
-- Consult the dealer or an experienced radio/TV technician for help.
E3+Wireless Trigger for Canon/Transmitter
E3+ transmitter is a transmitter for wireless ash shooting. It can control up
to 5 groups (15units) of Canon Speedlites that have a wireless multiple ash
shooting function using radio transmission, as well as non-wireless Canon
ETTL Speedlites by using E3+ receiver. The transmitter supports multiple ash
modes and shooting approaches including E-TTL II/E-TTL, Manual, MULTI,
Ext.A and Linked Shooting, catering to the diversication of photography
lighting demands.

5
Table of Contents
I. Parts-------------------------------------------------------------------------------------------
-
-6
II. Preparation Before Use-----------------------------------------------------------------
-
7
III. The LCD Display-------------------------------------------------------------------------15
IV. Wireless Flash Shooting: Radio Transmission-------------------------------18
1. Wireless Flash Setting----------------------------------------------------------------19
2. ETTL: Fully Automatic Wireless Flash Shooting-------------------------------23
3. Using Fully Automatic Wireless Flash--------------------------------------------24
4. ETTL: Wireless Multiple Flash Shooting with Flash Ratio-------------------28
5. M:Wireless Multiple Flash Shooting with Manual Flash Output------------32
6. Multi:-------------------------------------------------------------------------------
-------
-33
7. Gr: Shooting with a Different Flash Mode for Each Group------------------35
8. Linked Shooting------------------------------------------------------------------------37
V. Setting Transmitter Functions with Camera Operations -------------------41
VI. Customizing the Transmitter--------------------------------------------------------44
1.C.Fn: Setting Custom Functions----------------------------------------------------44
2.P.Fn: Setting Personal Functions --------------------------------------------------46
VII. Trouble Shooting Guide -------------------------------------------------------------48
VIII. Technical Specication -------------------------------------------------------------49

6
I. Parts
1. <LINK> indication light: Radio
transmission conrmation lamp
2. LCD panel
3. Function Button 3
4. Function Button 2
5. Function Button 1
6. <MODE>: Flash mode button
7. < >: Charge lamp/Test ash
button
8. < >: Select/Set button
9. < >: Select dial
10. Mounting foot lock lever
11. Battery compartment cover
12. Function button 4
13. < >: Linked shooting button
14. Power button
15.
Flash exposure conrmation lamp
16. Lock-rel ease button
17. USB port
18. Remote release terminal
19. Contacts
20. Mounting foot
21. Locking pin
22. AF assist light
1
5
6
7
8
9
10
2
3
411
12
13
14
15
19
16
17
18
20
21
22

7
II. Preparation Before Use
Installing the Batteries
1. Press the battery compartment cover and slide it down as shown to open
the battery cover. (See Picture 1)
Picture 1 Picture 2
2. Insert the batteries as shown. Make sure the “+” and“-”battery contacts
are correctly oriented as shown. (Note: Please use 2 pieces of AA alkaline
batteries or AA type NI-MH batteries). (See Picture 2)
3. Replace the battery cover and push back into the locked position.
Attaching and Detaching the E3+Transmitter
Attaching the E3+transmitter to the camera hot shoe:
1. Turn off the camera and E3+transmitter
2. Align the E3+ transmitter hot shoe with camera’s hot shoe mount.
8
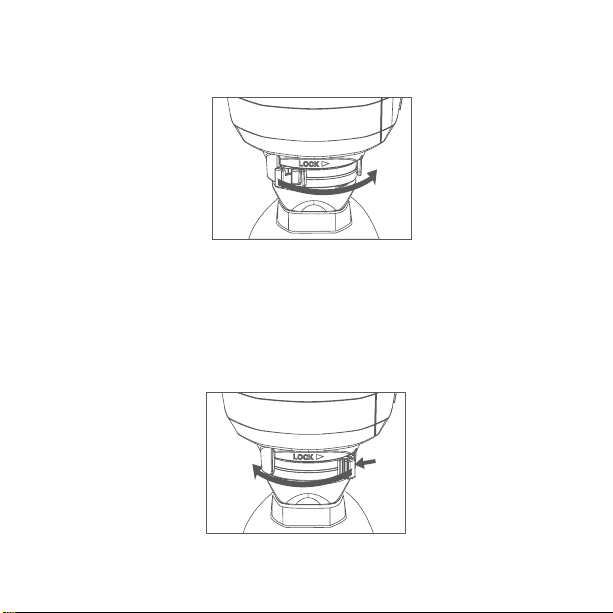
3. Slide the E3+ transmitter all the way into the camera’s hot shoe mount.
4. Lock the E3+ transmitter by sliding the mounting foot lock lever to the right
until the lock lever clicks in place.(See picture 3)
Picture 3
Detaching the E3+transmitter
1. Lock release: press the lock-release button while slide the lock lever all
the way back to the left.(see picture 4)
2. Slide the E3+ transmitter out of camera’s hot shoe mount.
Picture 4
Altri manuali per E3+
1
Indice
Altri manuali AODELAN Trasmettitore


