Arrowhead SK1L Manuale utente
SK1L
LCD KEYPAD
Owner's Manual
use with
SC800 & SC1600 Control panels
IT IS IMPORTANT FOR YOUR SAFETY TO TEST YOUR
SYSTEM AND IT'S COMPONENTS REGULARLY.
P/N 64812819 A PDF 8/15/97

2
General Description
The SK1L is a digital arming station that provides full system control and
displays full system status from one or more convenient locations. A
brief description of the functions of each light and the LCD display is
shown in Figure 1. Additionally, built into each SK1L is a miniature
sounding device which, when active, indicates various conditions such
as a Pre-Alarm Warning, Fault Condition, Test Modes of operation, or
Door Annunciation.
Your keypad has the added convenience of additional access codes.
These secondary codes are designed to provide access to a maid or
other service persons for whom you want to grant entry. Obviously, they
can also be used in any other way that you desire.
Arming, disarming, bypassing zones, etc., can be accomplished using
any of the codes. In order to change codes from the keypad, use of the
primary access code is required. Access codes can be changed from
the keypad and must have 4 digits.
IT IS IMPORTANT FOR YOUR SAFETY THAT YOU TEST
YOUR
SYSTEM REGULARLY.
Operating Instructions
Paragraphs that are indicated by a refer to options that may or may not apply
to your system. Those which your installer has marked with an x should
be read as they contain information which pertains to your system.
The material in this publication is for information purposes only and is subject to
change without notice. SENTROL, INC., assumes no responsibility for any error
which may appear in this publication.

3
System Configuration
This page should be marked by your installer at the time of installation to define
the Panel that was installed, and the options that were programmed.
Smoke detector reset from keypad
Duress from keypad
Silent alarm from keypad
Audible alarm from keypad
Fire alarm from keypad
Partitioned mode
Abbreviated arming
Opening and closing by user
Group 1 bypass zones
_________________________
Group 2 bypass zones
_________________________
Chime zones
_________________________
Figure 1

4
(when ARMED light is on)
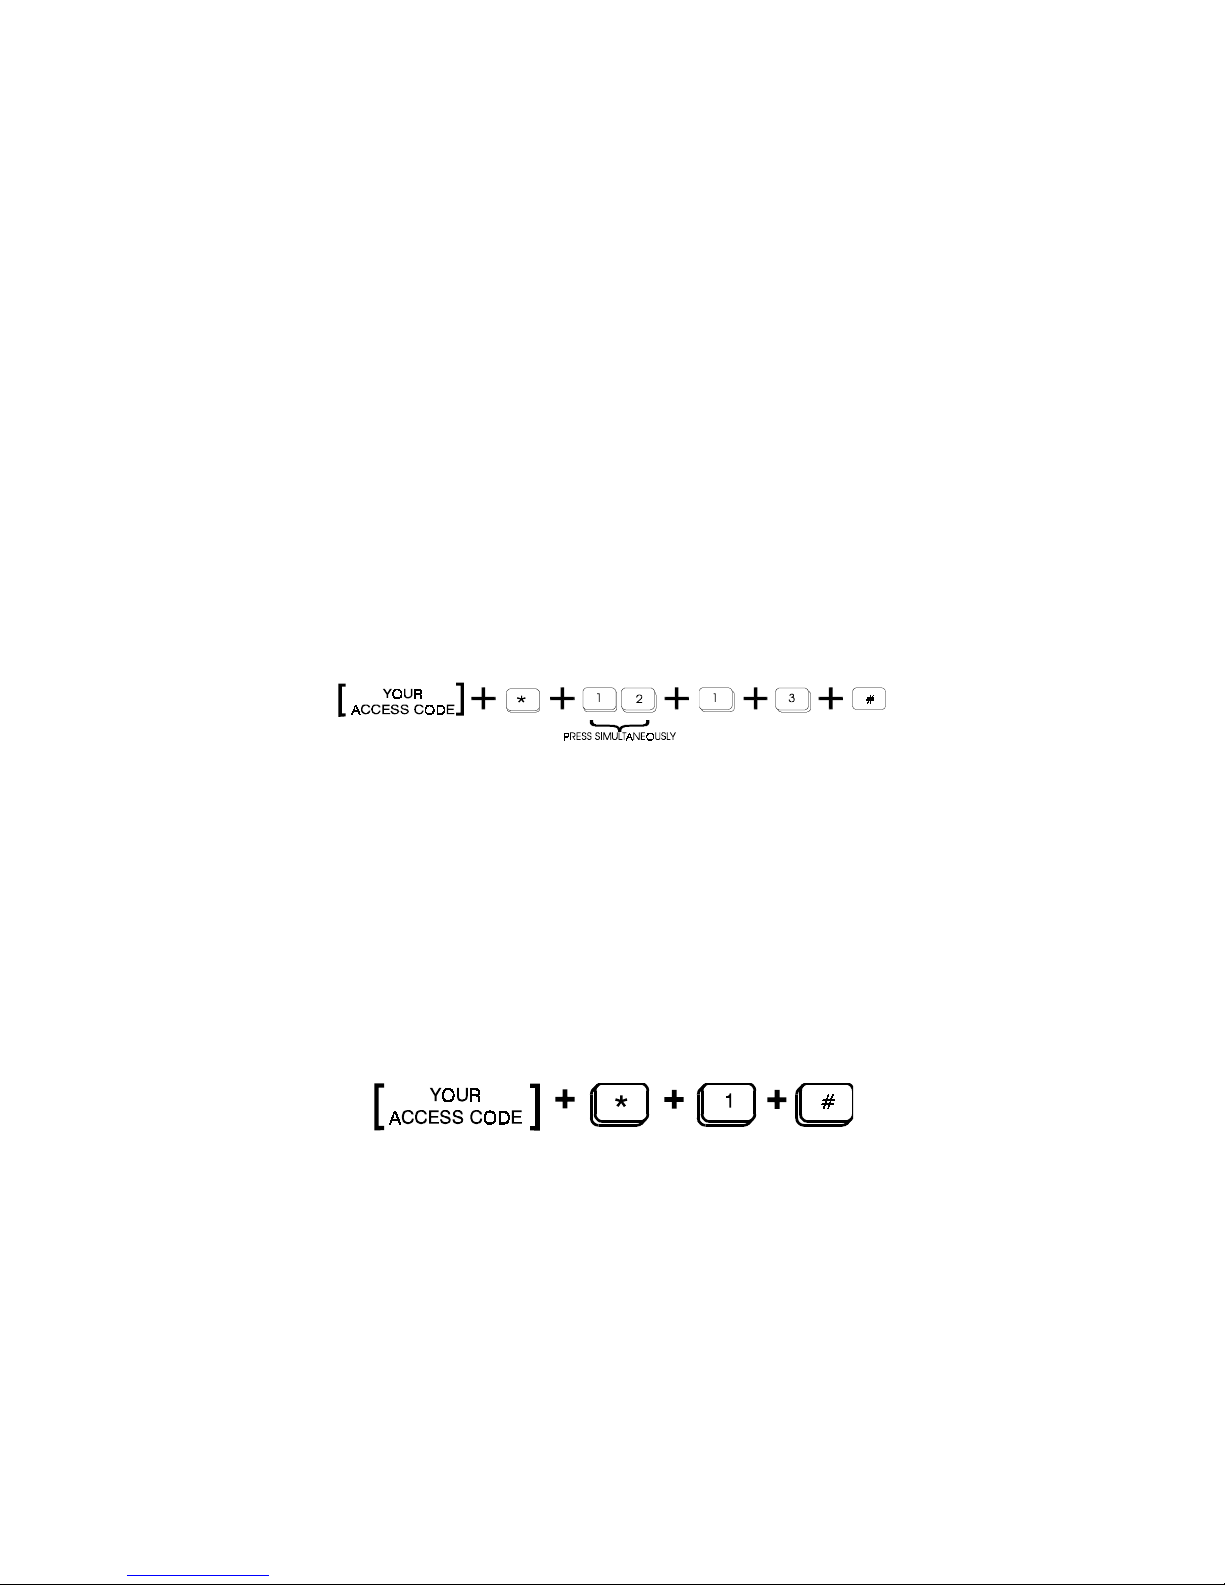
To Disarm your system (assume Access Code 1234), enter your Access
Code, key sequence as follows:
Figure 2
If you disarm your system, the armed light (RED) is off and the LCD display
will show READY if all zones are secure, or NOT READY if one or more zones
are not secure. If you silence the system after being in ALARM the LCD display
will show the zone description of the zone that was in alarm. This is called
ALARM MEMORY. It will be cleared the next time the system is ARMED. The
24 Hour zones will remain on all the time and they can be displayed by using
System Directory command code: [Your Access Code] * 6 # .
--Green READY Light when ON indicates that all protected areas
are secure and system is ready to be armed. A blinking ready light indicates
a Fault Condition.
--Red General ARMED Light when ON indicates system is
armed or on. A blinking armed light indicates that an alarm has occurred.
--The "LCD DISPLAY" indicates system status in Alpha Numeric
characters, with zone arming, zone bypassing, alarms and trouble conditions
all being displayed.
System information such as AC OFF, LOW BATTERY, and FAIL TO COMMUNI-
CATE along with ZONE DESCRIPTIONS will be displayed when needed to
clearly show the current condition of the system.
NOTE: This manual will use the default descriptions when referring to the
LCDdisplay, and assume Auto Scrolling is enabled. These descriptions may be
changed by your installer.
Disarming & Silencing the System

5
RECOMMENDATION:
If, when arriving home, the burglar alarm is sounding, contact police from
a nearby location. DO NOT ENTER YOUR RESIDENCE.
Arming System with Ready Light On or Off
If the READY light is on, all zones may be armed by entering your Access Code,
using the key sequence in Figure 3. If the READY light is not on you must either
go and close the door or window that is open or BYPASS the zone and eliminate
it from the system for this ARMING. When the READY light is not on the display
will show VIOLATED and scroll through the zone descriptions of the zones that
are not ready.
Figure 3
Your system is now armed.
The armed light is on and the display shows ARMED.
Zone Bypass with Ready Light One or Off
If the ready light is off the display will show VIOLATED and the description of
the zone that is open will be scrolling through the display. Let us assume that
the zone 3 "FRONT BEDROOM" window is open. The zone 3 description
"FRONT BEDROOM" will be in the display. Entering the Access Code will not
arm the system because the zone 3 window is open. Suppose that the window
is intentionally left open to allow some air circulation and the rest of the zones
are to be armed. To bypass a zone, enter your access code, then enter the
number of the zone to be bypassed (in this case 3), enter key sequence as
follows:
Figure 4
6
All the other burglary zones except zone 3 will ARM and the display will show
ARMED. Zone 3 is now deactivated. If the window is closed and opened again,
an alarm condition will not result, as this zone will be bypassed until the system
is disarmed and rearmed. When the system is disarmed the bypass is
removed.
Zone Bypass (cont'd)
Bypassing zones with zone numbers higher than 9 require the use of the
"Two Digit" key pair prior to inputting the zone number. In the following
example zone 13 will be bypassed:
Figure 5
Group Bypass
Instead of bypassing zones individually, your installer may have assigned
several zones together to be bypassed all at one time. An example would be
turning off all the interior zones of the premises allowing movement, while still
protecting the perimeter.
The SC series control panels have 2 bypass groups which can be programmed
and used separately.
Example: Interior zones 2, 3 and 4 have been assigned as GROUP BYPASS
#1. To bypass zones 2, 3 and 4 enter the following key sequence:
Figure 6
Zones 2, 3, and 4 will BYPASS but the other zones will ARM. This is a very
easy way of arming a part of the system all at one time. The display will
show ARMED. To bypass the zones programmed to group 2 use the
following sequence:

7
Figure 7
Instant/Delay Mode
The system will normally arm in the Delay Mode when leaving the premises.
This will delay arming, allowing time to exit. When entering, the alarm will be
delayed allowing time to disarm the system. The audible warning device will
sound during the entrance delay reminding you to disarm the system.
The Instant Mode is primarily used in residences. It is used during sleeping
hours when an entrance delay is not wanted. If the Instant Mode is desired,
enter the key sequence as follows:
Figure 8
The LCD display will show ARMED INSTANT .
Panel Test Mode
Your alarm system and its associated components (intrusion detectors, smoke
detectors, etc.) should be tested periodically. You can test these devices
yourself using the panel test mode. While in test mode the keypad beeps
continuously to tell you it is in test mode but it will not send any alarm signals
to the Monitoring Center. As you go through the system tripping the zones you
will get a short ring of the bell to let you know when a zone is violated. Entry and
exit delays are shortened to 4 secs during the test. After you have tripped all the
zones and returned to the keypad you will find all of the zones that responded
in ALARM MEMORY. In this way you can quickly test your system using only one
person and then verify that all zones worked when you return to the keypad.
If the Panel Test Mode is desired enter key sequence as follows:
Figure 9

8
The LCD display will be scrolling through the zones that were tripped.To exit
test mode enter your access code.
It is important for your safety that you test your system regularly.
Testing Communicator
Check with your installer as to how to test, and how often to test the
communicator portion of your system. Various central monitoring stations
have different procedures for testing the communicator. Your installer is
familiar with this procedure.
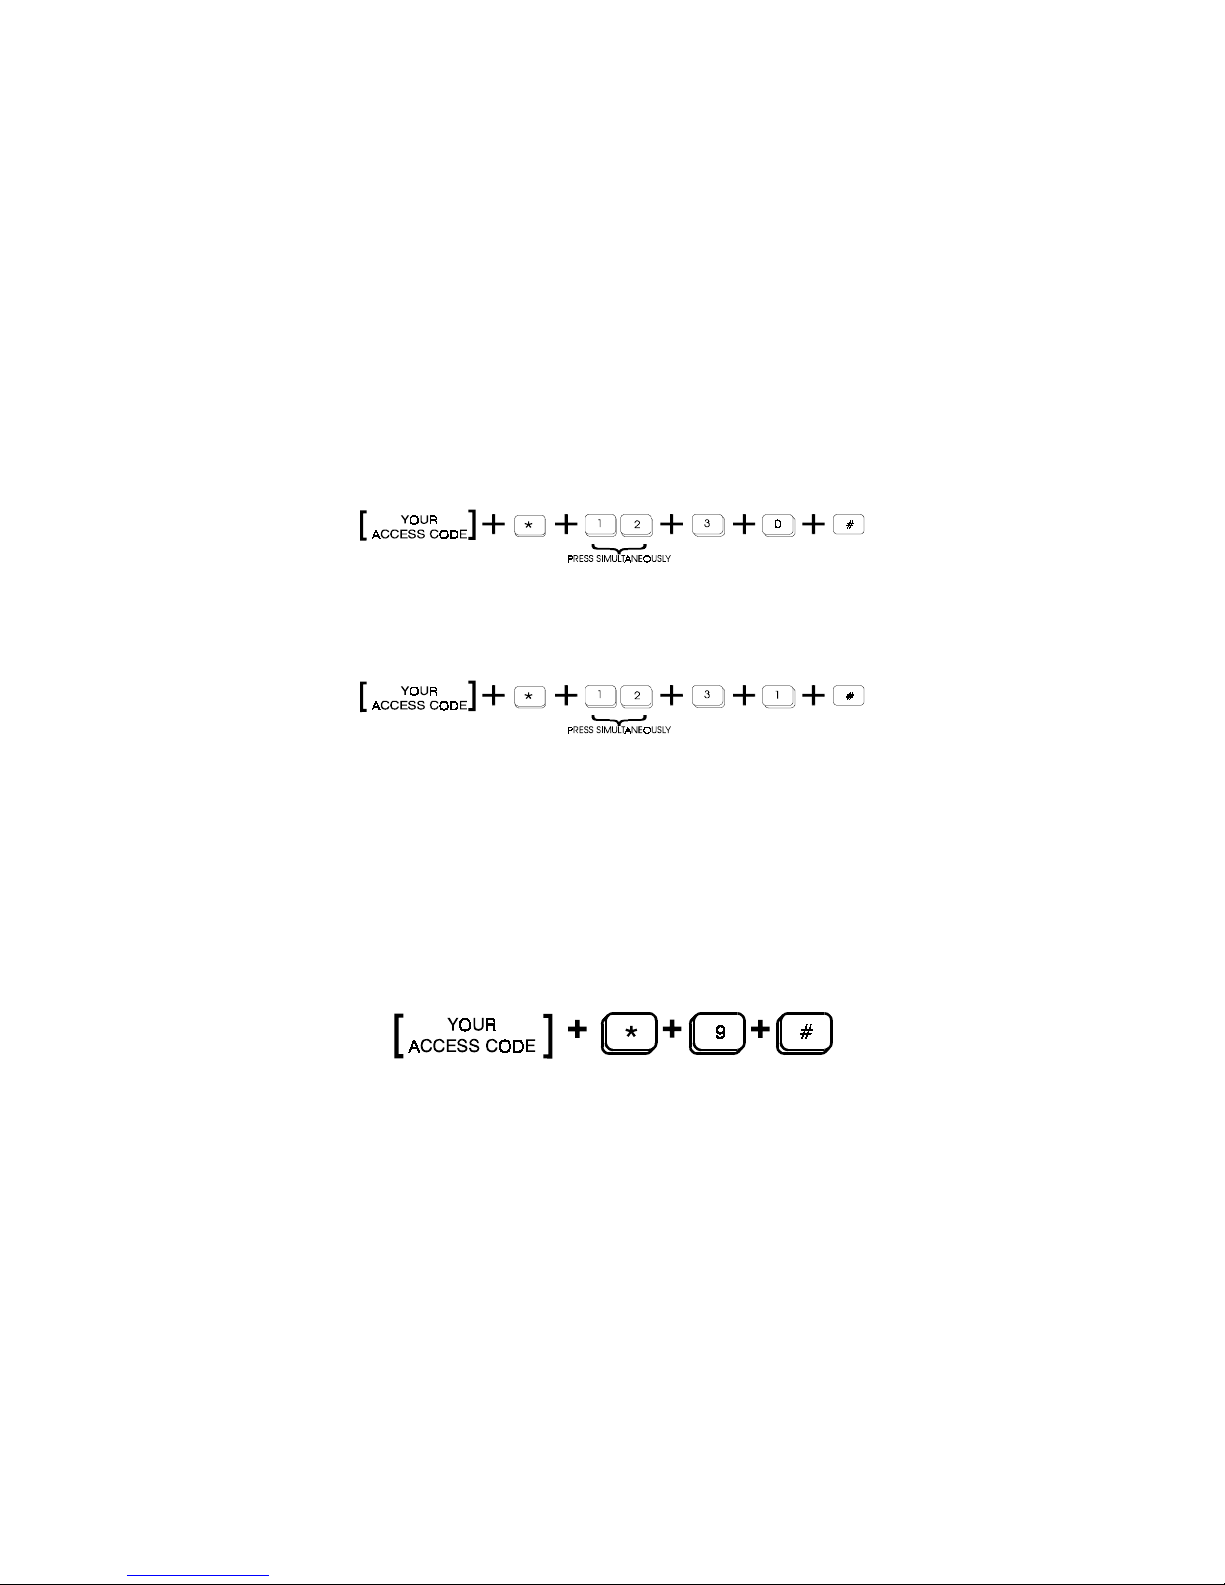
Smoke Detector Reset
If you have a smoke detector for use with your system, your panel can be
programmed to manually reset this device following an alarm condition by
simultaneously pressing the 1 KEY + 3 KEY on the SK1L keypad.
Abbreviated Arming
This allows the system to be armed by using only the first one, two, or three
digits of the access code. Once your installer has selected the number of digits
for abbreviated arming, access code(s) may be changed without effecting
abbreviated arming number of digits. All four access code digits must be used
to Disarm the the system.
Use full access code for arming if zone bypassing is desired.
Opening and Closing by User
The Opening and Closing by user code identifies the user who disarms
(opening) and arms (closing) the system. This is accomplished by assigning
an individual access code to each user, (up to 16 users on the SC800 and up
to 32 users on the SC1600). Select secondary codes as shown in Changing
User Code Section.
9
Chime Mode
Your installer may have designated certain burglary zones to briefly activate the
mini-sounder contained in each keypad. These zones typically annunciate that
a door has been opened or closed while the panel was disarmed. To turn on
the chime operation, enter the following key sequence:
Figure 10
If chime operation is not desired, simply enter the following key sequence:
Figure 11
Fault Condition
A Fault Condition could, if unheeded, potentially render your system inactive.
If such a fault should occur it will be indicated by a flashing green READY light,
a TROUBLE message on the LCD display, and an audible warning tone at the
keypad.
To identify the nature of the Fault Condition, enter the following sequence. This
will also silence the audible warning:
Figure 12
Fault conditions will be displayed on the LCD display.
The LCD display will now indicate the nature of the problem and it will scroll
through the problems if there is more than one. Discuss with your installer what
action to take if a problem should occur. If a trouble condition occurs on a fire
zone,(or Day/Night Trouble Zone), call your installer for service as an important
part of your system is out of order. Other messages that you may see are listed
below.

10
AC OFF: Indicates the A.C. power to your alarm
system has been disrupted.
LOW BATTERY: Indicates a low battery condition
FAIL COMMUNICATE: Indicates failure to communicate to the
central monitoring station.
IT IS IMPORTANT FOR YOUR SAFETY THAT YOU HAVE YOUR
INSTALLER CORRECT ANY FAULTS AS SOON AS POSSIBLE.
Duress (Ambush)
Duress is used during a hold-up when youre ordered to disarm your system.
When used, a silent alarm is transmitted to the central monitoring station. Press
the [0] after your Access Code, then press the ENTER#. The system will disarm
and a silent alarm will be transmitted.
NOTE: This function will only operate during a disarm command.
Normal Disarm Figure 13
Duress Disarm Figure 14
Altri manuali per SK1L
1
Indice
Altri manuali Arrowhead Tastiera


