AT&T 9452 Manuale utente

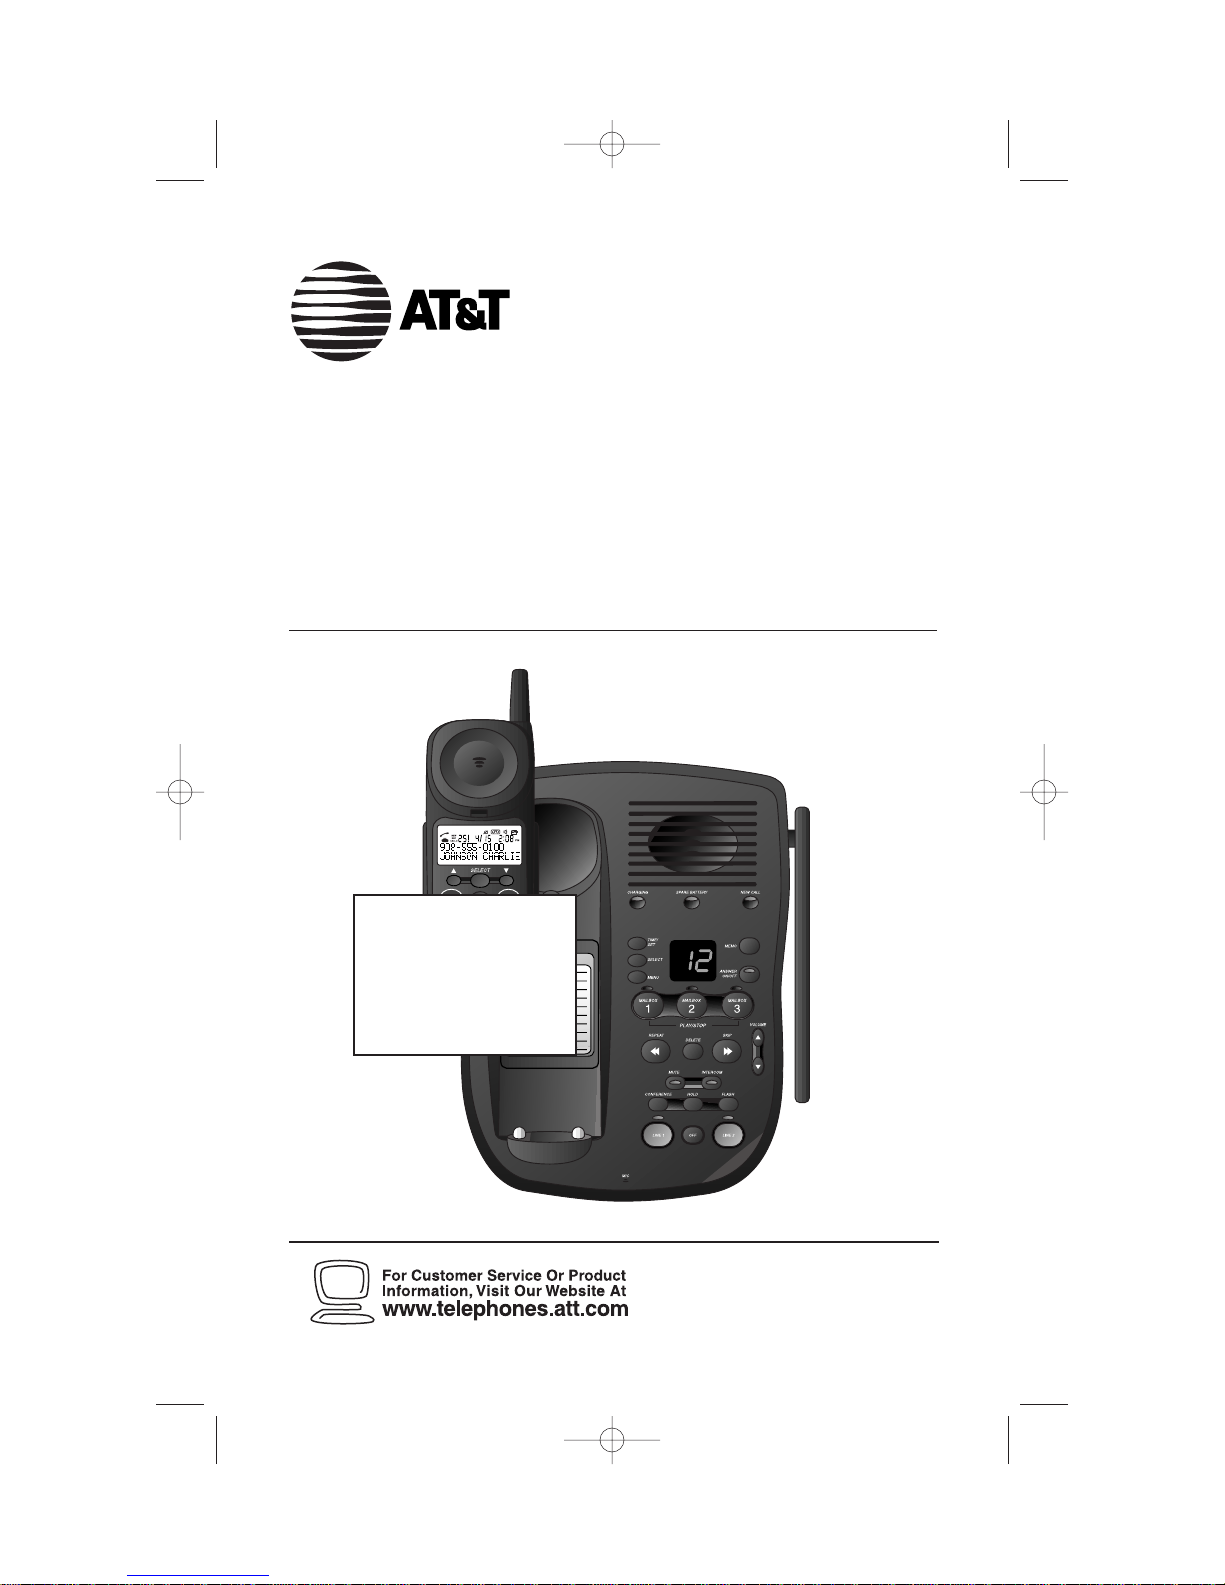
900 MHz Digital Two-Line
Cordless Speakerphone with
Answering System 9452
with Caller ID/Call Waiting
Please also read
Part 1 — Important
Product Information
USER’S MANUAL
Part 2
AT&T and the globe symbol are registered trademarks ofAT&T Corp.licensed toAdvancedAmericanTelephones.
REVISED
10/3/00
SCREEN WILL
BE UPDATED
9452_book_1ATT 10/5/00 3:17 PM Page ii

© 2000AdvancedAmericanTelephones. All rights reserved.
Printed in China. 850004409 Issue 1AT&T 10/00
9452_book_1ATT 10/5/00 3:17 PM Page iii

CONTENTS
1
BEFORE YOU BEGIN . . . . . . . . . . . . . 3
About Caller ID with CallWaiting.. 3
About the Data Port.......................3
About the Spare Battery Charger.. 3
INSTALLATION . . . . . . . . . . . . . . . . . . . . . . 4
BeforeYou Install.......................... 4
Table/Desk Installation...................6
Wall Installation ............................ 7
FEATURE SETUP . . . . . . . . . . . . . . . . . . . 9
Telephone Feature Setup.............. 9
Telephone Features........................9
TELEPHONE OPERATION
AT THE HANDSET . . . . . . . . . . . . . . . . . . . . . 10
Make a Call.................................. 10
Answer a Call.............................. 10
End a Call.....................................10
Hold ............................................ 10
Flash/CallWaiting........................ 10
Redial .......................................... 10
Intercom ..................................... 10
HandsetVolume.......................... 10
TemporaryTone Dialing.............. 11
Conference Calls......................... 11
Switching from Handset to
Base Speakerphone ................. 12
CallTimer.................................... 12
Headset Jack................................ 12
Operating Range......................... 13
TELEPHONE OPERATION
AT THE BASE . . . . . . . . . . . . . . . . . . . . . . . . . . . 14
Answer a Call.............................. 14
Switching from Base
Speakerphone to Handset....... 14
Mute............................................ 14
Conference Calls......................... 14
End a Call.................................... 15
Base RingerVolume..................... 15
Hold ............................................ 15
Page/Intercom............................. 15
SpeakerphoneVolume................ 15
Flash/CallWaiting........................ 15
CALLER ID OPERATION . . . . . . . 16
View Call History........................ 16
Dial a Number from
Call History.............................. 16
Erase a Call Record..................... 17
EraseAll Call Records.................. 17
Display Screen Messages............. 17
TELEPHONE DIRECTORY . . . . . 18
Store a Directory Name
& Number................................ 18
Edit a Directory Name
& Number................................ 19
Erase a Directory Name
& Number................................ 19
Store a Call History Record
in Directory............................. 19
Dial a Directory Number............ 19
ANSWERING SYSTEM
OPERATION . . . . . . . . . . . . . . . . . . . . . . . . 20
Audible Indicators....................... 20
About Mailboxes......................... 20
AboutAnnouncements ............... 20
RecordYourAnnouncement....... 21
Answering System
Feature Setup........................... 22
Feature Summary.........................22
ListenTo,Save,& Delete
Messages.................................. 23
Call Screening/Intercept............. 24
Record a Memo........................... 24
Connect with theAnswering
System...................................... 24
Voice Menu................................. 24
RemoteAccess Commands......... 25
MessageWindow Display............ 26
BATTERIES . . . . . . . . . . . . . . . . . . . . . . . . . 27
Charging the Handset
Battery Pack............................. 27
Replacing the Handset
Battery Pack............................. 28
Installing a Spare Battery.............29
IN CASE OF DIFFICULTY . . . . . 30
9452_book_1ATT 10/5/00 3:17 PM Page 1

9452_book_1ATT 10/5/00 3:17 PM Page 2

3
BEFORE YOU BEGIN
About Caller ID with Call Waiting
This product has a Caller ID with CallWaiting feature that works with
service from your local phone service provider.
Caller ID with CallWaiting lets you see who’s calling before you answer the
phone,even when you’re on another call.
You may need to change your phone service to use this feature. Contact
your phone service provider if:
• You have both Caller ID and CallWaiting,but as separate services
(you may need combined service)
• You have only Caller ID service,or only CallWaiting service
• You don’t subscribe to any Caller ID or CallWaiting services.
You can also use this product with regular Caller ID service,and you can use
this product’s other features without subscribing to either Caller ID or
combined Caller ID with CallWaiting service.
There are fees for Caller ID services,and they may not be available in
all areas.
This phone can provide information only if both you and the caller are in
areas offering Caller ID service and if both telephone companies use
compatible equipment.
About the Data Port
If you want to connect another device (such as a modem or fax machine)
to the wall jack,you can use the jack on the phone labeled DATA PORT.
This convenience port uses Line 2;a call picked up on Line 2 at this or
another extension,or incoming Caller ID information,may interrupt a fax,
modem,or message transmission.
About the Spare Battery Charger
This phone is equipped with a built-in spare battery charger in the base
unit. The spare battery charger allows you to always have a charged
battery available should the handset battery charge become low. For
complete information,see page 29.
9452_book_1ATT 10/5/00 3:17 PM Page 3

INSTALLATION
4
Before You Install
1Choose a location for the base near an electrical outlet and a
telephone jack.
This phone requires a modular telephone jack and a standard electrical
outlet (110vAC) not controlled by a wall switch. For optimum
performance,install the base on the highest floor of your home.
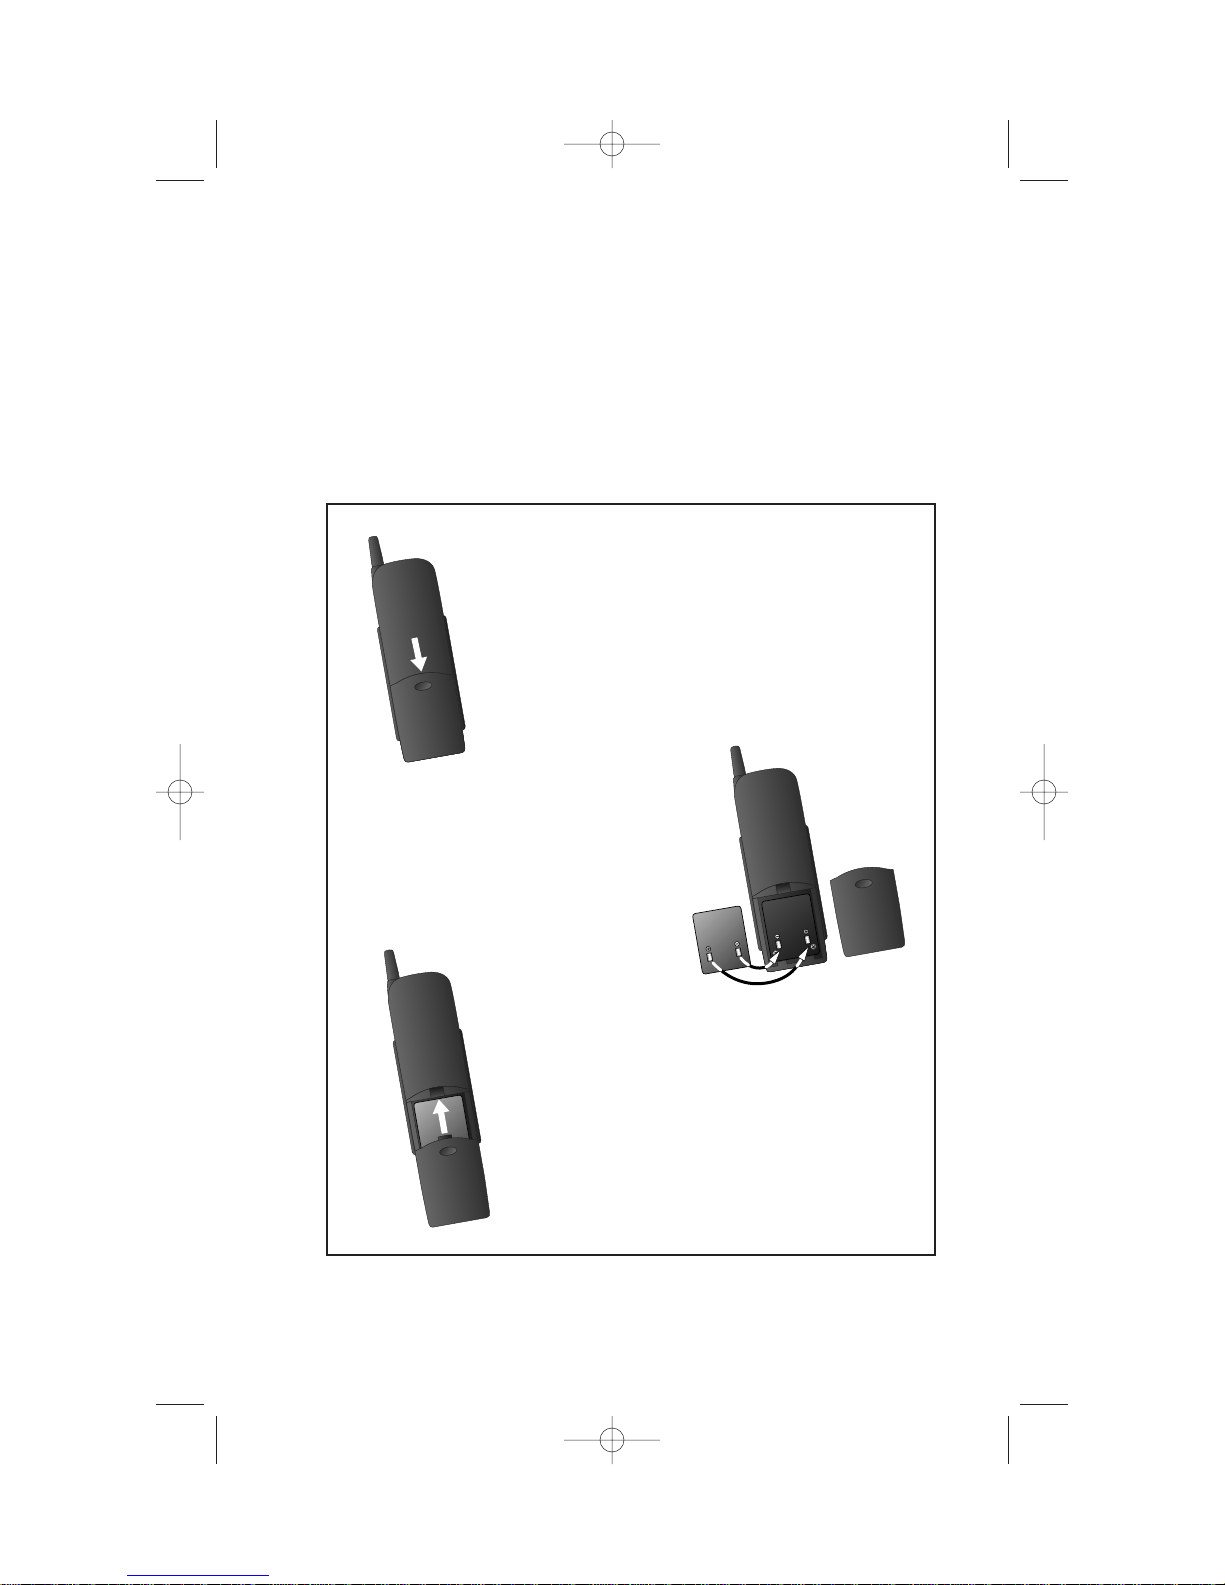
b) Place the battery
pack in the
handset. Align the
metal contacts on
the battery with
the contacts in the
battery
compartment.
c) Replace cover by
sliding it on its track
up over battery case
until it snaps firmly
into place.
a) Remove battery
compartment
cover by pressing
on the indentation
and sliding
downward.
9452_book_1ATT 10/5/00 3:17 PM Page 4

INSTALLATION
5
2Install the handset battery.
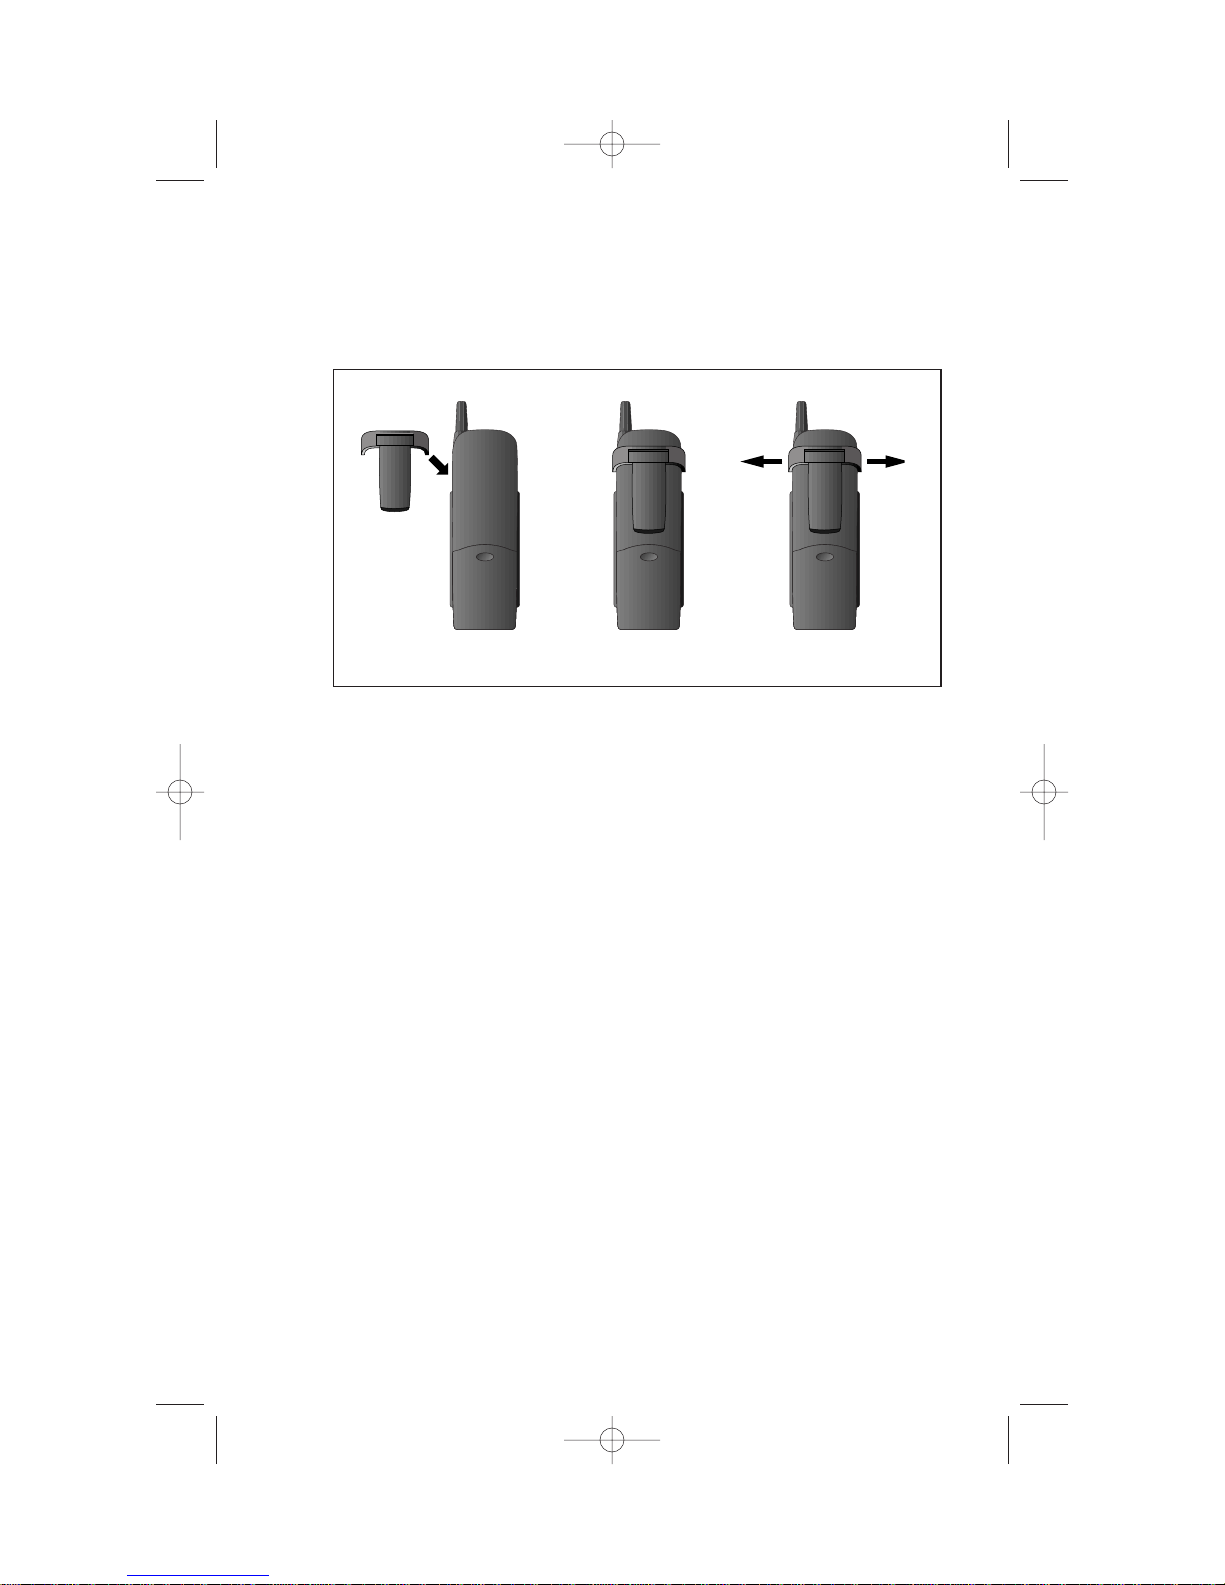
3 Attach the belt clip to the cordless handset (optional).
4 Set the dial mode.
The dial mode switch on the side of the base comes set toTONE.
If you have touch tone service,the phone will be ready to use when
installation is complete. If you have dial pulse (rotary) service,set the
switch to PULSE.
5Select base ringer volume for each line.
Set the RINGER switches on the side of the base to HIGH,LOW,or OFF.
To attach To remove
9452_book_1ATT 10/5/00 3:17 PM Page 5

INSTALLATION
6
Table/Desk Installation
1Connect the power cord.
Use only the power cord supplied with this product. If you
need a replacement,call 1 800 222-3111.
2 Charge the handset battery.
Place the handset in the base. Charge the battery for at least 16 hours
the first time. After the first charge,the battery is typically fully
charged overnight.
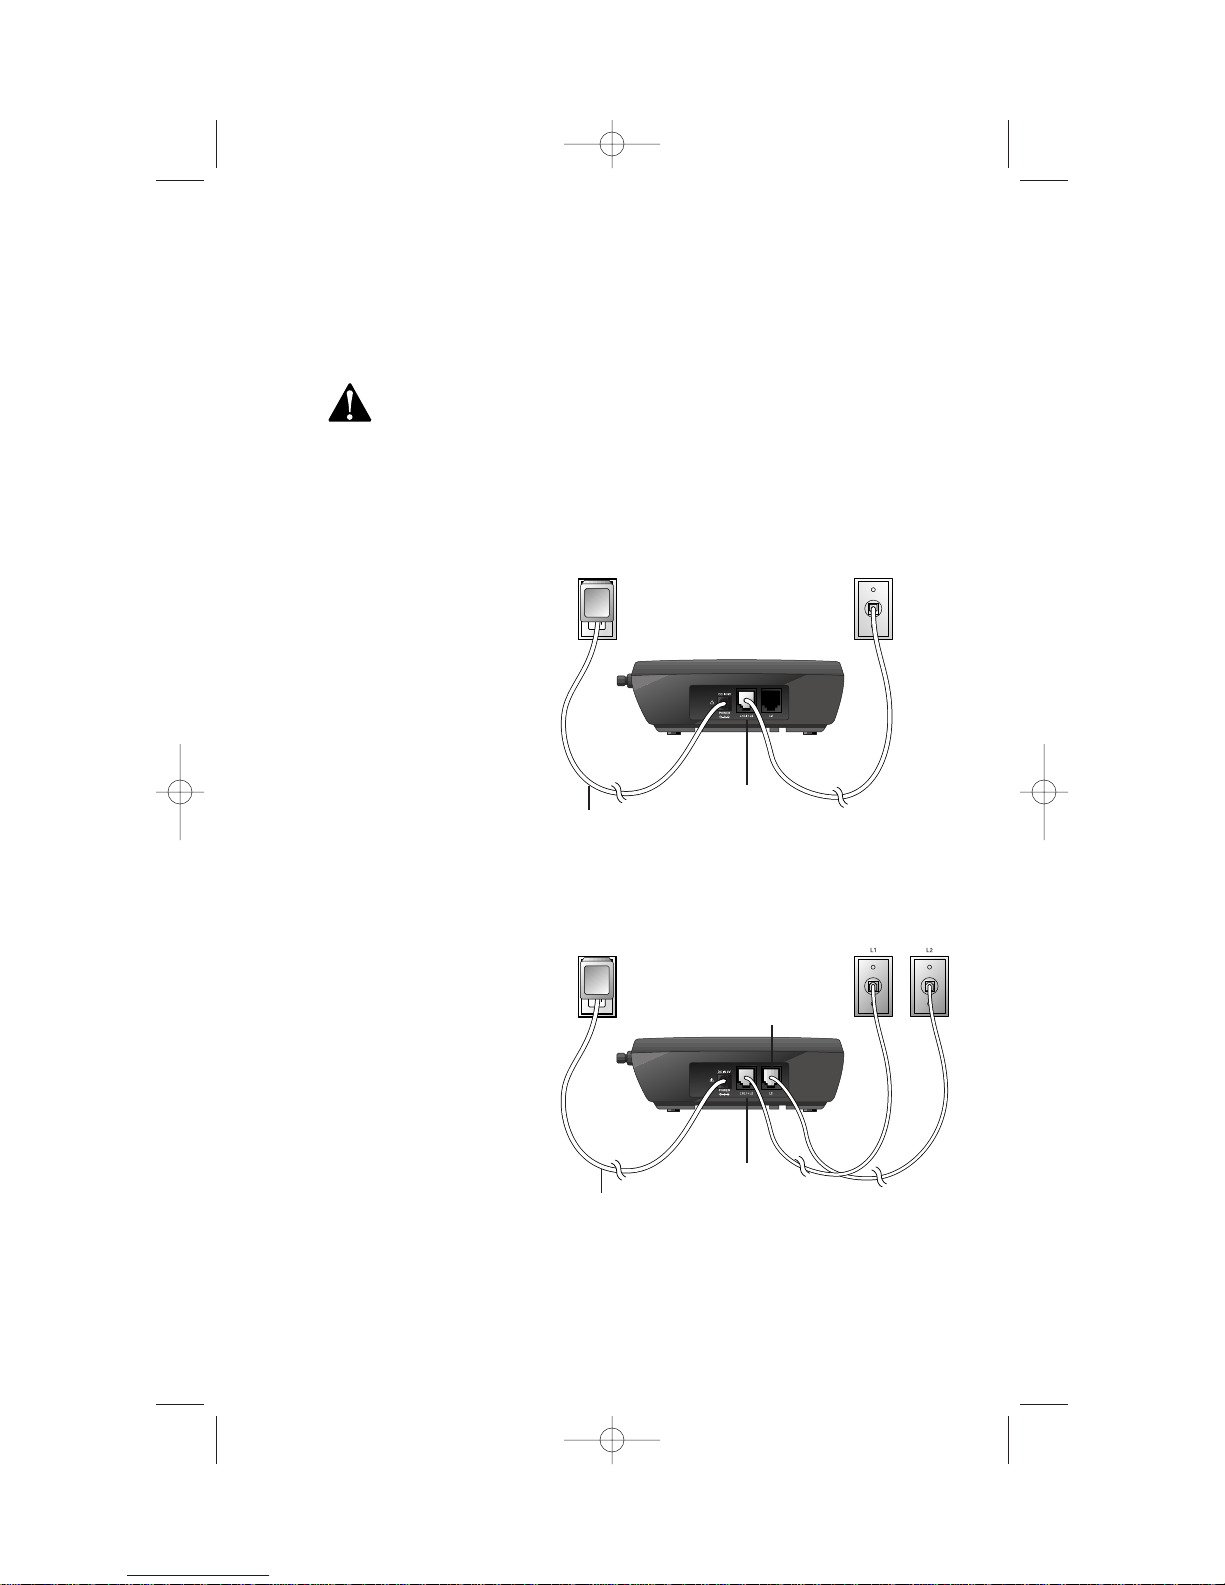
3Connect the telephone line cord(s).
If you have a two-
line jack, use only the
4-wire (RJ-14) line cord.
Connect the line cord
from the wall jack to
the jack labeled
L1/L1+L2 on the base.
Make sure the plugs
snap firmly into place.
If you have two separate
jacks, use both long line
cords. Connect a line cord
from the wall jack you
wish to designate as
your Line 1 to the jack
labeled L1/L1+L2 on the
back of the base.
Connect the other line
cord from the remaining
wall jack to the jack
labeled L2 on the back
of the base. Make sure
the plugs snap firmly
into place.
Standard
electrical
outlet
L1/L1+L2 jack
Power cord
Modular
telephone
jack
Standard
electrical
outlet
Modular
telephone
jacks
L1/L1+L2 jack
L2 jack
Power cord
9452_book_1ATT 10/5/00 3:17 PM Page 6

4Check for dial tone.
After the batteries are charged,pick up the handset,press L,and
listen for a dial tone. Then press l. If you don’t hear a dial tone,see
“IN CASE OF DIFFICULTY.”
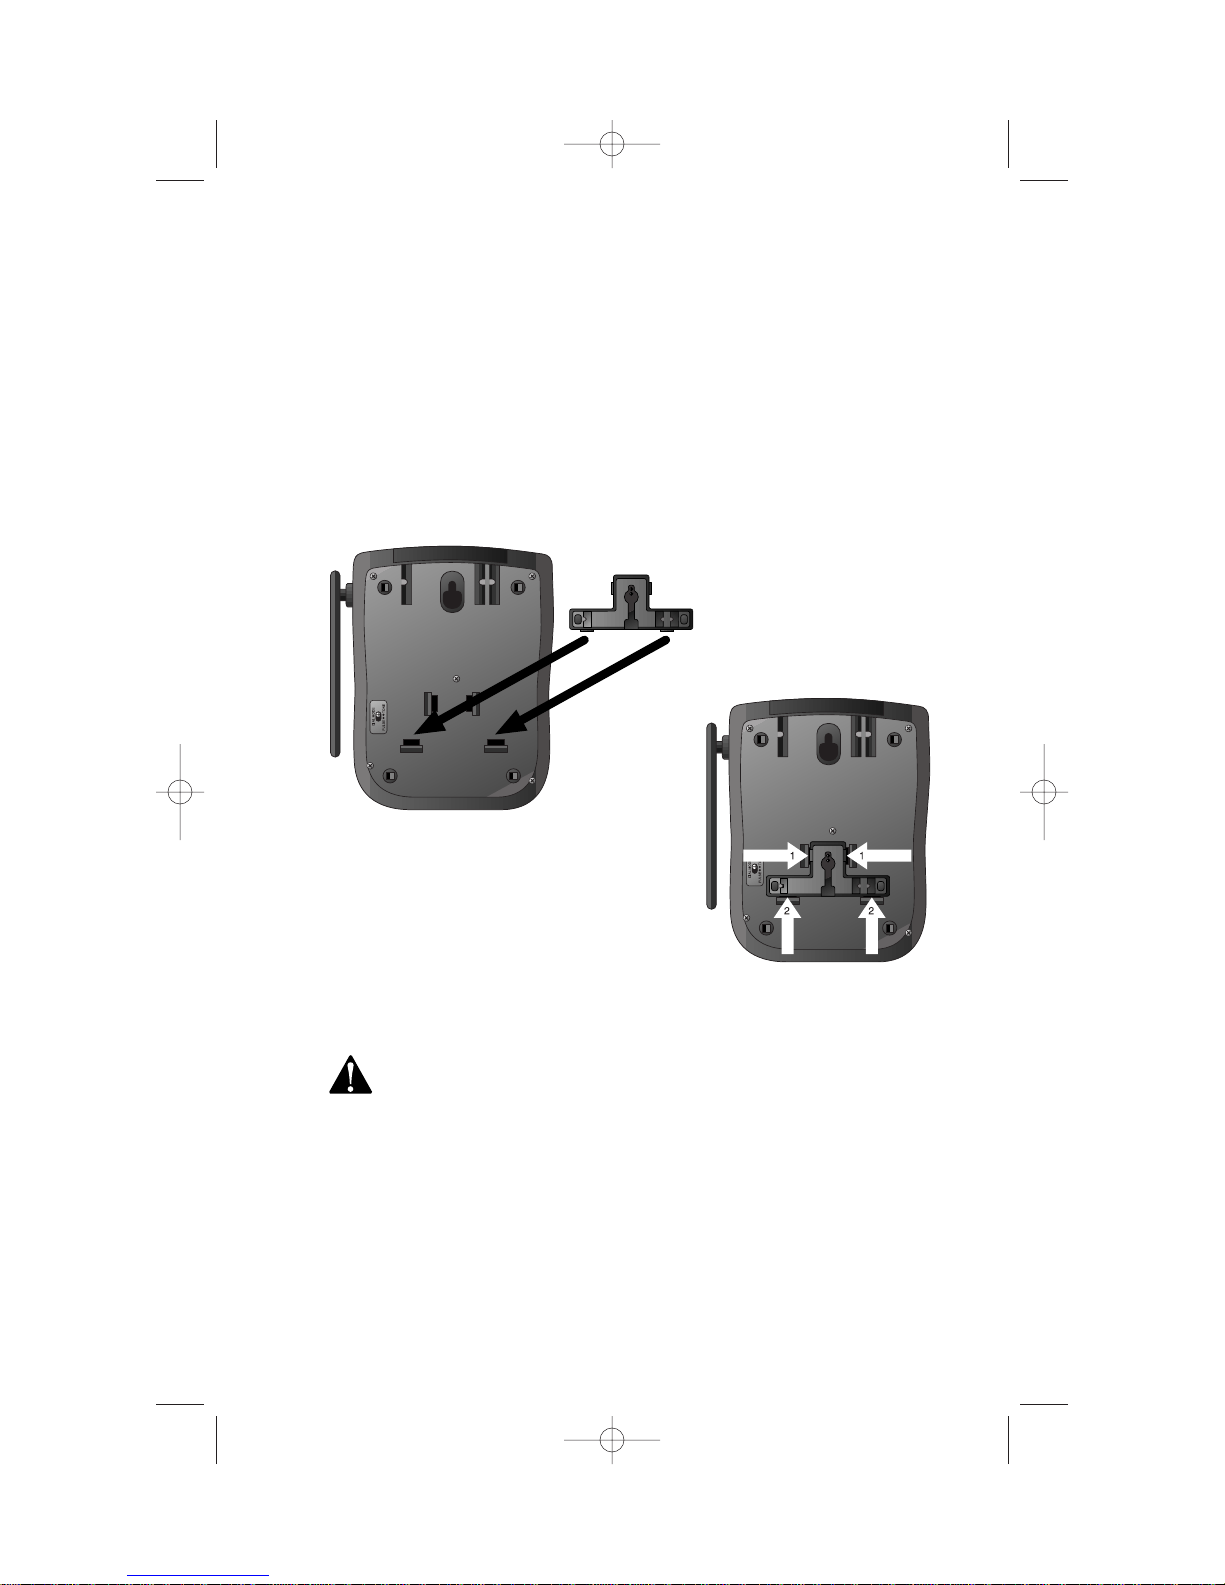
Wall Installation
1Position the wall mount adapter on the base.
2 Connect the power cord to the phone.
Use only the power cord supplied with this product. If you
need a replacement,call 1 800 222-3111.
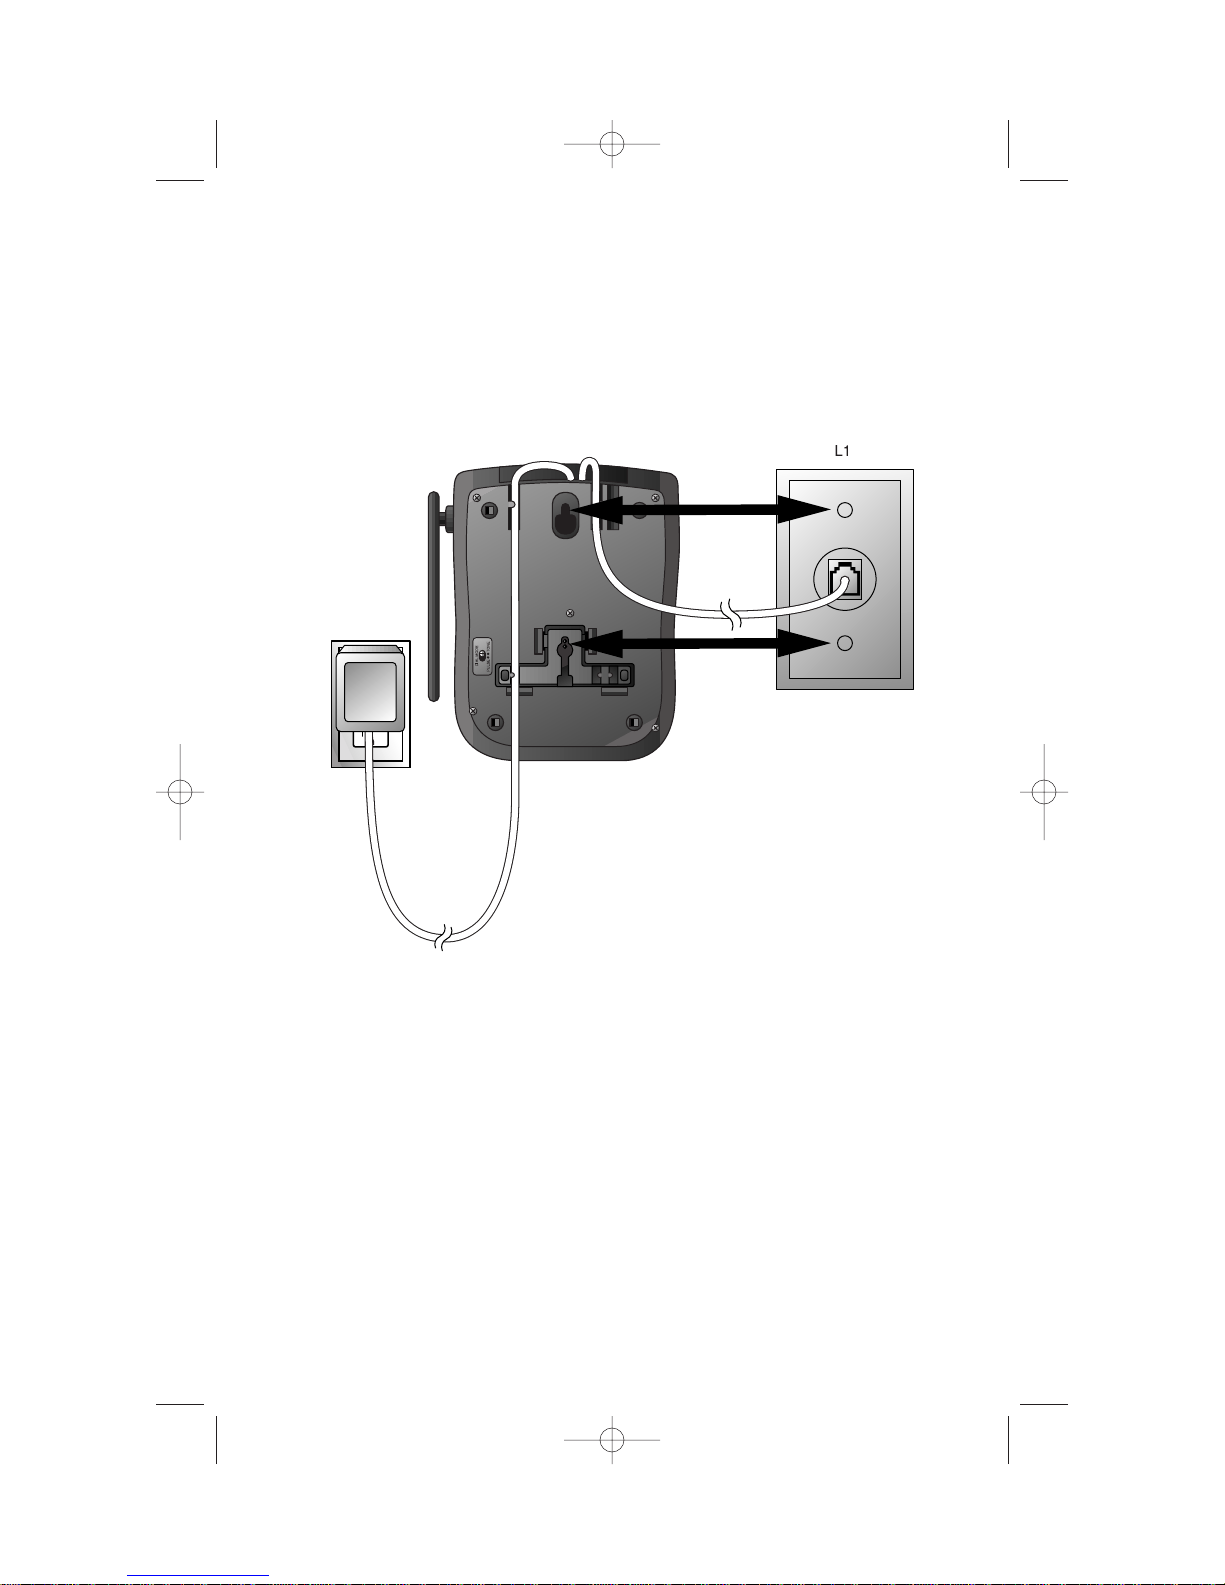
3Connect the telephone line cord(s). See illustrations on previous
page for connections. Use the short line cord instead of a long line
cord for the connection to the L1/L1+L2 phone jack.
INSTALLATION
7
Align tabs on wall mount
adapter with holes on bottom
of base. Snap wall mount
adapter firmly into place.
Wall mount
adapter
9452_book_1ATT 10/5/00 3:17 PM Page 7

4Mount the base on the wall.
4 Plug the power cord into the outlet.
5 Charge the handset battery.
Place the handset in the base. Charge the battery for at least 16 hours
the first time. After the first charge,the battery is typically fully
charged overnight.
6Check for dial tone.
After the batteries are charged,pick up the handset,press L,and
listen for a dial tone. Then press l. If you don’t hear a dial tone,see
“IN CASE OF DIFFICULTY.”
INSTALLATION
8
a) Align holes on
base with
mounting studs
on wall jack.
b) Place power cord
as shown,guiding
it through tabs on
base.
c) Pull base down on
mounting studs
until it locks into
place.
9452_book_1ATT 10/5/00 3:17 PM Page 8
Indice
Altri manuali AT&T Telefono

AT&T
AT&T ATT1856 Manuale utente

AT&T
AT&T SynJ SB67118 Manuale utente

AT&T
AT&T Syn248 SB35020 Manuale utente

AT&T
AT&T 1070 Manuale utente

AT&T
AT&T 945 Manuale utente

AT&T
AT&T CRL32102 Manuale utente

AT&T
AT&T 964 Manuale utente

AT&T
AT&T 145 Manuale utente

AT&T
AT&T Plus Manuale utente

AT&T
AT&T CL82115 Manuale utente

AT&T
AT&T TL92271 Manuale utente

AT&T
AT&T Trimline TR1909B Manuale utente

AT&T
AT&T EL52265 Manuale utente

AT&T
AT&T 1070 Manuale utente

AT&T
AT&T CL81211 Manuale utente

AT&T
AT&T CL4940 Manuale utente

AT&T
AT&T CL2940 Manuale utente

AT&T
AT&T Merlin Legend 7102 Manuale utente

AT&T
AT&T 9370 Manuale utente

AT&T
AT&T DLP72212 Manuale utente