
Atlona AT-HDTX-WP Manuale utente
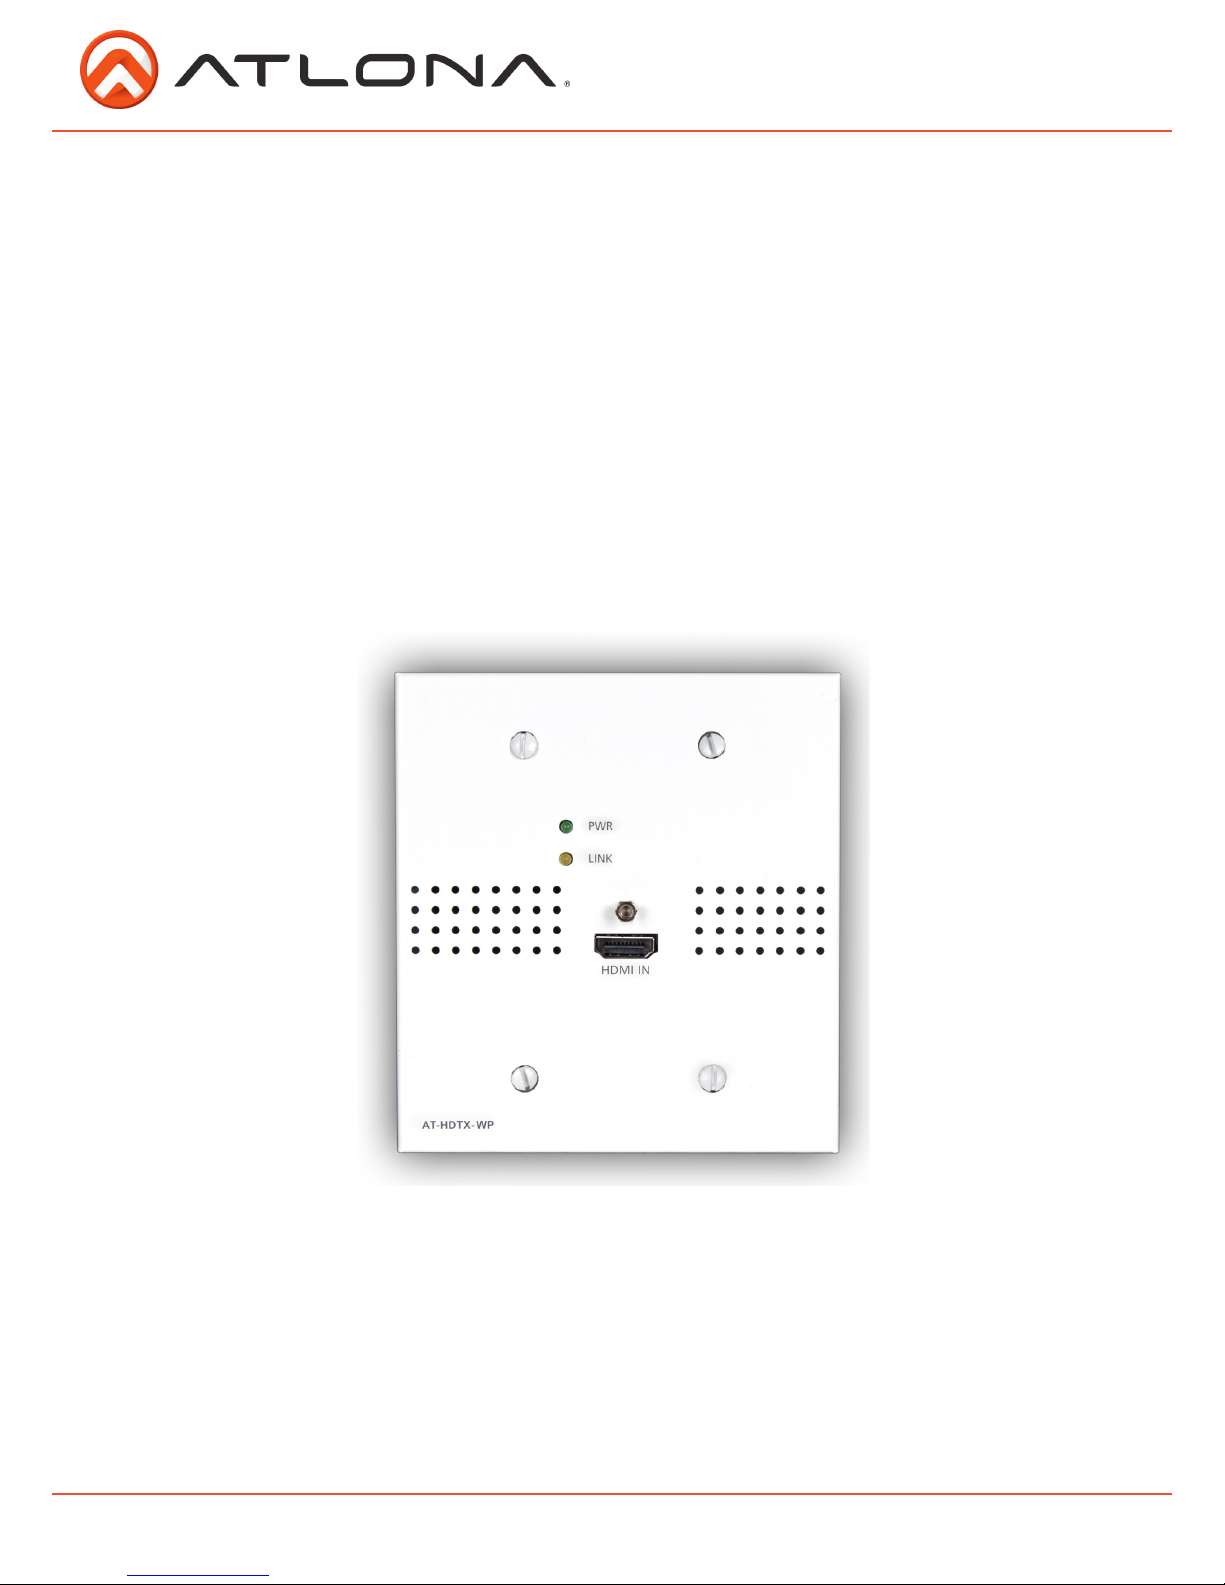
User Manual
Atlona HDBaseT
Wall Plate Transmitter
w/RS-232 & IR
AT-HDTX-WP
atlona.com Toll free: 1-877-536-3976
Local: 1-408-962-0515

2
1. Introduction ................................................................................... 3
2. Package Contents ................................................................................... 3
3. Features ................................................................................... 3
4. Panel Descriptions ................................................................................... 4
5. Electrical Box ................................................................................... 4
6. Wall plate installation ................................................................................... 5
7. Captive Screw ................................................................................... 6-7
8. Connection ................................................................................... 7-9
9. Specifications ................................................................................... 10
10. Safety Information ................................................................................... 11
11. Warranty ................................................................................... 12-13
12. Atlona Product Registration ................................................................................... 13
atlona.com Toll free: 1-877-536-3976
Local: 1-408-962-0515
Table of Contents

3
atlona.com Toll free: 1-877-536-3976
Local: 1-408-962-0515
Introduction
Extend uninterrupted 1080p video signal up to 230ft (70m) with the Atlona HDBaseT Wall Plate
Transmitter w/RS-232 & IR. With pass through support of 4Kx2K, 1920x1200, lossy & lossless
audio, bi-directional IR signals, and RS-232 over a single category cable, the HDTX-WP provides an
affordable, high quality, solution for your audio/video and control needs.
Package Contents
Features
• 1 x AT-HDTX-WP
• 1 x Wall plate cover (US or UK)
• 4 x Screws (US #6)
• 2 x Screws (UK 3.5mm)
• 1 x User manual
• Extends audio/video and control content up to 230ft @ 1080p over a single category cable
• Supports 4Kx2K pass through
• Wall plate form ensures the transmitter is securely mounted where it is easily accessed by sources
• USB updating for easy, in the field, firmware updates
• Captive screw IR I/O ports for emitting and receiving IR control signals for use with IR remote
controls and 3rd party control boxes
• Bi-directional captive screw RS-232 pass through
• 3-Way power
Power the transmitter with the included power supply
Power the transmitter with compatible receivers and matrices
Power the receiver with power over category cable (POCC) when connected to the included
power supply
• Lossy and lossless multi-channel audio formats pass through (including Dolby TrueHD and
DTS-HD Master Audio)
• Full 3D pass through
• HDCP compliant
4
When switching the product between US and UK face plates, three layers of screws will need to be
removed.
Replace the grey and the white face plates with the correct regional face plate starting at layer 3
until layer one has been replaced.
The first screw that needs removal is the locking screw for the HDMI port.
The top white face plate can be removed once the locking screw has been taken out.
The second set of screws to remove are in the grey tabs attached to the wall plate back box.
Remove all 4.
The back box can be removed now.
The third set of screws for removal are at the bottom of the PCB boards. Place the grey face plate
down and remove the 4 screws from the corner edges. The grey plate is removable now.
US and UK Face Plate Change
First Layer
Second Layer
Third Layer
atlona.com Toll free: 1-877-536-3976
Local: 1-408-962-0515
DC 24V
-+
RS232
IR IN
PWR
IR RX TX
IR OUT
-+
HDMI IN
AT-HDTX-WP
PWR
LINK
Panel Description
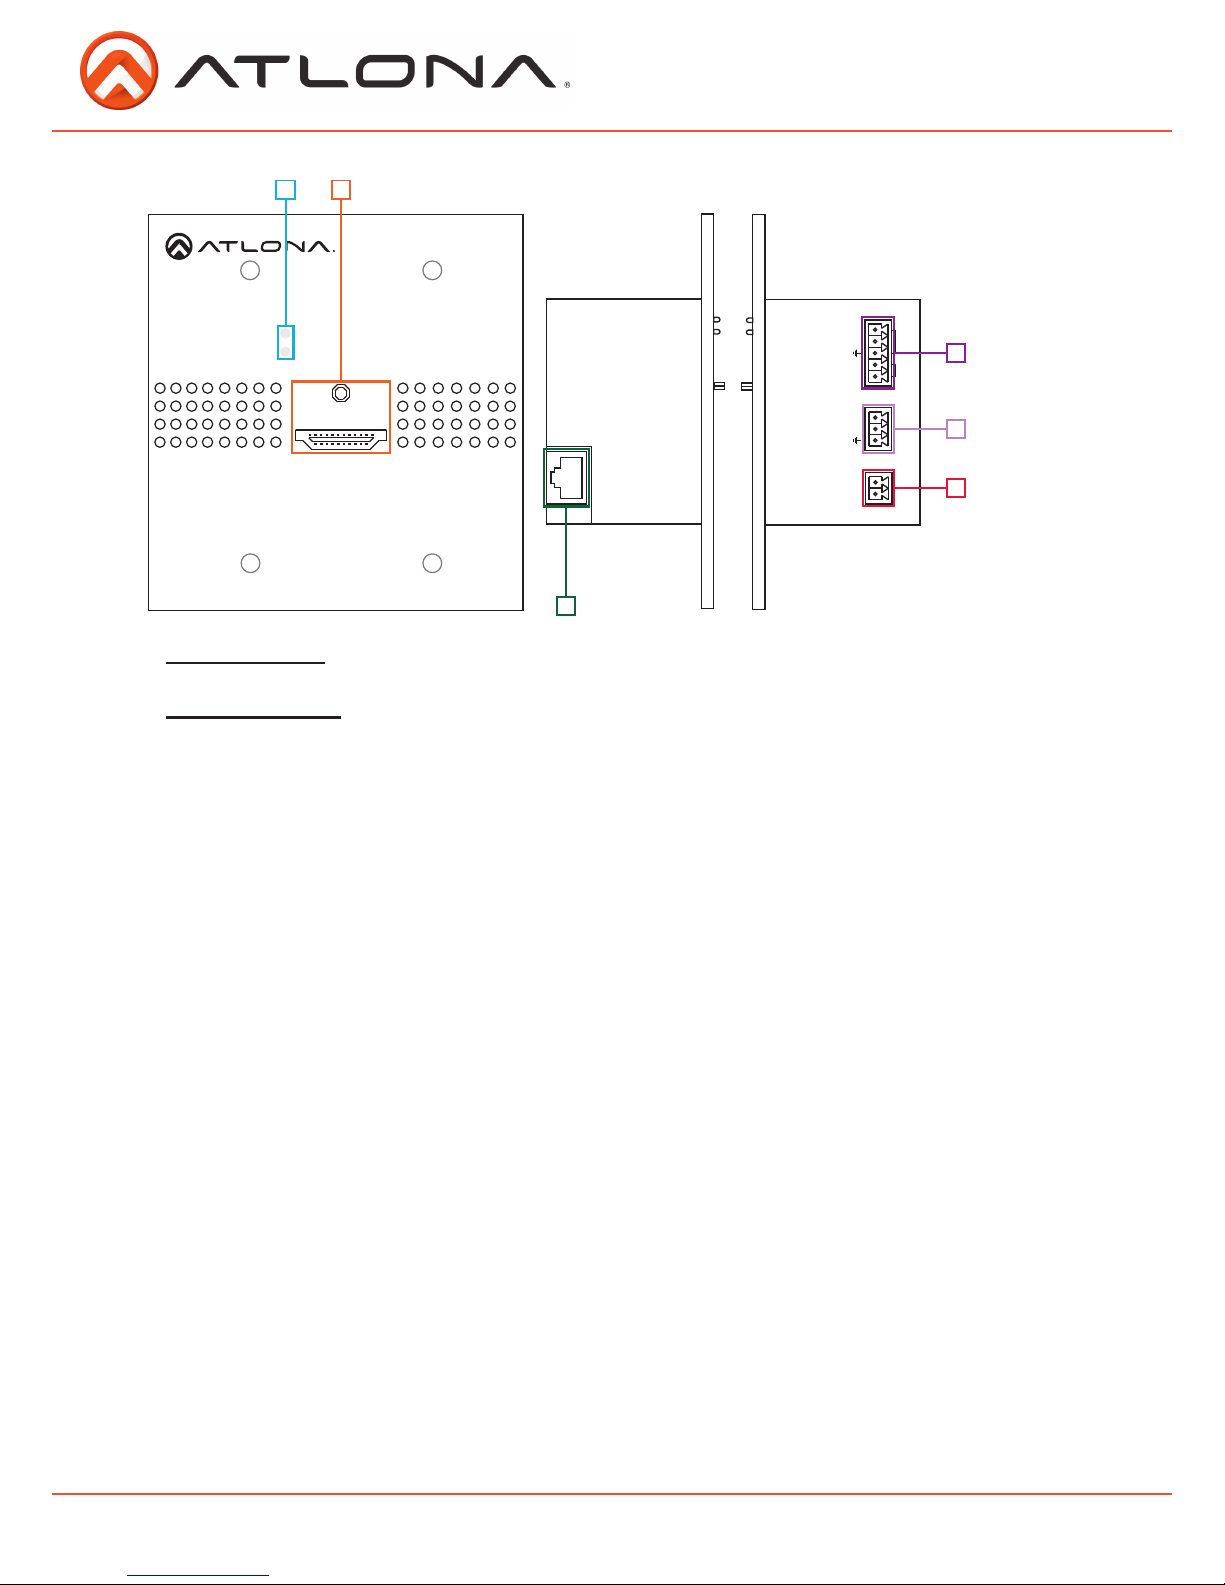
1. Yellow Link LED: Signal Indicator for the CAT5e/6/7 OUT port. LED will remain solid, unless there
is an issue with the cable or signal, then it will blink
Green Power LED: Power indicator. If power is being received steadily the light will remain solid.
If the LED starts blinking power is intermittent or there is a problem with the cable. If LED is
off, no power is passing to the transmitter (check your outlet or the power cable)
2. HDMI IN Port: Connect to HDMI source
3. CAT5e/6/7 IN Port: Connect a category cable from a compatible transmitter to this port
4. a. IR IN Port: Connect the IR receiver to this port
b. IR OUT Port: Connect the IR Emitter to this port
5. RS-232 Port: Bi-directional RS-232, send signal to or from a control system or PC
6. DC 24V Port: Connect the included power cable to this port
NOTE: If receiving power from a compatible HDBaseT receiver or matrix, do not connect the
power supply
2
1
4
6
3
5
5
Wall Plate Installation
US
UK
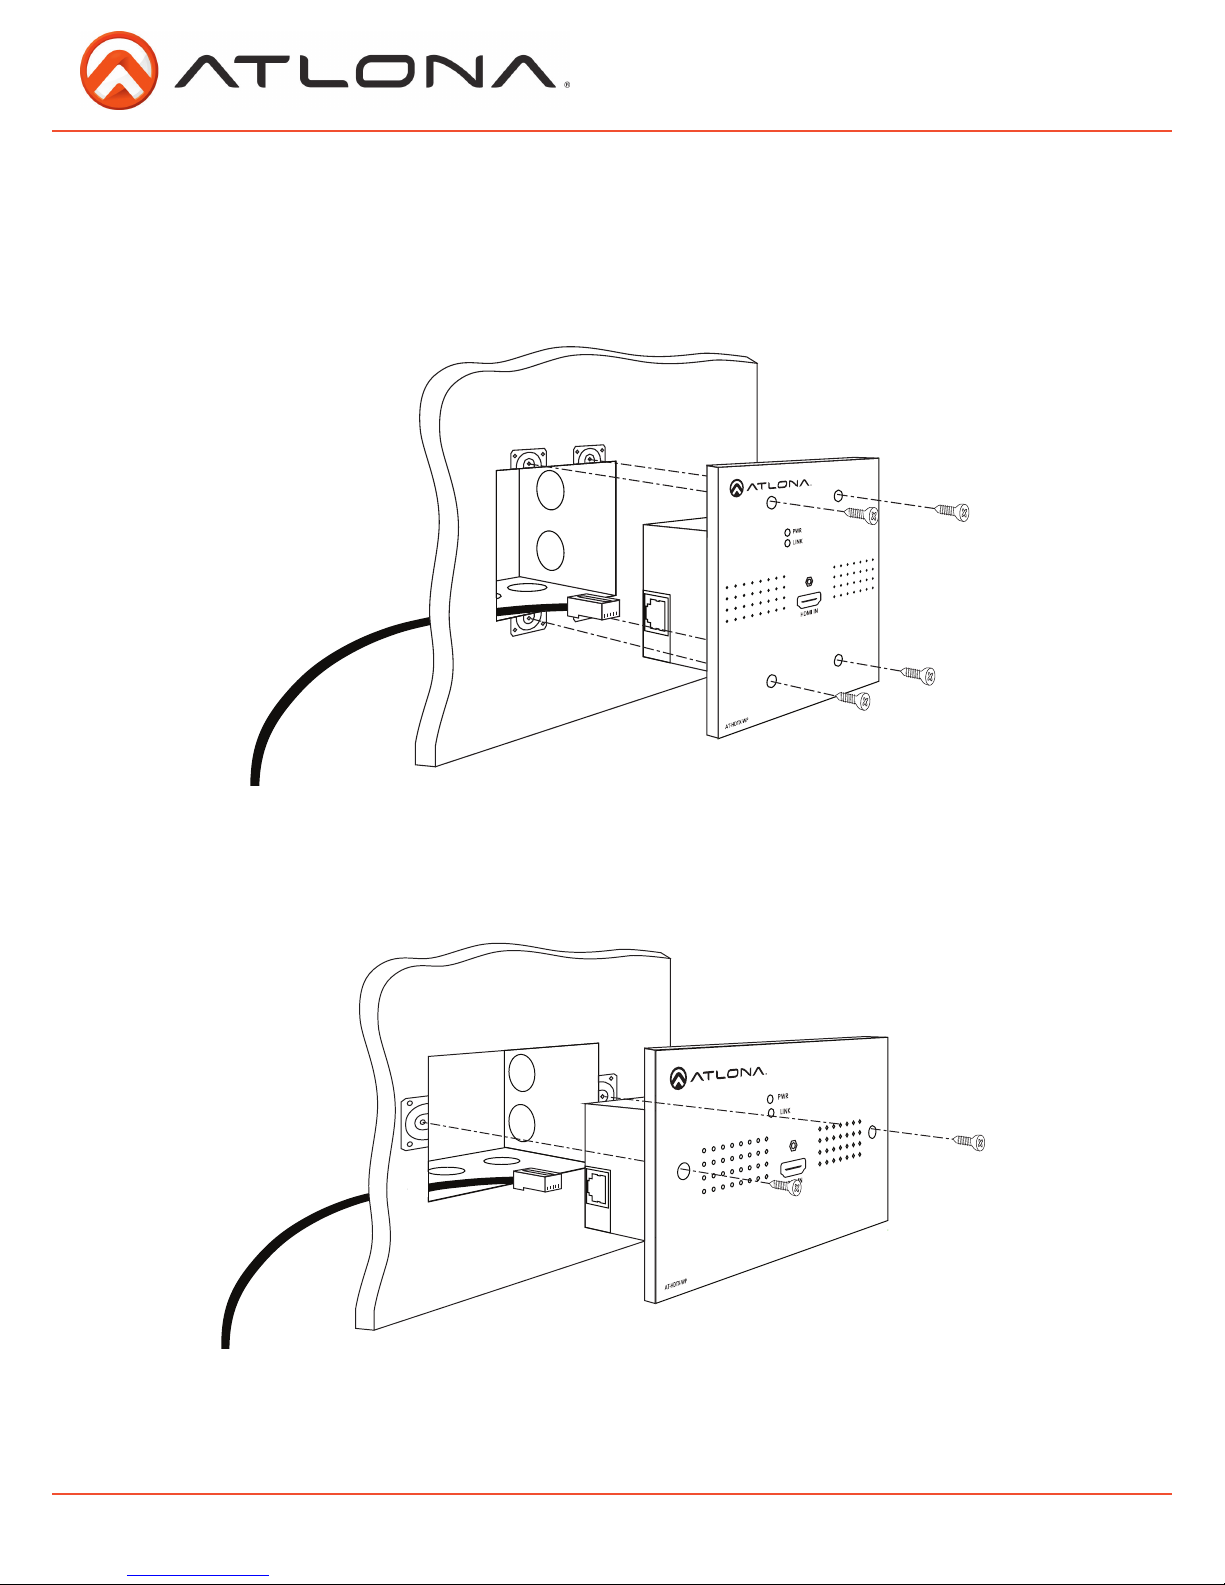
The HDTX-WP will fit in any 2 Gang (US or UK) electrical box or mud ring (that is at least 40mm
deep).
Important: To use the power, RS-232, or IR ports on the wallplate a mud ring or 3 gang back box
with custom plate will need to be used.
When installing the US version, use the four shorter screws. Thread the screws through the face
plate into the back box (as shown above).
Note: Be sure to plug the CAT cable into the back of the wall plate before full installation
The UK wall plate screws will be the longer than the US screws. Thread the screws through the two
holes in the UK wall plate and into the back box (as shown above).
Note: Be sure to plug the CAT cable into the back of the wall plate before full installation
atlona.com Toll free: 1-877-536-3976
Local: 1-408-962-0515
6
atlona.com Toll free: 1-877-536-3976
Local: 1-408-962-0515
PWR IR ╧
Receiver
Captive Screw
Connecting
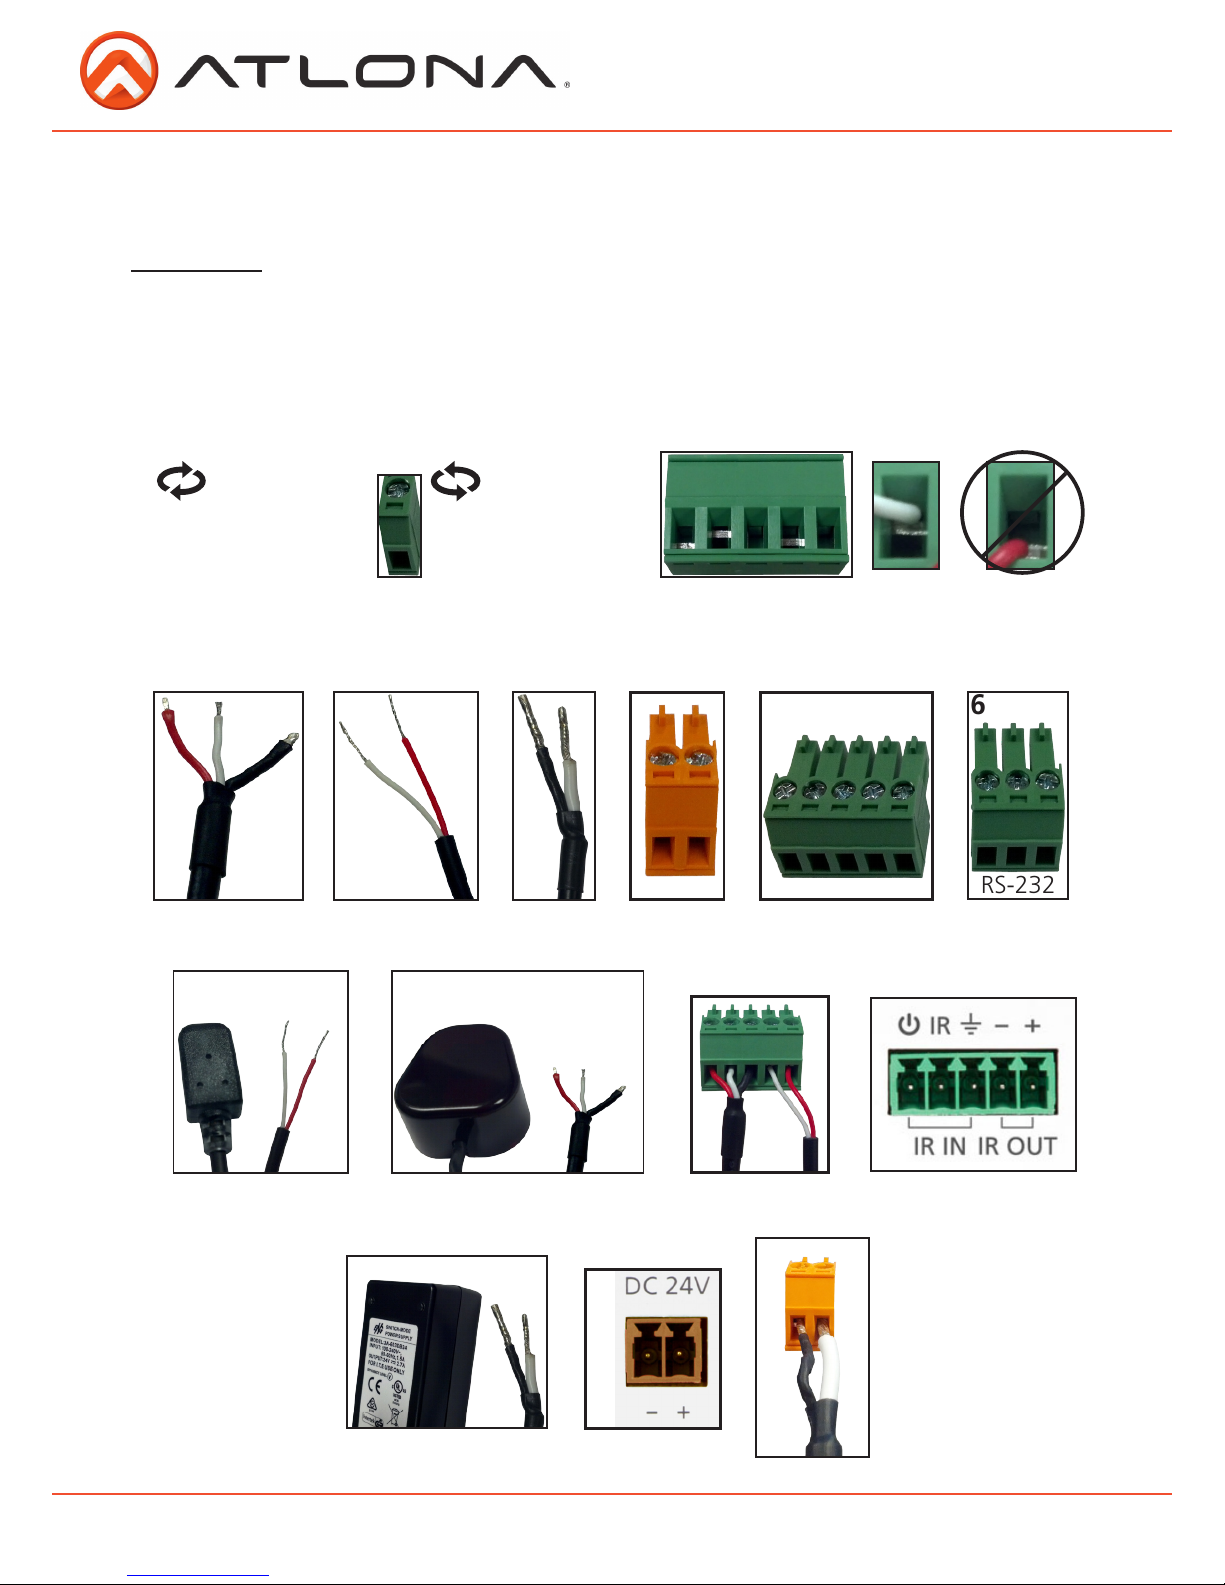
Captive screw connectors are an added feature on the HD Extender. The Captive screw connectors allow you
to cut cables down to a suitable length, reducing cable clutter while providing a more reliable connection.
The captive screw connectors have a contact bar that is adjusted to compress the wire against the top
contact plate. Use the screws at the top of the connector to compress the wire against the contact plate.
When connecting the cables to the female captive screw connector it is important that the wires be
terminated correctly. The female captive screw connector (see picture A) has a contact plate at the top and
must have the wires touching it for signal to pass. When wired correctly (see picture B) the signal will pass,
incorrectly (see picture C) no signal will pass.
For your convenience the cables do not come pre-terminated. Each item, whether it’s an IR receiver (picture
1), IR emitter (picture 2), or power cable (picture 3), will have exposed wires. Each wire is encased in a
different colored cover. Female captive screw connectors are included: Power (see picture 4), IR (see picture
5), and RS-232 (see picture 6).
IR pin outs have been included for the included IR emitter and IR receiver (see picture 7 & 8). The wires are
colored for each pin (see picture 9 and 10).
The power pin out (see picture 11) and wire configuration (see picture 12 and 13) are shown below.
Note: When using the HDVS-RX do not connect a power supply to the HDTX-WP
White: - Red:+
Black: - White: +
Red: PWR White: IR Black: ╧
4
2 3
1
Power IR RS-232
Clockwise Counter
Clockwise
Turn the screws clockwise to
raise the contact bar to the upper
contact plate and hold the wires
in place.
Turn the screws counter clockwise
to lower the contact bar to release
the wires.
56
89 10
12
ABC
- +
Emitter
- +
11 13
7
7
LINK
FW
HDMI OUT
AT-HDWP-IR
PWR
IR IN
IR
IR OUT
-+
AT-HDTX-WP
HDMI IN
PWR
LINK
AT-HDTX-WP
HDMI IN
PWR
LINK
Connection Diagrams
Laptop
BluRay Player
AT-HDWP-IR
AT-HDTX-WP
AT-HDTX-WP
Display
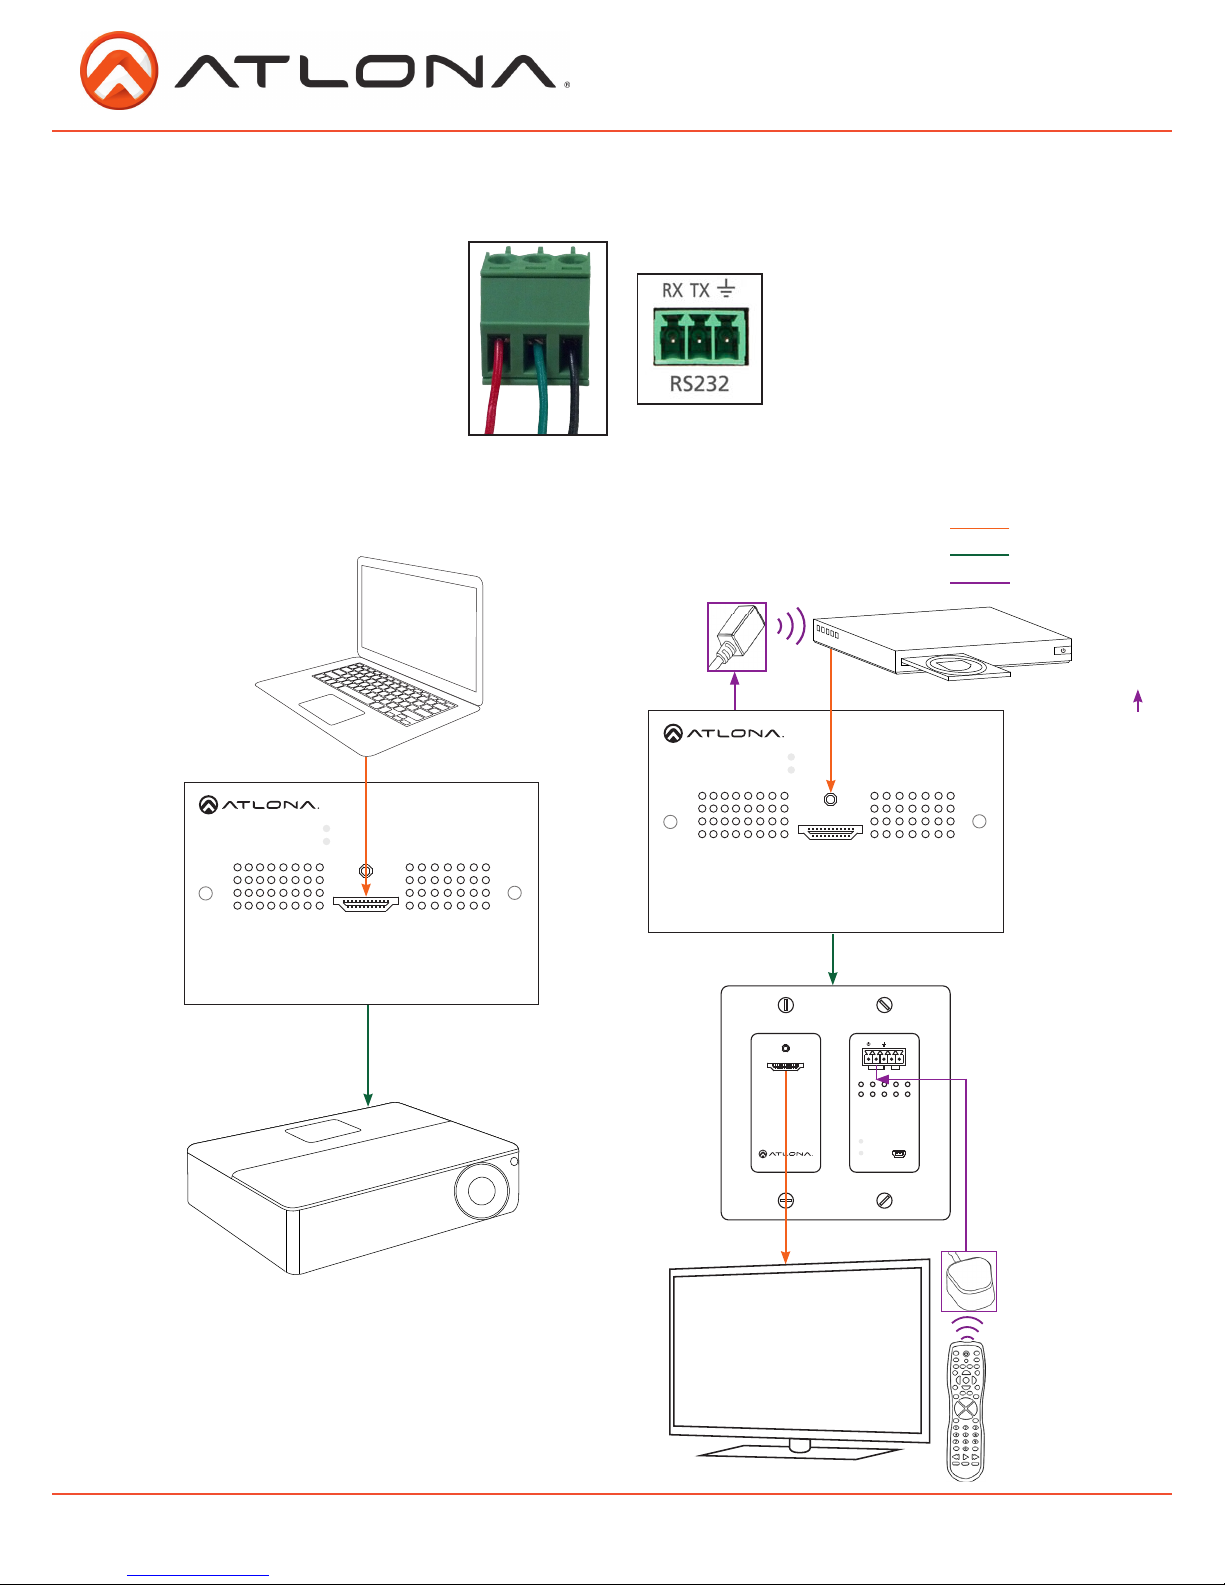
RS-232 pin out will be determined by the RS-232 cable and will connect as Rx (receiver), Tx
(transmitter), and ╧ (ground). (See picture 1)
Pin out color will differ per RS-232 cable.
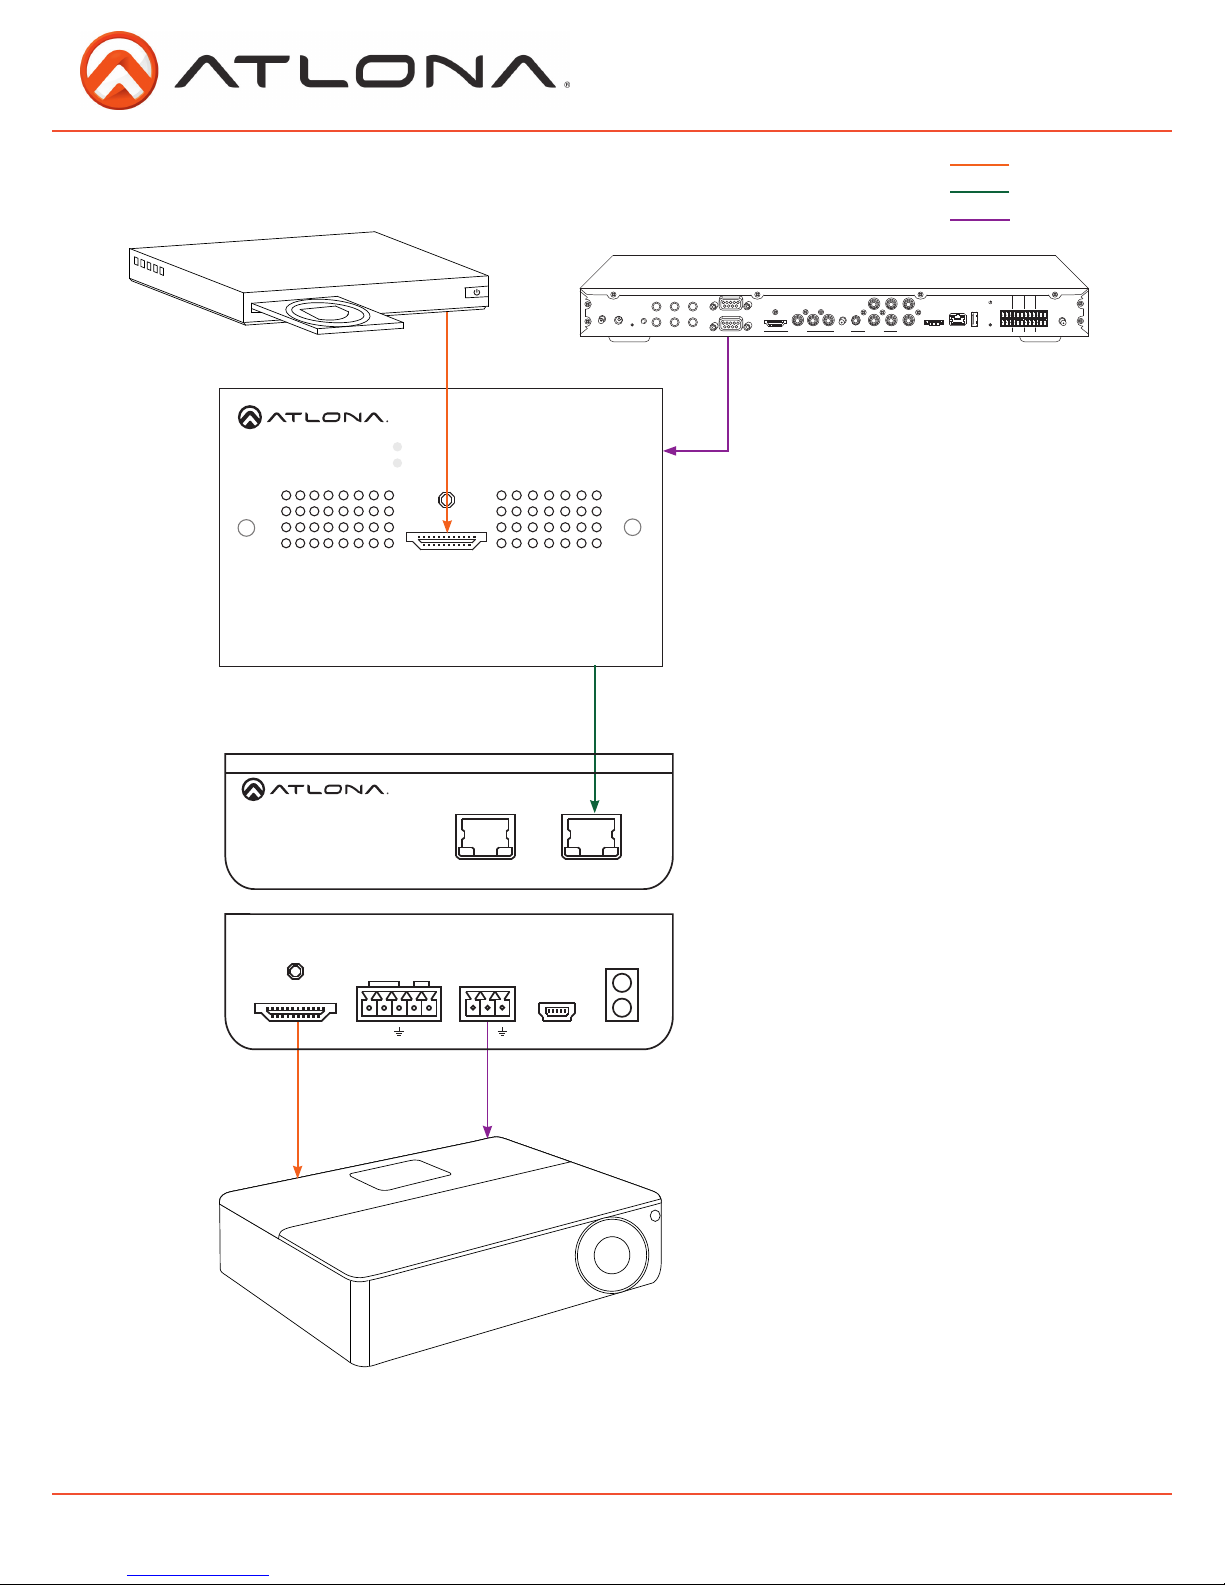
Note: This connection will only work with HDBaseT
compatible projectors.
Important: Be sure to connect the RJ45 cable into
HDBaseT input on the projector. Connecting
to the LAN port may damage the projector.
1
HDMI
HDBaseT
Control
IR
Emitter
IR
Receiver
Display 1
atlona.com Toll free: 1-877-536-3976
Local: 1-408-962-0515
8
AT-HDTX-WP
HDMI IN
PWR
LINK
HDMI
HDBaseT
Control
NO
NC
COM
NO
NC
COM
NO
NC
COM
NO
NC
COM
GND
SIG
+12V
GND
SIG
+12V
GND
SIG
+12V
GND
SIG
+12V
1 2 3 4
RELAYS
WIFI 2
ZIGBEE 12V DC
IR OUT
IDFACTORY
RESTORE
SERIAL 1
SERIAL 2
HDMI COMPONENT
VIDEO OUT
ETHERNET
CONTACTS
AUDIO OUT
AUDIO IN
WIFI 1 eSATA USB
DIGITAL
COAX OUT
1
2
3
4
5
6
L
R
Connection Diagrams Cont.
3rd Party Control Box
BluRay Player
CAT5e/6/7 IN
ETHERNET
FIRMWARE
LINK
POWER
RS232
IR IN
HDMI OUT
AT-HDRX-RSNET
PWR
IR RX TX
IR OUT
-+
Display
atlona.com Toll free: 1-877-536-3976
Local: 1-408-962-0515
9
AT-HDTX-WP
HDMI IN
PWR
LINK
Laptop
Matrix w/HDBaseT
(PoCc compatible) input
HDMI
HDBaseT
Power
Connection Diagrams Cont.
DC 24V 5A
FIRMWARELAN
1 2 34
INPUT OUTPUT
IR IN
PWRIR -+
IR OUT
5 6
INPUT FUNCTION
IR IN
PWRIR -+
IR OUT IR IN
MIC/LINE IN 48V
MIC LINE
PWRIR -+
IR OUT IR IN
PWRIR -+
IR OUT
-+-
+-
+
IR IN
LR
-
+-
+
L R
-
+-
+
LR
PWRIR -+
IR OUT IR IN
PWRIR -+
IR OUT
56+-
4
123
+
MENU EDID
-
VOLUME
MUTE
POWER
RS232
RX TX
Display
atlona.com Toll free: 1-877-536-3976
Local: 1-408-962-0515
10
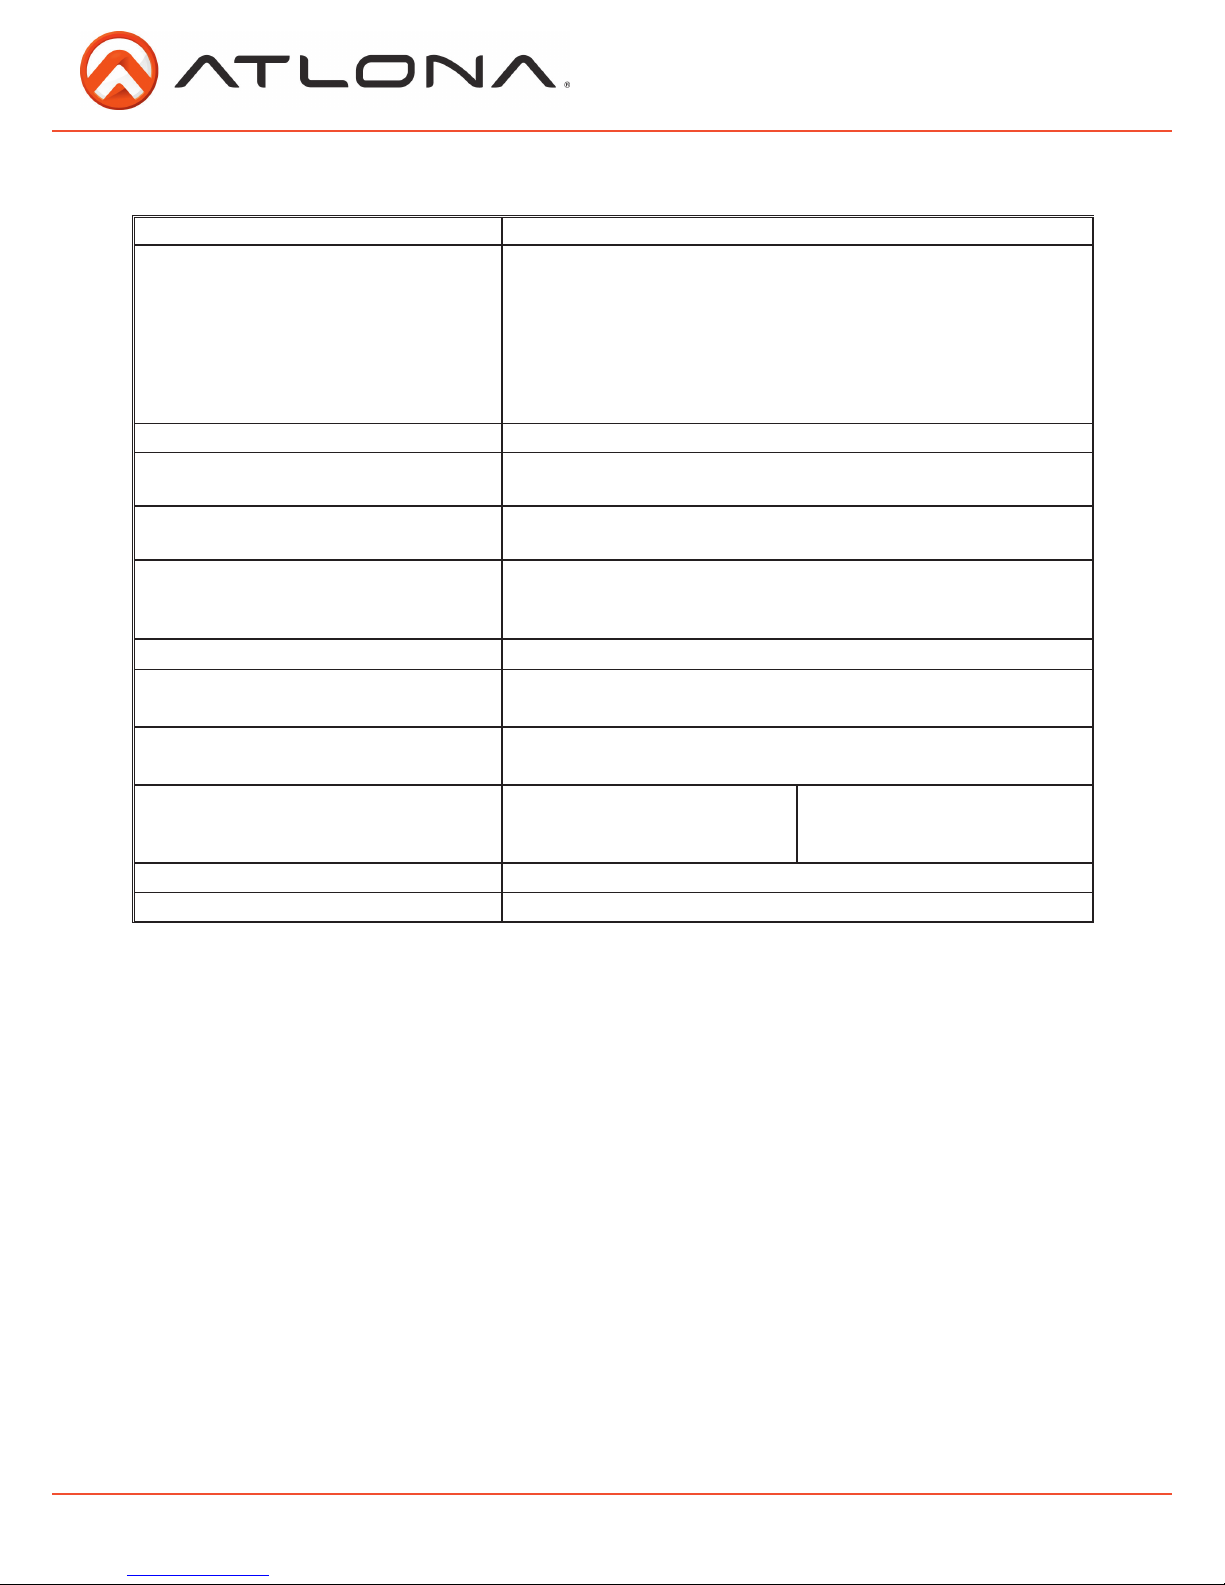
Bandwidth 10.2Gbps
Ports
A/V input
A/V output
IR IN/OUT
RS-232
Firmware update
Power
1 x HDMI
1 x RJ45
1 x Captive Screw (5 pin)
1 x Captive Screw (3 pin)
1 x Mini USB
1 x Captive Screw (2 pin)
Power Consumption up to 10W (varies per paired receiver)
Audio Passes up to Dolby TrueHD
or DTS-HD Master Audio
Resolution Video: up to 4Kx2K
VESA: up to 1920x1200@60Hz
Distance 230ft @ 1080p over CAT6a/7
197ft @ 1080p over CAT5e/6
130ft @ 4Kx2K over CAT5e/6
Size 2 Gang
Installation Dimensions (H x W x D) 2.46 x 3.5 x 1.38 inch
62.44 x 89.02 x 35 mm
Weight 0.49 lbs
0.22 kg
Temperature Operating
32°F to 104°F
0°C to 40°C
Storage
-4°F to 140°F
20°C to 60°C
HDCP Compliant? Yes
Certifications CE, FCC, RoHS, cULus for power supplies
atlona.com Toll free: 1-877-536-3976
Local: 1-408-962-0515
Specifications
Indice
Altri manuali Atlona Trasmettitore

Atlona
Atlona AT-UHD-EX-70C-RX Manuale utente

Atlona
Atlona AT-WHD200 Manuale utente

Atlona
Atlona AT-WHD200 Manuale utente

Atlona
Atlona AT-HDR-EX-100CEA-KIT Manuale utente

Atlona
Atlona AT-HDS100SR Manuale utente

Atlona
Atlona AT-UHD-EX-100CE-RX Manuale utente

Atlona
Atlona AT-HDTX-RSNET Manuale utente

Atlona
Atlona AT-HDTX Manuale utente

Atlona
Atlona AT-UHD-EX-100CE-TX-PD Manuale utente


