Axium KPC-2.8 Manuale utente

Axium Keypad Manager
OVERVIEW
The Axium Keypad Manager is a Windows program that easily and quickly configures AX-KP
2.8 touch panels and AX-KPB keypads. Touch Panels are configured using a powerful page
designer with predefined and user galleries of images and sounds. A public database of
predefined commands as well as a user database is available for storing learnt commands.
ommand databases are presented using a tree view to group commands to models and
models to makes. This provides an efficient method for finding the required commands for
programming the keys of AX-KPB keypads and the virtual keys displayed by the touch panels.
Infra-Red commands using the HEX format may be pasted directly either to keys or the
database tree.
Keypads and touch panels are connected via USB to a P for programming or downloading of
their configurations. Such configurations can be saved and later reused for programming
more keypads and touch panels.
MAIN WINDOW
Image 1 - The main window
1

The main window provides most of the functionality of Axium Keypad Manager. It contains a
menu and toolbar, a library browser consisting of objects useful for programming a touch
panel or keypad device and a device dependent designer is displayed on the right.
FILE MENU
The commands in the file menu are for managing configuration and database files.
Image 2 - The File menu
New: Opens a blank configuration for a specific type of device. If a new AX-KPB
configuration is selected, the KPB designer will be opened with blank keys. If a new
AX-KP 2.8 configuration is selected, the touch panel designer will be opened with a
single blank home page and with default settings. This is the state when AKM starts.
O en: Loads a saved keypad or touch panel configuration. This can be a configuration
downloaded from a keypad or touch panel or it can be one that has been designed in
the Axium Keypad Manager using the available commands, images and other objects.
Save: Saves the current configuration. onfigurations are also autosaved (see Autosave).
Save As: Saves the current configuration under a different name or path.
New designer (KPC only):
Opens a window containing a touch panel designer. A separate configuration can be
opened or designed in this window and objects can be dragged & dropped or copied
& pasted between the designers.
O en User database:
Opens another database file and adds it to the database tree. User databases are a
means to exchange infra-red and RS-232 commands to other computers. Using this
command, any number of user databases can be opened. ommands, models and
makes can be dragged and dropped between the databases.
2

User databases should usually be stored in the “Axium Keypad Manager” folder in
“My Documents”, which is where the predefined “User” database is located. The
public database is stored in the common application data folder, which on Windows
XP is typically :\Documents and Settings\All Users\Application Data.
Ex ort database:
Exports all open IR-command databases as HEX commands to a SV file. Specific
branches of a database (e.g. specific makes or models) can be exported using the
database’s context menu or the Edit menu rather than using this command.
Exit: loses Axium Keypad Manager.
3

EDIT MENU
Image 3 - The Edit menu
Undo: Undoes the last change. The Axium Keypad Manager boasts with a powerful undo
feature capable of undoing up to 50 individual changes of any type.
Redo: Redoes a change that was just undone by the “Undo” function.
Cut: Available only when a make, model or command in the user database is selected or
when an object in one of the designers is selected. Selects the object for pasting and
deletes it from its original Position.
Co y: Available only when a make, model or command in a database is selected or when an
object in one of the designers is selected. Selects the object for pasting.
Paste: Available when an object has been cut or copied and another object is selected that
can accept the copied/cut object. For example: if a command has been cut from a
key in one of the designers, it can be pasted to a model in the user database or to
another key in the designer.
Add: For adding new makes, models or commands to the user database. The “New
ommands…” command creates a specific number of new commands and numbers
them from 1 to the number given. Any new commands are of course initially
undefined but can be filled with hex code, for example.
Delete:
Deletes the selected object in the user database or in a designer. When deleting a
make, it is not necessary to delete its models and commands first. Likewise when
deleting a model, it is not necessary to delete its commands first.
Rename:
Initiates rename mode for the selected object in the user database or in a designer, if
4

applicable. Rename mode can also be initiated using the F2 key or by clicking on the
selected node (as in the Windows Explorer).
Edit: Opens a dockable window for editing or viewing the selected command in a
command database. In the case of an infra-red command, details of the command’s
Modulation frequency, sequential ON / OFF periods and format can be viewed. For
RS-232, details of the baud rate, number of data & stop bits, type of parity and
command data can be viewed and edited. When viewing Axium IR-commands, the
Axium command is also displayed, which is useful for verifying the Axium protocol
RS-232 command string. The “Hex ode” tab displays a hex code representation of
the IR-command. The hex code may be copied to and from the clipboard and other
applications. Only commands in a user database can be edited.
Image 4 - The Edit window for infra-red commands
View: Opens the edit window with the waveform tab selected. This provides a graphical
representation of the IR command along. Pulse and pause period lengths are shown
when the mouse is held over high and low levels. Holding the mouse over a rising or
falling edge shows when the pulse or pause begins. The edit window can be left open
while selecting other IR commands, thus allowing a comparison of IR commands.
Image 5 - The Waveform tab
Hex code sub menu:
5

Edit: Opens the command edit window with the “Hex ode” tab selected. The
hex code may be copied to and from the clipboard and other
applications.
Co y: Available when a command is selected. opies a Hex code
representation of the command to the clipboard.
Paste: Available when a new undefined command has been created in the user
database. Pastes the code from the clipboard.
Paste new:Pastes a hex code from the clipboard into a new command in the user
database.
Auto aste:
This is useful for pasting a series of hex codes from another application
without swapping between the application and the Axium Keypad
Manager. This is done by first creating a group of new commands in the
user database (e.g. by using Add – New commands) and then selecting
the first command in the group. The user then selects “Auto paste”,
switches to the other application and copies hex codes from that
application into the clipboard. Each time a hex code is copied, it is
automatically pasted from the clipboard into the selected command. The
command selection is then advanced to the next command ready for the
next hex code to be copied. If the “paste names” option in the auto-
paste window is selected, the command names can be copied along with
the hex-codes.
Ex ort: Exports the selected make, model or command as HEX commands to a
SV file.
Class sub menu:
There are a number of very common functions that often appear on various equipment.
There are many examples of this such as “Play”, “Pause” and “Stop” are found on equipment
ranging from cassette players to video streaming servers. “Standby”, “volume up”, “volume
down” are further functions that are almost universally found on equipment. The purpose of
the class sub menu is to assign one or more classes to infra-red and RS-232 commands so
that their purpose is known thus enabling the designer to make well-informed suggestions for
the types of buttons to use and which commands to assign to them.
Add <default> class:
This option appears if the name of the command matches a built-in
pattern for one of the classes. The F10 function key can be used as a
short cut for selecting this function.
Add <grou > class:
Sub menus are provided for the following groups of classes: “transport”,
“numeric”, “cursor” and “system”.
Remove <class>:
This option appears if a class has been assigned to the command and
allows the user to remove the class.
6

TOOLS MENU
Image 6 - The Tools menu
Download from key ad:
Downloads the configuration from a connected AX-KPB keypad or AX-KP 2.8 touch
panel to the Axium keypad manager. This can be useful for:
Downloading infra-red commands that have been learnt on a KPB or KP .
Downloading configurations that have not been previously saved to disk for
programming other KPBs or KP s.
Note that due to storage restrictions on the KP 2.8, downloaded images and sounds
may not have the original quality. Also, to prevent unnecessary duplication, do not
mix downloaded images and sounds with the same images and sounds from the
galleries.
Note that the term “download” is synonymous with “receiving” data from the P 's
perspective.
U load to key ad:
Uploads the current configuration to a connected AX-KPB keypad or AX-KP 2.8
touch panel. Any existing configuration will be erased. This command can also be
understood as “programming” the keypad or touch panel.
Note that the term “upload” is synonymous with “sending” data from the P 's
perspective.
Verify Configuration (KPC only):
ompares the configuration in the connected AX-KP 2.8 to the current configuration.
This is useful for ensuring that an upload has been performed error free or for
checking if a particular saved configuration has been used on a KP or not.
Advanced (KPC only):
ontains advanced features for firmware updates and diagnostics.
Axium Settings (KPB only):
Opens the Axium settings window, where the Axium Zone, Device (amplifier or
preamplifier), Source assignments, IR receiver enable/disable, Source, Volume
Indicator and Backlighting brightness settings in the configuration can be set. See
onfiguring Axium Settings.
7

Find Key ads:
Searches for all connected keypads & touch
panels and displays the keypads serial
number, zone allocation, and connection
path:
Direct (KPB or KP on USB port)
Network connected (via amplifier stack,
KPB only)
Network connected keypads must be
registered with the amplifier by pushing the
keypad SET key twice. Selecting a connected
keypad in the connection tree will enable the
download and upload tools.
Simulate (KPC only):
Opens a window that simulates a touch panel programmed with the current
configuration. This is useful for testing basic aspects of the configuration, such as
page navigation, without having to program a touch panel. See Simulator.
Context Menus: ontext menus - opened by right mouse clicks – are available for the
databases, image & sound galleries and the designers. AX-KPB context menus are
available for keys and key details. AX-KP 2.8 context menus are available wherever
a context menu is applicable, e.g. the resources list, page designer, action and sound
panels, button image components window, device window, macro editor, image and
sound galleries, etc.
Toolbar: a toolbar is provided for easy access to some of the most useful menu functions.
The symbols in the toolbar correspond to the same symbols shown in the menus.
Docked windows: various windows in AKM may be docked so that are large flat workarea
can be set up rather than have many overlapping windows. Docking can be prevented by
holding down the trl-key while dragging the window to another position. To undock a
docked window, double click its caption.
Autosave: keypad configurations are saved automatically into the temporary “My
Documents\Axium Keypad Manager\autosave” folder. This occurs immediately when a
configuration is loaded from disk or downloaded from a keypad and then after every ten
minutes if changes are made. Each time the configuration is autosaved, a new backup file is
created thus making it possible to revert to an earlier version if there is a problem with the
last backup(s) or if something from an earlier version is required.
The autosave folder is moved into the Windows trash can (“Recycle Bin”) when AKM is
closed. This is done to prevent backups from consuming large amounts of disk space
unnecessarily. Over time, a number of autosave folders will appear in the trash, where each
one represents an AKM session when at least one file was autosaved.
If AKM is not running when a backup needs to be restored, the autosave folder will probably
be in the trash. The user must find the appropriate folder (the “Date Deleted” is a good
indication of which session each folder represents) and restore it. AKM can then be started.
8

In order to load a backup configuration, it should first be moved out of the autosave folder as
this folder is only temporary and will be deleted when AKM is closed again. Once the file has
been moved, it can be opened using File – Open.
9
AX-KPB PROGRAMMING
When designing or viewing a configuration for an AX-
KPB, the area on the right of the main window
represents the keypad. Below the keypad is an area
showing the details of the selected key. The six source
select keys at the top of the keypad select the six
banks, selection is indicated by the blue LED. When a
key is shown with a depressed appearance, it is loaded
with a command. Placing the mouse cursor over a key
displays a tool tip showing the key’s name.
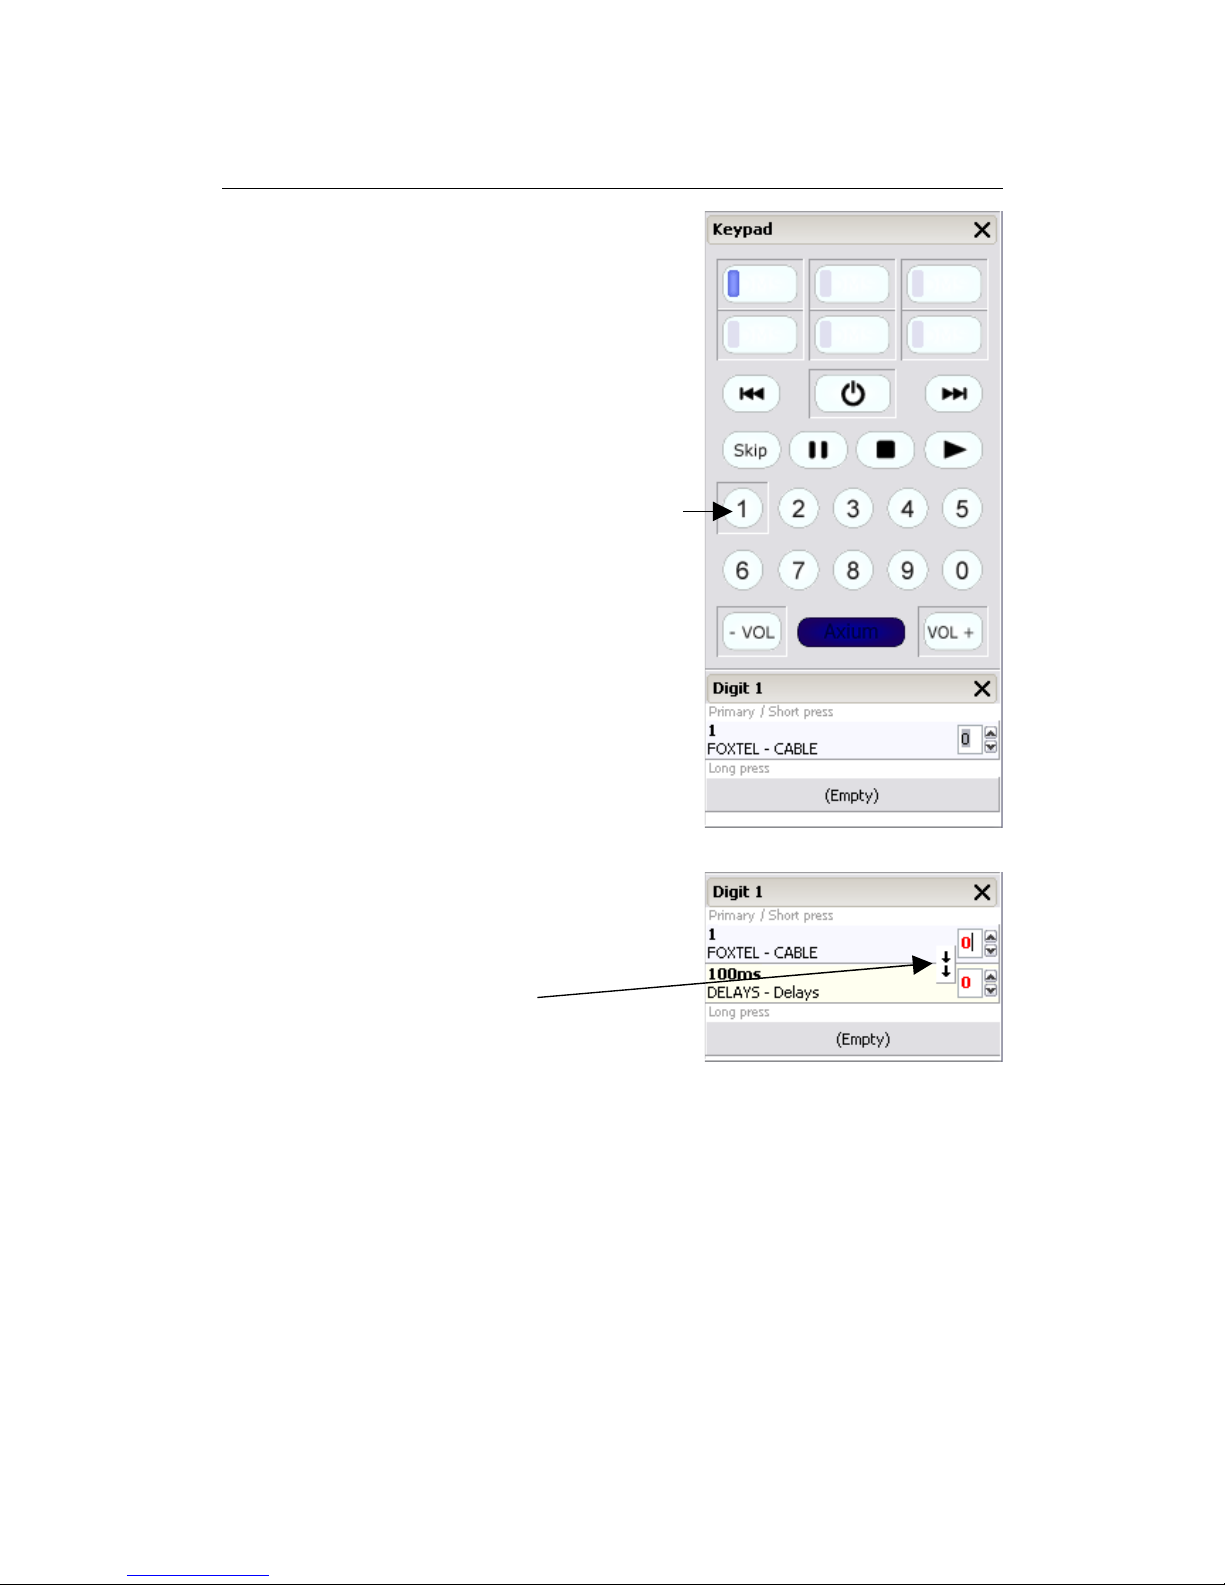
Loading a key with a command:
Select the bank for programming and drag a command
from a database and drop it onto the desired key.
Example: FOXTEL / ABLE / 1 command is dropped
onto the digit 1 key. Digit 1 remains depressed
indicating the key has a command loaded, and the
programming detail window displays the command,
make and model.
If the P clipboard has a Hex code copied to it, then it
may be pasted directly to a key by right clicking the key
and selecting; Hex code / Paste new.
Loading a key with a Sequential macro:
For sequential macro’s simply drag and drop commands
in the correct order onto the same key – up to 32
commands.
When just two commands have been dropped onto a
key the ‘Macro Type’ button pops up.
Both arrows down indicate a sequential macro.
Arrows pointing outwards indicate an alternating
macro.
lick the Macro Type button to make the selection.
When more than two commands are dropped onto a key the sequential macro is assumed
and the Macro Type button disappears.
The number of code repeats may be adjusted from 1 – 15.
Some brands of equipment require a delay between commands before they will correctly
respond to a sequence, various delay times with repeats are provided in the public database
under Axium / Delays / _ _
10
Questo manuale è adatto per i seguenti modelli
1
Indice
Manuali Software popolari di altre marche


PS Audio
PS Audio PowerPlay Manuale del proprietario

Brady
Brady LOCKOUT PRO 3.0 Manuale di servizio

Avaya
Avaya Interaction Center Manuale utente

Texas Instruments
Texas Instruments TI-83 Plus Silver Edition Manuale

Novell
Novell GROUPWISE 8 - INTERNET AGENT Manuale utente

Oracle
Oracle Application 9i Manuale utente

Acer
Acer RDM Manuale utente

Canon
Canon Vixia HF21 Manuale utente

Canon
Canon ZR950 Manuale utente

Samsung
Samsung Auto Backup Manuale utente

Polycom
Polycom Vortex EF2201 Istruzioni per l'installazione e il funzionamento

Brocade Communications Systems
Brocade Communications Systems Brocade 8/12c Manuale utente