Bermuda Auto Fish Feeder Manuale utente

Instruction Manual For Auto Model &
Wi-Fi Controlled Model
301121
Auto Fish Feeder
IMPORTANT: Please read this instruction manual carefully before
using this product. Keep the manual safe for future reference.

2
Thank you for purchasing a Bermuda Auto Fish Feeder.
The Bermuda Auto Fish Feeder is an automatic fish feeder suitable for all
garden fish ponds. It provides an easy and reliable way to ensure your pond
fish are fed regularly, even when you’re not there.
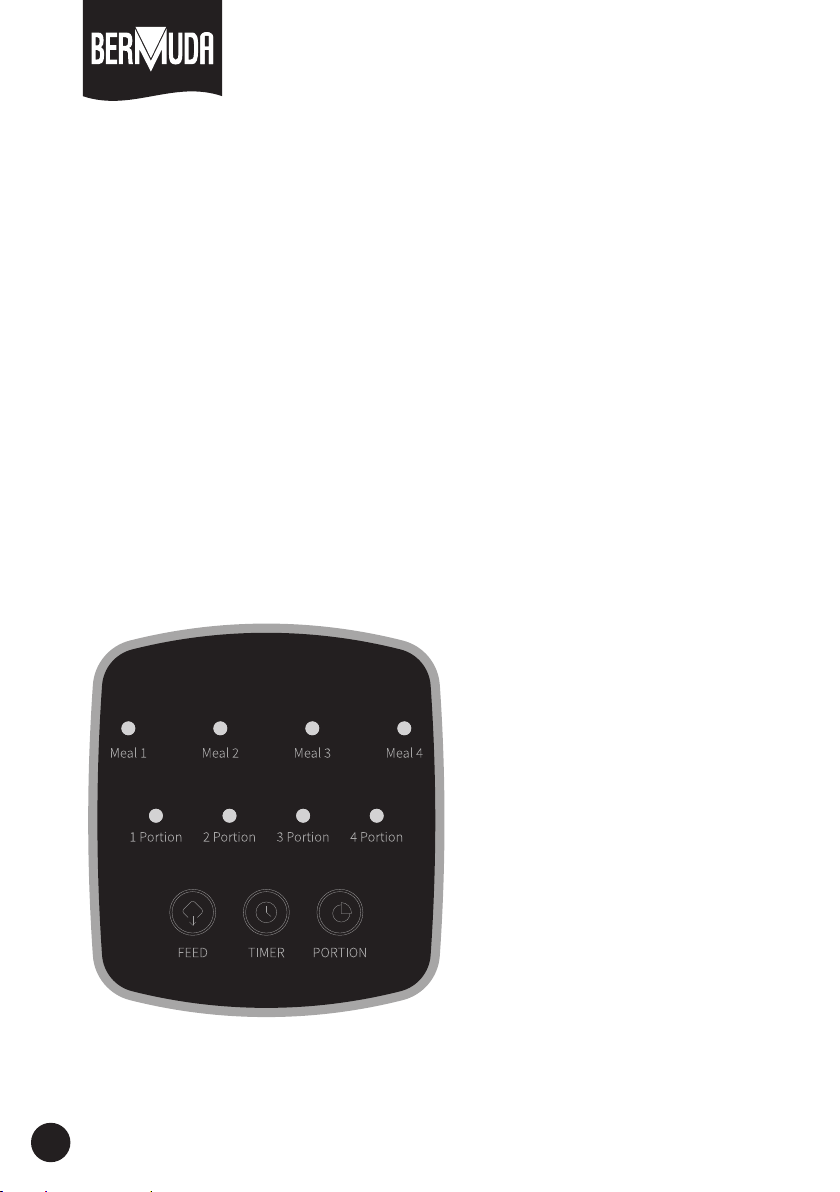
Two models are available. Wi-Fi CONTROLLED MODELS can be pre-programmed
via an App on your mobile device to dispense varied amounts of food at specific
times of the day. Or simply press the buttons on the AUTO MODEL to dispense
pre-set amounts, every four hours, up to four times a day.
Attention
• Keep out of reach of children
• This appliance is not intended for use by persons (including children) with
reduced physical, sensory or mental capabilities, or lack of experience and
knowledge, unless they have been given supervision or instruction concerning
use of the appliance by a person responsible for their safety.
• Turn off the power when maintaining the feeder or when not intended for use.
• Do not use any other cable other than the one supplied (if supplied).
• Always install at the side of a pond, never in the pond.
• For best results, do not leave food inside the feeder for long periods of time.
• Product specifications can be seen on the ratings label on each unit.
• Requires 3 x 1.5V D TYPE (R20 / D / UM-1) Batteries. These are not included.
• Only pellet type foods, such as Bermuda Pond Pellets should be used.
Do not use flake type foods.
• Devices such as mobiles, tablets or routers are not included.
• Download the SMART LIFE - SMART LIVING App to connect your device
to the Wi-Fi Fish Feeder.

3
Set-Up (All Models)
• Fit the food chamber onto the chute
• Push the button near to the top of the feeder to open the hinged lid.
• Remove any loose components / packaging that may be inside.
• Clean the feeder using a soft towel to remove any dirt and debris.
DO NOT immerse in water. Make sure the chamber is completely dry before
filling with food.
• Fit 3 x 1.5V D TYPE Batteries (R20 / D / UM-1), not included, into the battery
compartment. Pay attention to the battery polarity marked in the battery
compartment (the end with the spring is negative).
• Re-fit cover onto the battery compartment.
Specifications
Capacity: 6 Litres
Voltage: DC 5V
Current: 1000mA
Dimensions: 19.1 x 34.6 x 53.9cm

4
AUTO MODEL - Set-Up
Once the batteries are installed you can test the fish feeder.
• Turn the power button on.
• The feeder will automatically start as if it is dispensing food for the first
time and the lights will illuminate on the display panel.
• Press "FEED", "TIMER" and "PORTION" buttons to check that they all work
properly.
• Now position the unit at the side of your pond where food can be dispensed
into the water.
• If you want to fix the feeder into soft ground, you can fit the 4 spikes
provided into the mounting holes on the bottom of the feeder.
AUTO MODEL - Understanding the auto feeding cycle
FEED BUTTON
Press to dispense 1 portion
amount of food
TIMER BUTTON
Press to cycle between
Meal 1 to Meal 4
PORTION BUTTON
Press toset the feeding
amount for each meal

5
AUTO MODEL - Understanding the auto feeding cycle
MEAL
The control panel identifies each feeding time as "MEAL 1", "MEAL 2", "MEAL
3" and "MEAL 4". A "MEAL" is basically the time when the food is being
dispensed. Each "MEAL" will occur four times per day on a four hourly cycle
from the moment you turn the power on. After "MEAL 4" has finished,
the next feed will start 24 hours from when the first feed started.
The blue LED will illuminate to show which meal is due next.
As an example:
8am - Turn power on - MEAL 1 will be dispensed
12pm - MEAL 2 will be dispensed
4pm - MEAL 3 will be dispensed
8pm - MEAL 4 will be dispensed
The feeder will then next feed the following day at 8am and will follow the
same cycle.
NOTE: If you turn the power switch off at any point, the cycle will be re-set
from the next time you turn it back on.
PORTION SIZE
The amount of fish food dispensed during each "MEAL" can be set to four
amounts named "PORTIONS". Approximately 15 cubic cm of food is dispensed
per portion. The actual weight of the of the food will vary depending on the
density and pellet size, although usually this is approximately 5 to 7 grams.
The red LED will illuminate to show the portion size for the meal.
As an example:
1 Portion = About 15 cubic cm of food. (Approx. 7 grams)
2 Portion = About 30 cubic cm of food. (Approx. 14 grams)
3 Portion = About 45 cubic cm of food. (Approx. 21 grams)
4 Portion = About 60 cubic cm of food. (Approx. 28 grams)

6
AUTO MODEL - Setting the auto feeding cycle
• Turn the power button on. The feeder will automatically start as if it is
dispensing food for the first time and the lights will illuminate on the
display panel.
• Press "TIMER" button repeatedly until the blue light above Meal 1 is
illuminated.
• Now press the "PORTION" button to set how much food will be dispensed
during Meal 1. Press the buttons repeatedly until the red light illuminates
above the portion size you require.
NOTE: If you do not want any food to be dispensed during this Meal, press
the "PORTION" button repeatedly until no red lights are illuminated.
• To set Meal 2, press TIMER button until the blue light above Meal 2 is
illuminated. Then press PORTION button until the red light above the
correct portion is illuminated.
• Continue this sequence until all four meals have been set.
• The feeder automatically saves the current settings after 3 seconds of
inactivity.
NOTE: If you turn the power switch off at any point, the cycle will be re-set
from the next time you turn it back on.
NOTE: If you press the FEED button at any point, the feeder will dispense 1
portion of food. This will not affect the Auto feeding cycle program.
NOTE: You can easily modify the portion sizes for each meal at any point.
After 3 seconds of inactivity the program will revert back to where it left off.

7
AUTO MODEL - Setting the auto feeding cycle
EXAMPLE SCENARIO:
I want to set the feeder to feed about 30 cubic cm of food (2 portions) at 8am,
14 cubic cm of food (2 portions) at 12pm, no food (0 Portions) at 4pm and 60
cubic cm of food (4 portions) at 8pm.
8am - Turn power on - Feeder will dispense one portion as MEAL 1.
The blue light above MEAL 2 will then illuminate to indicate MEAL 2
is next and this will dispense four hours later at 12pm.
You could press FEED button to dispense another portion.
Press "TIMER" button until MEAL 1 is illuminated blue. Now press
"PORTION" button until 2 portions are illuminated red.
Press "TIMER" button until MEAL 2 is illuminated blue. Now press
"PORTION" button until 2 portions are illuminated red.
Press "TIMER" button until MEAL 3 is illuminated blue. Now press
"PORTION" button until 0 lights are illuminated red.
Press "TIMER" button until MEAL 4 is illuminated blue. Now press
"PORTION" button until 4 portions are illuminated red.
12pm - Meal 2 will dispense 2 portions.
4pm - Meal 3 will dispense nothing.
8pm - Meal 4 will dispense 4 portions.
NEXT DAY at 8am - Meal 1 will dispense 2 portions.
Then cycle repeats every day.
IMPORTANT: Top-up the food in the feeder regularly to maintain accurate
feeding.

8
Wi-Fi MODEL - Downloading the App
Wi-Fi LIGHT
Indicator light to show
power is on and there is a
connection to a Wi-Fi signal
SET BUTTON
Press to set the
Wi-Fi signal
Wi-Fi MODEL - Set-Up
• Once the batteries are installed, turn the power button on and the Wi-Fi
light should illuminate green .
• Now position the unit at the side of your pond where food can be dispensed
into the water.
• If you want to fix the feeder into soft ground, you can fit the 4 spikes
provided into the mounting holes on the bottom of the feeder.
To operate the feeder you need to download the SMART LIFE - SMART LIVING
App onto a mobile device. For first time connection and set-up you will need
to ensure the mobile and the feeder are connected to the internet by the
same 2.4 Ghz Wi-Fi router.
NOTE: The developers of the third party App may update and improve the
App software as required therefore the interface and instructions could differ
from those shown on the following pages.
1. To program the feeder you will need to download the App.
Scan this QR code to download the SMART LIFE App onto
your mobile or tablet (Fig. 1). Once downloaded the App
icon will then be created on your mobile desktop.
Or visit: http://e.tuya.com/smartlife.
Or search App Store or Google Play store for:
SMART LIFE - SMART LIVING
By Volcano Technology

9
Wi-Fi MODEL - Using the App
Fig. 1
Fig. 5
Fig. 2
Fig. 6
Fig. 3
Fig. 7
Fig. 4
Fig. 8
2. Click on the App icon and open the App. The Privacy Policy and User
Agreement (Fig. 2) will appear the first time the App is opened. Click "AGREE".
Registered users can click on "LOG IN" to enter their log-in details. (Fig. 3)
First time users will need to click on "SIGN UP" to register their details. (Fig. 3)
To register a new ID, enter your email address, tick the box to agree to the
terms and conditions. Then check your email inbox to get the verification code.
In the App, enter the 6 digit verification code in the boxes provided. Now set a
memorable password. You'll then be prompted with a number of pop-ups to
allow access to your device to enable things like location services and access
to bluetooth. Click to enable them ONLY WHEN IN USE as prompted. (Fig. 4 - 8).

10
Wi-Fi MODEL - Using the App
Fig. 9 Fig. 10 Fig. 11 Fig. 12
3. Now you have logged in to the App, you can add new devices and view
existing devices if you have already added any.
4. To add a new device click on "Add Device" button or the "+" sign (Fig. 9) at
the top right of the screen.
To add the Feeder manually, select "SMALL HOME APPLIANCES" from the left
hand menu list. Then scroll to find the icon "PET FEEDER (Wi-Fi)" (Fig.10).
*A pop-up dialog box may appear asking to obtain device location, if so click
on the "Only In Use" button.
Now you will enter the Wi-Fi Set-Up interface. Click on your Wi-Fi name and
enter the password (Fig. 11) and click on "Next" to enter Device Reset.
Switch on the Feeder and follow the instructions shown in the App (Fig. 12).
Press and hold the "SET" button on the front panel of the feeder for 5 seconds
until the green indicator light blinks. A pop-up dialog box appears asking if the
light is "Blinking Slowly" or "Blinking Quickly" (Fig. 13). Press the corresponding
button.
*If the App asks for you to connect the mobile phone to the device's hotspot.
Select "SmartLife-9261" in your phone's settings. Then go back to the App
(Fig. 14 - 15).
Indice
Manuali Alimentatore di filo popolari di altre marche

Miller
Miller XR-AlumaFeed Suitcase Manuale utente

Lincoln Electric
Lincoln Electric Activ8X Manuale utente

Abicor Binzel
Abicor Binzel iROB Feed HA Manuale utente

EWM
EWM drive 4X IC D EX Manuale utente

Lincoln Electric
Lincoln Electric LF-72 Manuale utente

Hakko Electronics
Hakko Electronics 373 Manuale utente


