Brugg Pipesystems CASAFLEX UNO Manuale utente

10.04.2017 www.brugg.com Tel. +49 (0)5031 170-0
- Technische Änderungen vorbehalten - Subject to technical change -
CASAFLEX-Fernwärmeleitung
CASAFLEX District Heating Pipe
Montageanleitung CASAFLEX UNO Anschlussverbindung „MINI“
DN 20 – DN 40 (PN 16)
Instruction manual CASAFLEX UNO Connection unit “MINI”
DN 20 – DN 40 (PN 16)
1
2.22.32.1
DE
1 Druckring
2 Schiebehülse, komplett
2.1 Schiebehülse
2.2 Graphitdichtung
2.3 Sprengring, DIN 5417
3 Anschlussstück
DE
Verpackungs-
einheit
EN
Packing unit
EN
1 Pressure ring
2 Slide-on sleeve, complete
2.1 Slide-on sleeve
2.2 Graphite sealing
2.3 Snap ring, DIN 5417
3 Connection piece
2 3
Art. Nr. 1061613
Nut für Sprengring
Groove for snap ring
2.3 1
2.22.1
3
10.04.2017 www.brugg.com Tel. +49 (0)5031 170-0
CASAFLEX MINI 2
- Technische Änderungen vorbehalten - Subject to technical change -
Montageanleitung / Instruction manual
Sicherheitshinweise / Saftey Instructions
CASAFLEX
DE Lesen Sie diese Montageanleitung aufmerksam, bevor Sie mit dem Arbeiten beginnen.
EN Read these installation instructions carefully before starting work.
DE Wichtige Hinweise für die sichere und korrekte Handhabung dieses Produkts!
Unfallverhütungsvorschriften beachten!
EN Important information on how to handle this product safely and correctly!
Attention! Be careful to observe all safety regulations!
x
x = 50 mm
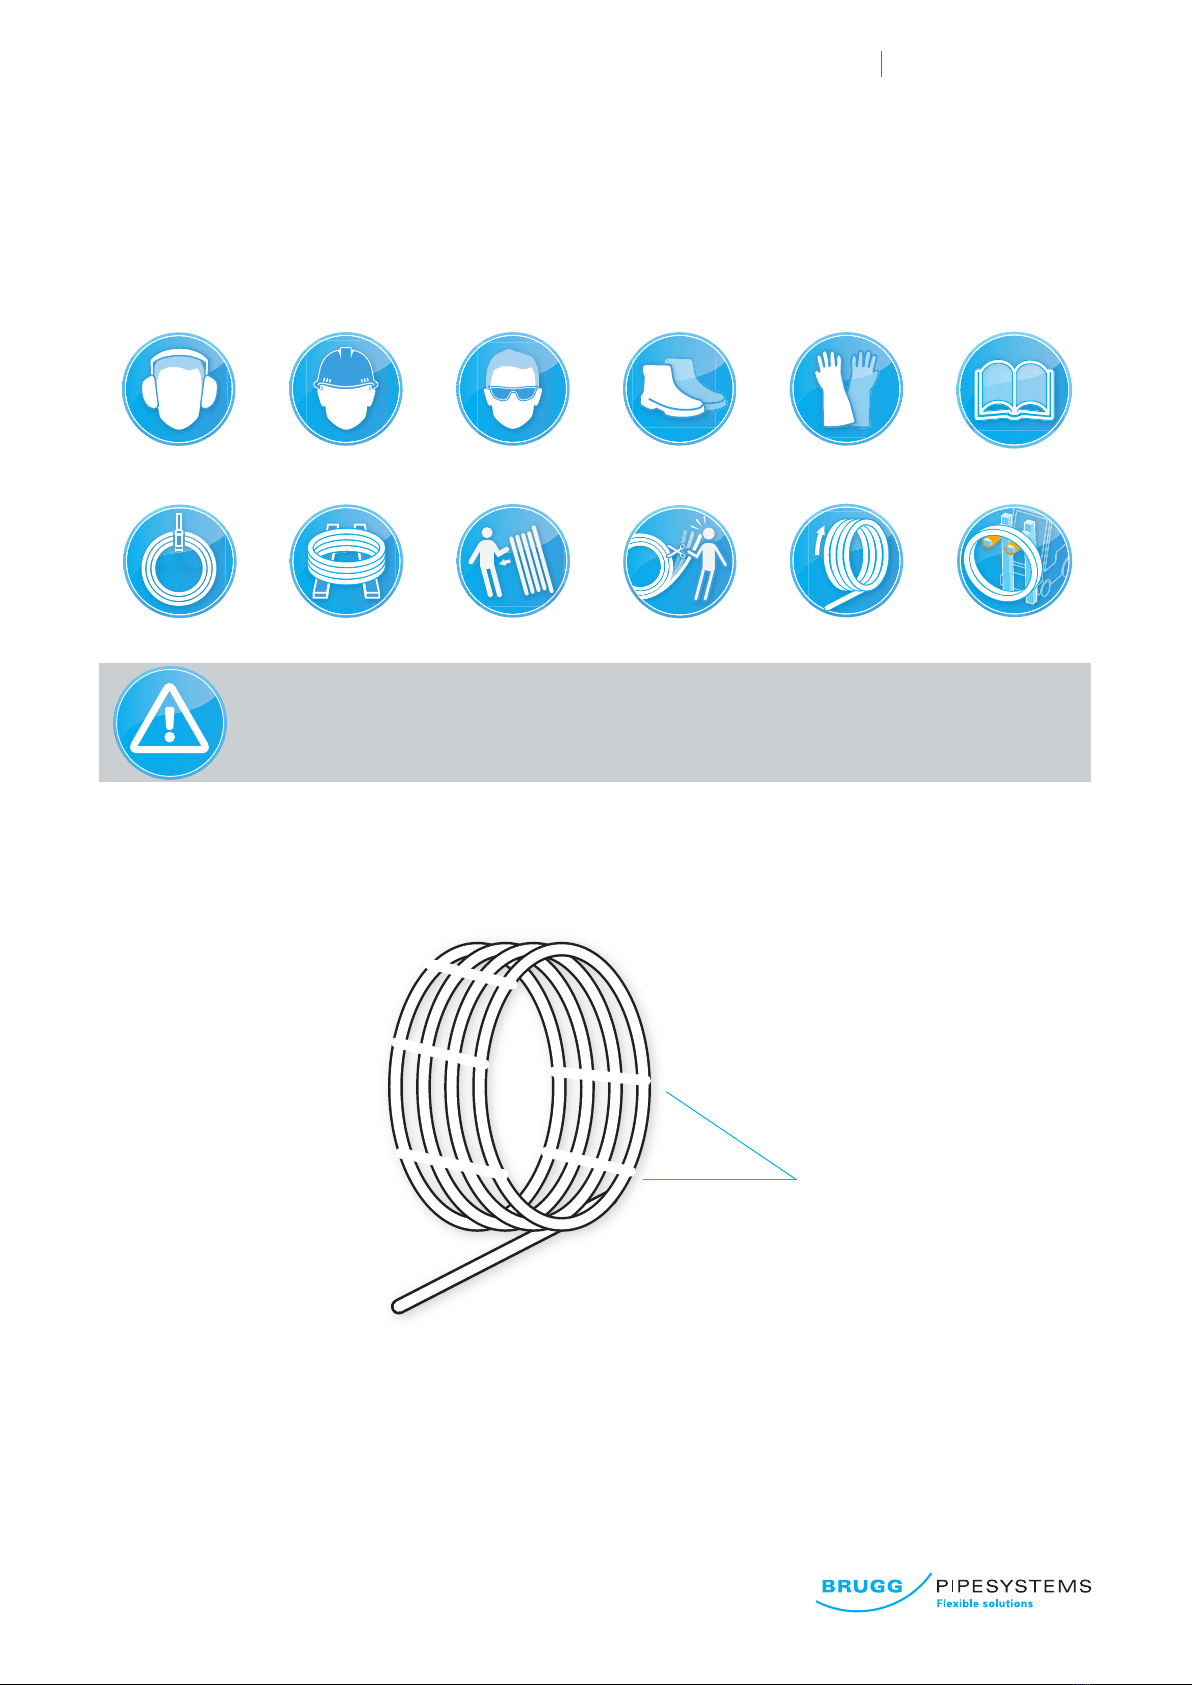
DE Verlegung und Montage von CASAFLEX Rohren
EN Laying and installation of CASAFLEX pipes
Spannbänder
xing ribbons
1.
DE Verlegung (Skizze)
Spannbänder nacheinander von außen nach innen
durchtrennen und Ring im Graben (oder neben
dem Graben) abrollen.
EN Laying the pipe (sketch)
Cut the xing ribbons one after the other from the
outside inwards and roll the pipe out into the trench
(or next to the trench).
10.04.2017 www.brugg.com Tel. +49 (0)5031 170-0
CASAFLEX MINI 3
- Technische Änderungen vorbehalten - Subject to technical change -
Montageanleitung / Instruction manual
1.
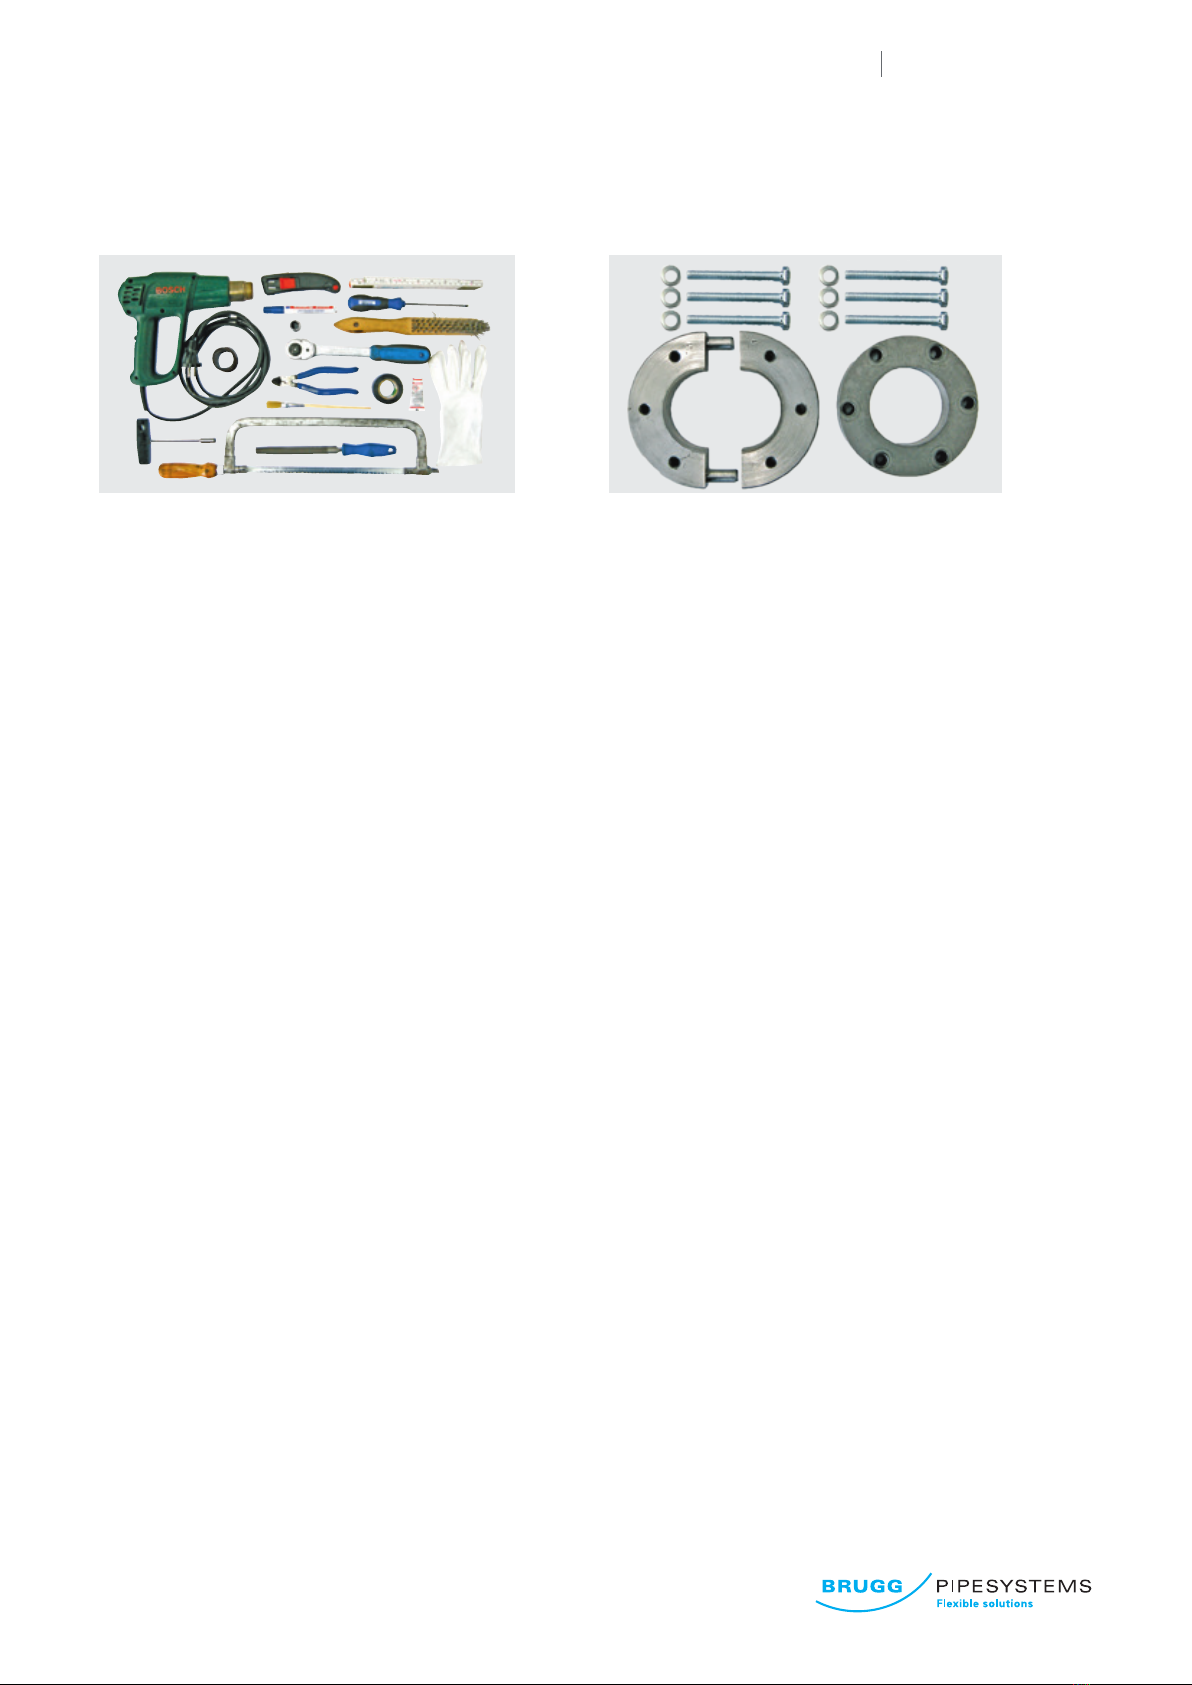
DE Benötigte Werkzeuge
2.
DE Montagewerkzeug zum Verpressen
a geteilter Flansch
b Flansch
c Sechskantschrauben M8
d Unterlegscheiben
EN Tools needed
EN Installation set for compression connection
a Split ange
b Flange
c Allen screws M8
d Washers
a
b
c
e
d
f
g
q
h
i
j
kl
mn
o
p
DE Übersicht Werkzeuge
EN Tools at a glance
c
a b
d
a Heißluftfön
b Sicherheitsmesser
c Marker
d Steckschlüssel
½" – SW13
e Umschaltknarre ½"
f Seitenschneider
g Pinsel
h Gliedermaßstab
i Schraubendreher
j Edelstahl-Drahtbürste
k Klebeband
l Gratpaste
m Handsteckschlüssel SW7
n Halbrundfeile
o Bügelsäge
p Schutzhandschuh
q Schmirgelleinen
a Hot-air blower
b Safety knife
c Marker
d Socket wrench
½" – SW13
e Ratchet brace ½"
f Side cutter
g Brush
h Folding rule
i Screwdriver
j Stainless steel wire brush
k Adhesive tape
l Graphite paste
m Manual socket wrench
SW7
n Half-round le
o Bow saw
p Protective gloves
q Emery cloth
10.04.2017 www.brugg.com Tel. +49 (0)5031 170-0
CASAFLEX MINI 4
- Technische Änderungen vorbehalten - Subject to technical change -
Montageanleitung / Instruction manual
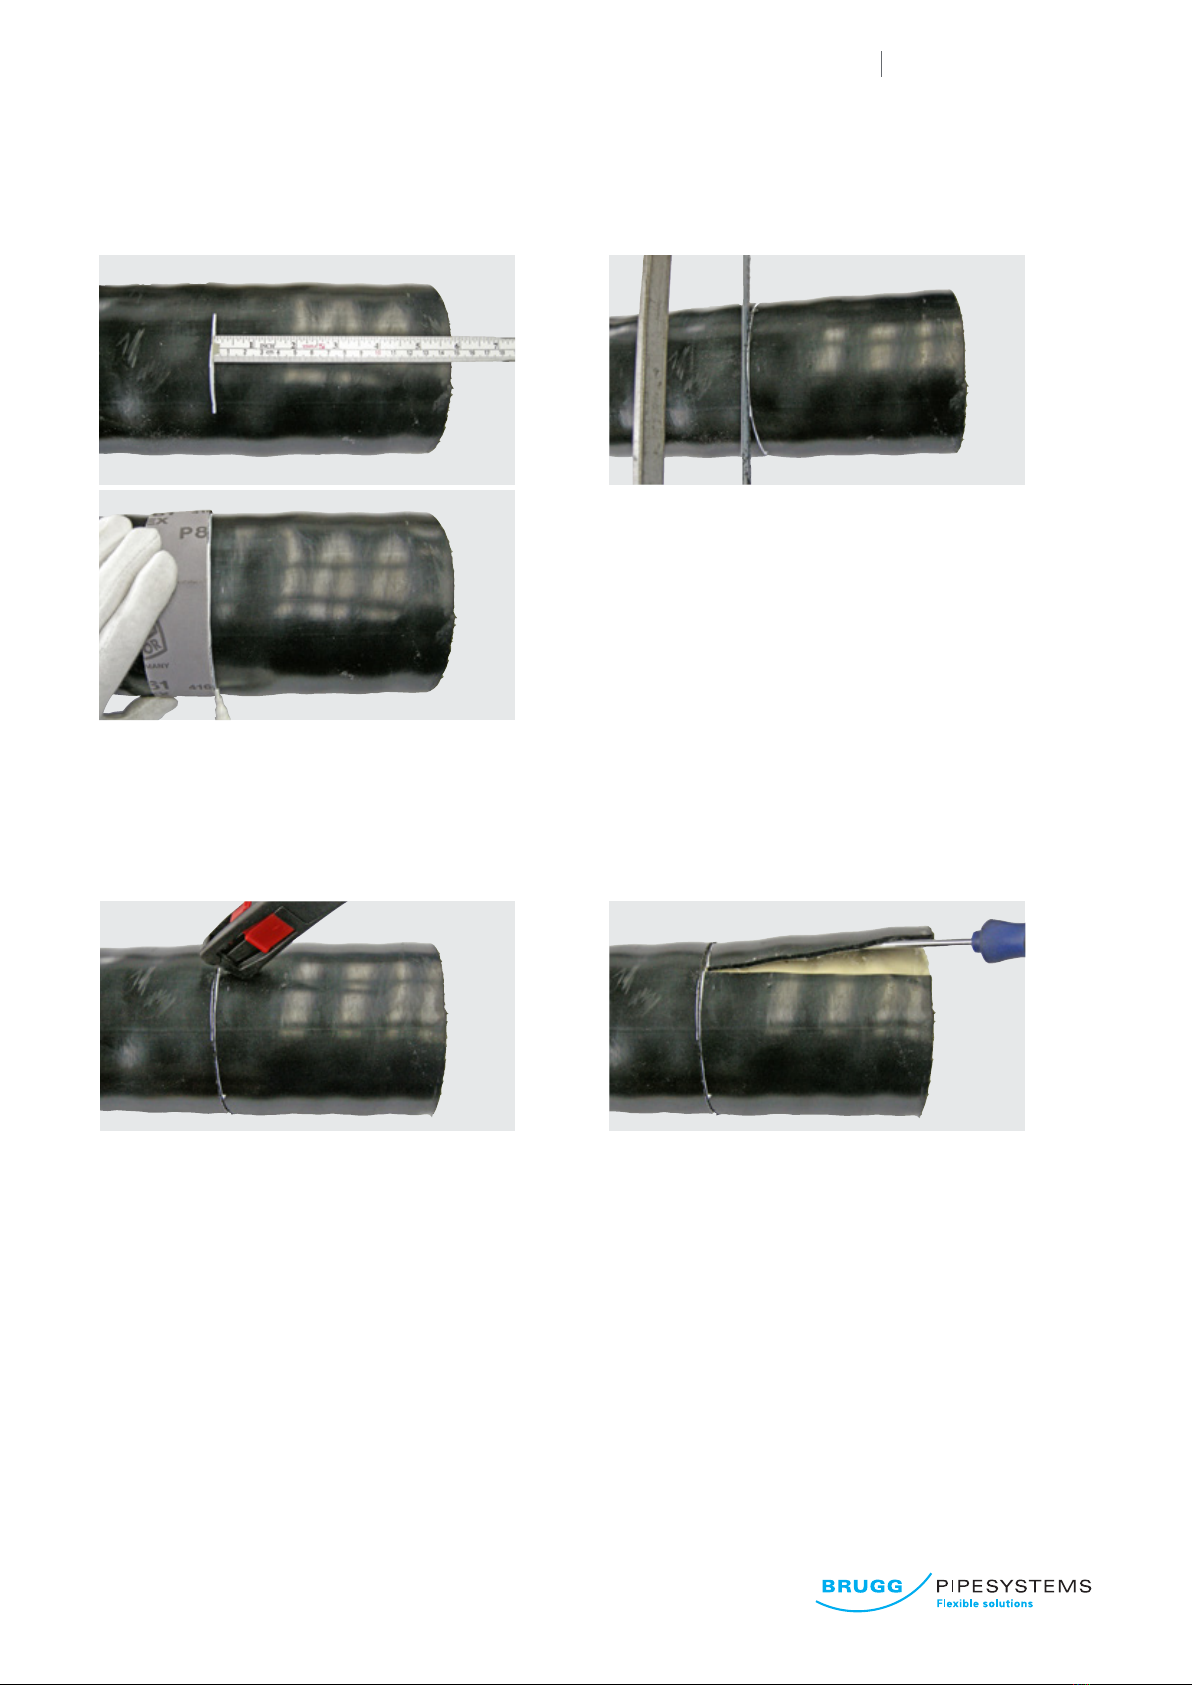
6.
DE Mantel mit Schraubendreher anheben
und mit der Hand entfernen.
EN Lift the jacket using the screwdriver and
remove it by hand.
5.
DE Mantel mit Sicherheitsmesser längs einschneiden.
EN Cut into the jacket in a longitudinal direction using
the safety knife.
DE Rohrvorbereitung für
CASAFLEX-Anschlussverbindung „MINI“
EN Preparing the pipe for the
CASAFLEX connecting piece “MINI”
4.
DE Mantel maximal 10 mm (Sägeblatthöhe) tief rund-
herum ansägen – Streckgitter mit durchtrennen!
Achtung! Überwachungsader nicht ansägen.
EN Saw around the circumference of the jacket to a
maximum depth of 10 mm (saw blade depth) –
cut through the expanding mesh as well!
Attention! Take care not to cut the monitoring leads.
3.
DE Mantel 150 mm vom Ende rundherum markieren.
EN Mark off a line around the circumference of the
pipe jacket 150 mm from the end.

10.04.2017 www.brugg.com Tel. +49 (0)5031 170-0
CASAFLEX MINI 5
- Technische Änderungen vorbehalten - Subject to technical change -
Montageanleitung / Instruction manual
8.
DE Streckgitter mit Schraubendreher
abhebeln und entfernen.
EN Lever off the expanding mesh using the
screwdriver and remove it.
7.
DE Schaum im Bereich der Überlappung des
Streckgitters (gegenüber den Überwachungs-
adern) entfernen.
EN Remove the foam from the expanding mesh
where it overlaps (opposite the monitoring leads).
10.
DE Anzeichnen 80 mm Rohrlänge.
EN Mark off 80 mm of the pipe length.
9.
DE Freilegen und xieren der Überwachungsadern
am Außenmantel. Kunststoff-Beilauf am Mantel
abschneiden.
EN Expose and secure the monitoring leads to the
outer jacket. Cut the plastic core off at the outer
jacket.
80 mm

10.04.2017 www.brugg.com Tel. +49 (0)5031 170-0
CASAFLEX MINI 6
- Technische Änderungen vorbehalten - Subject to technical change -
Montageanleitung / Instruction manual
12.
DE Schaum vom verbliebenen Rohr bis zum
Außenmantel entfernen.
Wellrohr nicht beschädigen!
EN Remove the foam from the remaining pipe as
far as the outer jacket.
Take care not to damage the corrugated pipe!
11.
DE Absägen der Rohrlänge.
EN Saw off the pipe length.
13.
DE Rohr von innen mit Heißluftfön anwärmen –
keine Anlauffarben!
Rohrende mit Edelstahl-Drahtbürste metallisch
blank säubern und entstauben.
Achtung: Rohroberäche ist Dichtäche!
EN Warm up the pipe from inside using the hot-air
blower – take care there is no discolouration!
Clean pipe end to the are surface with stainless
steel brush and remove all dust.
Attention: pipe surface = seal surface!
10.04.2017 www.brugg.com Tel. +49 (0)5031 170-0
CASAFLEX MINI 7
- Technische Änderungen vorbehalten - Subject to technical change -
Montageanleitung / Instruction manual
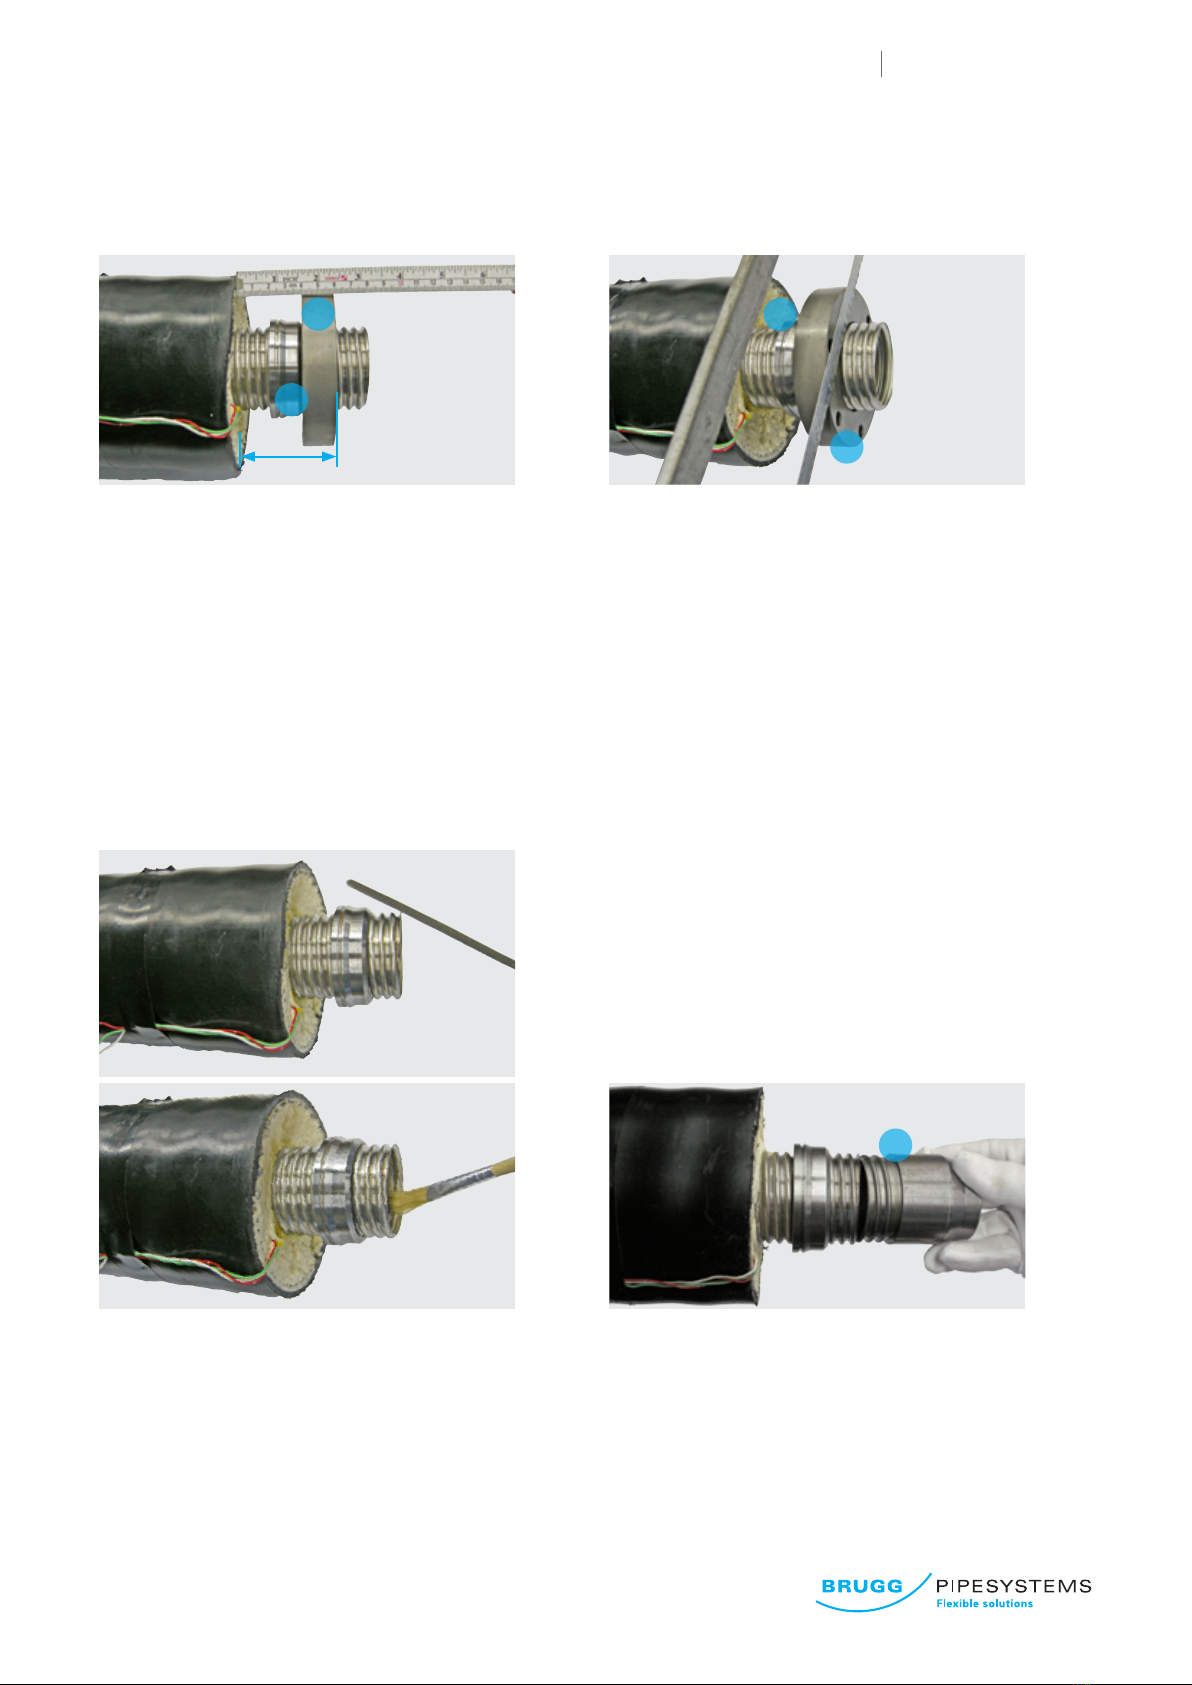
16.
DE Wellrohrende mit Halbrundfeile sauber entgraten.
Späne mit Pinsel entfernen.
Das Rohr außen und innen nicht beschädigen!
EN Remove any burs from the corrugated pipe end
using a half-round le until it is quite clean.
Remove llings using a brush.
Take care not to damage the pipe inside or outside!
15.
DE Flansch (b) am Druckring (1) gegenhalten! Well-
rohr am Flansch entlang gerade absägen.
Achtung! Druckring (1) nach Sägevorgang
weiter aufschrauben!
EN Hold the ange (b) tight in position against the
pressure ring (1). Saw the corrugated pipe off in a
straight line along the ange.
Attention! Screw the pressure ring (1) further on
after sawing is completed.
1
14.
DE Druckring (1) soweit auf das Wellrohr aufdrehen,
dass Maß L mit Flansch (b) eingestellt ist.
Maß L einhalten:
DN 20, DN 25 und DN 32 = 55 mm
DN 40 = 60 mm
EN Screw the pressure ring (1) onto the corrugated
pipe until it is adjusted to the measurement L
with the ange (b).
Keep to the measurement L:
DN 20, DN 25 and DN 32 = 55 mm
DN 40 = 60 mm
L
1
b
b
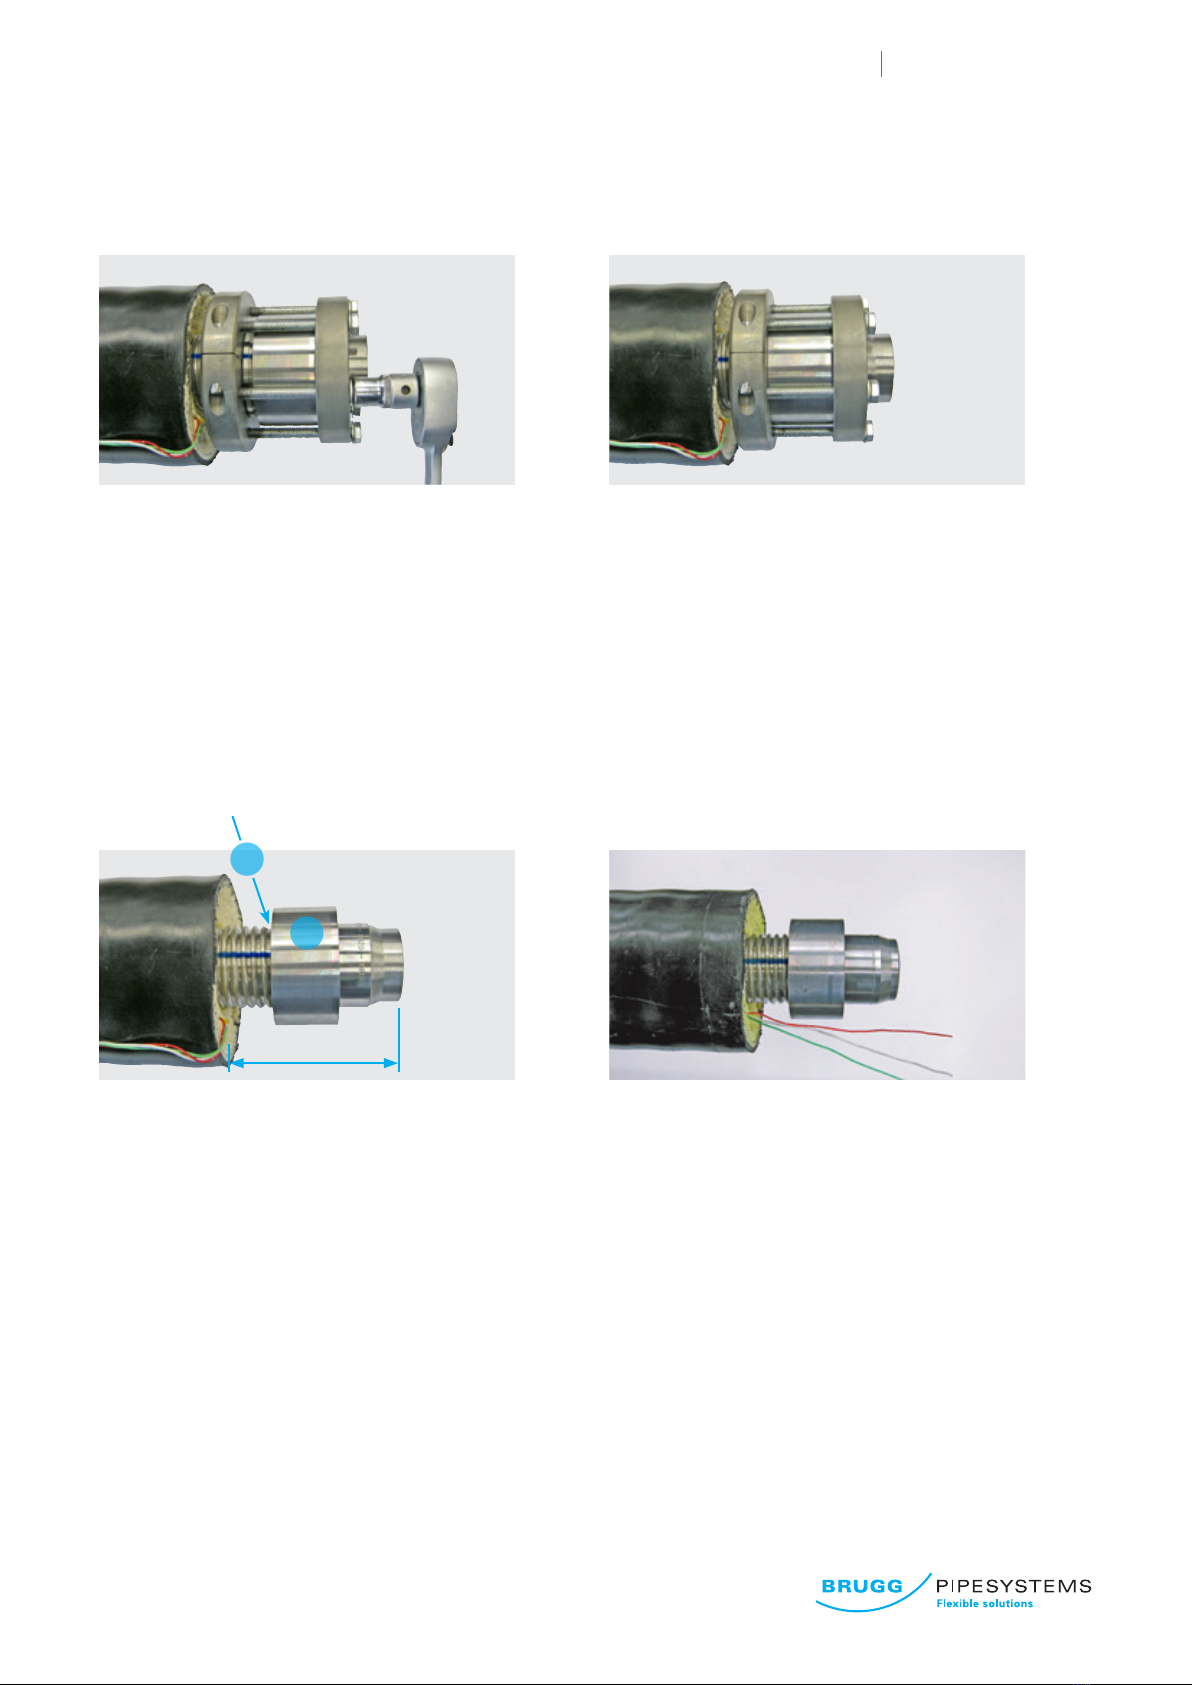
17.
DE Anschlussstück (3) bis zum Anschlag in
das Wellrohr schrauben.
EN Screw the connection piece (3) into the
corrugated pipe as far as is will go.
3
DE Montage der
CASAFLEX-Anschlussverbindung „MINI“
EN Installing the
CASAFLEX connecting unit “MINI”

10.04.2017 www.brugg.com Tel. +49 (0)5031 170-0
CASAFLEX MINI 8
- Technische Änderungen vorbehalten - Subject to technical change -
Montageanleitung / Instruction manual
18.
DE Druckring (1) mit Hilfe der Schiebehülse (2)
einstellen.
EN Adjust the pressure ring (1) with the help of the
slide-on sleeve (2).
19.
DE Schiebehülse (2) an der Kerbe anhalten und
Druckring (1) bis zur Schiebehülse (2) zurück-
schrauben – siehe Abb. 18.
Wichtig: genau arbeiten! Einstellung prüfen!
EN Hold the slide-on sleeve (2) on the notch and
screw the pressure ring (1) back to the slide-on
sleeve (2) – see Fig. 18.
Important: Work precisely! Check the setting
carefuly!
1
2
20.
DE Position des Druckringes (1) für weitere
Montage bis an den Schaum markieren.
EN Mark the position of the pressure ring (1)
up to the foam for the further installation.
1
21.
DE Schiebehülse (2) bis zum Anschlag aufschieben.
Achtung: Teil (1) darf sich während der Montage
nicht verdrehen.
EN Push on the slide-on sleeve (2) as far as it will go.
Attention: Component (1) must not be allowed to
twist during installation.
2
1
Markierung / Marking
1
2
1
2
Kerbe
Notch
Kerbe
Notch
Kerbe
Notch

10.04.2017 www.brugg.com Tel. +49 (0)5031 170-0
CASAFLEX MINI 9
- Technische Änderungen vorbehalten - Subject to technical change -
Montageanleitung / Instruction manual
25.
DE Schrauben (c) setzen.
EN Place all screws (c) in position.
24.
DE Schmiermittel (z.B. Graphit-/Kupferpaste)
auf das Gewinde und unter den Kopf der
Schraube (c) aufbringen.
EN Lubricate the screws on the thread and
under the screw heads (c) (e.g. with
graphite or copper paste).
26.
DE Alle Schrauben von Hand einschrauben.
Achtung: Beim Anziehen der Schrauben den Druck-
ring (1) nicht verdrehen; Markierung beachten!
EN Screw in all the screws by hand.
Attention: when tightening the screws take care not
twist the pressure ring (1); Observe the marking!
23.
DE Montagewerkzeug montieren:
Rundansch (b) vorn auf das Anschlussstück (3) und
geteilten Rundansch (a) hinter den Druckring (1)
auf das Wellrohr aufsetzen.
EN Assembling the installation set:
Push the round ange (b) over the connection piece
(3) and the split ange (a) onto the corrugated pipe
from the front behind the pressure ring (1).
1
a
c
c
3
b
kein Spalt
no gap
1
10.04.2017 www.brugg.com Tel. +49 (0)5031 170-0
CASAFLEX MINI 10
- Technische Änderungen vorbehalten - Subject to technical change -
Montageanleitung / Instruction manual
29.
Typ/Type Länge/Length
DN 20 L1ca. 95 mm
DN 25 L1ca. 100 mm
DN 32 L1ca. 105 mm
DN 40 L1ca. 110 mm
DE Fertige Anschlussverbindung.
Achtung: Druckring (1) zeigt maximal 0.5mm aus
der Schiebehülse (2).
EN The nished connection tting.
Attention: the pressure ring (1) may not protrude
more than 0.5 mm from the slide-on sleeve (2).
30.
DE Fertiger Anschluss beim Einbau von Muffen
im Erdreich. Beim Schweißanschluss die
Schweißnahtvorbereitung beachten
(Entfetten und Schleifen der Oberäche).
EN Connection in the soil when installing sleeves.
Observe the weld seam preparation when
welding. Attention! Degreasing and sanding the
surface.
28.
DE Montageansche bis zum Anschlag festziehen.
Danach Verpresswerkzeug demontieren.
EN Screw the mounting anges of the installation
set tight as far as they will go. Then dismantle
the compression set.
2
Druckring (1) max. 0.5 mm vorstehend
Pressure ring (1) max. 0.5 mm protruding
27.
DE Zum Verpressen die Schraubverbinder nachein-
ander gleichmäßig in mehreren Runden anziehen.
Achtung: Markierung beachten!
EN To press in the connection, tighten the connecting
srews uniformly one after the other in several
rounds. Attention: observe the marking!
1
ca. L1
Altri manuali per CASAFLEX UNO
1


