
BWI 416 Series Manuale utente

54"42"
Adjustment
Spring Power
48" 60" 15 TURNS C.W.
10 TURNS C.W.
Back Check
CONTROL RANGE
1
Latching
FClosing
3
2S
S
F
2 TURNS C.C.W.
5 TURNS C.C.W.
(PUSH SIDE)
TOP JAMB MOUNT
36"
30"
DOORS
EXTERIOR TURNS
5 Ib-f*
34"
38"
INTERIOR
DOORS
8.5 Ib-f*
48" 5 TURNS C.W.
0 TURNS
REQUIRED
DOOR WIDTH
MAXIMUM FULL
(PULL SIDE)
STANDARD MOUNT
HOW TO TELL HAND OF DOOR
DOOR
LEFT
HAND DOOR
HAND
RIGHT
PARALLEL MOUNT
(PUSH SIDE)
INSTALLATION INSTRUCTION
SERIES 416
DOOR CLOSER
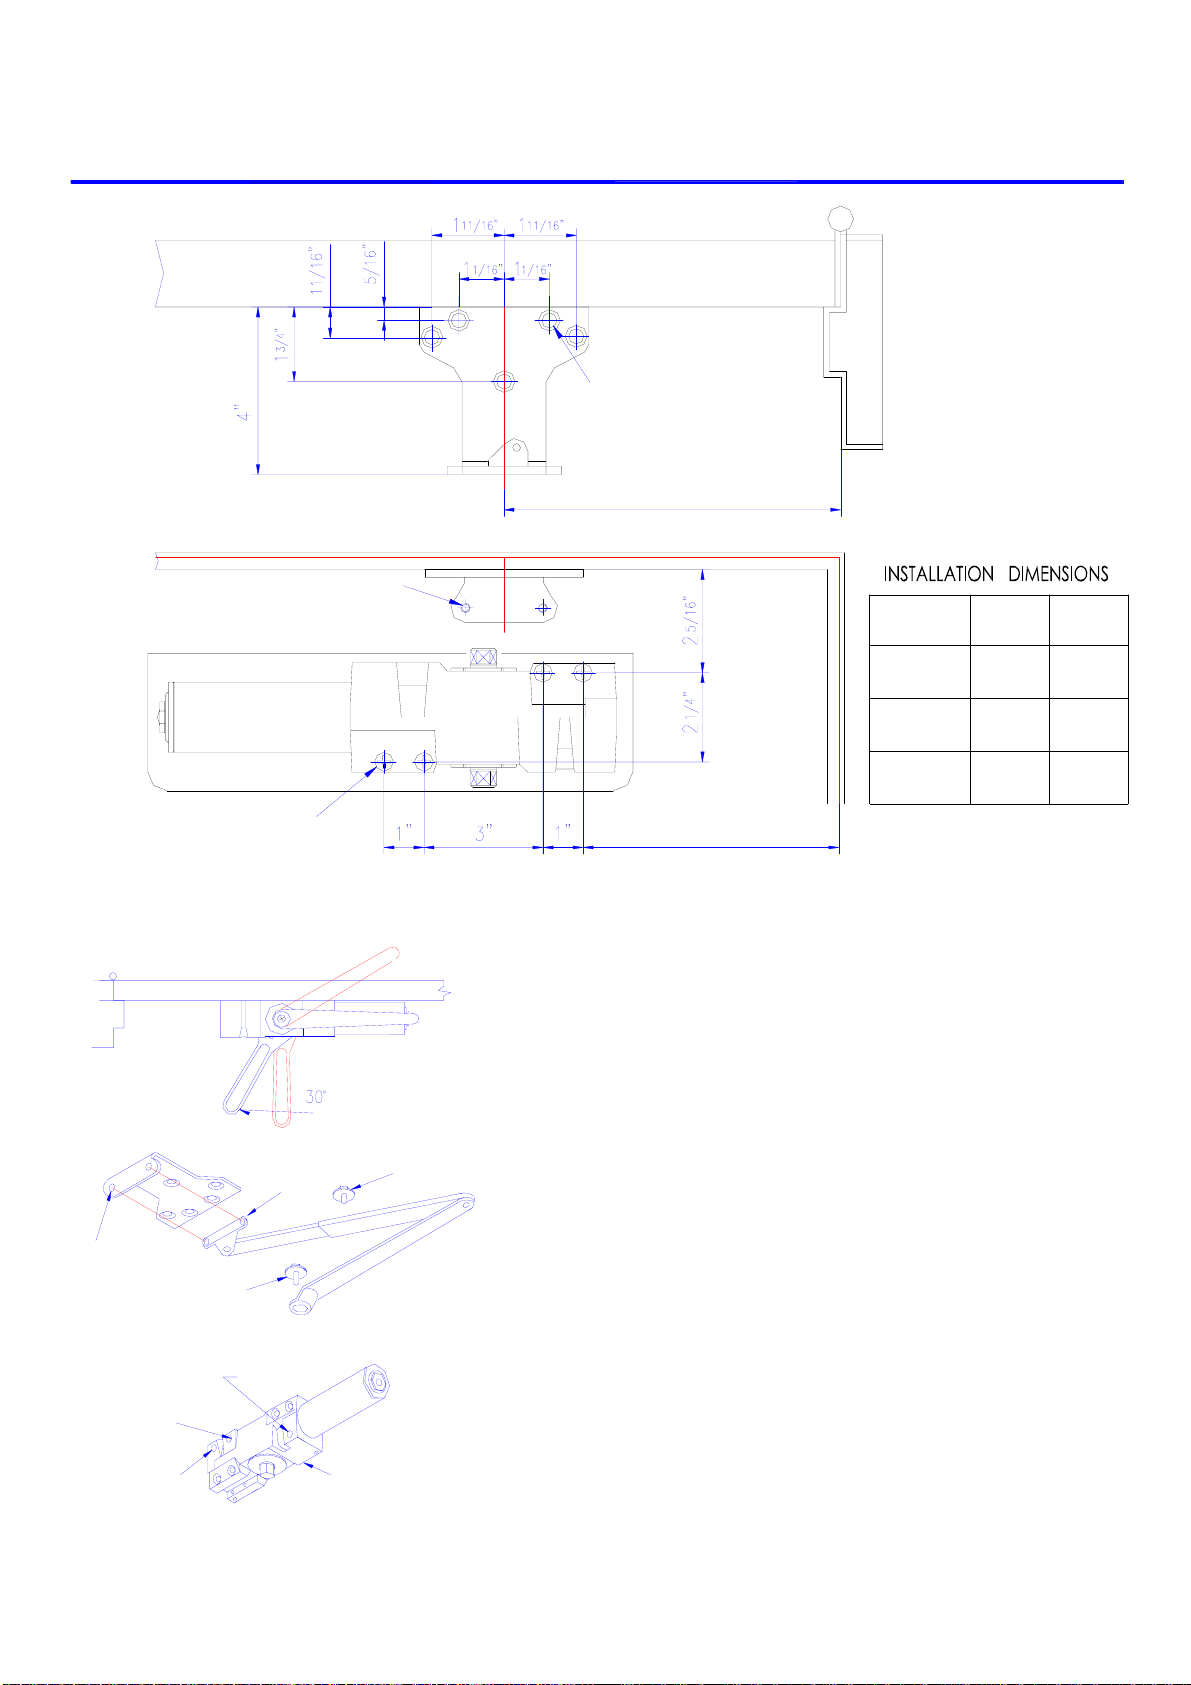
PARALLEL ARM INSTALLATION
OPENING
TO 100°
TO 120°
OVER 140°
1.Before installation, (parallel arm), turn Back Check selector valve (found on the
2.Adjust spring power to match door width as indicated by chart on page 1.
3.Mount closer on door as dimensions shown. Tube end toward latch. If pivots are
used, locate closer and parallel bracket from CENTERLINE OF PIVOT.
and then palce main arm on top shaft, insert arm screw into top of shaft and tighten.
7.Insert rod in forearm, and then insert main arm to closer parallel to door. Then insert
A 'Normal' closing time from 90° open position to door stop position is 4-6 secs,
evenly divided between main swing speed and latch swing speed. Use socket
key(furnished) to adjust speed. To slow main speed of door, turn regulating screw
nearest shaft clockwise. To slow latch speed, turn regulating screw nearest hinge
To increase back-check force, turn regulating screw nearest hinge clockwise.
DO NOT USE ABRUPT BACKCHECK OR EXPECT DOOR CLOSER TO ACT
Place insert in proper cutout, then push cover against door frame. Tighten both
4.Place open end wrench on bottom shaft and turn toward hinge jamb about 30°
SPEED
SCREW
MAIN SPEED
PARALLEL
SCREW
LATCH
BRACKET
cover screws securely.
BACKCHECK
SELECTOR
VALVE SCREW
COVER
forearm set screw and tighten.
6.Attach rod and shoe to parallel bracket as shown.
REGULATION:
clockwise.
BACK CHECK
AS A DOOR STOP.
5.Attach parallel bracket on frame as dimensions shown.
BACKCHECK
SCREW
SCREW
ARM
SHOE
FOREARM
SCREW
or 1/4-20 Machine
machine screws,Wood screws
4 Holes for Self drilling/tapping
CLOSER MOUNTED ON DOOR ON PUSH SIDE
opposite side of closer) ALL THE WAY IN (CLOCKWISE).
Screws.
Screws.
machine screws,Wood screws
2 Holes for Self drilling/tapping
or 1/4-20 Machine
B
Screws.
machine screws,Wood screws
5 Holes for Self drilling/tapping
A
or 1/4-20 Machine
"B"
8-1/4"
7-5/16"8-5/8"
7-7/8" 6-1/2"
"A"
9-7/16"

STANDARD INSTALLATION
cover screws securely.
Place insert in proper cutout, then push cover against door frame. Tighten both
AS A DOOR STOP.
DO NOT USE ABRUPT BACKCHECK OR EXPECT DOOR CLOSER TO ACT
To increase back-check force, turn regulating screw nearest hinge clockwise.
nearest shaft clockwise. To slow latch speed, turn regulating screw nearest hinge
key(furnished) to adjust speed. To slow main speed of door, turn regulating screw
evenly divided between main swing speed and latch swing speed. Use socket
A 'Normal' closing time from 90° open position to door stop position is 4-6 secs,
MAIN ARM
SCREW
F
OREARM
ROD
SCREW
LATCH SPEED
M
AIN SPEED
SCREW
BACKCHECK
SCREW
ARM
SCREW
COVER
COVER
SCREW
clockwise.
BACK CHECK
REGULATION:
1"
6.With forearm at right angle to door (90° ),insert forearm set screw and tighten.
5.Open door and insert rod in forearm.
4.Attach shoe to frame as shown.(if more latching power is required,rotate shoe 180°
top of shaft and tighten.
3.Place main arm on top of shaft 100° to closer body,insert arm screw into
(For offset pivots, please increase the marked dimensions by 1/8")
used, locate closer and shoe from CENTERLINE OF PIVOT.
2.Mount closer on door as dimensions shown. Tube end toward hinge. If pivots are
1.Adjust spring power to match door width as indicated by chart on front page.
CLOSER MOUNTED ON DOOR ON PULL SIDE
1" 3"
Screws.
machine screws,Wood screws
4 Holes for Self drilling/tapping
OPENING
6
or 1/4-20 Machine
TO 100° 7-5/16" 11-13/16"
10-13/16"
PRELOAD TO
90°
6-1/4"
TO 130°
"B""A"
Screws.
machine screws,Wood screws
2 Holes for Self drilling/tapping
2
11/16"
1/4"
11/16"
or 1/4-20 Machine 115/16"
A
B

TOP JAMB INSTALLATION
2
CLOSER MOUNTED TOP JAMB ON PUSH SIDE OF DOOR
SCREW
ARM
SCREW
COVER
11/16"
PRELOAD TO
90°
6
11/16"
1/4"
A 'Normal' closing time from 90° open position to door stop position is 4-6 secs,
evenly divided between main swing speed and latch swing speed. Use socket
key(furnished) to adjust speed. To slow main speed of door, turn regulating screw
nearest shaft clockwise. To slow latch speed, turn regulating screw nearest hinge
To increase back-check force, turn regulating screw nearest hinge clockwise.
DO NOT USE ABRUPT BACKCHECK OR EXPECT DOOR CLOSER TO ACT
Place insert in proper cutout, then push cover against door frame. Tighten both
REGULATION:
BACK CHECK
AS A DOOR STOP.
cover screws securely.
FOREARM
SCREW
ROD
MAIN ARM COVER
SCREW
MAIN SPEED
SCREW
LATCH SPEED
SCREW
BACKCHECK
clockwise.
long rod. For reveals 4 7/8" to 8" use FOREARM ENTENDER(ROD)--available
5.Open door and insert rod in forearm--for reveal 2 5/8" through 4 13/16"use
1.Adjust spring power to match door width as indicated by chart on front page.
2.Mount closer on jamb as dimension shown. Tube end toward hinge.If pivots are
3.Place main arm on top of shaft 100° to closer body,insert arm screw into
4.Attach shoe to frame as shown.(if more latching power is required,rotate shoe 180°
6.With forearm at right angle to door (90° ),insert forearm set screw and tighten.
Screws.
machine screws,Wood screws
2 Holes for Self drilling/tapping
from dealed.
top of shaft and tighten.
used.locate closer and shoe from CENTERLINE OF PIVOT.
(For offset pivots,pls increase the marked dimensions by 1/8")
11-13/16"
7-5/16"
TO 100°
TO 130° 6-1/4" 10-13/16"
1
OPENING "A"
15/16"
"B"
or 1/4-20 Machine
B
1"1" 3" or 1/4-20 Machine
machine screws,Wood screws
4 Holes for Self drilling/tapping
A
Screws.
Altri manuali BWI Sistema di apertura della porta


