Carro PN-04F02D Manuale utente

User Manual
Ceiling Fan Smart Switch
SMART LIFE STAYS IN MOTION
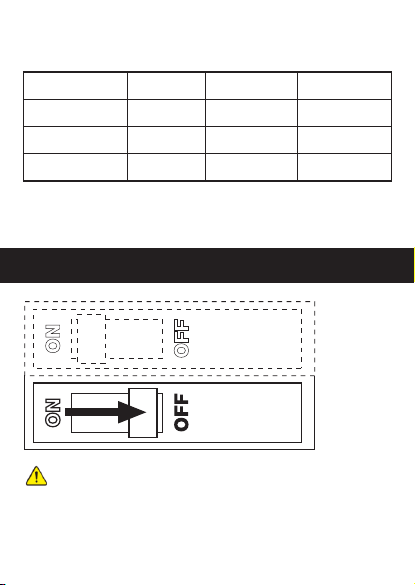
Turn power off at circuit breaker!
May result in serious injury or death. Turn off power at circuit breaker
or fuse before installing. If you are unsure or uncomfortable about
performing this installation, consult a qualified electrician.
1
WARNING – SHOCK HAZARD
Installing your switch
General Specifications
Model PN-04F02D FCC ID 2ANDL-WBR3
Power Supply AC 120V Rated Frequency 60Hz
Max. Current Max. Power 400W/gang
Wireless Standard WiFi 2.4GHz WIFI IEEE 802.11b/g/n
Fan: 1.5A
Light: 2.5A

Wiring Switch.
2
Note: Make sure all the wires are connected
with the correct colors as shown above.
White: Neutral (Supplied)
Black: Live
Bare copper or Green: Ground
Red: Load (Light)
Orange: Electric Fan
Electric Fan
Light
Take out the white wire and wiring cap from the screw bag . Stick this
white wire to the switch using the provided screw. Then connect tightly
the white wire to the Neutral wire from the wall by wiring cap.
(If the length of Neutral wire from the wall is long enough, connect it
to the switch directly.)
Connect tightly the remaining wires from the wall to the switch by the
provided screws as per the above wiring diagram.
Note: If the wiring in your wall-box does not resemble any of these
configurations, consult a qualified electrician.
Mount the device using the provided screws.
3
Attach the wallplate.
Attach the adapter to the switch panel using the screws provided and
snap on the wallplate.
4
Installation of the Smart Switch is now completed.
Turn the circuit breaker back on.

step 1 step 2
Switch can be assembled in several.
Switch can be combined in 2gang, 3gang, or 4gang boxes.
The buttons and switch can be seamlessly connected together, which
fully conforms to the size of the home switchbox.
5
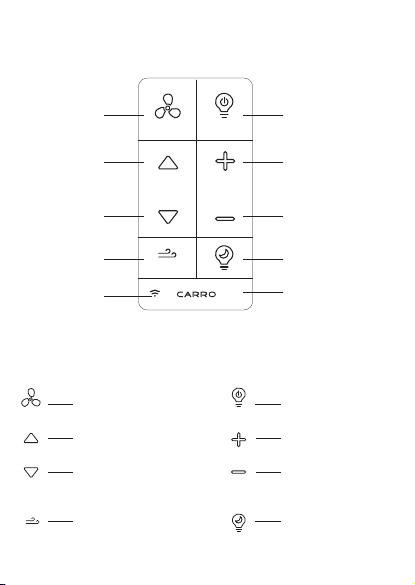
Operation
ON/OFF
ON/OFF
MINI
Fan On/Off
Fan Speed Up
Fan Speed Down
Sleep Breeze
Fan Indicator Light
Light On/Off
Light High
Light Low
Night Light
Pair Function,press and
hold button for 5 Seconds
to retry switch and App
connection.
ON/OFF
MINI
Turns the power to fan off.
Speeds up the fan.
Simulates a breeze for sleep
at the lowest speed of the fan.
Turns the light on and off.
Presses to get a night light
at the lowest brightness of
the light.
Speeds down the fan.
There are three gears of
wind speed.
Presses to get the light
brighter.
Presses to make the light
dimmer.
ON/OFF

NOTE:If the fan indicator light is blinking then the switch is ready
to pair with the App. If you are unable to pair smart switch with App,
press and hold "CARRO"button for 5 Seconds until LED indicator
light starts blinking slowly on switch button to pair with App again.
The fan indicator light is red when you fail to connect smart switch
to App, and green when the connection is finished.
Cleaning: Clean with a damp cloth. DO NOT use chemical cleaners.

1. First download the free Carro Home app from the App Store or Google Play
or scan the QR Code as below.
2. Open the Carro Home app to create your account. The account with
“Carro Home” can be registered through E-mail or Mobile phone.
3. Connect the device to the Carro Home app (Four ways connection):
① Bluetooth connect (WIFI & Bluetooth on)
a. Press “+” button into the device list, then a window will pop up to show
you some devices can be connected.
b. Click “Go to add” (If you click “Do not add” in mistake, please see “Do
not add” steps).
c. Choose the device.
d. Connect to your home WIFI, then back to the app and wait
for connecting.
“Do not add” steps:
a. Select “Electrical”(smart switch) or “Air Circulation”(smart ceiling fan) on
the sidebar menu then select “Ceiling Fan Switch” or “Ceiling Fan” and tap
next.
b. Connect to your home WIFI and tap “Next” to wait for connecting.
② Auto Scan (WIFI & Bluetooth on)
a. Press “+” button into the device list.
b. Tap “Auto Scan” on the top.
c. Wait for the device comes out and tap “Next”.
d. Press “+” button to add device.
e. Connect to your home WIFI.
f. Wait for connecting.
③ WIFI connect-EZ Mode (WIFI on & Bluetooth off)
a. Press “+” button to select “Electrical”(smart switch) or “Air Circulation”
(smart ceiling fan) on the sidebar menu then select “Ceiling Fan Switch” or
“Ceiling Fan” and tap next.
b. Connect to your home WIFI (Only for 2.4Ghz).
c. EZ Mode is set as default, just tap “Next” button to wait for the connection
to complete.
④ WIFI connect-AP Mode (WIFI on & Bluetooth off)
a. Smart ceiling fan: Press and hold the WIFI button on the remote for 5
seconds into AP Mode.
APP control Connection (Wifi and Bluetooth):

Smart switch: Press and hold the “CARRO” button for 5 seconds till the
indicator light blinking slowly to into AP Mode.
b. Press “+” button to select “Electrical”(smart switch) or “Air Circulation”
(smart ceiling fan) on the sidebar menu then select “Ceiling Fan Switch” or
“Ceiling Fan” and tap next.
c. Connect to your home WIFI (Only for 2.4Ghz).
d. Choose AP Mode.
e. Press “Next” button to go to connect the fan’s WIFI signal.
f. Choose the fan’s WIFI signal “CarroHome-XXXX” then back to the app.
g. Wait for connecting.
4. Connect the device to the Alexa:
a. Make sure you have connected the device to the app and working
normally.
b. Open Alexa app, go to the skill to search “Carro Home” skill.
c. Link the skill, log in with your Carro Home app account and password,
then authorize and connect with Carro Home app.
d. Then the Alexa will find out the device automatically.
5. Connect the device to the Google Home
a. Make sure you have connected the device to the app and working
normally.
b. Open Google Home app, Set up a device, choose “Works with Google”.
c. Search “Carro Home”, log in with your Carro Home app account and
password, then authorize and connect with Carro Home app.
d. Then the Google Assistant will find out the device automatically.
6. Connect the device to the Siri shortcuts
a. Make sure you have connected the device to the app and working in
functional.
b. Tap “Smart” on the main menu.
c. Tap “+” button.
d. Tap “launch Tap To Run”.
e. Tap “Run the device”.
f. Choose the device you want to control by Siri.
g. Select the function you want to control by Siri.
h. Then save it.
I. Add to Siri, choose the scene you just made, Add to Siri .
j. Enter the sentence you want to say to make the device works, Add to Siri.
Indice


