Champion Workbench Series Manuale utente

PROPER USAGE AND ASSEMBLY INSTRUCTIONS
WORKBENCH SERIES
The following instructions will provide you with a guide for installation and usage
for the Workbench Series. If at any time you need guidance or help, please do not
hesitate to call us. Thanks again for choosing Champion Tool Storage.
Champion Tool Storage
3070 Lower Mill Dr.
Hood River Oregon 97031
W: www.championbuilt.com
E-mail: [email protected]
QUESTIONS
Phone: 866-391-4200
8 AM - 5PM, PST, Monday-Friday
THIS DOCUMENT IS CONFIDENTIAL AND PROPRIETARY PART NO. 1000590
Read all instructions before proceeding with installation or drawer loading. Vital
product information pertaining to proper set-up and cautions are included.
Failure to follow these instructions may cause failure which may result in
personal injury or property damage.

2
THIS DOCUMENT IS CONFIDENTIAL AND PROPRIETARY PART NO. 1000590
Table Of Contants
Before You Begin 3
Basic Workbench 4
Bottom Shelf 7
Retainer Lip 8
Riser Shelf 9
Warranty 14
Bench Uprights 10
Bin Rails 11
Light Frame / Light Fixture 12
Monitor Holder, With Keyboard, Dual Tilt, Vertical Mount 13

Check your inventory to be sure you received your entire order; refer to the
Parts List on the following pages. If there are any missing or damaged parts,
contact Champion Customer Service at 541-386-7700
Only use the provided hardware during assembly.
Read and understand the entire installation instructions prior to beginning
the install.
1.
2.
3.
THIS DOCUMENT IS CONFIDENTIAL AND PROPRIETARY PART NO. 1000590
Before You Begin
Tools Required
Cordless Drill 1/4" Hex Driver Philps Screwdriver Box Wrench 7/16, 9/16 5/32" Drill Bit
Basic Workbench Hardware Supplied
1000232
Screw 1/4 - 20 x 5/8
Qty. 8
1000326
Washer 1/4
Qty. 8
1000325
Nut 1/4 - 20
Qty. 8
1000327
Screw #14 x 1
Qty. 8
A B C D
3

THIS DOCUMENT IS CONFIDENTIAL AND PROPRIETARY PART NO. 1000590
Basic Workbench Parts List
4
Place the wood top on the ground
upside down. Use the packing foam to
protect the surface when on the ground.
Place the legs on the wood top as
shown and align the edge of the leg
flush to the wood top. Center the holes
with the holes in the wood top.
Install 1000327(Screw #14 x 1) using a
cordless drill and a 1/4" driver. DO NOT
OVERTIGHTEN.
1.
2.
3.
Assembly of Basic Worbench
Attach Legs to Wood Top
1
D
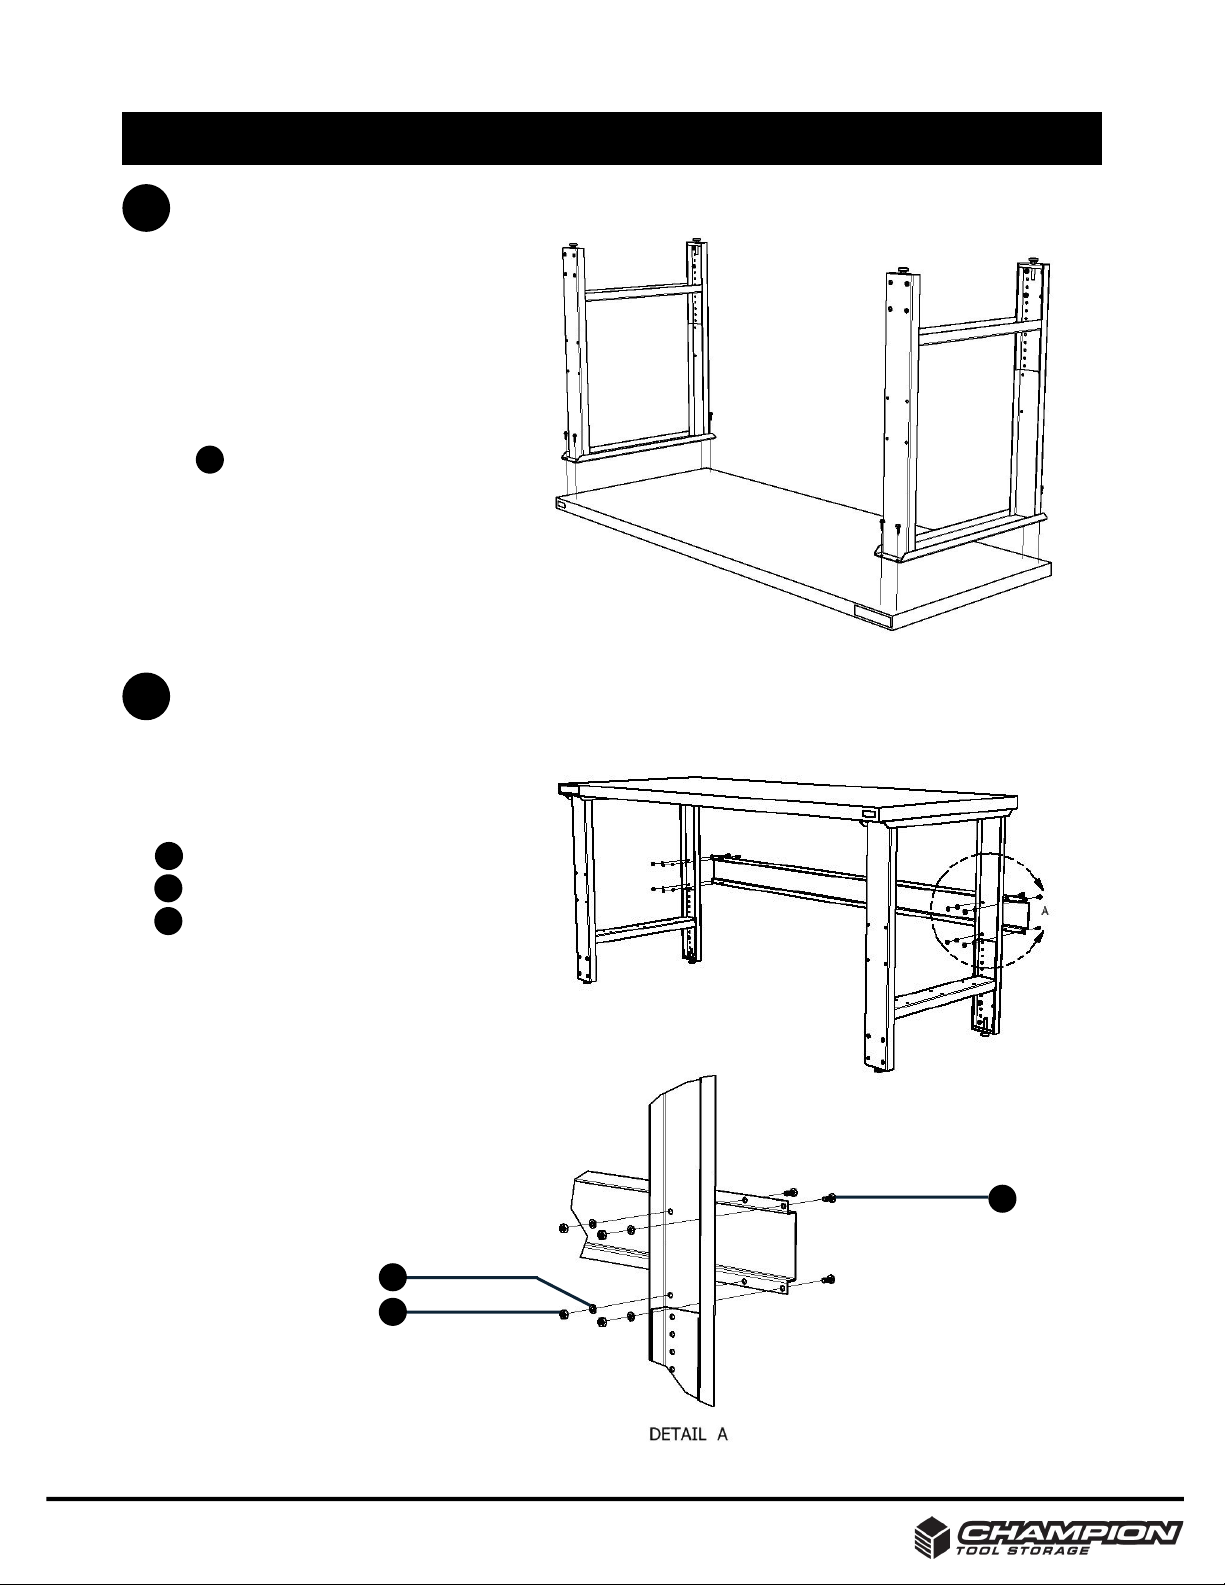
Attach Workbench Support to Legs
2
Align the Workbench Support with the
holes on the legs.
Install the following and tighten.
1.
2.
A
B
C
1000232 - Screw 1/4 - 20 x 5/8
1000326 - Washer 1/4
1000325 - Nut 1/4 - 20
THIS DOCUMENT IS CONFIDENTIAL AND PROPRIETARY PART NO. 1000590
B
C
5
A

Ensure all fasteners are properly tightened.
Rotate the Workbench to upright position. Requires (2) people. Do not attempt to tip bench on its side with a
single person, as it is unstable in this position and may cause harm to you or damage to workbench integrity.
Move Workbench to final location. Requires (2) people.
Adjust leg levelers and legs to desired height. To adjust leg height, see illustration below.
This completes the assembly of the Basic Workbench.
1.
2.
3.
4.
5.
THIS DOCUMENT IS CONFIDENTIAL AND PROPRIETARY PART NO. 1000590
Assembly of Basic Worbench
Final Assembly
3
6
THIS DOCUMENT IS CONFIDENTIAL AND PROPRIETARY PART NO. 1000590
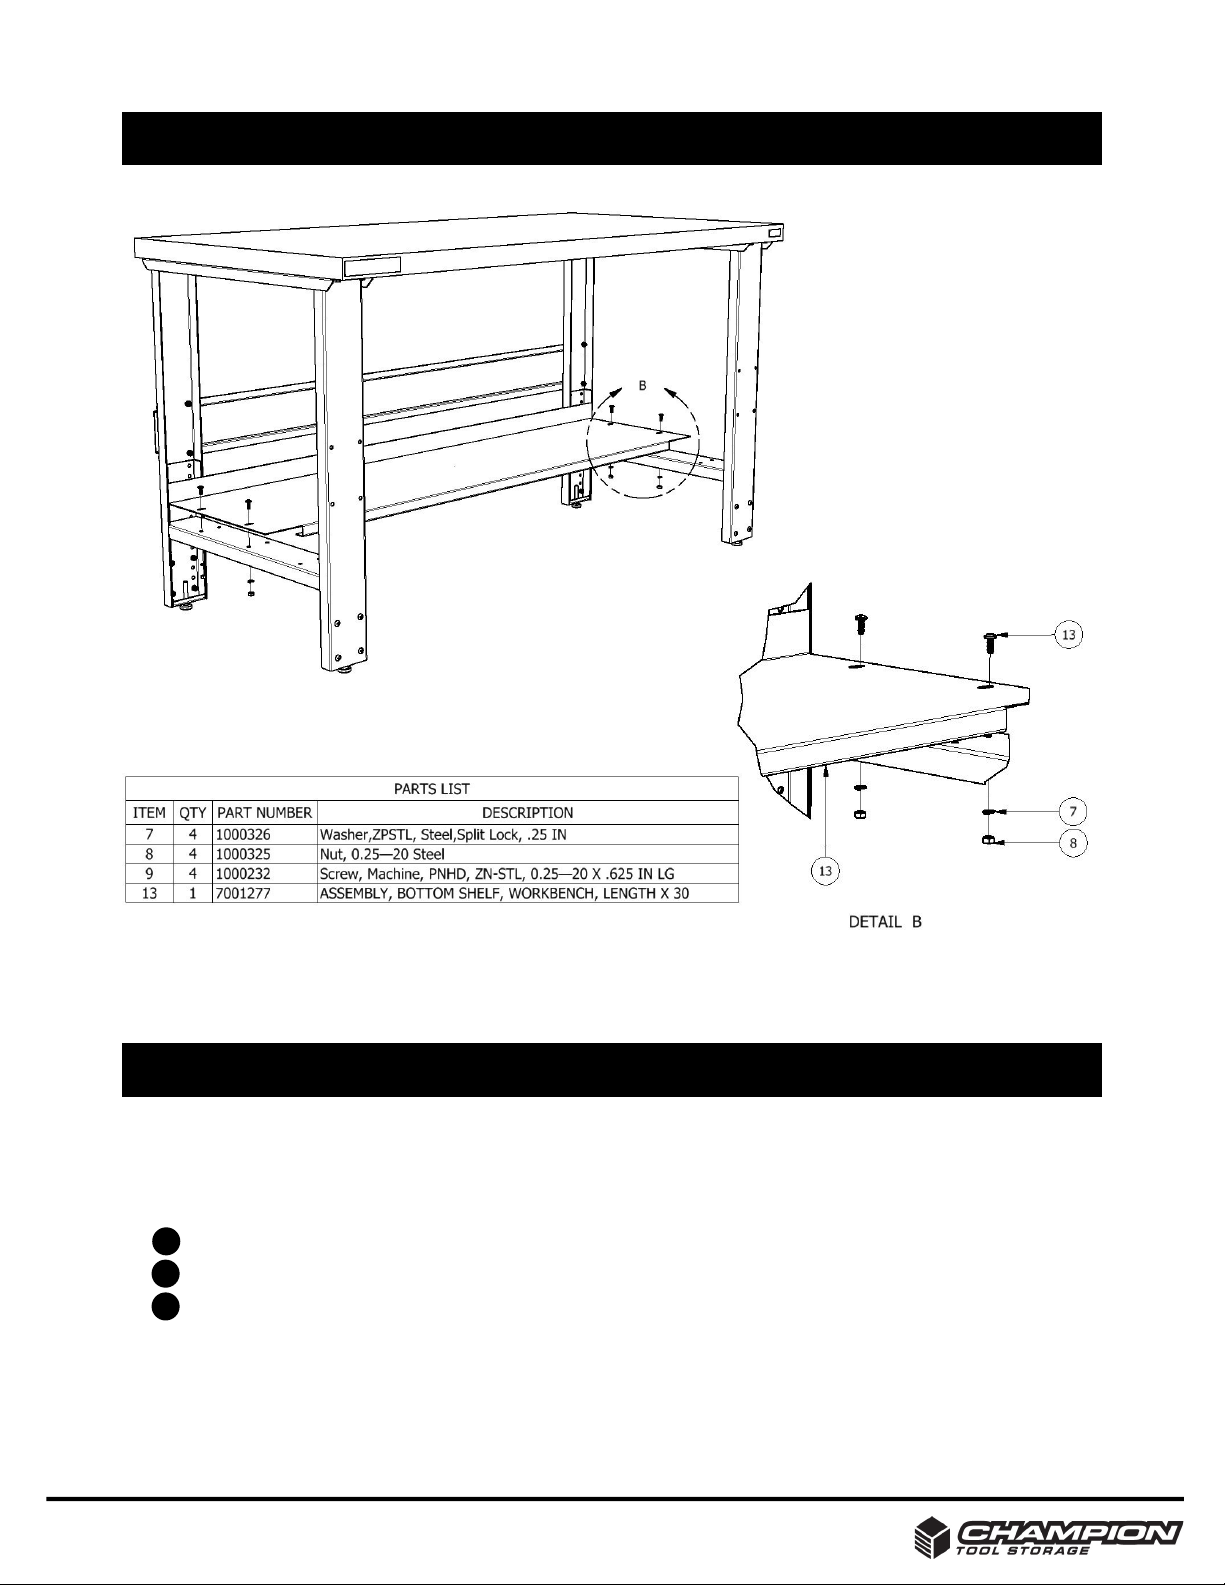
Bottom Shelf Parts List
7
Position Bottom Shelf over left and right Leg Assemblies. Note, Large single return is placed at the rear of the unit.
Align holes in Bottom Shelf to holes in Leg Assemblies.
Install the following and tighten.
This completes the assembly of the Bottom Shelf.
1.
2.
3.
4.
Assembly of Bottom Shelf
A
B
C
1000232 - Screw 1/4 - 20 x 5/8
1000326 - Washer 1/4
1000325 - Nut 1/4 - 20

8
THIS DOCUMENT IS CONFIDENTIAL AND PROPRIETARY PART NO. 1000590
Retainer Lip Parts List
Position ITEM 2 flush to bottom edge of the top and flush to each end. Mark the holes on the wood top and drill 3/4"
deep with 5/32" drill bit. Install Item 2 using the supplied screws(ITEM3). Do not overtighten.
Position Item 1 flush to bottom edge of the top and with the return lip sitting inside of ITEM 2. Mark the holes on the
wood top and drill 3/4" deep with 5/32" drill bit. Install ITEM 1 using the supplied screws(ITEM3). Do not overtighten.
Repeat Step 2 for opposite End Plate(ITEM 7).
Fasten the Back Plate to the End Plates as shown in Detail C Using the supplied fasteners, ITEM 6, ITEM 5, ITEM 4
This completes the assembly of the Retainer Lip.
1.
2.
3.
4.
5.
Assembly of Retainer Lip
3
4
5
1000615 - Screw, #14 X 3/4
1000514 - Screw, #10-24 x 1/2"
1000456 - Washer, #10
61000159 - Nut, Locking, #10-24

THIS DOCUMENT IS CONFIDENTIAL AND PROPRIETARY PART NO. 1000590
9
Riser Shelf Parts List
Position ITEM 2 flush to back edge of the top and flush to the edge of the end. Mark the holes on the wood top and
drill 3/4" deep with 5/32" drill bit. Install Item 2 using the supplied screws(ITEM6). Do not overtighten.
Set ITEM 1 on top of ITEM 2, align holes. Fasten panels together using ITEM3, ITEM 4, and ITEM 5.
This completes the assembly of the Riser Shelf.
1.
2.
3.
Assembly of Riser Shelf
3
4
5
1000615 - Screw, #14 X 3/4
1000514 - Screw, #10-24 x 1/2"
1000456 - Washer, #10
6
1000159 - Nut, Locking, #10-24

BP-UPB48 - Uprights, 48", power plug, for 1.75" butcher block top.
THIS DOCUMENT IS CONFIDENTIAL AND PROPRIETARY PART NO. 1000590
Set Upright on bench top with the bracket tight up against the wood top and flush to the end. See Fig. 1
Using the 1/4" screws, install the screws until tight against wood top. If you have Bin Rails, you can check the
spacing of the uprights by installing (1) Bin Rail.
Using a 5/32" drill, drill a hole 3/4" deep into the top using the (2) holes on the bracket on the top surface of the
wood top.
Install 1000327(Screw #14 x 1) using a cordless drill and a 1/4" driver. DO NOT OVERTIGHTEN.
Repeat process for remaining upright.
This completes the assembly of the Uprights.
1.
2.
3.
4.
5.
6.
Assembly of Uprights
Bench Uprights Parts List
Fig. 1
Fig. 2
D
10
Questo manuale è adatto per i seguenti modelli
1
Indice
Altri manuali Champion Deposito attrezzi


