Clas Ohlson KE7932-A Manuale utente
EnglishSvenskaNorskSuomi
Hot Cup Mini Kettle
Vattenkokare Hot Cup
Vannkoker Hot Cup
Vedenkeitin Hot Cup
Art.no Model
34-1545-1, -2 KE7932-A Ver. 201205

2

3
English
Hot Cup Mini-Kettle
Art.no 34-1545-1, -2 Model KE7932-A
Please read the entire instruction manual before use and save it for future reference.
We reserve the right for any errors in text or images and for making any necessary
technical changes to this document. If you should have any questions concerning
technical problems please contact our Customer Services.
Please read the Safety section of this manual before using the kettle.
Safe use practices are described under the Operation section below.
Note: Remember that the amount of water you boil will also be dispensed in its entire
amount once boiling is complete. Be sure that the cup you are using is able to contain
this amount. If the cup is too small, hot boiling water will overflow, causing possible
scalding injuries, damaging underlying furniture, etc.
Note: Fill the kettle to max level with water, boil and empty at least once before
the kettle is put into use for the first time.
Safety
• This product must not be used by anyone (including children) with reduced physical,
sensory or mental capabilities. This product should not be used by anyone without
sufficient experience or knowledge unless they have been instructed in its use by
someone who will take full responsibility for their safety.
• Be careful, water dispensed from the kettle’s spout is extremely hot. Any steam
exiting the spout is also extremely hot.
• Never let children play with the kettle.
• The kettle may only be used to boil water and only in the manner described in this
instruction manual.
• Place the electric kettle on a dry flat surface and out of children’s reach.
• The kettle should only be used and stored indoors.
• Always unplug the kettle from the wall socket before cleaning it or when it will not
be used for a long time.
• Never immerse the product in water.
• Check that your power supply is 220–240 V and that the kettle is connected to an
earthed socket.
• Do not pull or carry the kettle by the mains lead.
• Make sure that the mains lead does not drape over a table or work top. Make sure
that the lead does not come into contact with hot surfaces, e.g. warm hobs.
• Make sure that there is water in the kettle before turning it on.
• Do not use the kettle if the lead or plug is damaged.
• Only allow a qualified technician to replace the mains lead if it is damaged.
• Do not open the casing. Certain components inside the casing carry dangerous
electrical current. Contact with these could result in electric shock.
• The kettle should only be repaired by qualified service technicians using original parts.
• The kettle should not be taken apart or modified.

4
English
1
2
3
4
5
6
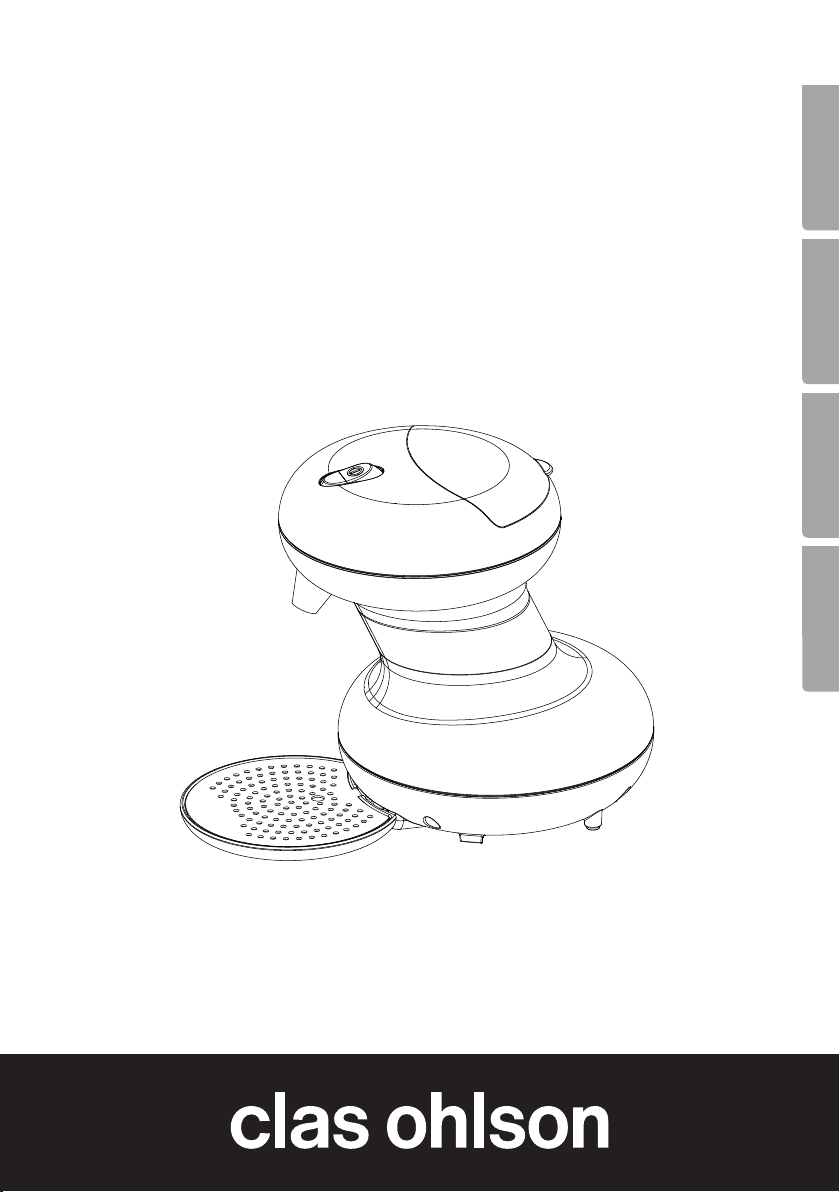
Product description
1. [ ] On/off
2. Spout
3. Drip tray
4. Water reservoir lid
5. Max water level mark
6. Water reservoir
Operation
1. Slide the drip tray into place.
2. Plug the kettle into a wall socket.
3. Open the water reservoir’s lid, min 150 ml, max: 300 ml).
Note: At the bottom of the filler reservoir lies the
max water level mark. The arrow pointing from the
max level mark points to the water tank’s filler hole.
No water should be seen above the filler hole. In
other words there should be no water left in the filler
reservoir that covers the max symbol. Pour out any
excess water before boiling.
4. Close the filler lid.
5. Place an appropriate sized cup on the drip tray under the spout.
Make sure the drip tray is directly under the spout.
6. Press [ ] to turn the kettle on. The indicator light will be lit when
the kettle is switched on.
7. Hot water will automatically be dispensed from the spout and [ ] will automatically
return to the off position once boiling is finished. Note: Water exiting the spout is
extremely hot!
8. Let all the water run out before attempting to remove your cup.
9. Wait 30 sec before filling the kettle again, if you are to boil another cup.
10. Boiling can be cancelled at any time by pressing [ ].
11. If the kettle is started when empty, it will automatically turn off. Always let the kettle
cool before attempting to refill it with cold water.

5
English
Care and maintenance
• Make sure the kettle is off, pull out the plug and let the kettle cool before cleaning.
• Clean the exterior using a slightly moistened cloth. Only use mild cleaning agents,
never solvents or corrosive chemicals.
• Remove the drip-tray and its stainless steel stand and wash them when necessary.
• Unplug the mains adaptor from the wall socket and empty the kettle of all water
before if it is not to be used for a long time.
Emptying the kettle
1. Open the filler lid and lay the kettle on its side over the sink.
2. Then turn the kettle upside down.
3. Return the kettle to its side with the spout pointing down over the sink and
drain any water.
4. Repeat this process two to three times or as many as needed to completely empty
the tank.
Descaling
For optimal performance, your kettle should be descaled regularly.
For descaling you can use a mixture of white vinegar and water:
Mix one part white vinegar (12 % acetic acid) to three parts water. Do not use vinegar
meant for pickling (6%) or cooking (3%).
You may also choose to use any of the pre-prepared descaling agents available at
your local supermarket for this purpose. Note: Always read the directions on
the descaling agent before using.
1. Fill the kettle with 300 ml of descaling solution, whether purchased or homemade.
2. Place an appropriate sized cup on the drip tray under the spout and turn the kettle on.
3. Wait until the cup is entirely filled.
4. Wait for at least 30 seconds and then pour the contents of the cup back into
the water reservoir and close the lid.
5. Return the cup to the drip tray and turn the kettle on.
6. Wait until the cup fills and discard the contents.
7. Let the kettle cool and fill it with clean fresh water. Empty the kettle following
the emptying procedures previously described above.
8. Fill the kettle with 250 ml of clean fresh water and put a clean fresh cup of
appropriate size on the drip tray.
9. Turn on the kettle and let the cup fill. Discard the water. Repeat this rinsing procedure
at least three times.
10. Wait for the kettle to cool completely and empty out any water remaining in the kettle.

6
English
Disposal
This product should be disposed of in accordance with local regulations.
If you are unsure how to proceed, contact your local authority.
Specifications
Capacity 300 ml
Power 2000–2400 W
Voltage 220–240 V, 50/60 Hz

7
Svenska
Vattenkokare Hot Cup
Art.nr 34-1545-1, -2 Modell KE7932-A
Läs igenom hela bruksanvisningen före användning och spara den sedan för framtida bruk.
Vi reserverar oss för ev. text- och bildfel samt ändringar av tekniska data. Vid tekniska
problem eller andra frågor, kontakta vår kundtjänst (se adressuppgifter på baksidan).
Läs avsnittet Säkerhet nedan innan du börjar använda vattenkokaren.
I avsnittet Användning nedan beskrivs hur du på ett säkert sätt använder vattenkokaren.
Obs! Tänk på att hela den vattenmängd du häller i vattenkokaren kokas upp och
kommer ut i ett svep. Koppen du använder måste vara stor nog för att kunna ta emot
allt vatten. Om koppen är för liten kommer kokhet vatten att rinna över vilket kan
orsaka brännskador och skador på möbler etc.
Obs! Koka max vattenmängd och häll sedan bort vattnet innan vattenkokaren
används första gången.
Säkerhet
• Vattenkokaren får inte användas av personer (inklusive barn) med begränsad
fysisk eller mental förmåga. Den får inte heller användas av personer utan tillräcklig
erfarenhet och kunskap om de inte fått instruktioner om användningen av någon
som ansvarar för deras säkerhet.
• Var försiktig, vattnet som kommer ur pipen när vattenkokaren används är mycket hett.
Även den ånga som kan komma ur pipen vid kokning är mycket het.
• Låt aldrig barn leka med vattenkokaren.
• Vattenkokaren får endast användas för kokning av vatten på det sätt som beskrivs
i den här bruksanvisningen.
• Placera vattenkokaren på ett torrt och jämnt underlag, utom räckhåll för barn.
• Vattenkokaren får endast användas och förvaras inomhus.
• Dra alltid stickproppen ur vägguttaget före rengöring eller om vattenkokaren inte
ska användas under en längre period.
• Sänk aldrig ner vattenkokaren i vatten.
• Se till att spänningen i vägguttaget är 220–240 V och att du ansluter vattenkokaren
till ett jordat uttag.
• Dra eller bär inte vattenkokaren i nätsladden.
• Se till att nätsladden inte hänger ut över bänken eller bordets kant. Se också till att
den inte kommer i kontakt med varma ytor, som t.ex. en varm spisplatta.
• Kontrollera alltid att det finns vatten i vattenkokaren innan den slås på.
• Använd inte vattenkokaren om nätsladden eller stickproppen är skadade.
• Om nätsladden är skadad får den endast bytas av kvalificerad servicepersonal.
• Öppna inte höljet. Farlig spänning finns oskyddad på vissa komponenter inuti
produktens hölje. Kontakt med dessa kan ge upphov till elektriska stötar.
• Vattenkokaren får endast repareras med originalreservdelar av kvalificerad
servicepersonal.
• Vattenkokaren får inte ändras eller demonteras.

8
Svenska
1
2
3
4
5
6
Produktbeskrivning
1. [ ] På/av
2. Pip
3. Droppbricka
4. Lock till vattenbehållare
5. Märkning för max vattennivå
6. Vattenbehållare
Användning
1. Skjut in droppbrickan på sin plats.
2. Anslut vattenkokaren till ett vägguttag.
3. Öppna vattenbehållarens lock och fyll på önskad mängd vatten
(min: 1,5 dl, max: 3 dl).
Obs! I botten på utrymmet där vattnet fylls på finns
en maxmarkering och en pil. Pilen pekar på hålet
där vattnet rinner ner i behållaren. Inget vatten ska
finnas i utrymmet där maxmarkeringen finns.
Om vatten ligger kvar och täcker maxmarkeringen
har för mycket vatten fyllts på. Häll ut överflödigt
vatten innan kokningen påbörjas.
4. Stäng locket.
5. Ställ en lämplig kopp på droppbrickan. Se till att koppen placeras rakt under pipen.
6. Tryck [ ] för att slå på vattenkokaren. Knappen lyser när vattenkokaren är påslagen.
7. Vattnet strömmar ut ur pipen och [ ] slås automatiskt av när kokningen är klar.
Obs! Vattnet är mycket hett!
8. Låt allt vatten strömma ut innan koppen tas bort.
9. Vänta en halv minut innan nytt vatten fylls på.
10. Kokningen kan när som helst avbrytas genom att slå av vattenkokaren med [ ].
11. Om vattenkokaren startas utan vatten kommer den automatiskt att slås av.
Låt kokaren svalna innan kallt vatten fylls på.

9
Svenska
Skötsel och underhåll
• Stäng av vattenkokaren, dra ur nätkabeln ur vägguttaget och låt kokaren svalna
före rengöring.
• Rengör vattenkokaren utvändigt med en lätt fuktad trasa. Använd ett milt
rengöringsmedel, aldrig lösningsmedel eller frätande kemikalier.
• Dra bort droppbrickan, ta bort den rostfria plåten och diska vid behov.
• Dra ur nätkabeln ur vägguttaget och töm ur allt vatten om inte vattenkokaren ska
användas under en längre period.
Tömning av kvarvarande vatten
1. Öppna vattenbehållarens lock och håll vattenkokaren liggande över diskhon.
2. Vänd kokaren upp och ner.
3. Håll vattenkokaren liggande igen och vrid ner pipen i diskhon för att tömma ut
kvarvarande vatten.
4. Upprepa punkt 2 och 3 vid behov.
Avkalkning
För att vattenkokaren ska fungera optimalt bör den avkalkas regelbundet.
För avkalkning kan du använda en blandning av ättikssprit och vatten:
Blanda 1 dl ättikssprit (12 %) med 3 dl kallt vatten. Använd inte ättika avsedd för
inläggning (6 %) eller matlagning (3 %).
Du kan också köpa färdigt avkalkningsmedel, finns i matvaruhandeln.
Obs! Läs avkalkningsproduktens bruksanvisning noggrant innan den används.
1. Fyll vattenkokaren med 3 dl vätska för avkalkning, den du blandat själv eller den köpta.
2. Ställ en lämplig kopp på droppbrickan och slå på vattenkokaren.
3. Vänta tills koppen fyllts med den kokande blandningen.
4. Vänta en halv minut och häll tillbaka blandningen i vattenbehållaren och stäng locket.
5. Ställ tillbaka koppen på droppbrickan och slå på vattenkokaren.
6. Vänta tills koppen fyllts på nytt och slå sedan bort blandningen.
7. Låt vattenkokaren svalna och fyll på med rent vatten. Töm sedan ut detta på det
sätt som beskrivs ovan.
8. Fyll på 2,5 dl rent vatten och ställ en ren kopp på droppbrickan.
9. Slå på vattenkokaren och låt koppen fyllas med kokande vatten. Häll bort vattnet.
Upprepa 3 gånger.
10. Öppna vattenbehållarens lock och töm ut ev. kvarvarande vatten.

10
Svenska
Avfallshantering
När du ska göra dig av med produkten ska detta ske enligt lokala föreskrifter.
Är du osäker på hur du ska gå tillväga, kontakta din kommun.
Specifikationer
Kapacitet 3 dl
Effekt 2000–2400 W
Spänning 220–240 V, 50/60 Hz
Questo manuale è adatto per i seguenti modelli
2
Indice
Lingue:
Altri manuali Clas Ohlson Bollitore

Clas Ohlson
Clas Ohlson Coline MK-17S16E2-Black Manuale utente

Clas Ohlson
Clas Ohlson HB-3262-UK Manuale utente

Clas Ohlson
Clas Ohlson KE-1008S Manuale utente

Clas Ohlson
Clas Ohlson KK-2001 Manuale utente

Clas Ohlson
Clas Ohlson 18-4710-1 Manuale utente

Clas Ohlson
Clas Ohlson 31-9287 Manuale utente

Clas Ohlson
Clas Ohlson KE7709-A-UK Istruzioni per l'installazione

Clas Ohlson
Clas Ohlson KE7086-BH Manuale utente

Clas Ohlson
Clas Ohlson KE7709AB-GS Manuale utente

Clas Ohlson
Clas Ohlson WK8299A Manuale utente


