Clas Ohlson TR512026 Manuale utente

EnglishSvenskaNorskSuomiDeutsch
RC Car and Helicopter
RC-bil och helikopter
Radiostyrt bil og helikopter
Radio-ohjattava auto ja helikopteri
Ferngesteuertes Auto und Hubschrauber
Art.no Model
31-9092 TR512026 Ver. 20160711

2
English
Warning! From3years. Contains small parts.
Choking hazard.
RC Car and Helicopter
Art.no 31-9092 Model TR512026
Please read theentire instruction manual before using theproduct and then save
it for future reference. We reserve theright for any errors in text or images and any
necessary changes made to technicaldata. In theevent of technical problems or other
queries, please contact our Customer Services (see address details on theback).
Safety
• Handle theproduct withcare. Knocks and blows can damage fragile components.
• Be careful when operating theproduct close to air-conditioning units orfans.
• Theproduct must only be operated by persons over theage of 6years.
• Never modify theproduct. Doingso can affect its safety.
• Keep hands, hair, necklaces and loose clothing away from theproduct during
operation.
• Switch off thecontroller, car and helicopter when they are not inuse.
• Only manoeuvre theproduct in anarea where you have clear visual contact withit.
• Replace thecontroller batteries as soon as they start to lose their charge.
• Never mix old and new batteries. Nevermix rechargeable and non-rechargeable
batteries.
• Never expose theproduct to rain, liquids or moisture.
• Never attempt to recharge non-rechargeable batteries.
• Rechargeable batteries should be removed from the product before charging.
• Rechargeable batteries should only be charged under adult supervision.
• Never mix old and new batteries or batteries of a different type.
• Make sure that the batteries are inserted with the correct polarity.
• Do not leave discharged batteries inside the product.
• The battery terminals must never be short-circuited.

3
English
1 2
3 4 5 6 7 8 9
1110
Product description
1. Helicopter
2. Car
3. Reverse (special button for car)
4. Controlstick
5. Power indicatorlight
6. Left/right [L] and [R] (special button for helicopter)
7. Rotation control
8. Charging indicator
9. Select car or helicopter: C = car, H = helicopter
10. [ON/OFF] Power button
11. Charger cable compartment

4
English
Inserting batteries into thecontroller
Make sure thepower switch on thecontroller is in theOFF position.
1. Unscrew and remove thebatterycover.
2. Insert 6×AA/LR6 batteries. Observe thepolarity markings in thebattery compartment.
3. Refit thebattery cover and screw it ontight.
Inserting batteries into thecar
Make sure thepower switch on thecar is in theOFF position.
1. Unscrew and remove thebatterycover.
2. Insert 3×AAA/LR03 batteries. Observe thepolarity markings in thebattery
compartment.
3. Refit thebattery cover and screw it ontight.
Charging the helicopter
1. Remove thecover and pull thecharger cableout.
2. Set thepower switch on thehelicopter to OFF. Plugthecharger cable into
thecharger socket on thehelicopter.
3. Set thepower switch on thecontroller to theON position. Thegreen charging
indicator will flash during charging and will shine steadily when thebattery is fully
charged. Unplug thecharger cable when charging is complete.
5
English
Operating instructions
1. Switch thecar/helicopter and controller on by setting their on/off switches to ON.
2. Thepower switch on thecontroller will flashred. Pushthecontrol stick (4) forwards
and then release it, theflashing red light will change to asteady redlight.
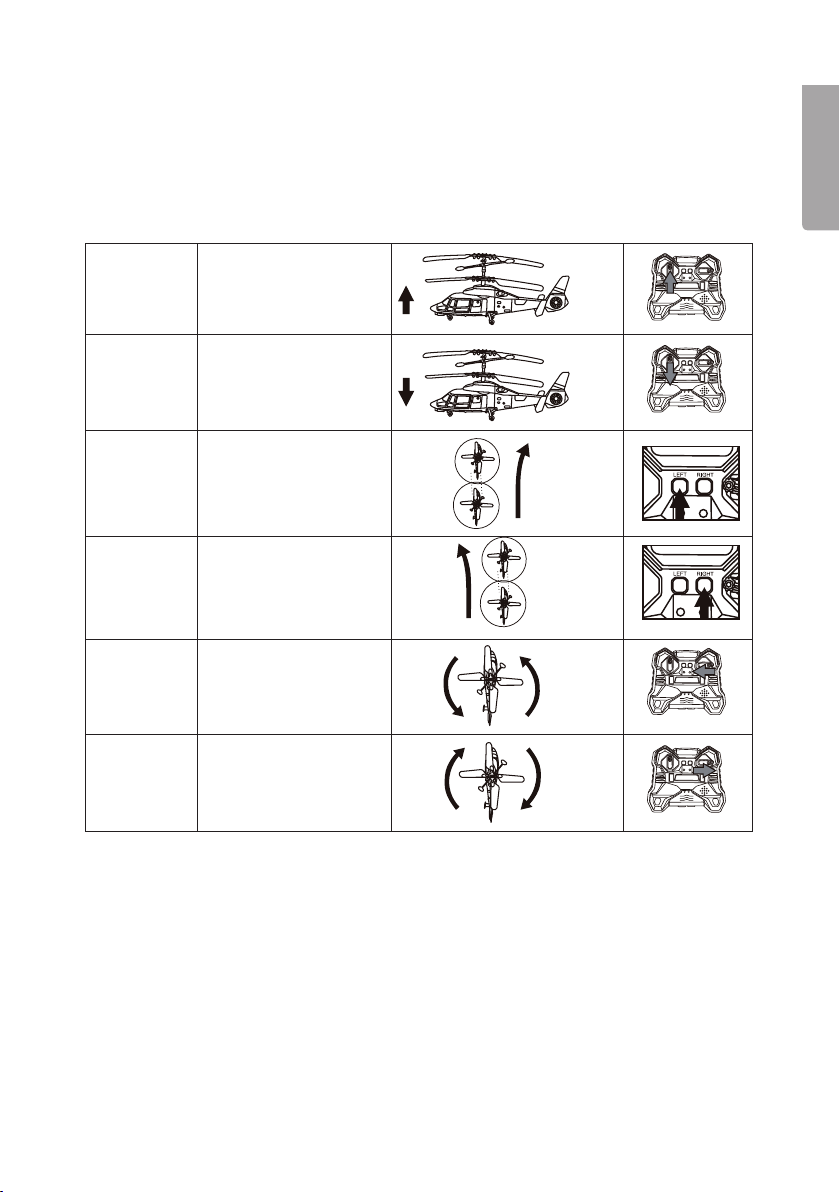
Helicopter
To fly
upwards
Push thecontrol stick
(4) up
To fly
downwards
Pull thecontrol stick
(4) down
To adjust to
theleft
If thehelicopter is
rotating clockwise,
press [L] (6) to
compensate
To adjust to
theright
If thehelicopter is
rotating anticlockwise,
press [R] (6) to
compensate
To turn left Push therotation
control (7) to theleft
to turn left
To turn right Push therotation
control (7) to theright
to turn right

6
English
Car
To drive
forwards
Push thecontrol stick
(4) up
To drive
backwards
Push thecontrol stick
(4) and thespecial car
reverse button (3) down
to make thecar reverse.
To turn left Push therotation
control (7) to theleft to
turn left
To turn right Push therotation
control (7) to theright
to turn right
Handytips:
• Do not drive thecar through grass, sand, deep-pile carpets orwater.
• Do not drive thecar in windy or rainy weather.
• Avoid subjecting thecar and helicopter to heavy impacts.
• Switch both thecontroller and thecar/helicopter off when they are not beingused.
• Remove thebatteries from both thecontroller and car if they are not to be used for
alongtime.
• Keep fingers and hair away from thecar/helicopter duringuse.
• Thecontroller signal can be affected by weak batteries or other electronic transmitters.
• Operating thehelicopter outdoors is recommended for optimum signal reception.
• It is recommended that thecar be driven on aclean and level surface.
• Clean thebattery compartment regularly.
Care and maintenance
Clean theproduct by wiping it with asoft, dampcloth. Neveruse solvents or abrasive
cleaning agents.

7
English
Troubleshootingguide
Problem Cause Solution
Car/helicopter
won’t move.
1. Thecontroller is not
aimed at thevehicle
2. Dead batteries
3. Thecontroller is too far
away from thevehicle.
4. Interference between
controller and vehicle.
1. Aim thecontroller directly at
thevehicle.
2. Recharge or replace
thebatteries.
3. Move closer (max 5m away).
4. Move to anarea with less signal
interference.
Uncontrollable
driving.
1. Dirty wheels.
2. Inappropriate driving
surface such as carpet.
1. Remove thedirt.
2. Drive on aflat and level surface.
Loss of control. 1. Thebatteries are
tooweak.
2. Sunlight too strong.
3. Other devices interfering
with frequency.
1. Recharge or replace thebattery.
2. Operate thetoy in less sunlight.
3. Operate thetoy away from other
devices.
Responsible disposal
This symbol indicates that this product should not be disposed of
with general householdwaste. Thisapplies throughout theentire EU.
Inorder to prevent any harm to theenvironment or health hazards
caused by incorrect waste disposal, theproduct must be handed in
for recycling so that thematerial can be disposed of in aresponsible
manner. Whenrecycling your product, take it to your local collection
facility or contact theplace of purchase. Theywill ensure that
theproduct is disposed of in anenvironmentally sound manner.
Specifications
Controller batteries 6×AA/LR6 batteries (sold separately)
Car batteries 3×AAA/LR03 batteries (sold separately)

8
Svenska
Varning! Från3år. Innehåller smådelar.
Risk för kvävning.
RC-bil och helikopter
Art.nr 31-9092 Modell TR512026
Läs igenom hela bruksanvisningen före användning och spara den sedan för fram-
tidabruk. Vireserverar oss förev. text- och bildfel samt ändringar av tekniskadata.
Vidtekniska problem eller andra frågor, kontakta vår kundtjänst (se adressuppgifter
påbaksidan).
Säkerhet
• Var försiktig med produkten vid användning. Slagoch stötar kan skadaden.
• Var varsam vid användning nära enheter som AC-anläggning, fläktetc.
• Produkten får endast användas av personer från 6år.
• Modifiera aldrig produkten. Detkan påverka säkerheten.
• Håll undan händer, hår, halsband, kläderetc. från produkten vid användning.
• Stäng av sändaren, bilen och helikoptern när de inte används.
• Använd produkten där du lätt kan seden.
• Byt batterier isändaren omedelbart när de börjar blisvaga.
• Blanda inte nya och gamla batterier. Blanda inte heller laddbara batterier med
ejladdbara.
• Utsätt aldrig produkten för fukt eller vätska.
• Ladda aldrig icke uppladdningsbara batterier.
• Laddningsbara batterier ska tas ur produkten vid laddning.
• Laddningsbara batterier får endast laddas under över uppsikt av en vuxen.
• Blanda aldrig gamla och nya batterier eller batterier av olika typ.
• Se till att batterierna sätts i med rätt polaritet.
• Låt inte urladdade batterier sitta kvar i produkten.
• Batterianslutningarna får inte kortslutas.

9
Svenska
1 2
3 4 5 6 7 8 9
1110
Produktbeskrivning
1. Helikopter
2. Bil
3. Välj körriktning bakåt (specialknapp för bil)
4. Manövreringsspak
5. Strömindikator
6. Vänster/höger [ L ] och [ R ] (specialknappar för helikopter)
7. Rotera
8. Laddindikator
9. Välj bil eller helikopter: C = bil, H = helikopter
10. [ON/OFF] På/av
11. Laddkabelsutrymme

10
Svenska
Sätta ibatterierna isändaren
Kontrollera att sändarens ströbrytare är iläge OFF.
1. Skruva bort skruven och ta bort locket.
2. Sätt i6×AA/LR6-batterier. Observera märkningen ibatterifacket.
3. Sätt tillbaka locket och skruva fastdet.
Sätta ibatterierna ibilen
Kontrollera att bilens strömbrytare är iläge OFF.
1. Använd enskruvmejsel för att lossa på skruven och ta bort batteriluckan.
2. Sätt i3×AAA/LR03-batterier. Observera märkningen ibatterifacket.
3. Sätt tillbaka locket och skruva fastdet.
Ladda helikoptern
1. Ta bort locket och dra ut laddkabeln.
2. Sätt helikopterns strömbrytare iläge OFF. Sättiladdkabeln ihelikopterns ladduttag.
3. Sätt sändarens strömbrytare ilägen ON. Den gröna LED-indikatorn blinkar när
batteriet laddas och lyser med fast sken när laddningen ärklar. Taur laddkabeln
när laddningen ärklar.
Questo manuale è adatto per i seguenti modelli
1
Indice
Lingue:
Altri manuali Clas Ohlson Giocattolo

Clas Ohlson
Clas Ohlson Santa Manuale utente

Clas Ohlson
Clas Ohlson HK-TF2357 Manuale utente

Clas Ohlson
Clas Ohlson 054080 Manuale utente

Clas Ohlson
Clas Ohlson HK-TF2144A-2.4G Manuale utente

Clas Ohlson
Clas Ohlson HK-TF2357A Manuale utente

Clas Ohlson
Clas Ohlson Lightning McQueen Manuale utente

Clas Ohlson
Clas Ohlson 31-8060 Manuale utente

Clas Ohlson
Clas Ohlson HK-TF2357A-2.4G Manuale utente

Clas Ohlson
Clas Ohlson Kubb Set Manuale utente

Clas Ohlson
Clas Ohlson HK-TF2144A Manuale utente


