Clean Air Optima CA-703B Manuale utente

Read these instructions carefully before you start using the Dehumidifier and keep the manual for later usage.
Clean Air Optima Dehumidifier CA-703B/ CA-703W
© Copyright: Clean Air Optima
®
Manual
(EN) User manual
(DE) Gebrauchsanweisung
(NL) Gebruiksaanwijzing
(FR) Mode d’emploi
(ES) Manual del usuario
(PL) Instrukcja obsługi
(CZ) Uživatelská příručka
(RO) Manual de utilizare
(LT) Naudotojo vadovas
(EE) Kasutusjuhend
(LV) Lietošanas pamācība
Find more languages on:
www.cleanairoptima.com/
info/manuals
(RU) Руководство
пользователя
(MK) Прирачник
за користење

2
CA-703B/ CA-703W Parts / Main unit

3

4
English
Thank you for purchasing the Clean Air Optima Dehumidifier CA-703B/ CA-703W.
We wish you many years of healthy indoor air with this ecient and eective product.
Ensure that all safety precautions are followed when using this electrical appliance for the proper
operation of the device. These instructions describe the safety precautions to be observed
during operation. They are meant to prevent injuries and to avoid damaging the device.
Description of the appliance
The appliance consists of the following main components:
1. Handle
2. Air inlet
3. Air outlet
4. Power interface
5. Continuous drainage (water drain, hose connection). Drain hose 1 meter included
6. Water tank
7. Control panel
3. Air outlet
7. Right side plate
8. Air outlet

5
Safety warnings
This device may only be used in accordance with this safety instructions. Take the following
steps to minimize the risk of personal injury caused by for example electric shocks or fire.
1. Only for indoor use. Do not use or store outdoors.
2. The appliance is not intended to be used by children or persons with reduced physical,
sensory or mental capabilities, unless they are supervised by a person responsible
fortheirsafety.
3. Use proper voltage: AC 220V – 240V, 50/ 60Hz.
4. Do not use the device when there is visible damage on the electrical cord or on the device
itself. Do not repair the device yourself in case of damage. Never pull the device by its cord.
If the power cord is damaged, then it must be replaced by an authorized service person
toprevent electric shock or fire.
5. Repairs may only performed by authorized service personal. Do not try to repair the device
yourself to prevent electric shock or fire.
6. Always switch o the device before disconnecting the plug.
7. Always remove the plug from the cord when the device is not being used.
8. Pull the plug when you do not use the device or when you clean internal or external parts of it.
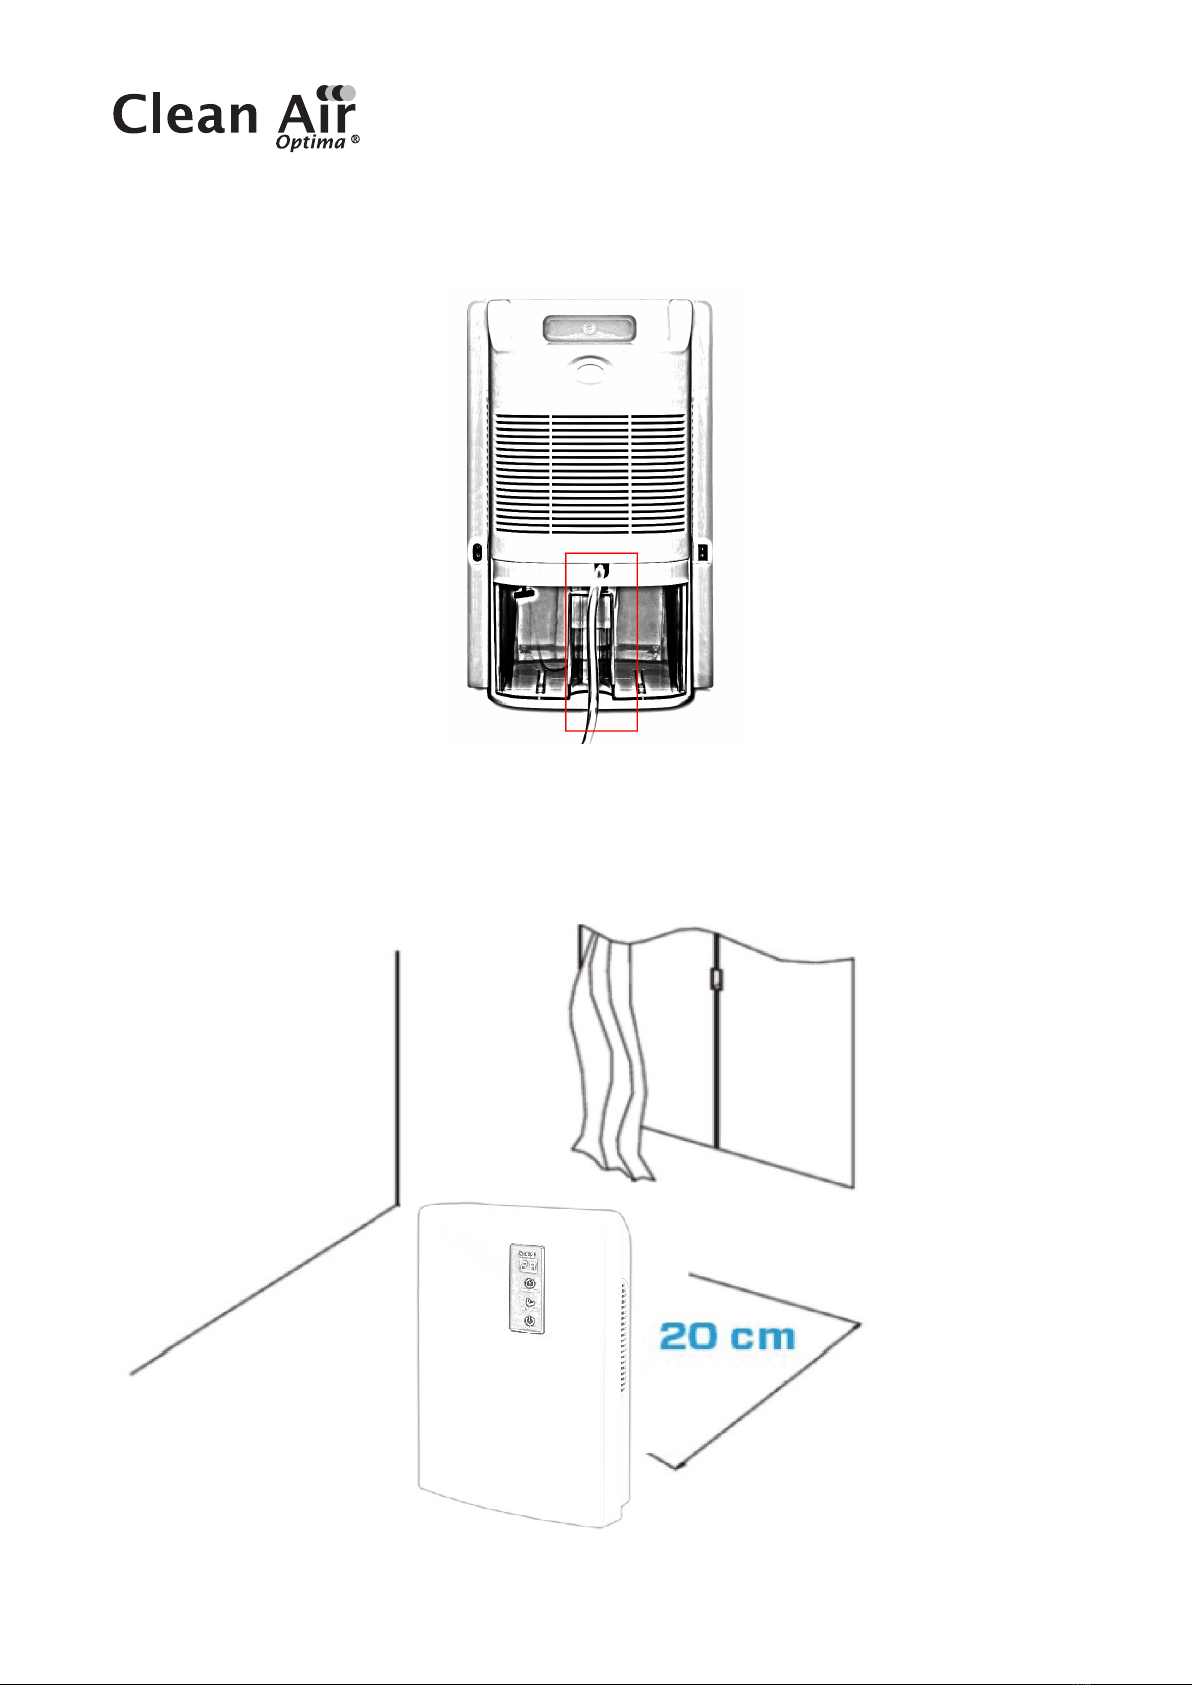
9. For safety use put the device in a steady, horizontal position. Do not move while using.
10. Do not use the device in rooms where inflammable liquids, gases are stored or close
toheat sources or heat-generating devices.
11. Never insert any other object into the body to avoid breakdown.
12. Never cover the air inlet and air outlet grid.
13. Never dissemble or replace the device’s inner parts.
14. Use and store the device not under 5°C or above 50°C.
15. Do not tip the unit to any side when the water tank is full.
16. Do not put heavy objects on the unit.
17. Please avoid places with direct sunlight. There is a risk that the device discolors.
18. Never immerse the unit in water or other liquids.
19. Empty the water tank regularly. In extreme conditions the water tank may be full after a
few hours operation.
20.Use, maintain and clean the device as described in this manual.

6
How to use
Power
Press the “POWER” button, the button lights
up blue, the device starts to dehumidify.
Press the “POWER” button again, the device
turns o. All indicator lights go out. The fan will stop
10seconds later.
The evaporator in the dehumidifier may defrost
automatically if it is operated with a room temperature
less than 18 °C.
- During the defrosting operation, the dehumidification
function and air purification function may intermit.
- Don’t turn of the power or pull out the power plug of
the device during the defrosting operation.
Air Purify Indicator Light
When the device is working, the air purify
function (Ionizer & UV) starts to work when
you push this button. The indicator light will
light up.
Timer
Press the “TIMER” button to set 0-24 hours
timing. Press the button one time, the timer
willincrease with one hour.
When the device is operating, the timer that is set
indicates when the device switches o.
Temperature Light
This light shows the indoor temperature. This light shows the temperature both
when the device is in operation and in standby mode.
Dehumidify Indicator Light
This light shows the indoor humidity. This light
shows the humidity level both when the device
is in operation and in standby mode.
Water Tank Full Indicator Light
When water tank is full, the device will automatically stop. This light turns on and
lights up red.
Drain the water tank, and return the water tank to the body of the device, the water
tank full indicator light will turn o. The device will work automatically again.

7
Water Drainage
Water tank:
The Water tank full indicator light will lights up red when the water tank is full, a warning will
begiven.
Take out the water tank(FIG 1), then empty the water inside. Then put the water tank back into
the dehumidifier correctly.
(Fig 1)
Please do not move the float out of the water tank, or the sensor will not detect the water tank
whether it is full or not (FIG 2).
(Fig 2)

8
Continuous Drainage
Connect the hose
tothe drainage hole.
Installation
When the device is working, make sure that the left distance is 20 cm away from walls
andfurniture, see picture below.

9
Maintenance
NOTE: TURN OFF THE DEVICE AND UNPLUG IT BEFORE ANY MAINTENANCE OR REPAIR
TO AVOID ELECTRIC SHOCKS.
Cleaning
Before cleaning the device, unplug the power cord.
Clean the housing with a soft moisture cloth. Do not use chemical solvent (such as benzene,
alcohol, gasoline). The surface may be damaged or even the whole case may be deformed.
Do not sprinkle water on the device.
Dehumidifier storage
If the dehumidifier will not be used for an extended period of time:
1. Drain the water tank completely and make sure that there is no more water stocked inside.
2 Unplug the device and fold up the power supply cord.
3. Remove and clean the Pre-Filter, allow it to dry completely and reinstall it.
4. Store the dehumidifier in a cool, dry location, away from direct sunlight, extreme
temperature and excessive dust.

10
Troubleshooting
The following is a troubling shooting guide to help you solve any issues that you may have
using the Clean Air Optima Dehumidifier CA-703B/ CA-703W.
Problem Possible Cause Solution
Device does not
switch on
Ineciency
dehumidification
The power cord does not
connect correctly
The water tank is full
orwatertank is not
inthecorrectposition
The environment temperature
isbelow 5°C or above 50°C
The air inlet and outlet have a
blockage
The setting humidity is higher
than environmental humidity
Connect the power plug and
power socket correctly
Drain the water tank and replace
the water tank to the correct
position
The device can not work in such
temperature
Clean the blockage from the air
inlet and outlet
Set the humidity at least 5%
lower than environmental
humidity
Noise The device is installed askew Make sure the machine
isinstalled uprightly
Questo manuale è adatto per i seguenti modelli
1
Indice
Lingue:
Altri manuali Clean Air Optima Deumidificatore

Clean Air Optima
Clean Air Optima CA-707 Manuale utente

Clean Air Optima
Clean Air Optima CA-703 Manuale utente

Clean Air Optima
Clean Air Optima CA-703 Manuale utente

Clean Air Optima
Clean Air Optima CA-702 Smart Manuale utente

Clean Air Optima
Clean Air Optima CA-705 Smart Manuale utente

Clean Air Optima
Clean Air Optima CA-704 Manuale utente


