Clean Logix ALX-PRO Manuale utente

USER
MANUAL
English (Original Instrucons)
Updated: 02/22/2022
MODEL:
ALX-PRO
Chemical Allocaon Controller
Page 2 of 33 ALX-PRO Manual V5 Updated: 02/22/2022
USER MANUAL: ALX-PRO
READ ALL INSTRUCTIONS BEFORE OPERATING EQUIPMENT
Table of Contents
General
Overview
Specicaons
Terminology
Installaon
Installaon Requirements
Mounng Controller
Connecng Devices
Conguraon
General Sengs
Users
Pumps
Manifolds
Pump Priming
03
03
03
04
05
05
07
08
09
11
12
Safety Warning
• All personnel servicing this unit must be familiar with
the informaon contained in this manual. Follow all
installaon and maintenance instrucons.
• Follow safety instrucons of chemical manufacturer (SDS).
• Wear proper PPE when working with chemicals (gloves,
safety glasses, face shield, etc.)
• Always follow plant and OSHA guidelines.
• Avoid contact of chemicals with skin and eyes. If contact
occurs, see SDS sheet for further rst aid measures.
• Follow all local codes for backow prevenon when
connecng to a potable water supply.
• Disconnect power before servicing equipment.
• WARNING: Severe damage to your facility, or
contaminaon of your water supply, can occur without
proper backow prevenon.
Calibraon
Scale Set-Up
Weight Based Calibraon
Time Based Calibraons
Operaon
Dispensing an Applicaon
Water Flush
Reporng
Syncing to Clean Intel
Historical Logs
Troubleshoong
Appendices
Parts Callout
Electrical Schemac
Air-Water Kit Set Up
Network Conguraon
Monitor Calibraon
13
14
15
17
18
19
20
21
26
30
31
32
33

Page 3 of 33 ALX-PRO Manual V5 Updated: 02/22/2022
USER MANUAL: ALX-PRO
READ ALL INSTRUCTIONS BEFORE OPERATING EQUIPMENT
GeneralInstallaonConguraonAppendices Operaon
Troubleshoong General
The ALX-PRO oers the highest level control system
available to accurately measure, dispense, and record
chemical consumpon. PRO units allow authorized
Users to log in with a 4-digit code or RFID card to
reliably dispense chemicals via me or weight-based
methods. The 10” touchscreen and stainless steel
keypad provide an easy interacve plaorm, making
the dispensing process as smooth as possible.
All PRO systems integrate with the Clean Intel web-
site, an online reporng and conguraon dashboard.
Its secure connecon ensures privacy of all data and
allows managers to create new users, monitor dis-
pense permissions, construct chemical applicaon
recipes, and more both in the eld or on the go.
Overview
• Dimensions: 16” x 14” x 8”
Soware [V5]
• Maximum number of Users: 500
• Maximum number of Manifolds: 10
• Max number of pumps/chemicals: 32
• Maximum number of Applicaons: 500
• Maximum Dispense Steps per Applicaon: 6
• Dispense Step me range: 00.1s - 99m:99.9s
• Permissions me range: 1-24 hours
• Max Permissions count: 99
• Maximum number of Devices: 16
Acceptable Chemical Products
• Acids • Sanizer
• Causcs • Chlorine
Specicaons
Terminology
• Users - The people who will be using the system
to dispense Applicaons. Up to 999 users can be
stored.
• Permissions - Control the number of mes
each User can access each Applicaon. Can be
disabled.
• Devices - The physical outputs and/or inputs that
connect to the controller to perform a funcon.
The ALX-PRO is compable CAN-SO-1 and CAN-
SO-4 solenoid valve output devices as well as
CAN-SC devices for weight-based applicaons.
• Applicaons - Recipes which determine the
type and sequence of Dispense Steps. Up to 999
recipes can be stored.
• Dispense Steps - Segments of an Applicaon that
determine which output Device will be energized
and for how long. Each Applicaon can contain
up to 6 Steps.
• Fixed Time Step - Will energize an output Device
for a specied amount of me. Reported Step
volume must be manually entered.
• Calibrated Step - Uses Device Calibraon to
determine how long an output Device should be
energized, based on a specied target volume.
• Weight-Based Step - Uses Scale Calibraons to
determine how long an output Device should be
energized, based on weight. Requires CAN-SC
device for integraon with ALX-PRO.
NOTE: A single CAN-SO-4 counts as 4 Devices.
PROTECT THE ENVIRONMENT
Please dispose of packaging materials, old machine
components, and hazardous uids in an environmentally safe
way according to local waste disposal regulaons.
Please remember to recycle.

Page 4 of 33 ALX-PRO Manual V5 Updated: 02/22/2022
USER MANUAL: ALX-PRO
READ ALL INSTRUCTIONS BEFORE OPERATING EQUIPMENT
Compressed Air (typical installaon)
• Clean, dry air
• 10 CFM (283 L/min) @ 80 psi (5.5 bar) minimum
• 100 psi (6.9 bar) maximum supply pressure
• Recommended regulator seng: 80 PSI (5.5 bar).
Water Supply (typical installaon)
• Cold Portable Water
• 7 GPM (26.5 Lpm) @ 35 psi (2.5 bar) minimum
• 100 psi (6.9 bar) maximum supply pressure
• Recommended regulator seng: 50 PSI (3.4 bar)
Electrical
• 110 VAC, 5A, Single Phase, 50-60 Hz
• NEMA 5-15 GFCI Protected Outlet
• Surge suppression recommended
Network
• Cat 5e or higher Ethernet cable connecon (eld-
wired sealed plug included with unit)
• CELL-POE cellular box (sold separately)
Installaon Requirements
NOTE: A back ow preventer must be installed in the water supply to this unit, per local codes.

Page 5 of 33 ALX-PRO Manual V5 Updated: 02/22/2022
USER MANUAL: ALX-PRO
READ ALL INSTRUCTIONS BEFORE OPERATING EQUIPMENT
GeneralInstallaonConguraonAppendices Operaon
Troubleshoong General
1. Determine mounng locaon, with consideraon
of the following:
• User accessibility
• Distance to electrical outlet
• Distance to Devices/pumps
• Accessibility to Ethernet
2. Aach the included mounng feet to the
controller.
3. Securely mount unit to wall using appropriate
hardware (not included).
4. Plug power cord into a 115 VAC, GFCI protected
receptacle.
5. Using the included sealed ethernet plug, connect
Ethernet (either from the facility or CELL-POE) via
Cat 5e cable (or similar).
AIR OUTPUTS
(3/8" PUSH-FIT)
AIR INLET 2
(3/8" PUSH-FIT)
AIR INLET 1
(3/8" PUSH-FIT)
CONNECT TO
OTHER CAN
DEVICE
CAN-SO-4
AIR OUTPUT
(3/8" PUSH-FIT)
CONNECT TO
OTHER CAN DEVICE
CONNECT TO ALX
CONTROLLER OR
OTHER CAN DEVICE
AIR INLET (3/8"
PUSH-FIT)
CAN-SO-1
Mounng Controller
The following types of Devices are compable with
the ALX-PRO:
• CAN-SO-4: A four output, 3-way solenoid valve
pack for controlling 1/2" or smaller AODD pumps
and/or air operated valves
• CAN-SO-1: A single output, 2-way solenoid
valve for controlling up to a 1" Air Operated
Double Diaphragm (AODD) pumps
Connecng Devices

Page 6 of 33 ALX-PRO Manual V5 Updated: 02/22/2022
USER MANUAL: ALX-PRO
READ ALL INSTRUCTIONS BEFORE OPERATING EQUIPMENT
1. Mount and connect Devices in a daisy-chain fashion using the orange M12 cables. They can be installed in
any order. (NOTE: If purchased as a -KIT, the Devices will be supplied pre-mounted and connected)
2. Hand ghten M12 cable connecons, then ghten two more clicks using wrenches.
3. Plumb compressed air lines and uid lines for pumps and valves as necessary [see below]
*See Appendix for IVX Sensor Integraon
Connecng Devices (connued)
Installaon Example:
*

Page 7 of 33 ALX-PRO Manual V5 Updated: 02/22/2022
USER MANUAL: ALX-PRO
READ ALL INSTRUCTIONS BEFORE OPERATING EQUIPMENT
GeneralInstallaonConguraonAppendices Operaon
Troubleshoong Installaon
General Sengs
1. Login as admin using the keypad or RFID
1. Press CONFIG on the side menu
2. Under the General tab, the soware version and
unit ID can be viewed.
3. The following Conguraon opons are
available:
• Dispense Permissions: limit the number of
dispenses each user can access per/day or
not. Toggle on (to the right/blue) to enable.
• Max Dispense Time: If enabled, will limit the
maximum amount of me (seconds) that
an applicaon recipe can be dispensed for.
Use the + and - buons or press the entry
window to type in a value.
• Time Zone: Idenes Time Zone for
operaon area. Used in reports and logs.
• Water Flush: If enabled, will allow water
ushes for an alloed amount of me.
Use the + and - buons or press the entry
window to type in a value.
• Water Flush Required: If enabled, requires
a water ush between dispense applicaons
to ush manifold and dispense lines.
• Clear All Learned Calibraons: Clears all
previously logged dispense calibraons for
pump overshoot.
Conguraon
NOTE: Contact Clean Logix for admin setup.
Fig. 7.1: Home screen, Conguraon selecon
Fig. 7.2: Admin screen, General selecon
Fig. 7.3: General sengs screen
NOTE: To avoid ending dispenses early, set
the Max Dispense Time so that it will not
compromise larger dispense Applicaons.
Please contact Clean Logix at:
iMore Informaon

Page 8 of 33 ALX-PRO Manual V5 Updated: 02/22/2022
USER MANUAL: ALX-PRO
READ ALL INSTRUCTIONS BEFORE OPERATING EQUIPMENT
Add New User
1. From the conguraon screen, select Users.
2. Click the blue Add New User buon to add a
new user
• Name: User name, used in reporng
• Key Code: 4-digit passcode for login.
• RFID: Oponal RFID access. Scan RFID code
at unit to enter.
• RFID cards must be assigned to each
user. RFID codes cannot be used
between mulple users.
• iClass or MIFARE cards will not register
3. Select the green check mark to save user.
4. Sync with Clean Intel - Unit must be synced
before user is added to list and able to login.
Conguraon (cont.)
NOTE: To edit or delete an exisng user log
onto Clean Intel.
Fig. 8.1: Admin screen, General selecon
Fig. 8.2: Users screen
NOTE: HID Prox cards are fully supported. RFID
cards are availabe for purchase from Clean
Logix. Contact us for more details.

Page 9 of 33 ALX-PRO Manual V5 Updated: 02/22/2022
USER MANUAL: ALX-PRO
READ ALL INSTRUCTIONS BEFORE OPERATING EQUIPMENT
GeneralInstallaonConguraonAppendices Operaon
Troubleshoong Conguraon
Pumps
In order to dispense chemical with the ALX-PRO, the
following requirements are necessary:
• Each chemical being dispensed must be
assigned to a Pump (i.e. solenoid device).
• Water must be assigned to each manifold that
requires water or if the manifold ush funcon
will be used.
1. From the admin conguraon page select Pumps
2. The le sidebar will display a list of all the
available pump solenoid devices.
• Green: The device is connected
• Red: The device is disconnected or not
receiving power
• Orange: Current selected device.
3. Select a pump solenoid device from the list by
clicking on it. The following details and opons
will be available:
• ID: Solenoid device ID number. This number
will be labeled on a corresponding CAN-SO-4
or CAN-SO-1.
• Manifold: Manifold the pump is/will be
connected to physically for dispensing.
• Chemical: The chemical that will be pumped
for dispenses using this solenoid.
• Calibraon Type: Dispense calibraons for
precise measurements.
• Time Cal: always available
• Weight Cal: requires scale (see page 13 for
more informaon on calibraons).
Conguraon (cont.)
NOTE: Chemicals need to be set up on Clean
Intel for selecons to be available.
Fig. 9.1: Admin screen, Pumps selecon
Fig. 9.2: Pumps screen
Page 10 of 33 ALX-PRO Manual V5 Updated: 02/22/2022
USER MANUAL: ALX-PRO
READ ALL INSTRUCTIONS BEFORE OPERATING EQUIPMENT
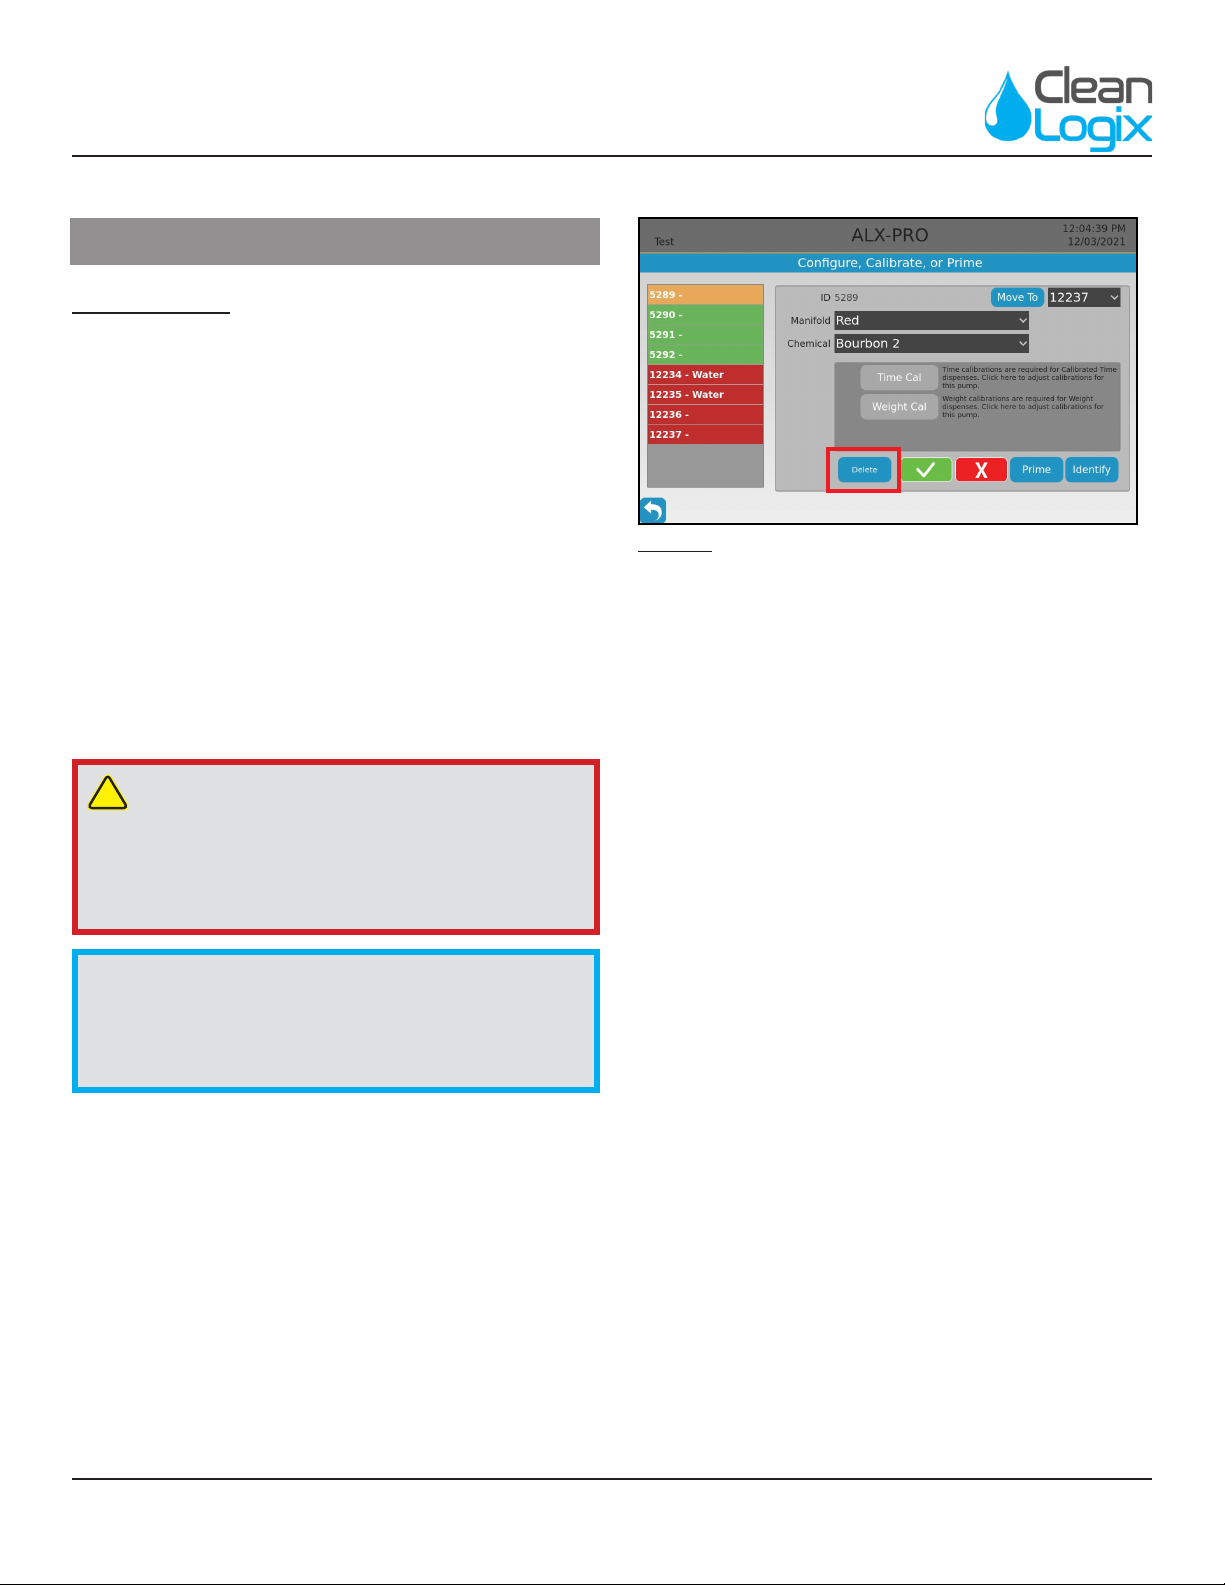
Pumps (cont.)
• Prime: Acvely runs the pump for up to
30-seconds, without dispense applicaon
selecon. Used for inial set up and
troubleshoong.
• Idenfy: Causes light on solenoid device
to blink. Do not cause pump to run - visual
indicator only.
• Move To: Migrates the pump sengs to
another solenoid device. Pick a selecon from
the drop down menu, select Move To, and
conrm to save changes.
• Delete: to remove a pump and its sengs
select the blue delete buon.
!
CAUTION:
When deleng a pump, all calibraons for both
me and weight based dispensing will be removed.
If the pump device is later re-added it will need to
be recalibrated prior to dispensing.
NOTE: Deleng pumps should only happen when
a device breaks and is replaced. If the device is
deleted and reconnected, it will automacally
show up in the list of pumps again with no
chemical assignments.
Conguraon (cont.)
Fig. 10.1: Pumps screen, delete selecon.
Indice
Altri manuali Clean Logix Controllori


