Clever Little Box Pro-Vue Interactive Manuale utente

User Guide
02
Contents of the Accessory Bag 02
Accessories Introduction 03
Good Practice use of E-Tools 04
Operation Guide for Windows OS 05
Operation Guide for Mac OS 12
Troubleshooting 16~17
Warrenty 17
Contents
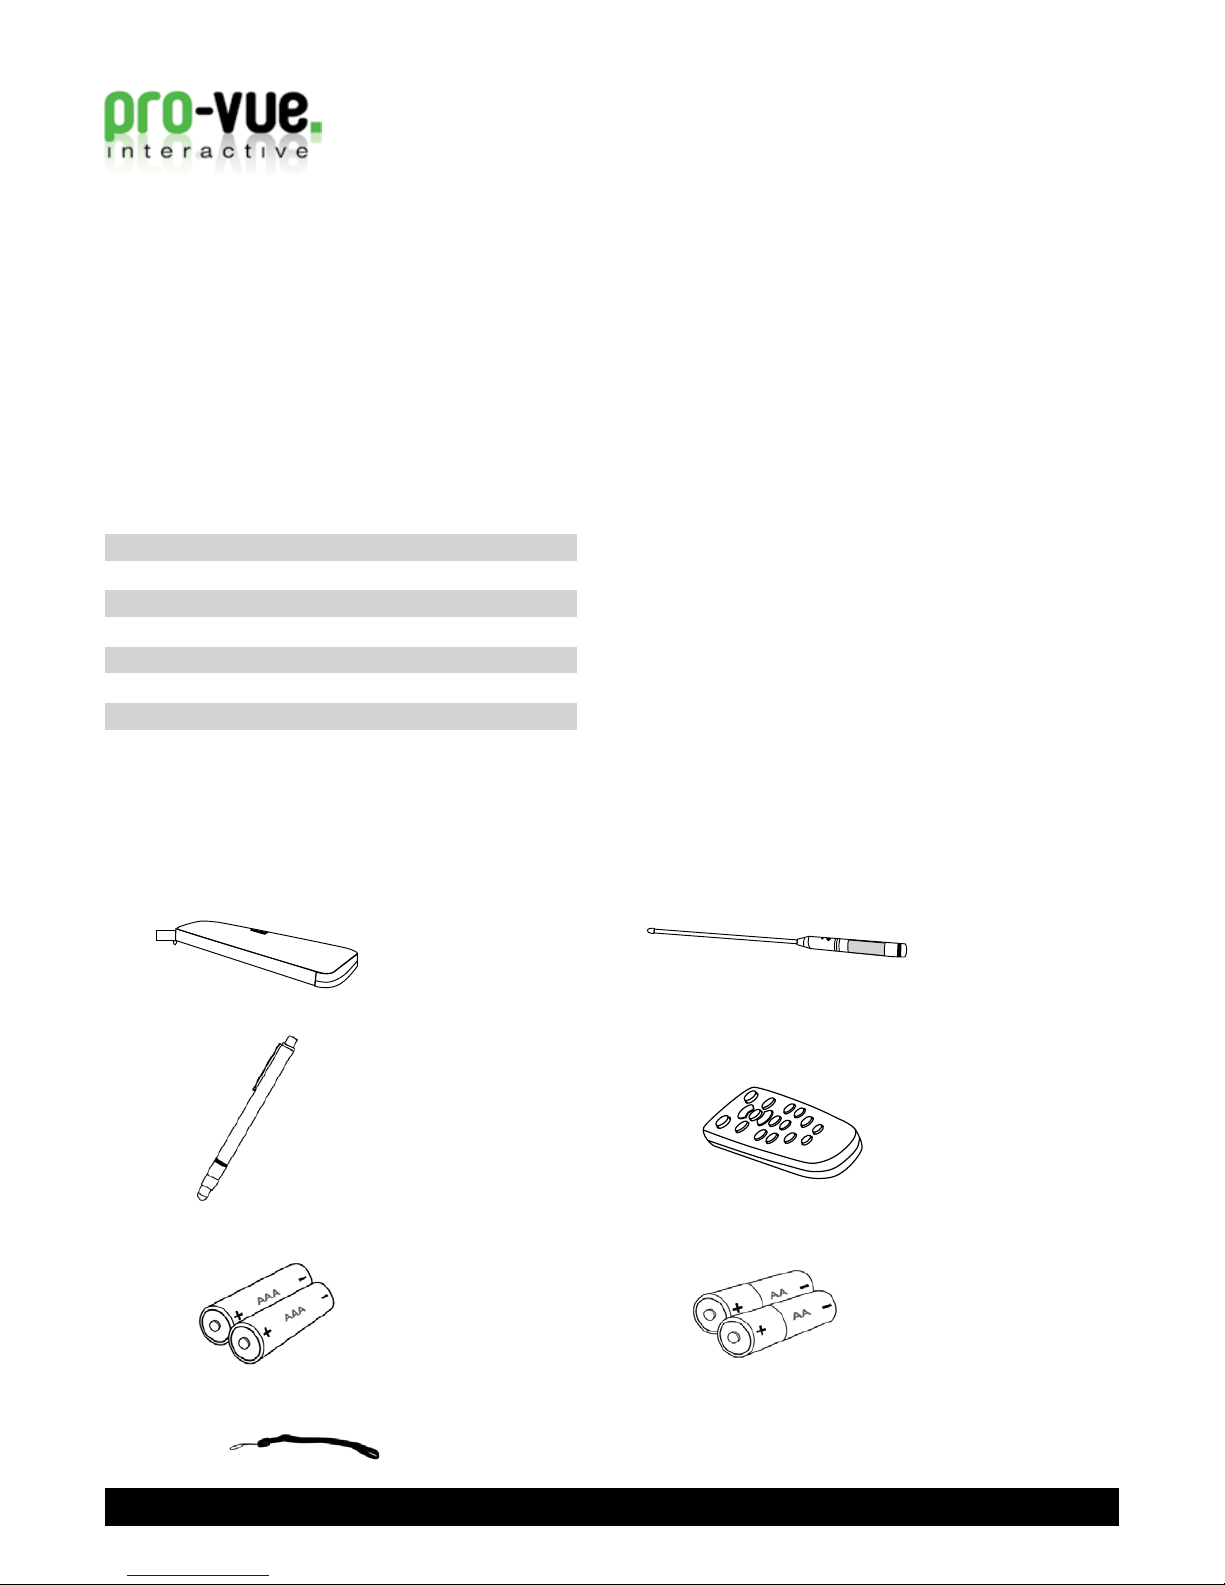
Contents of the Accessory Bag
Please make sure that following items are included in the Accessory Bag. If any items are missing, contact your dealer.
1. Accessory Bag
3. E-Pen
5. Batteries (AAA)
2. E-Wand
7. Hanging String
6. Batteries (AA)
The new Pro-Vue Interactive provides a whole new dimension to interactive teaching and presentation; all the benefits of an interactive
whiteboard... without the whiteboard!
The Pro-Vue features integrated infrared technology which means that virtually any white (or light coloured) surface can be used as an
interactive screen! From a conventional wipe-clean whiteboard, to retractable tripod screens - or simply walls, ceilings or even floors!
- any surface can be used as a fully interactive screen. In addition, the size of your interactive ‘screen’ is only limited to the space
available (imagine how big the screen could be using a simple, clear wall in the school hall?).
... And your interactive projector is fully portable. Easily stored/transported in a lightweight canvas bag, Pro-Vue Interactive can be
taken anywhere your interactive presentation needs to go; whether it be room-to-room, city-to-city or even international travel (imagine
trying to transport any conventional interactive whiteboard setup on your next flight?!)
Introduction
4. Remote Control
Accessories Introduction
03
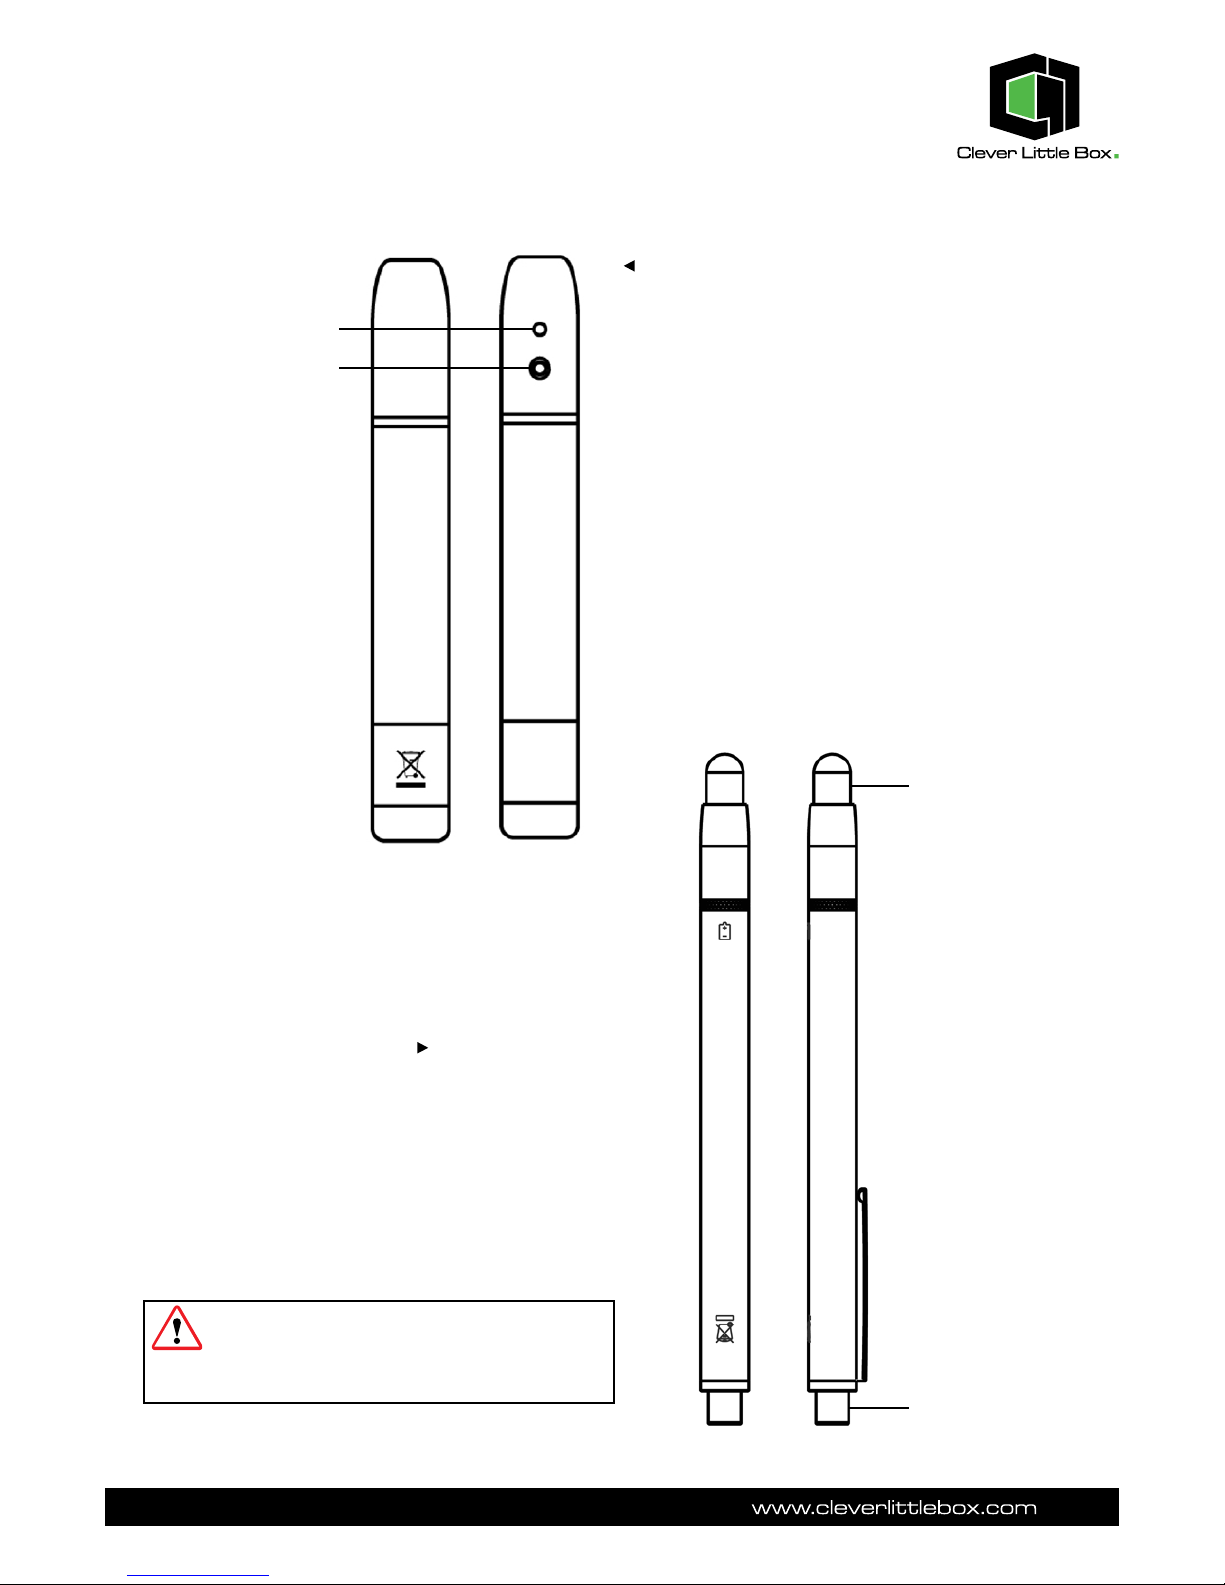
Function of the “E-Wand”
When the silver button on the E-Wand body is pressed,
an infrared signal is emitted, which is detected by the IR
Sensor integrated within the Projector (when the button is
pressed and an IR signal emitted, the LED on the E-Wand
lights red).
Before using the Wand.
Screw the Telescopic Rod into the Wand body firmly.
How to use:
1) Extend the telescopic E-Wand to the required length.
2) Position the tip of the E-Wand on the ‘screen’.
3) Push the E-Wand button to click the target as in ‘mouse’
function, or click and hold the button to draw or write in
‘pen’ function.
Back Front
LED Lamp
Button: Mouse Left Key
Function of the “E-Pen”
How to use:
When the tip of the E-Pen is pressed (such as onto the
‘screen’ area), an infrared signal is emitted, which is
detected by the IR sensor integrated within the Pro-Vue
Projector.
1) Position the tip of the E-Pen on the ‘screen’
2) Press the E-Pen on the screen to click the target as in
‘mouse’ function; press and drag to draw or write in ‘pen’
function.
PLEASE NOTE: As the sensor is located in the
tip of the E-Pen, it is very important to ensure the
E-Pen is switched off when not in use to avoid
unnecessary battery consumption.
Pen tip with touch sensor
Power switch
Back Front

04
Good Practice use of the E-Pen & E-Wand when presenting/teaching:
Please note that as the Pro-Vue functions using infrared light, a ‘line-of-sight’ between the E-Pen/E-Wand and the Projector
is essential for effective use.
Therefore, good-practice use requires the presenter/teacher to ensure the E-Pen/E-Wand is used out of any shadow area,
which may occur dependent on your positioning of the projector to screen. Ceiling-mounting the projector, or use of the
E-Wand (as opposed to the E-Pen) in portable/temporary applications, will significantly reduce the possibility of shadow.
8 4
4
Using the E-Wand will all but eliminate any
‘in-shadow’ issues.
With your back to the audience, the E-Pen is
most likely to be in shadow.
Facing side-on to the screen and your audience
will significantly reduce shadow.

05
Operation Guide for Windows OS
Interactive function is provided by “LightPenII” software.
1. System Requirements
To ensure the interactive functions of your Pro-Vue Projector
work properly, please check your computer to ensure it
meets the following specifications.
System Requirements
OS Required Microsoft Window XP(SP2)/
Vista/Windows 7
Processor Type Core Duo or above
RAM 512 MB above
Min. Free disk space 30 MB
2. LightPenII Software Installation
Step 1: Insert the Owner’s Manual CD-ROM into the
CD drive.
Step 2: Copy the “LightPen Software for Windows” folder
from the CDROM to your PC’s hard disk drive.
Step 3: Remove the CD-ROM from the CD drive.
Step 4: Create a short-cut icon for the “LightPenII.exe”,
and put it on the desktop for your ease of use.
Note: The software cannot be executed from CD-ROM.
Note: for Windows Vista
(a) Click mouse right key on “LightPenII.exe” or the
short-cut icon for “LightPenII.exe” and then click mouse
left key to select “Properties”.
(b) Select “Compatibility” sheet and add check marks
to the following. “Run this program in compatibility
mode for:Windows XP (Service Pack 2)”, “Disable
desktop composition”. Then select “Apply”.
Latest versions of the Lightpen II software,
including latest upgrades and amendments,
are available for free download from
www.cleverlittlebox.com

3. Initial Setup for Interactive Function
3.1 Connect the supplied USB & VGA cables between
Pro-Vue projector and PC.
3.2 Executethe “LightPenII”software bydouble-clicking
the “LightPenII.exe” or the short-cut icon for the
“LightPenII.exe”. Then the icon for the “LightPenII”
appears in the task bar and the tool bar appears
on the right side of the screen.
3.3 Select Distance
Step 1: Click left mouse button on the “LightPenII” in the
task bar.
Step 2: Select “Projection Distance”.
Step 3: Choose the projection distance from pop-up menu
(>3m,>2m,<2m) and then select “OK”.
06

07
3.4. Calibration
Step 1: Click the left mouse button on the “LightPenII” in
the task bar.
Step 2: Select “Calibration”.
Note: If the screen and projector stay where they are and
the same PC is used with the same resolution, Distance
and Calibration settings need be repeated.
3.5 StartUp
Step 1: Click the mouse left key on the “LightPenII” icon in
the task bar.
Step 2: Select the “StartUp”, then the “ 4 ” mark appears
in the pop-up menu.
Step 3: Push the button on the “E-Wand” or press the tip
of the “E-Pen” on the center of each green target.
The colour of target changes black from green as
it appears. Then next green target appears on the
upper middle area of the screen. Repeat the same
until all 13 targets change black.
In order to carry out the calibration smoothly, be
sure to expose the tip of the “E-Wand” or “E-Pen”
to the Pro-Vue’s IR Sensor with a clear line of
sight.
Note: If you set the “StartUp” function, the “LightPenII.exe”
will be executed automatically when you launch
Windows next time.

4. How To Use Interactive Functions
Function of each Icon in the Toolbar
Change location of the tool bar:
To position tool bar on the right or left side of screen
Switch to mouse function:
To change function to Computer Mouse
Mouse function - right click:
To change function to Computer Mouse Right Key
Mouse function - double click:
To change function to Computer Mouse Double Click
Change the pen width:
To select the fineness of pen
Change the pen colour:
To select the colour of pen
Hot key to change pen to red:
To change function to red pen
Hot key to change pen to green:
To change function to green pen
Hot key to change pen to blue:
To change function to blue pen
Hot key to change pen to black:
To change function to black pen
Hot key to change pen
to yellow highlighter
Eraser:
To erase drawing
Erase all:
To erase all drawings on the screen at once
Recall last erased items:
To recall the previous drawing (or erasing) you have made
Save file:
To save the current page to a file
Page up:
Previous page/Scroll up
Page down:
Next page/Scroll down
08

09
In Mouse Mode (default)
By selecting ‘Mouse’, ‘Mouse Right Click’ or ‘Mouse Double Click’ from the Lightpen
Toolbar, the E-Pen and E-Wand will fully interact with all your standard software, functioning
as would a standard mouse.
Shortcut switch between ‘Mouse’ and ‘Pen’ modes:
Switching between Mouse and Pen mode can be quickly and easily done by clicking the
E-Pen/E-Wand on the top or bottom edge of the ‘screen’ slightly outside of the projected
image.
When Mouse mode selected, icon is shown in the task bar.
When Red Pen mode is selected, icon is shown in the task bar.
10
Indice


