CognitiveTPG BL422003 Manuale utente

User’s Guide
Direct thermal linerless bar code printer
Models BL422003
BL423002
Barcode Blaster CL
CSIPN:10-00-0204
REV. C
February 19, 1999
Cognitive
An Axiohm Company
TM

Barcode Blaster printers are manufactured by
Cognitive, an Axiohm Company
691 Corporate Circle • Golden, CO 80401
TEL: (303) 273-1400 • FAX: (303) 273-1414
Copyright © 1999 by Axiohm, Inc.
Barcode Blaster™ is a trademark of Axiohm, Inc. Microsoft®and Windows™ are
trademarks of Microsoft Corporation. Other product and corporate names used in this
publication may be trademarks or registered trademarks of other companies, and are used
only for explanation and to their owner’s benefit, without intent to infringe.
All information in this manual is subject to change without notice, and does not represent
a commitment on the part of Axiohm, Inc. No part of this manual may be reproduced for any
purpose or in any form, including electronic storage and retrieval, without the express
permission of Axiohm, Inc. All program listings in this manual are copyrighted and are the
property of Axiohm, Inc., and are provided without warranty.
FCC Notice
This equipment has been tested and been found to comply with the limits for a Class A
digital device, pursuant to Part 15 of the FCC Rules. These limits are designed to provide
reasonable protection against harmful interference when the equipment is operated in a
commercial environment. This equipment generates, uses, and can radiate radio frequency
energy and, if not installed and used in accordance with the instruction manual, may cause
harmful interference to radio communications. Operation of this equipment in a residential
area is likely to cause harmful interference in which case the user will be required to correct
the interference at his own expense. CE Notice
Warning
This is a Class A product. In a domestic environment this product may cause radio
interference in which case the user may be required to take adequate measures.
Note:
This manual does not contain printer programming
information. A disk containing the Cognitive Intellidriver™, a
Windows driver for Cognitive printers, is shipped with every
Barcode Blaster printer. The Intellidriver lets you print labels
directly from your favorite Windows applications, without
programming.
For those who do want to control their printer directly, a file
called PROGGDE.HLP on the disk contains printer programming
information in Windows Help format. You can load and read
this file using WINHELP.EXE provided with Microsoft Windows
3.1 or above. Please refer to your Windows documentation
if you do not know how to do this.
If you need programming information and are not using
Windows (or cannot read the Help file for any other reason),
contact our Technical Support Services Organization for
assistance. Contact information is on page 14.

1
Contents
PRINTER SPECIFICATIONS.......................................................................... 2
SUPPLIED AND OPTIONAL ACCESSORIES ................................................ 2
Supplied accessories ......................................................................2
Optional accessories ......................................................................2
COMMUNICATION PORTS ........................................................................ 3
Serial port parameters ..................................................................3
CONTROLS, INDICATORS, AND CONNECTIONS ..................................... 5
SETUP.......................................................................................................... 5
Printer power connection ..............................................................5
Loading print media ......................................................................6
USING THE PRINTER ................................................................................... 8
Printing a self-test label ................................................................ 8
Feeding media ................................................................................8
Sending data to the printer...........................................................8
Printing labels................................................................................8
Controlling the printer using direct commands ..........................9
ROUTINE MAINTENANCE .......................................................................... 9
Cleaning the printhead and drive roller ......................................9
Cleaning the cutter ......................................................................10
WHAT TO DO IF... ..................................................................................... 11
POWER indicator is not lit ......................................................... 11
READY indicator is not lit .......................................................... 11
READY indicator glows red ........................................................12
Self-test label will not print ........................................................12
Media will not feed ......................................................................12
Host stops responding
or displays “printer not ready” message.............................. 12
Printer feeds media continuously ...............................................13
Automatic label cutter does not run ........................................... 13
Cutter does not fully cut labels...................................................13
Poor print quality ........................................................................14
TECHNICAL SUPPORT .............................................................................. 14
Contact information.....................................................................14
APPENDIX A: SUPPLIED SOFTWARE ......................................................... 15
APPENDIX B: RECOMMENDED PRINT MEDIA ......................................... 16

2
Print method: Direct thermal
Print pitch: BL4220: 203/101 DPI
8/4d/mm
BL4230: 300/150 DPI
11.8/5.9d/mm
Max. print speed: BL4220: 3 IPS
76mm/sec
BL4230 2 IPS
51mm/sec
Max. media width: 4.25" 108mm
Min. label width: 2" 50mm
Max. media roll
diameter: 4.7" 119mm
Max. print width: 4.1" 104mm
Max. print length*: BL4220: 22" 559mm
BL4230: 10" 254mm
Media types: Continuous form
linerless label or
backless receipt stock;
maximum thickness
0.004" 0.10mm
Installed RAM: 512 kB, plus 512 kB
flash memory
Communications: RS232 serial and
Centronics parallel
interfaces
Text fonts: 3X5, 5X7, 8X8, 9X12,
12X16, 18X23, 24X31,
UltraFont A, B, & C,
CG Triumvirate in 7
sizes
Text rotation: 0, 90, 180, 270 deg.
Graphics: PCX, BMP file support
plus Cognitive format
Bar codes: UPCA/E/E1, ADD2/5,
EAN8/13/128, Code39,
I2OF5, Code128A/B/C,
CODABAR, Plessey,
MSI, MSI1, Code93,
POSTNET, MaxiCode
Bar code rotation: 0 and 90 deg. CW
Power: 19.6 VAC, 80W ave.
while printing. Plug-in
120 VAC power supply
provided w/printer
Environmental: 5 to 40 C operating
-20 to 50 C storage
25 to 85% non-
condensing relative
humidity
Size: 6.1"H x 6.8"W x 10.4"D
155 x 173 x 264 mm
Weight: 4.5 lbs. 2.1 kg
(without media)
*Maximum print length is at maximum width
and pitch, default memory settings,
standard RAM, minimum stored objects.
PRINTER SPECIFICATIONS
SUPPLIED AND OPTIONAL ACCESSORIES
Supplied accessories
Power supply: 120 VAC input, 80 W.
Driver disk: Intellidriver allows any
Microsoft Windows
application to print to
Barcode Blaster. Drivers
are included for
Windows 95, NT, and
3.1/3.11.
Label design
software: LabelMagic is a
WYSIWYG label design
program for Windows
95, NT, and 3.1/3.11.
Optional accessories
Cables:
Parallel: Standard Centronics,
P/N 61-00-0002
Serial: DB9 to DB9,
(null modem cfg.)P/N 90-88-0079
DB9 to DB25,
P/N 90-88-0078
Memory: Factory installed 2 MB
or 4 MB added flash
RAM
Other: Annual service contract

3
COMMUNICATION PORTS
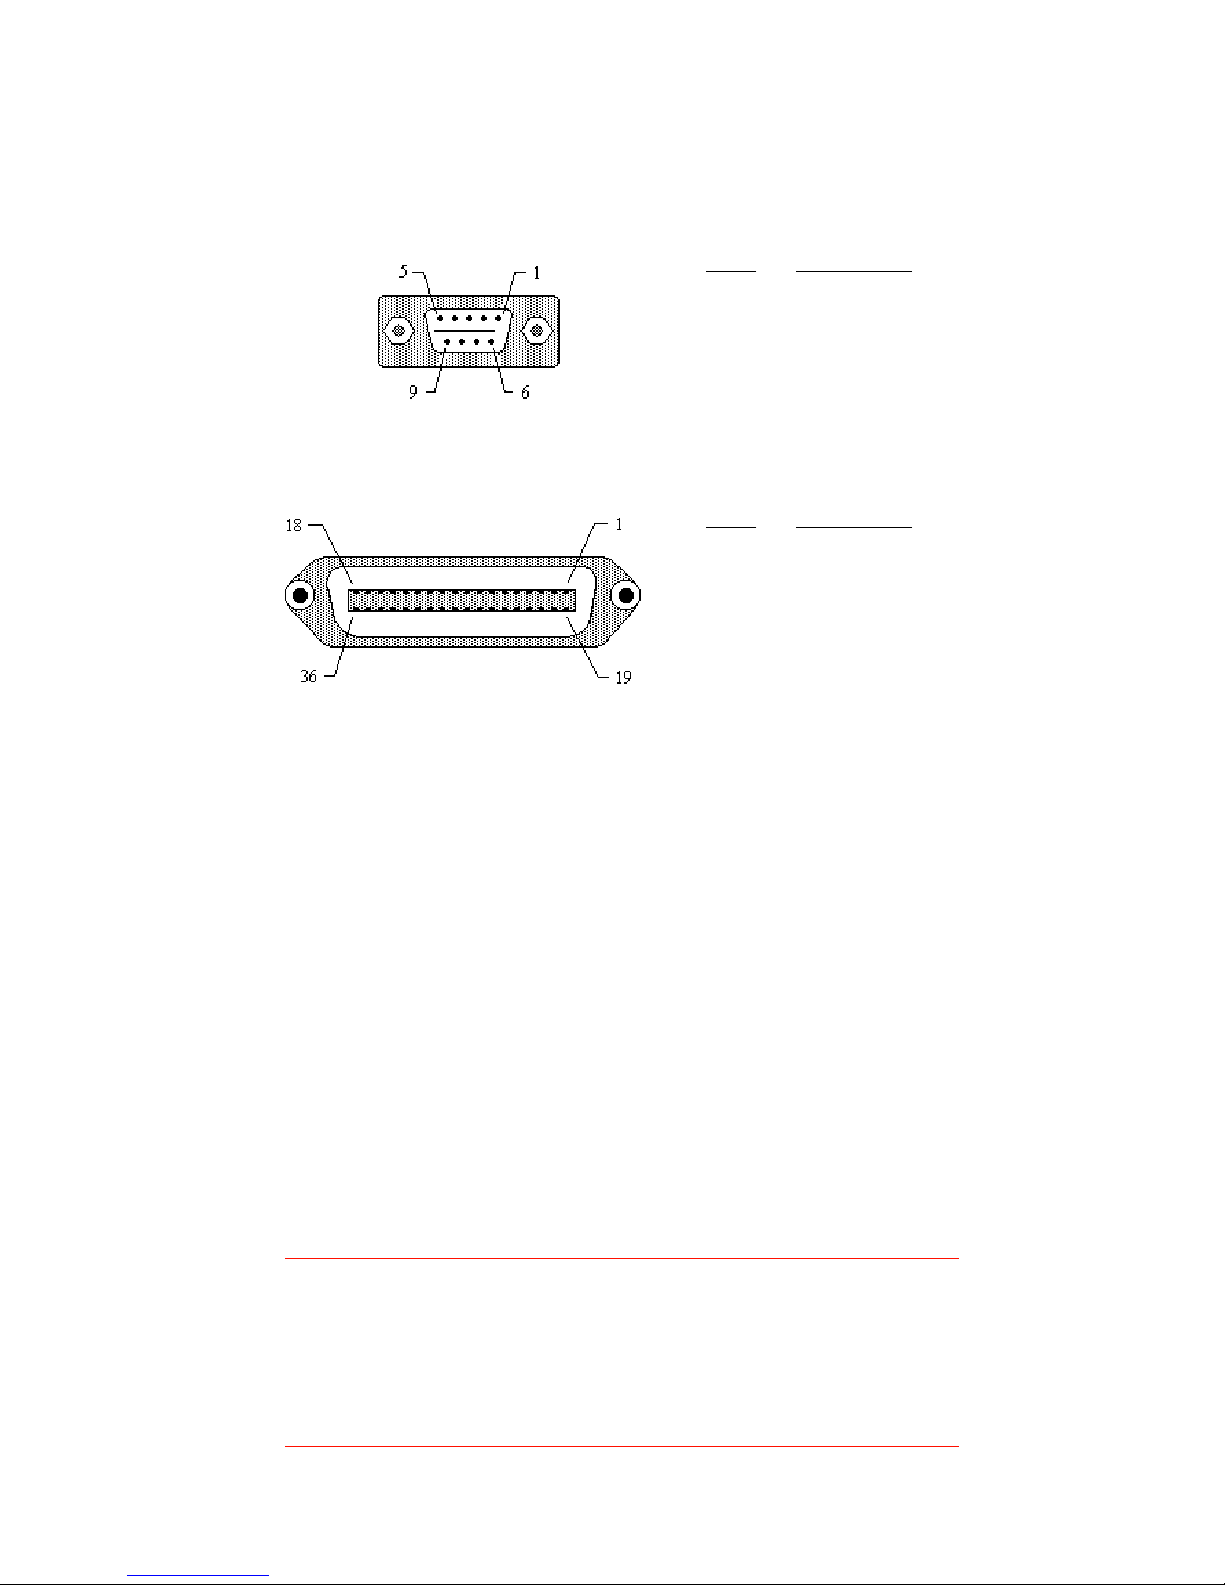
Blaster CL printers are equipped with Centronics parallel and RS232
serial communication ports, wired as shown below.
Serial input connector (DB9S)
Serial port parameters
Blaster CL printers are configured as DTE equipment, and use RTS/CTS
handshaking or XON/XOFF protocol (control characters are DC1 and DC3).
The serial port supports the following parameters:
Speed: 600, 1200, 2400, 4800, 9600, 19200
Parity: Odd, Even, or None
Word length: 7 or 8 bits
Stop bits: 1 or 2 bits
Default parameters: 9600 baud, no parity, 8 data bits, 1 stop bit
Note:
All Barcode Blaster printers require a “null modem” when
connected to another DTE device (i.e., a personal computer).
The serial cables listed as accessories on page 2 are wired
in a null modem configuration. Other cables may require an
external null modem adapter.
Pin # Description
1 Strobe
2 - 9 Data bits 0 - 7
10 Acknowledge
11 Busy
12 Out of paper
13 Select
17 Chassis ground
18 +5VDC
31 Reset
32 Error
16, 33, 19-30 Signal ground
14, 15, 34-36 No connection
Parallel input connector (Centronics 36 pin)
Pin # Description
2 RXD (printer data input)
3 TXD (printer data output)
5 Ground (-)
7 RTS (printer busy)
8 CTS
See “Optional Accessories” on page 2 for standard cable part numbers
and descriptions.

4
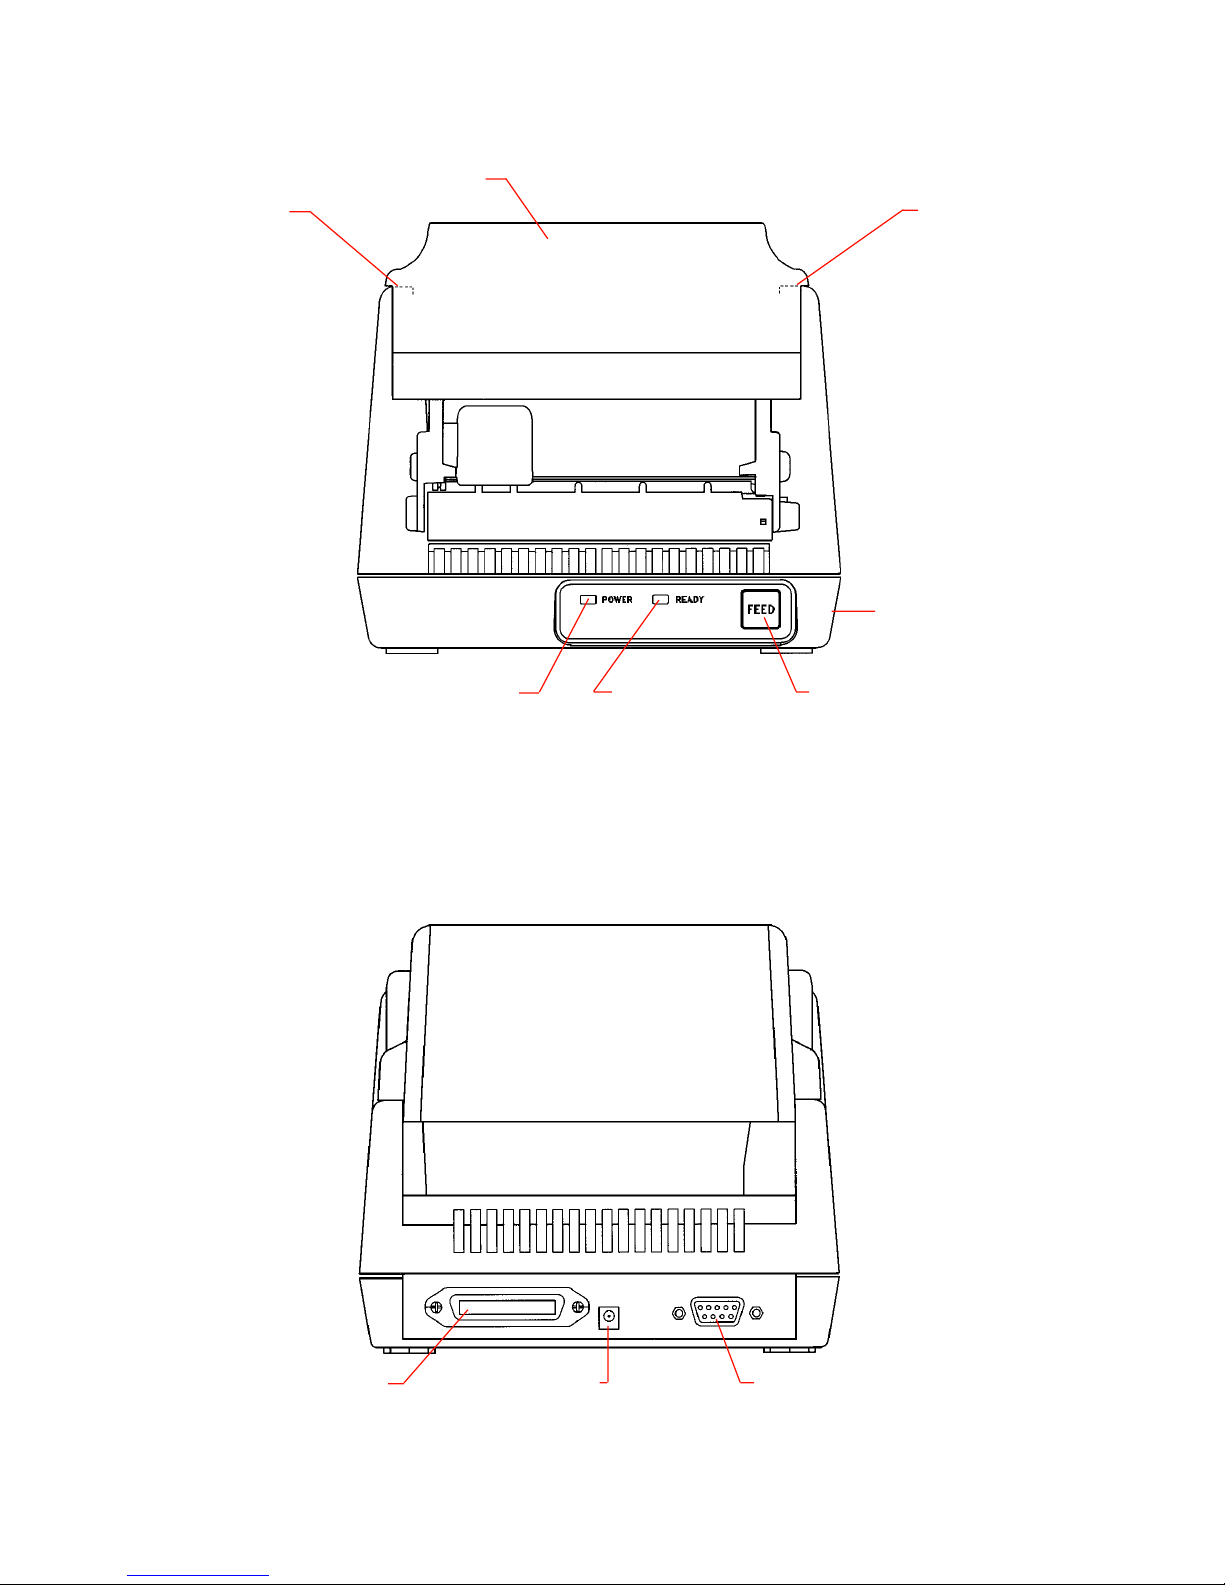
Figure 1. Printer front view
Figure 2. Printer rear view
ON/OFF switch
(on printer side)
FEED buttonREADY indicatorPOWER indicator
Printhead
release
(under cover)
Serial portParallel port Power input
Media cover
Printhead
release

5
CONTROLS, INDICATORS, AND CONNECTIONS
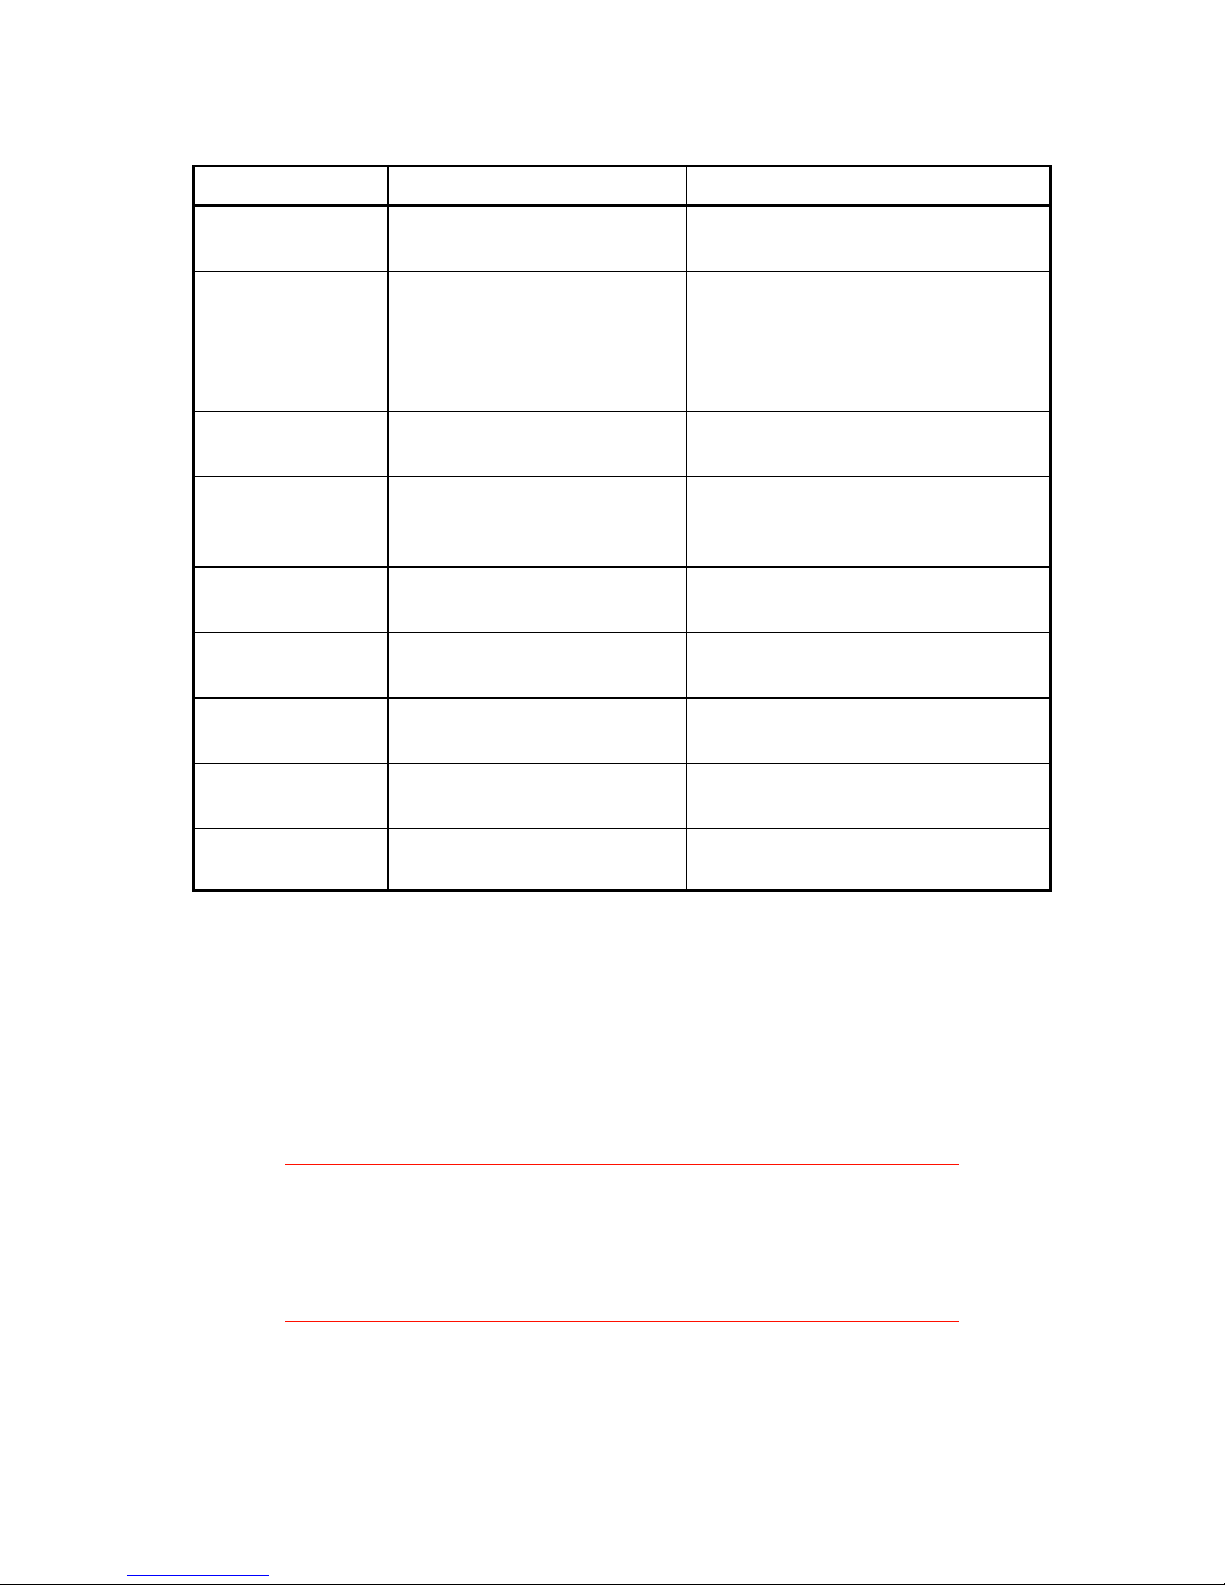
Device name Primary function Use
ON/OFF switch Controls printer power ON - for normal operation
OFF - for storage
FEED button Advances print media PRESS - to advance media
PRESS and HOLD while turning
printer ON - to print test label
PRESS to pause or resume printing
during batch mode operation
POWER indicator Shows printer power is ON GREEN - printer power on
OFF - printer power off
READY indicator Shows printer status GREEN - Printer ready for data
OFF - Printer busy, or in Standby
RED - Printer needs attention
Power input Connects to power supply Connect to transformer provided
with printer
Serial port Data input DB9 female connector for connec-
tion to host, RS232 protocol
Parallel port Data input Centronics compatible connector
for connection to host controller
Printhead releases Unlock printhead Push both releases toward rear of
printer to release printhead
Media cover Protects print media Lift to open
Squeeze hinge and lift to remove
SETUP
Printer power connection
1. Plug the output of the AC power supply provided with the printer
into the connector on the printer rear panel.
2. Plug the supply into an AC outlet having the proper voltage.
Important!
The required AC voltage is marked on the power supply.
Confirm that your AC voltage matches the power supply
requirements. Do not use any power supply other than
the one provided with the printer.
3. Place the ON/OFF switch in the ON position. The printer should feed
and cut about ¾" of media. The POWER indicator should glow green.
The READY indicator will glow green after you remove the cut label.

6
Loading print media
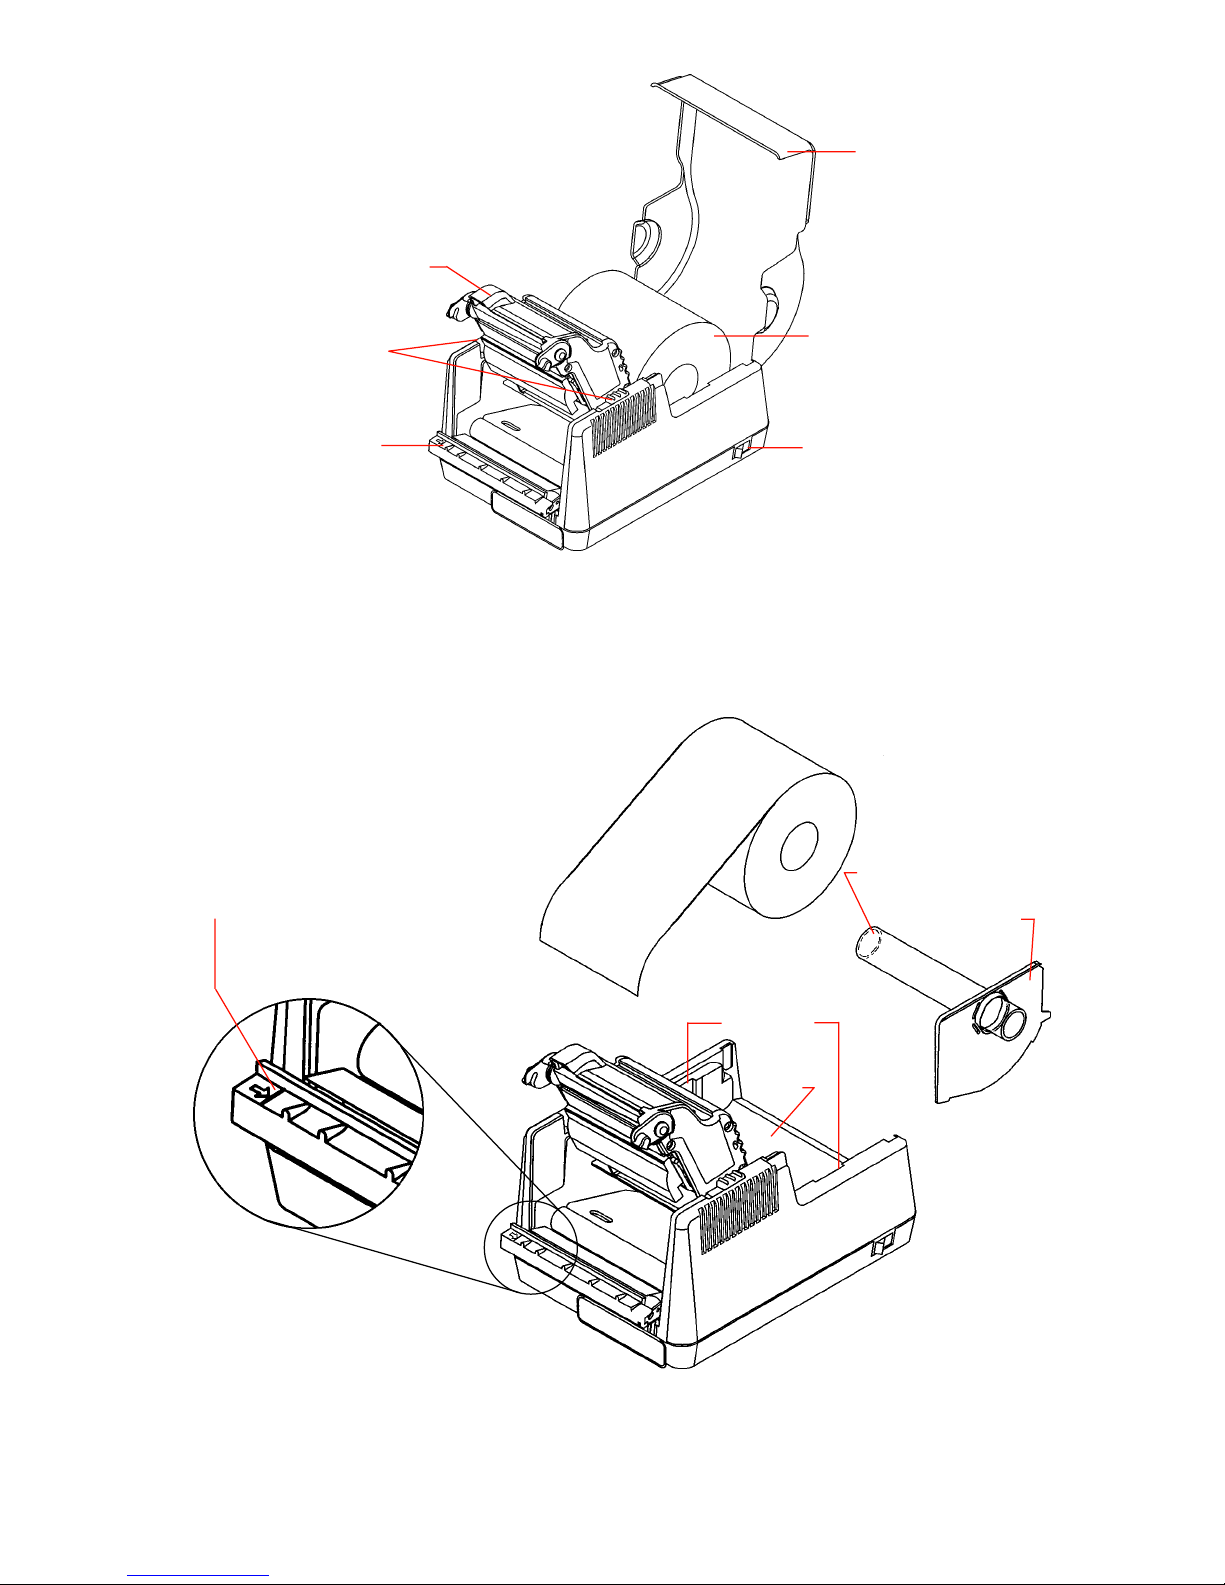
1. Lift open the media cover.
2. Press the two printhead releases back to unlock the printhead.
3. Lift the printhead until it is fully raised.
WARNING!
Raising the printhead will expose some sharp edges. Watch
where you put your hands when working under the front
edge of the printhead.
4. Remove any print media or empty media core from the printer.
5. Unwrap the new media, and unwind a few inches from the roll.
6. Remove the paper spindle and slide the paper guide to the right.
7. Insert the spindle into the label roll. Orient the roll such that the
paper guide is at the right side of the roll and the media unwinds
from the top of the roll toward the front of the printer. The media
imaging surface must face up as it passes under the printhead.
8. Lower the media roll into the paper tray and slip the free end of
the media under the printhead.
9. Adjust the paper guide until the media is snug between the paper
guide and the left side of the paper tray.
Note:
The media must feed straight through the printer for the
cutter to work properly. The left edge of the media will align
with the scribed line at the left end of the label platform if
the media is correctly aligned.
10. Lower the printhead and press it down firmly until it locks closed
on both sides.
Note:
The cutter will not operate correctly unless the printhead is
securely locked down on both sides.
11. Confirm that the printer is turned ON. The READY indicator will
glow red.
12. Press and release the FEED button. The printer will feed and cut
about ¾" of media. The READY light will glow red until you remove
the cut piece from the label platform.
13. Close the media cover.

7
Figure 3. Printer opened for loading
Figure 4. Printer and adjustable paper spindle
Align left paper edge with
line on label platform as
indicated by arrow
Paper spindle
Paper guide
Paper
tray
Spindle guide
channels
Media cover
Label roll
ON/OFF switch
Printhead/cutter
Printhead releases
Label platform

8
USING THE PRINTER
Printing a self-test label
Printing a self-test label checks the printer’s overall operability. To run
a self-test, confirm that the printer is ready to print (media loaded,
POWER and READY indicators green, no print jobs in process). Then:
1. Turn the printer OFF.
2. Press and hold in the FEED button, then turn the printer ON.
3. The printer should begin printing a self-test label. Release the FEED
button after printing starts.
4. After the self-test label finishes printing, turn the printer OFF and
back ON again restore normal operation.
Important!
The printer will be in hex dump mode after printing the self-
test label. It cannot print normal labels in hex dump mode.
The printer will return to normal operation after you reset it
as described in step 4 above.
Feeding media
Press the FEED button to feed media. The printer will feed media as
long as you hold in the FEED button.
Sending data to the printer
To print labels using data sent from a host computer or terminal:
1. Connect the host and printer serial or parallel ports together using
a correctly wired interface cable.
2. If you are using the serial port, confirm that the host and printer
are using the same communications parameters.
3. Confirm that the POWER and READY indicators are glowing green.
4. Send your data to the printer.
Printing labels
To print labels, the host computer sends commands to the printer via
the serial or parallel communications port.
If you use a label printing software package, the computer and
software control the entire printing process. You only need to set up
Questo manuale è adatto per i seguenti modelli
1
Indice
Altri manuali CognitiveTPG Lettore di codici a barre
Manuali Lettore di codici a barre popolari di altre marche

POSMicro
POSMicro Datalogic PowerScan D7100 Manuale utente

Marson
Marson MT780 Guida rapida alla configurazione

NCR
NCR RealPOS Manuale utente

Motorola
Motorola SE3300 Guida rapida alla configurazione

Element
Element P130BT Manuale utente

Motorola
Motorola Symbol LS3008 Manuale di installazione e funzionamento