CombiSteel 7450.0072 Manuale utente
Cabinets
User Manual
Gebruikershandleiding
Gebrauchsanweisung
Le mode d’emploi

2
CONTENT
Models.................................................................................................................................................................... 3
ENGLISH
Important safety instructions .................................................................................................................................4
Unpacking and installation .....................................................................................................................................4
Electrical connection .............................................................................................................................................. 5
Start-up of the cabinet............................................................................................................................................ 5
Thermostat .............................................................................................................................................................6
Defrosting ...............................................................................................................................................................6
Maintenance and cleaning .....................................................................................................................................7
Service .................................................................................................................................................................... 7
Disposal................................................................................................................................................................... 7
NEDERLANDS
Belangrijke veiligheidsinstructies............................................................................................................................ 8
Uitpakken en installatie .......................................................................................................................................... 8
Elektrische verbinding ............................................................................................................................................ 9
De kast starten ........................................................................................................................................................ 9
Thermostaat ......................................................................................................................................................... 10
Ontdooien.............................................................................................................................................................10
Onderhoud en reiniging........................................................................................................................................11
Service .................................................................................................................................................................. 11
Weggooien............................................................................................................................................................11
DEUTSCH
Wichtige Sicherheitsvorschriften..........................................................................................................................12
Aufstellung............................................................................................................................................................ 12
Ansließen .............................................................................................................................................................. 13
Einschalten............................................................................................................................................................ 13
Temperaturregelung ............................................................................................................................................. 14
Abtauen ................................................................................................................................................................ 14
Reinigung und Pflege Ihres Gerätes......................................................................................................................15
Wartung und Kundendienst.................................................................................................................................. 15
Entsorgung............................................................................................................................................................15
FRANÇAIS
Instructions importantes ......................................................................................................................................16
Désassemblage et mise en place .......................................................................................................................... 16
Branchement électrique ....................................................................................................................................... 17
Démarrage ............................................................................................................................................................17
Thermostat ...........................................................................................................................................................18
Dégivrage.............................................................................................................................................................. 18
Entretien ...............................................................................................................................................................19
Service .................................................................................................................................................................. 19
Élimination............................................................................................................................................................ 19

3
Models
7450.0072 Refrigerator SS 1 door
7450.0074 Refrigerator SS 2 doors
7450.0076 Freezer SS 1 door
7450.0078 Freezer SS 2 doors
7450.0150 Freezer SS 1 glass door
7450.0152 Refrigerator SS 1 glass door
7450.0154 Refrigerator SS 2 glass doors
7450.0400 Refrigerator exterior SS, interior aluminium, 1 door
7450.0405 Refrigerator exterior SS, interior aluminium, 2 doors
7450.0410 Freezer exterior SS, interior aluminium, 1 door
7450.0415 Freezer exterior SS, interior aluminium, 2 doors
7450.0700 Refrigerator SS 350 liter
7450.0702 Freezer SS 350 liter
7450.0704 Refrigerator 1 door 3 drawers
7450.0710 Fish refrigerator SS 507 liter
7450.0715 Refrigerator/Freezer SS 1 door
7450.0720 Refrigerator/Freezer SS 2 doors
7450.3650 Refrigerator exterior white steel, interior aluminium, 1 door
7450.3655 Refrigerator exterior white steel, interior aluminium, 2 doors
7450.3660 Freezer exterior white steel, interior aluminium, 1 door
7450.3665 Freezer exterior white steel, interior aluminium, 2 doors
7450.1205 Refrigerated bakery cabinet SS 1 door
7450.1210 Freezed bakery cabinet SS 1 door
4
Important safety instructions
1. To obtain full use of the cabinet, we recommend reading this instruction manual.
2. It is the user’s responsibility to operate the appliance in accordance with the instructions given.
3. Contact your dealer immediately in case of any malfunctions.
4. Place the cabinet in a dry and ventilated place.
5. Keep the cabinet away from strongly heat-emitting sources and do not expose it to direct sunlight.
6. Always keep in mind that all electrical devices are sources of potential danger.
7. Do not store inflammable material such as thinner, gasoline etc. in the cabinet.
8. We declare that no asbestos nor any CFC are used in the construction.
9. The oil in the compressor does not contain PCB.
Unpacking and installation
Remove the wooden pallet and the packing. External surfaces are supplied with a protection foil, which must be
removed before installation
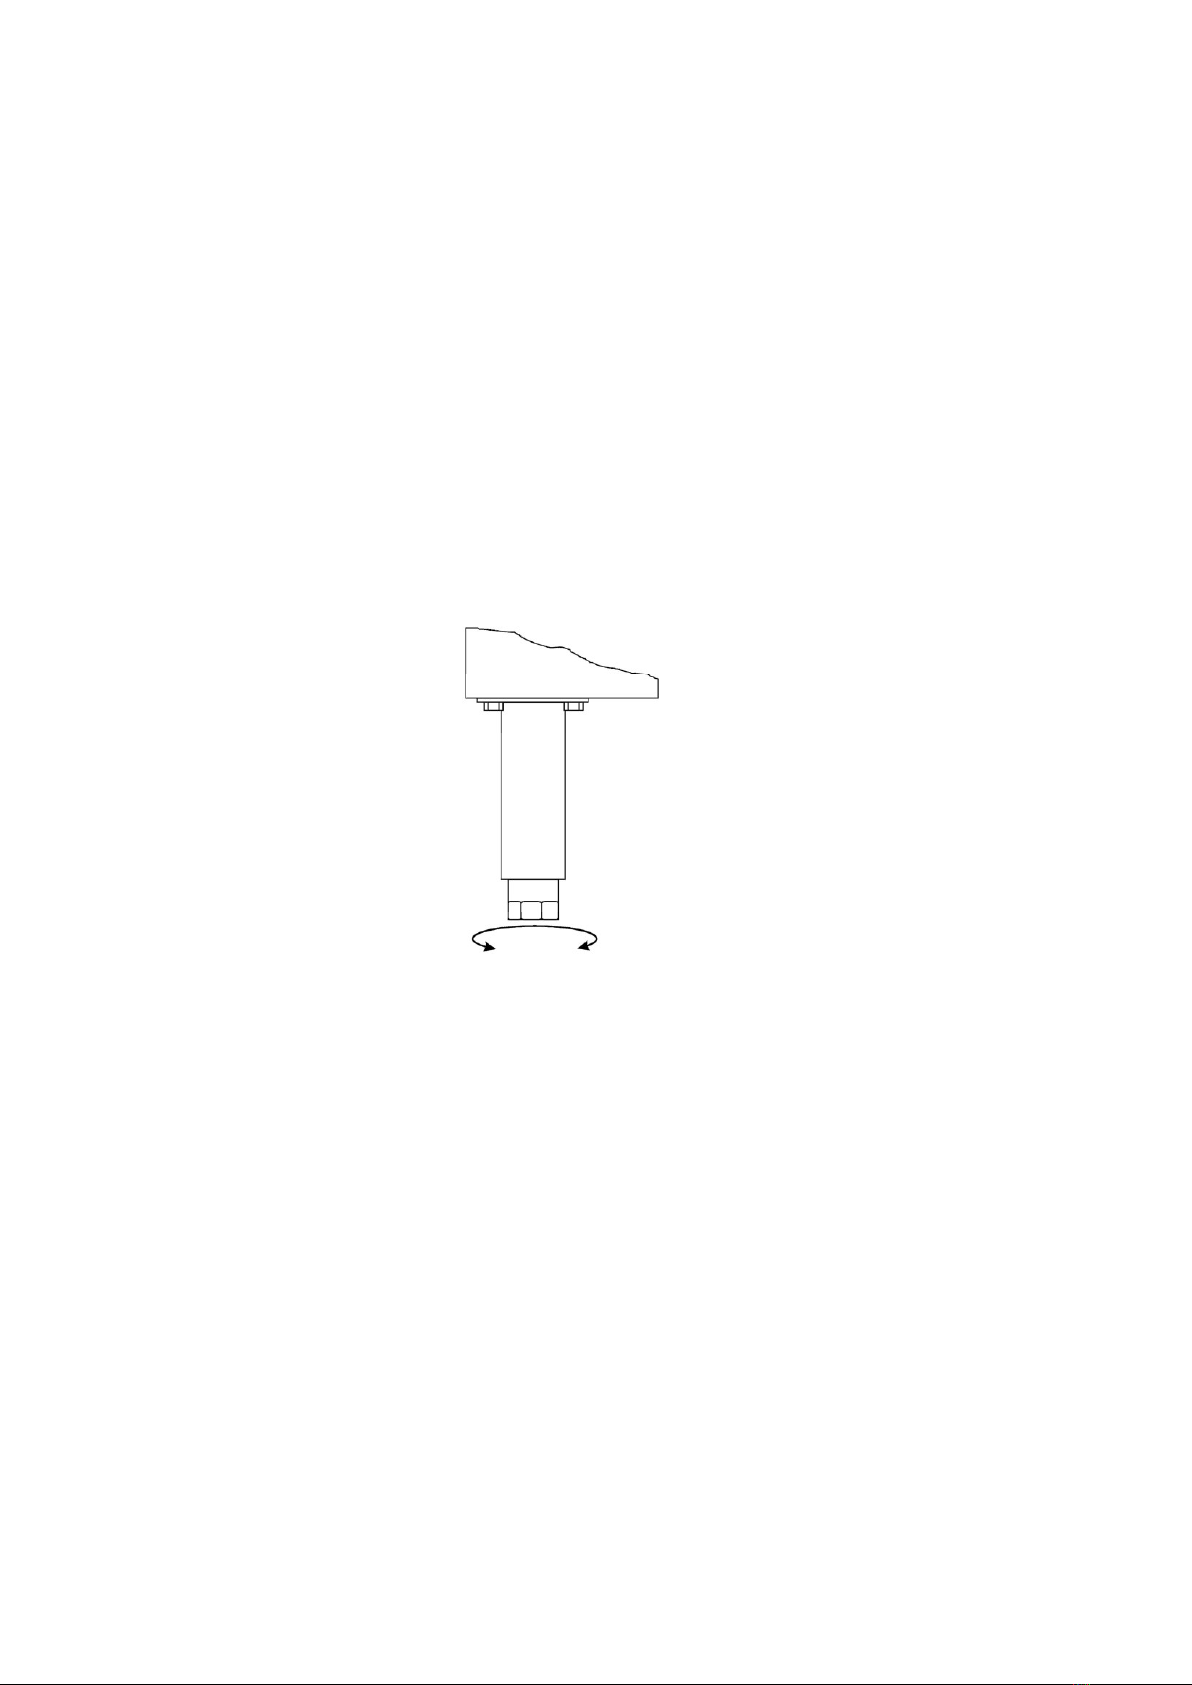
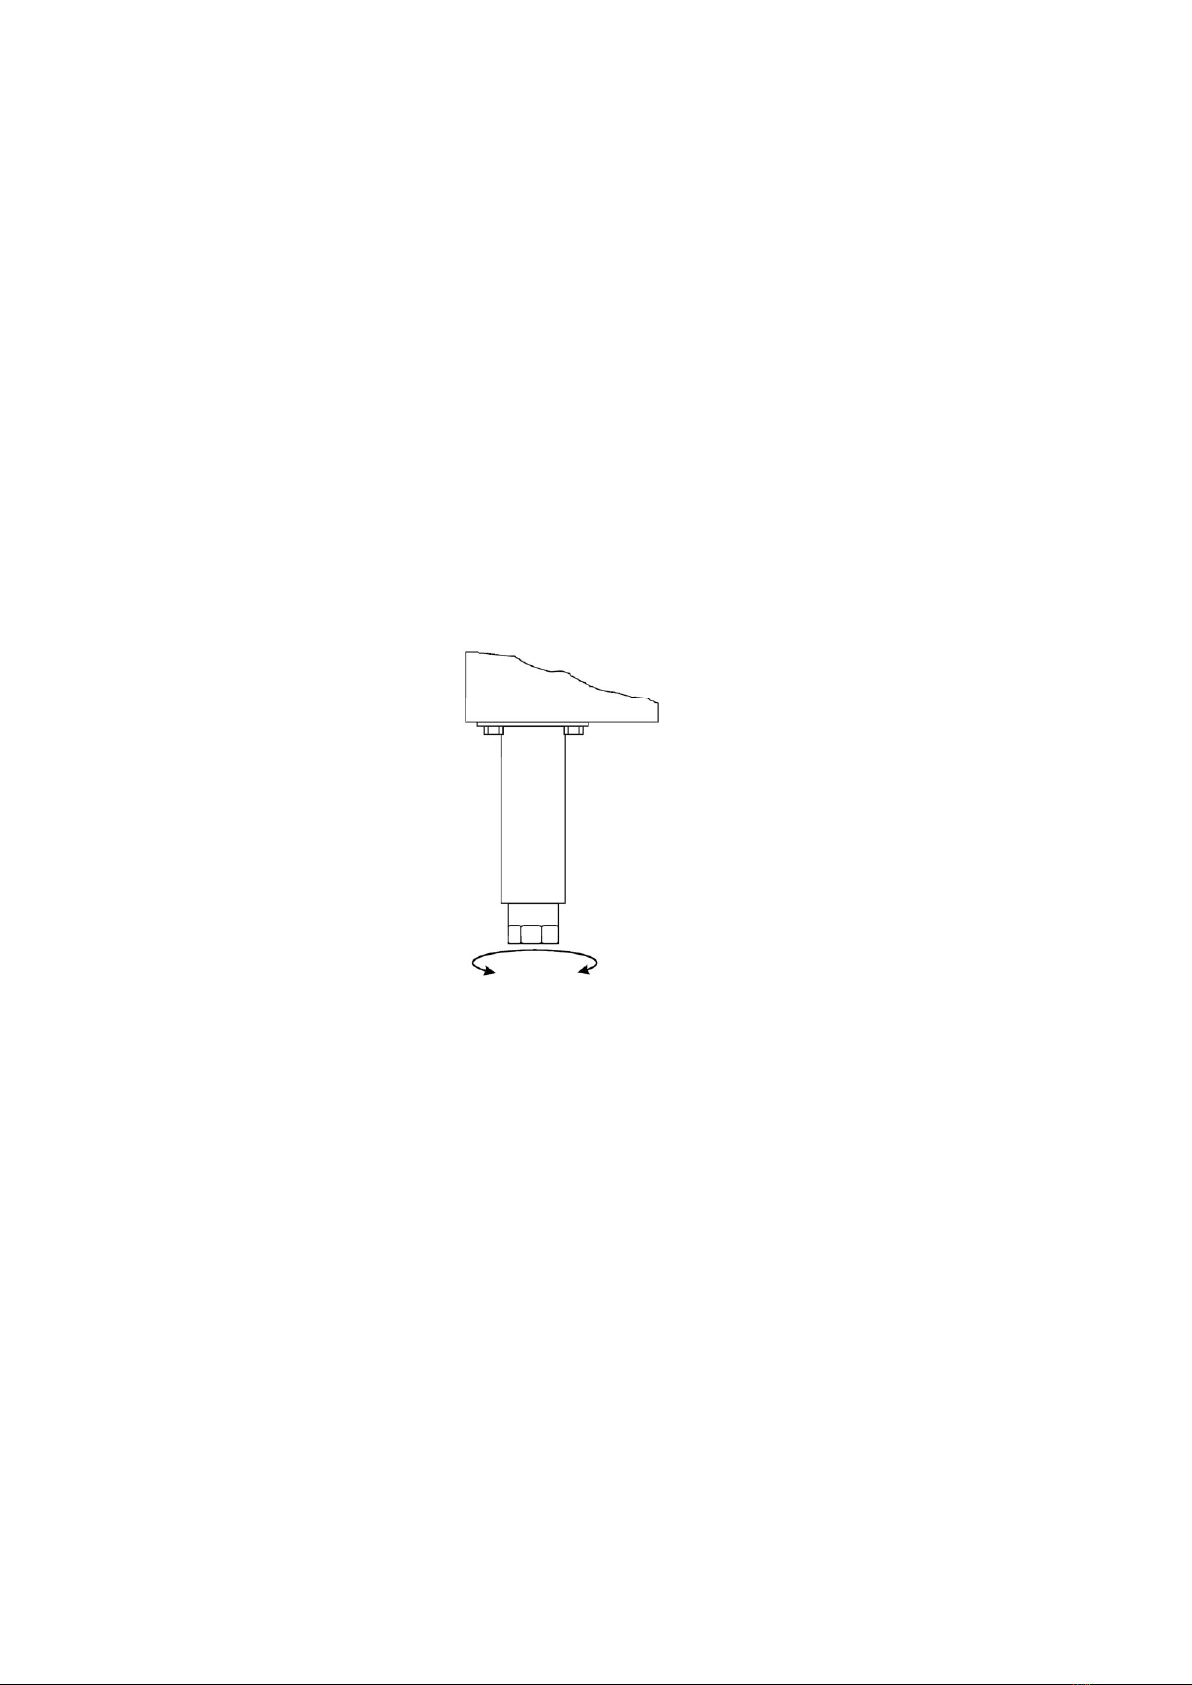
To ensure correct function it is important that the cabinet is level. If the cabinet is supplied with legs, these can
be adjusted. See fig. 1.1.
Fig. 1.1
If you want to build in your cabinet please note the following:
1. There must be at least 15 cm free space above the cabinet in order for the cooling system to work
satisfactorily.
2. There must be sufficient space at the hinge side to clean and replace the shelves and clean around the
hinge.
5
Electrical connection
The cabinet operates on 230 V/50 Hz.
The wall socket should be easily accessible.
All earthing requirements stipulated by the local electricity authorities must be observed. The cabinet plug and
wall socket should then give correct earthing. If in doubt, contact your local supplier or authorized electrician.
The flexible cord fitted to this appliance has three cores for use with a 3-pin 13-Amp or 3-pin 15Amp plug. If a
B.S. 1363 (13-Amp) fused plug is used, it should be fitted with a 13-Amp fuse.
The wires in this mains lead are coloured in accordance with the following code: Green/Yellow: Earth, Blue:
Neutral, Brown: Live.
The main electrical connections must be done by skilled electricians.
Start-up of the cabinet
Before use, we recommend that the cabinet is cleaned, see the section on maintenance and cleaning.
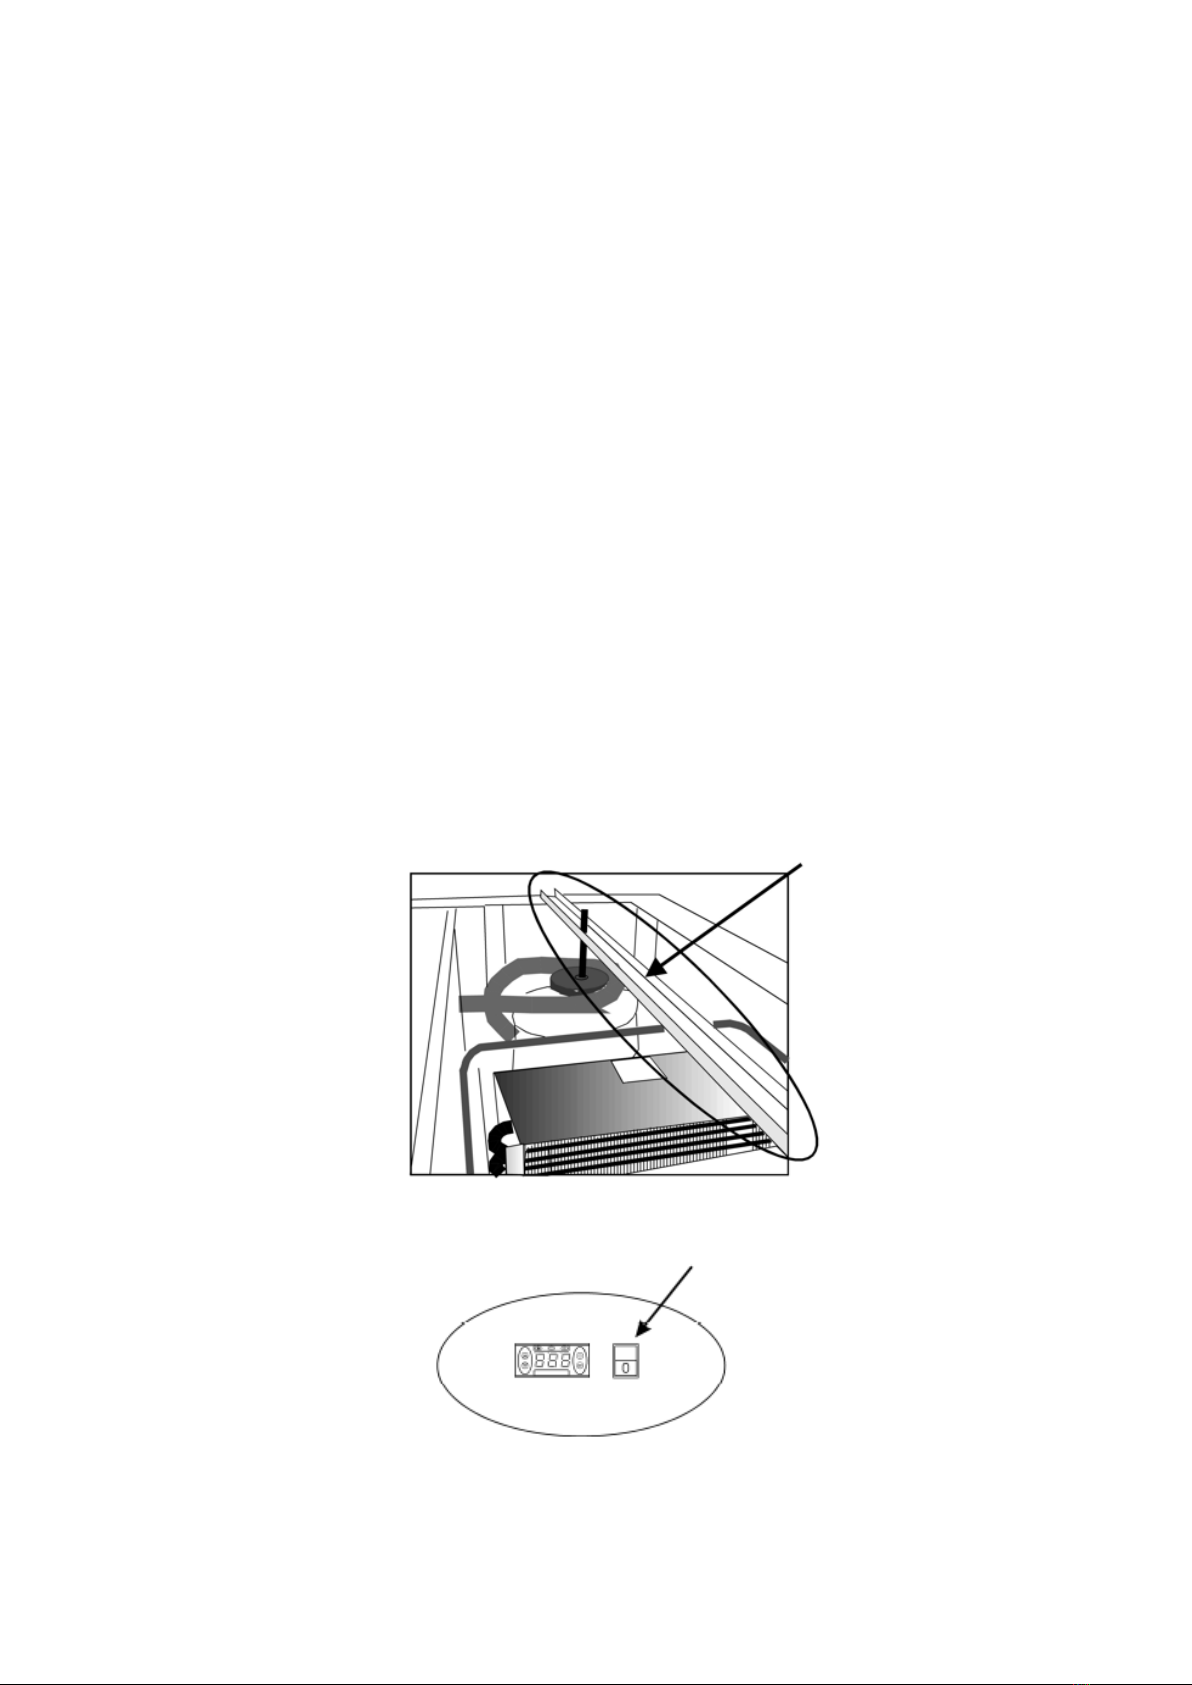
Important !
If the cabinet has been horizontally placed during transport, please wait 2 hours before starting up the cabinet.
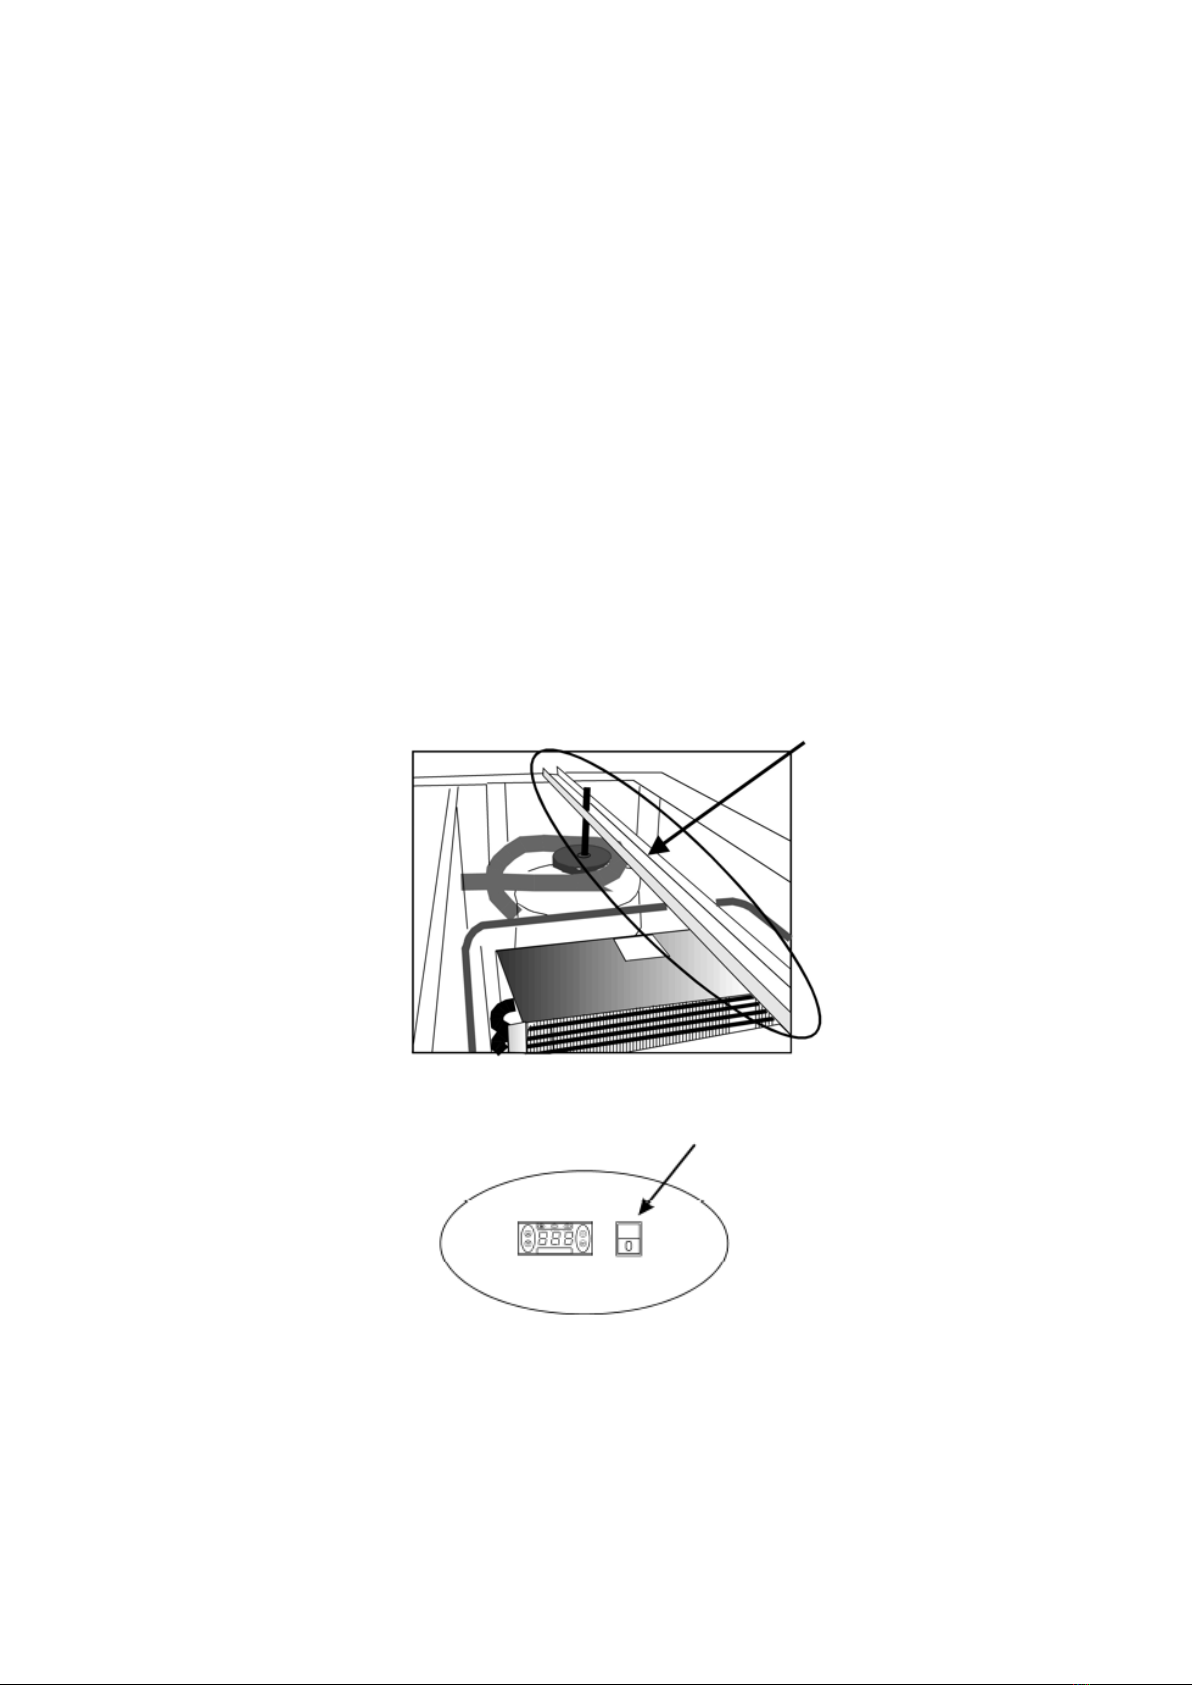
Remember to remove the transport safety device on the compressor. Remove the whole bar as shown in fig. 1.8.
Fig 1.8
Connect the cabinet to a socket and turn on the switch on the control panel, see fig. 1.9.
Fig 1.9

6
Thermostat
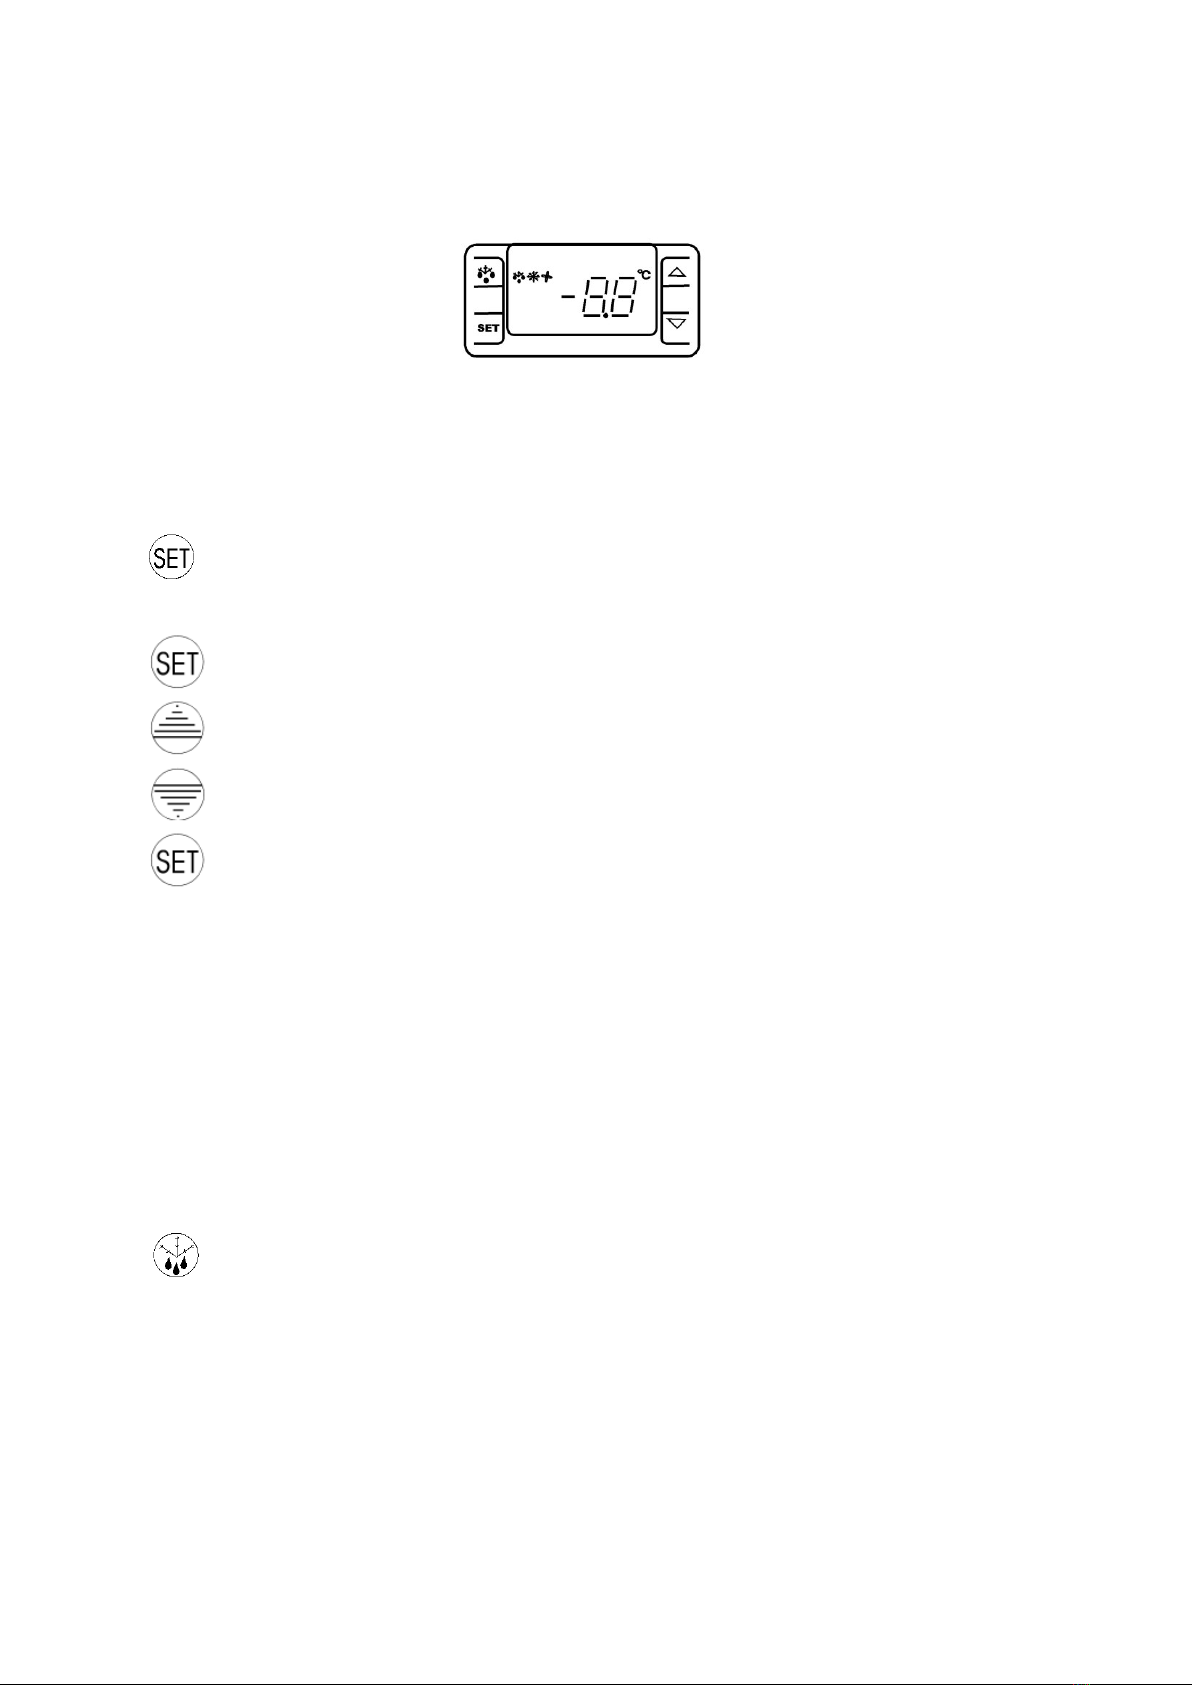
The thermostat is placed in the control panel, see fig. 2.0.
Fig. 2.0
The thermostat has been pre-set and in most cases it is not necessary to adjust the settings.
When turning on the cabinet the display will show the current temperature in the cabinet.
Display set temperature:
Press this key and the display will show the set temperature. Press the key again to return to normal
reading
Set new temperature:
Press this key continuously for more than 3 seconds and the display shows the set temperature.
Press this key to increase the set temperature.
Press this key to lower the set temperature.
Press this key to save the new settings. The display will flash with the new value and will then return
to normal reading.
Alarm codes:
‘P1’ Flashing in the display: indicates that the cabinet sensor is defective.
The cabinet will strive to keep the set temperature until it has been repaired.
‘P2’ Flashing in the display: indicates that the evaporator sensor is defective.
This does not influence the operation of the cabinet, but should be repaired as soon as possible.
Defrosting
The cabinet defrosts automatically with pre-set intervals. If the door to the cabinet is opened or the contents of
the cabinet is changed frequently it may become necessary to defrost the cabinet manually.
Pressing this key continuously for more than 3 seconds will start a manual defrosting and then return
to normal operation.
Defrosted water runs to a container placed in the compressor compartment and evaporates.
7
Maintenance and cleaning
Switch the cooler off at the socket.
The cabinet must be periodically cleaned. Clean the external and internal surfaces of the cabinet with a light
soap solution and subsequently wipe dry. External surfaces can be maintained using steel oil.
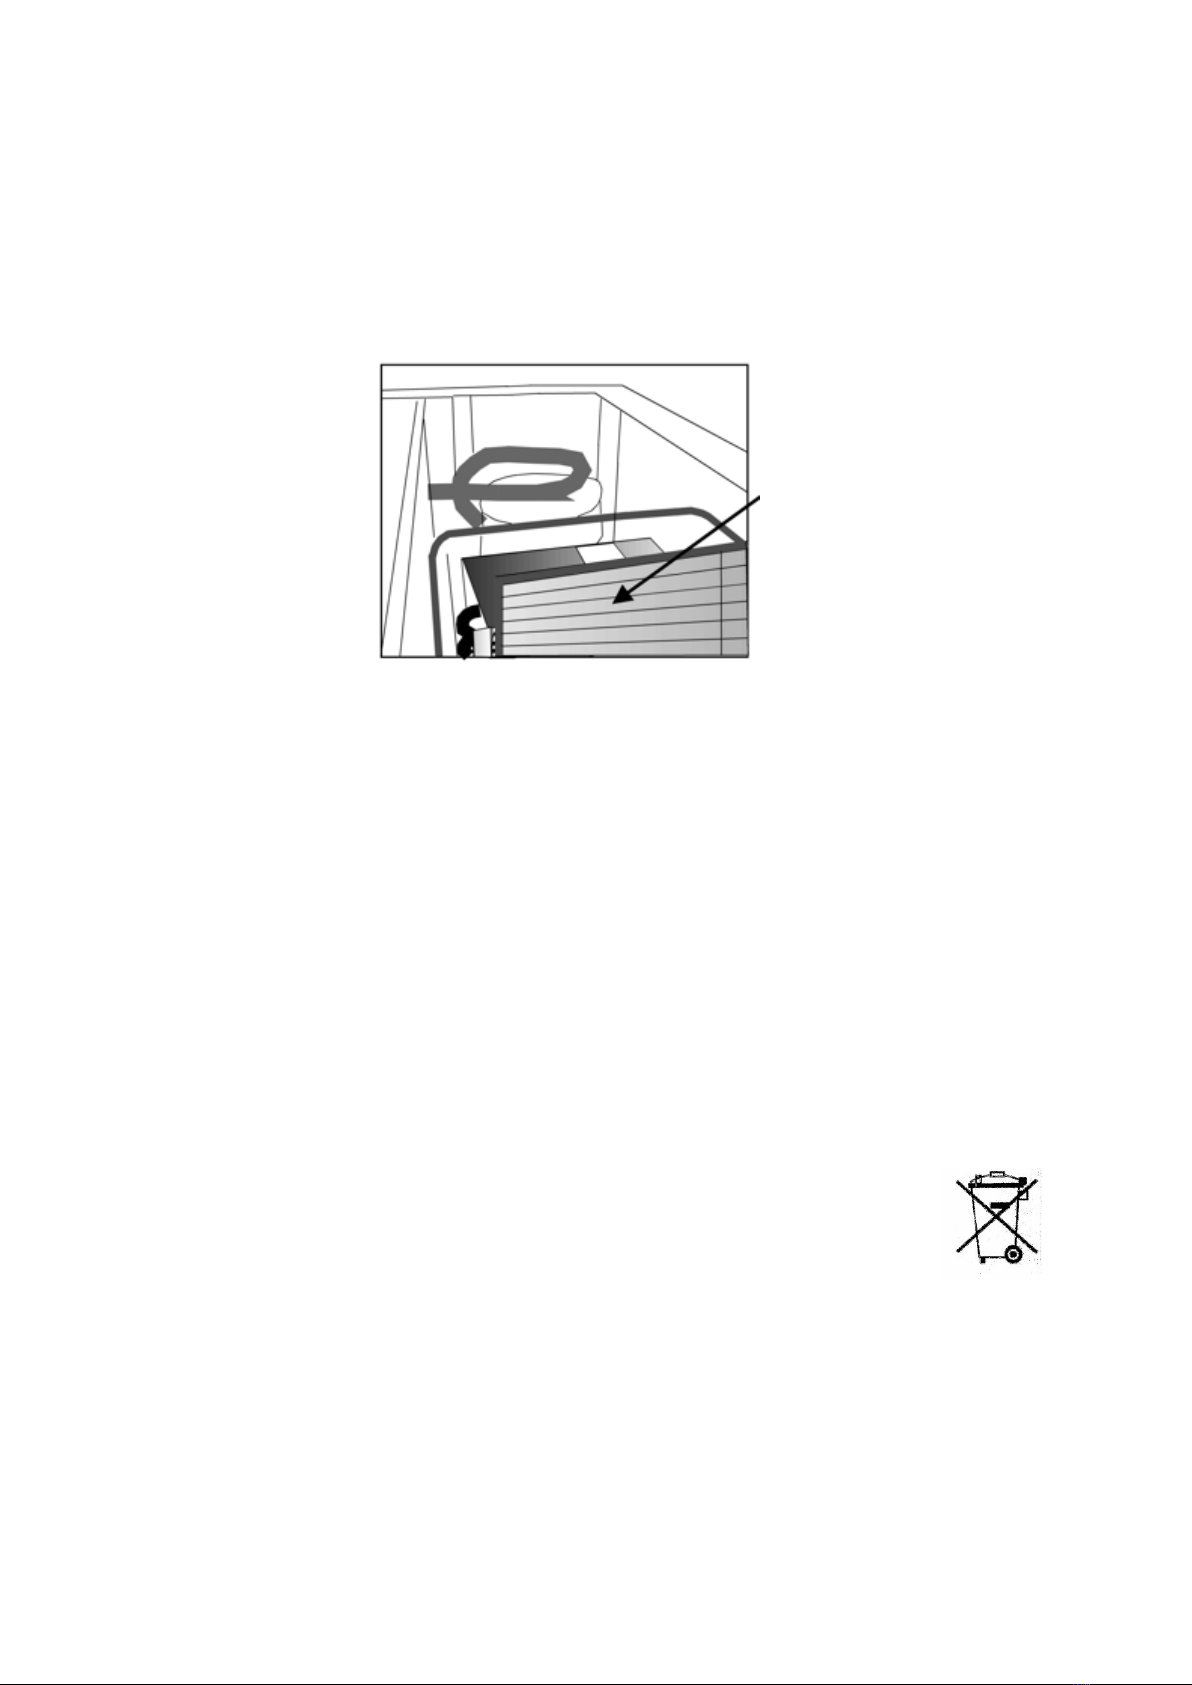
Remove the condenser filter (see fig. 2.1), and clean it with a vacuum cleaner and if necessary a light soap
solution.
Fig. 2.1
Do NOT use cleansers containing chlorine or other harsh cleansers, as these can damage the stainless steel
surfaces and the internal cooling system.
Clean the condenser and the compressor compartment using a vacuum cleaner and a stiff brush. Do NOT hose
the compressor compartment with water as this can cause short circuits and damage on the electrical parts.
Service
The cooling system is a hermetically sealed system and does not require supervision, only cleaning.
If the cabinet fails to cool, check if the reason is a power cut.
If you cannot locate the reason to the failure of the cabinet, please contact your supplier. Please inform model
and serial number of the cabinet. You can find this information on the rating label which is placed inside the
cabinet in the top right hand side.
Disposal
Disposal of the cabinet must take place in an environmentally correct way. Please note existing
regulation on disposal. There may be special requirements and conditions which must be
observed.
8
Belangrijke veiligheidsinstructies
1. Om de kast optimaal te gebruiken, raden wij u aan deze gebruiksaanwijzing te lezen.
2. Het is de verantwoordelijkheid van de gebruiker om het apparaat te bedienen volgens de opgegeven
instructies.
3. Neem onmiddellijk contact op met uw dealer als er storingen optreden.
4. Plaats de kast op een droge en geventileerde plaats.
5. Houd de kast weg van sterke hittebronnen en stel het niet aan direct zonlicht bloot.
6. Houd er altijd rekening mee dat alle elektrische apparaten mogelijke bronnen zijn van gevaar.
7. Bewaar geen brandbaar materiaal zoals verdunner, benzine, enz. in de kast.
8. We verklaren dat er geen asbest of CFC in de constructie wordt gebruikt.
9. De olie in de compressor bevat geen PCB.
Uitpakken en installatie
Verwijder de houten pallet en de verpakking. Externe oppervlakken worden geleverd met een beschermfolie,
die vóór de installatie moet worden verwijderd.
Om juist gebruik te waarborgen is het belangrijk dat de kast waterpas staat. Als de kast met poten wordt geleverd,
kunnen deze worden aangepast. Zie fig. 1.1.
Fig. 1.1
Als u uw kast wilt inbouwen, let dan op het volgende:
1. Er moet minimaal 15 cm vrije ruimte boven de kast zijn zodat het koelsysteem naar behoren kan werken.
2. Er moet voldoende ruimte zijn aan de scharnierzijde om de planken te reinigen en te vervangen en om
het scharnier schoon te maken.
9
Elektrische verbinding
De kast werkt op 230 V/50 Hz.
Het stopcontact moet gemakkelijk bereikbaar zijn.
Alle aardingsvereisten die door de lokale elektriciteitsautoriteiten worden vastgesteld, moeten in acht worden
genomen. De stekker en het stopcontact dienen de juiste aarding te geven. Als u twijfelt, contacteer uw
plaatselijke leverancier of geautoriseerde elektricien.
De flexibele kabel van dit toestel, heeft drie kernen voor gebruik met een 3-pins 13-Amp of 3-pins 15Amp-stekker.
Als een B.S. 1363 (13-Amp) gecondenseerde stekker wordt gebruikt, moet die voorzien zijn van een 13-Ampse
zekering.
De draden in dit netsnoer zijn gekleurd volgens de volgende code:
Groen/Geel: Aarding, Blauw: Neutraal, Bruin: Live.
De belangrijkste elektrische aansluitingen moeten door vakkundige elektriciens worden uitgevoerd.
De kast starten
Voor gebruik, adviseren wij u de kast schoon te maken, zie het gedeelte over onderhoud en reiniging.
Om de optimale werking van de kast te waarborgen, moet de omgevingstemperatuur tussen 18 en 35°C liggen.
Belangrijk!
Als de kast horizontaal geplaatst is tijdens het transport, wacht dan 2 uur voor u de kast opstart. Vergeet niet om
het transportveiligheidsapparaat op de compressor te verwijderen. Verwijder de hele balk zoals afgebeeld in fig.
1.8.
Fig. 1.8
Sluit de kast aan op een stopcontact en zet de schakelaar op het bedieningspaneel aan, zie fig. 1.9.
Fig. 1.9
10
Thermostaat
De thermostaat wordt in het bedieningspaneel geplaatst, zie fig. 2.0.
Fig. 2.0
De thermostaat is vooraf ingesteld en in de meeste gevallen is het niet nodig om de instellingen aan te passen.
Bij het inschakelen van de kast zal de display de huidige temperatuur in de kast laten zien.
Display ingestelde temperatuur:
Druk op deze toets en op het display verschijnt de ingestelde temperatuur. Druk nogmaals op de toets
om terug te keren naar normaal lezen
Stel nieuwe temperatuur in:
Druk nogmaals op deze toets gedurende meer dan 3 seconden en op de display wordt de ingestelde
temperatuur weergegeven.
Druk op deze toets om de ingestelde temperatuur te verhogen.
Druk op deze toets om de ingestelde temperatuur te verlagen.
Druk op deze toets om de nieuwe instellingen op te slaan. Het display knippert met de nieuwe waarde
en gaat dan terug naar normaal lezen.
Alarmcodes:
‘P1’ Knipperend op het display: geeft aan dat de kastensor defect is.
De kast zal trachten de ingestelde temperatuur te behouden tot die hersteld is.
‘P2’ Knippert op de display: geeft aan dat de verdamper sensor defect is.
Dit heeft geen invloed op de werking van de kast, maar moet zo snel mogelijk worden gerepareerd.
Ontdooien
De kast ontdooit automatisch met vooraf ingestelde intervallen. Als de deur naar de kast wordt geopend of de
inhoud van de kast regelmatig wordt veranderd, kan het nodig zijn om de kast handmatig te ontdooien.
Als u deze toets langer dan 3 seconden ingedrukt houdt, start u handmatig ontdooien en gaat u terug
naar de normale werking.
Ontdooid water loopt naar een container die in het compressorcompartiment is geplaatst en verdampt.
Questo manuale è adatto per i seguenti modelli
22
Indice
Lingue:
Altri manuali CombiSteel Frigorifero

CombiSteel
CombiSteel 7013.2570 Manuale utente

CombiSteel
CombiSteel 7464.0035 Manuale utente

CombiSteel
CombiSteel 7450.0551 Manuale utente

CombiSteel
CombiSteel Coldroom 7469 Series Manuale utente

CombiSteel
CombiSteel NAP-800 Manuale utente

CombiSteel
CombiSteel 7071 Series Manuale utente

CombiSteel
CombiSteel 7455.1392 Manuale utente

CombiSteel
CombiSteel 7013.2560 Manuale utente

CombiSteel
CombiSteel 7450.0900 Manuale utente

CombiSteel
CombiSteel MBB74551320 Manuale utente


