Comfee RG08A/CE Manuale utente

REMOTE CONTROL
FJERNBETJENING
FJÄRRKONTROLL
FJERNKONTROLL
KAUKO-OHJAIN
For more multi-language manuals please
visit our website: http://www.mideagermany.de


OPERATING INSTRUCTIONS
SPECIFICATIONS 4
PERFORMANCE FEATURES 4
BUTTON ASSIGNMENT 5
DISPLAY 6
OPERATION 7
SAFETY INSTRUCTIONS 10

4
INFORMATION
Please read these operating instructions prior to commissioning.1.
Keep these instructions in a safe place for future reference.2.
All data on HEAT mode in these instructions apply only for air-conditioning units that are equipped with a heating3.
function.
It takes the air-conditioning unit up to 3 minutes to respond when switched off and then turned back on again.4.
SPECIFICATIONS
Nominal voltage 3.0 V (alkali dry batteries LR03 x 2)
Lowest voltage for the processor send signal 2.0 V
Transmission distance 8 m
Environment -5 °C ~ 60 °C
PERFORMANCE FEATURES
Operating mode: AUTO, COOL, DRY, HEAT, and FAN1.
24-hour timer2.
Setting range for room temperature: 17 °C ~ 30 °C3.
LCD display4.

5
GB
BUTTON ASSIGNMENT
TEMP
>
:Pressing this button reduces the room
temperature setting.
TEMP
>
:Pressing this button increases the room
temperature setting.
MODE: Pressing this button selects the operating
mode for the unit. Each time you press the button,
the mode is switched in the following sequence:
AUTO – COOL – DRY – HEAT – FAN.
SWING: Pressing this button activates the automatic
direction change of the ventilation flaps. They now
move within a defined angle. Pressing the button
again stops this function.
RESET: Pressing this button deletes all the activated
settings and restores the factory setting.
AIR DIRECTION: Pressing this button changes the
angle of the ventilation flap. If the ventilation flap
swivels to a position that impairs the cooling and
heating effect of the air-conditioning unit, the swivel
direction will change automatically. (not applicable
for units without this function.)
LED DISPLAY: Pressing this button prevents the
temperature being indicated on the indoor unit
display. Pressing the button again reactivates the
display. (not applicable for units without this func-
tion.)
FAN SPEED: Pressing this button selects the blower
speed. Each time you press the button, the speed is
switched in the following sequence:
LOW – MED – HIGH – AUTO.
ON/OFF: Pressing this button activates the unit.
Pressing the button again stops operation.
TIMER ON: Pressing this button sets the activa-
tion time for the unit. Each time this button is
pressed, the activation time is shifted in 30-minute
increments (every hour from 10 hours onwards).
To deactivate this mode, simply set a time of 0:00.
SLEEP: Pressing this button selects energy-saving
mode. Pressing the button again deactivates this
mode. Pressing a different button also deactivates
this mode. This function can be used only in COOL,
HEAT and AUTO mode.
TIMER OFF: Pressing this button sets the deac-
tivation time for the unit. Each time this button is
pressed, the deactivation time is shifted in 30-min-
ute increments (every hour from 10-hours onwards).
To deactivate this mode, simply set a time of 0:00.
LOCK: Pressing this button disables all current set-
tings and the remote control allows no mode other
than LOCK. Pressing it again cancels LOCK mode.
TURBO: Pressing this button in COOL mode
switches the air-conditioning unit to performance
cooling mode. Pressing the button again cancels the
TURBO function.
CLEAN AIR: (applicable for certain models): Pressing
this button activates the ion generator, which is able
to remove pollen and impurities from the air.
FOLLOW ME: (applicable for certain models). Press
this button to start the Follow Me function and the
remote control will then record the current tem-
perature at the location. The remote control sends
a signal to the air-conditioning unit every 3 minutes
until the Follow Me button is pressed again. The air-
conditioning unit beeps to indicate that the Follow
Me function will be disabled if no signal is received
within 7 minutes.
ION: (applicable for certain models). Pressing this
button activates the ion generator, which is able to
remove pollen and impurities from the air.

6
DISPLAY
NOTE
All the displays shown here are simply to aid understanding. Only the selected functions will be displayed during
operation.
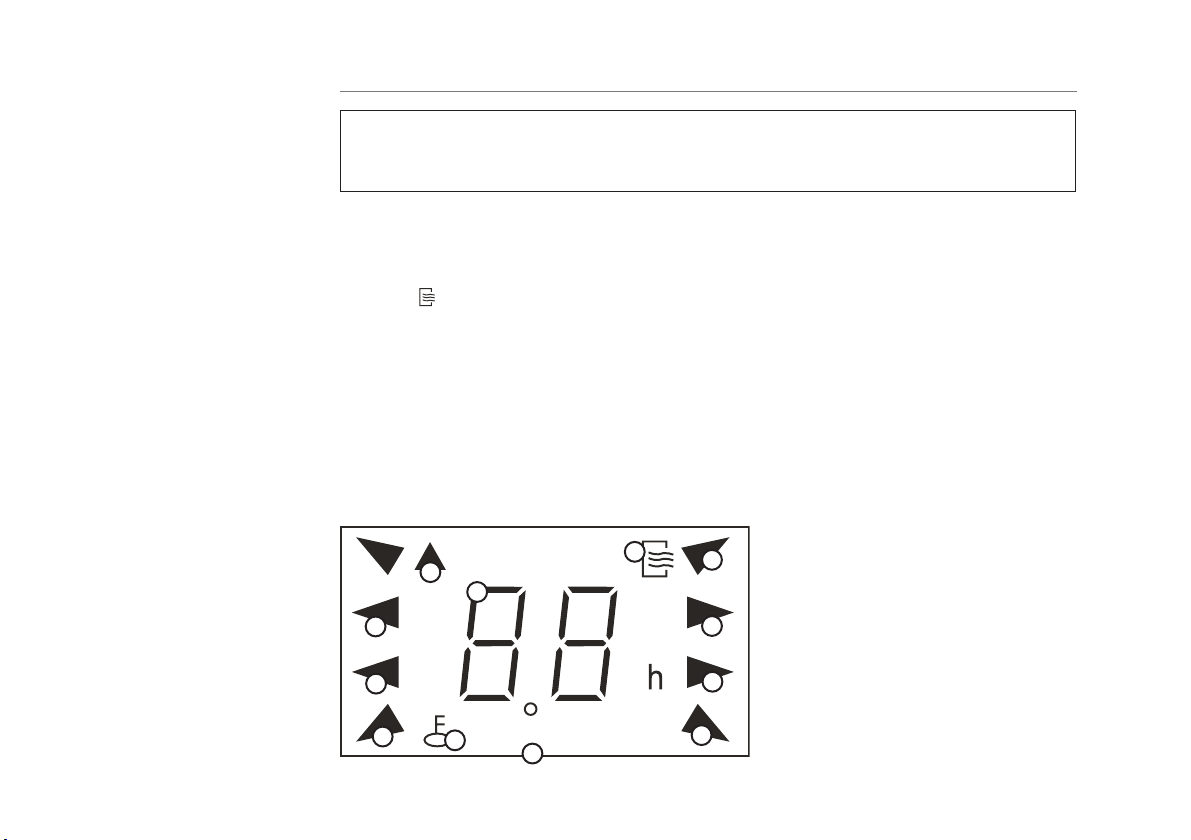
DIGITAL DISPLAY RANGE: This range indicates the set temperature. In TIMER mode, the applicable TIMER settings are
displayed. No symbol is displayed in FAN mode.
TRANSMISSION SIGNAL: This arrow illuminates when the remote control transmits signals to the indoor unit.
The indoor unit then responds with a beep.
ON/OFF : This symbol appears when the unit is activated by the remote control and extinguishes when the unit is
deactivated.
OPERATING MODES: Pressing the MODE button displays an arrow in front of the selected operating model
LOCK: The LOCK symbol appears after the LOCK button is pressed. When the LOCK button is pressed again, the symbol
disappears.
TIMER SYMBOL: As soon as you select an activation time, TIMER ON will appear in this range. TIMER OFF will be
displayed if you select a deactivation time. If you have selected both functions, TIMER ON OFF will be displayed.
FAN SPEED SYMBOL: Pressing the FAN SPEED button displays an arrow in front of the selected blower speed
(exception: no symbol is displayed if you have selected AUTO).
TIMER ON OFF
1
2
34
56
7
7
7
7
7
7

7
GB
OPERATION
Fitting/replacing batteries
The remote control requires two alkali dry batteries (LR03 x 2).
To fit the batteries, slide back the battery compartment cover and insert. Make sure the batteries are inserted the right1.
way around (+/-).
Follow the same procedure to replace used batteries.2.
NOTE
Do not use old or alternative batteries as replacements. This can cause the remote control to malfunction.1.
Remove the batteries if you do not intend to use the remote control for several weeks. Dead batteries can damage2.
the remote control.
The average battery life with normal use is approximately 6 months.3.
Replace the batteries when the indoor unit no longer responds with a beep or when the transmission indicator light4.
no longer illuminates.
Activate the air-conditioning unit by connecting the plug of the indoor unit to the mains socket (see operating instructions for
the unit). The OPERATION indicator light on the indoor unit's display will now flash. Now take hold of the remote control.

8
A AUTO mode
Pressing the MODE button selects AUTO mode.1.
Pressing the TEMP button selects required room temperature. The most pleasant temperature settings are be-2.
tween 21 °C and 28 °C.
Pressing the ON/OFF button starts the air-conditioning unit.3.
The OPERATION and AUTO indicator lights on the indoor unit's display illuminate. The indoor unit's display will also
indicate the temperature set on the remote control. The FAN SPEED is set automatically.
Pressing the ON/OFF button again stops operation.4.
NOTE
In AUTO mode, the air-conditioning unit detects the difference between the actual room temperature and the set1.
temperature and automatically selects either COOL, FAN or HEAT mode.
COOL, FAN and HEAT modes can of course also be selected manually.2.
B COOL, HEAT and FAN mode
Pressing the MODE button selects either COOL, HEAT or FAN mode as required.1.
Pressing the TEMP button selects required room temperature. The most pleasant temperature settings are be-2.
tween 21 °C and 28 °C.
Pressing the FAN SPEED button selects the speed of the fan. Pressing the button again selects the speeds in the follow-3.
ing sequence: AUTO – LOW – MED – HIGH.
Pressing the ON/OFF button starts the air-conditioning unit.4.
The OPERATION indicator light on the indoor unit's display illuminate. The indoor unit's display will also indicate the
temperature set on the remote control.
Pressing the ON/OFF button again stops operation.5.
NOTE
FAN mode cannot be used to control the temperature. Only steps 1, 3, 4 and 5 can be executed in this mode.

9
GB
C DRY mode
Pressing the MODE button selects DRY mode.1.
Pressing the TEMP button selects required room temperature. The most pleasant temperature settings are between2.
21 °C and 28 °C.
Pressing the ON/OFF button starts the air-conditioning unit.3.
The OPERATION indicator light on the indoor unit's display illuminate. The indoor unit's display will also indicate the
temperature set on the remote control. The air-conditioning unit now runs in DRY mode at low blower speed.
Pressing the ON/OFF button again stops operation.4.
NOTE
Due to the difference between the temperature set on the unit and the actual room temperature, the air-conditioning unit
often automatically starts in DRY mode without COOL and FAN mode.
D TIMER mode
Press the TIMER ON button to set the automatic activation time of the unit and the TIMER OFF button to set the automatic
deactivation time of the unit.
Setting the activation time (deactivation time):
Press the TIMER ON (TIMER OFF) button. The remote control display now shows TIMER ON (TIMER OFF), the time last1.
set for mode start (mode stop) and the symbol "h". You can now set the time for mode start (mode stop).
Each time the TIMER ON (TIMER OFF) button is pressed, the activation time (deactivation time) is postponed by2.
0.5 hours (ever hour from 10 hours onwards).
It takes the remote control approx. 30 seconds to transmit the signal to the air-conditioning unit once the activation3.
time (deactivation time) has been set. After a further 2 seconds, the set functions and TIMER ON (TIMER OFF) appear in
the display.
After a few seconds, the TIMER indicator light illuminates permanently on the indoor unit.4.
NOTE
If you have selected both an activation time and a deactivation time, TIMER ON/OFF will appear in the display.1.
To change the TIMER ON/OFF time, press the corresponding TIMER button and reset the time.2.
To delete the TIMER ON/OFF setting, set the timer time to 0:00.3.

10
SAFETY INSTRUCTIONS
The air-conditioning unit will not function if there are any barriers between the remote control and the indoor unit1.
receiver.
Keep the remote control away from liquids.2.
Protect the remote control against high temperatures and sunlight.3.
Do not expose the interior receiver to direct sunlight as this will prevent the air-conditioning unit from functioning cor-4.
rectly.
Keep the remote control away from electromagnetic influences that can be produced by other household devices.5.
Technical changes and printing errors excepted.
Questo manuale è adatto per i seguenti modelli
3
Indice
Lingue: