COMPRO S350 - STARTUP Manuale utente

VideoMate S350
DVB-S PCI TV Tuner Card
Start Up Guide
Compro Technology, Inc.
www.comprousa.com

ii
Copyright © 2001-2009. Compro Technology, Inc. No part of this
document may be copied or reproduced in any form or by any means
without the prior written consent of Compro Technology, Inc.
Compro, VideoMate, Poladyne, Play with Power, and the Compro
logo are trademarks of Compro Technology, Inc. Other names and
marks are trademarks of their respective owners.
Compro makes no warranties with respect to this documentation and
disclaims any implied warranties of merchantability, quality, or fitness
for any particular purpose. The information in this document is subject
to change without notice. COMPRO reserves the right to make
revisions to this publication without obligation to notify any person or
entity of any such changes.
Compro Technology, Inc.
Tel. +886 2 2918 0169, Fax +886 2 2915 2389
3/F, No.12, Alley 6, Lane 45, Pao Shin Road
Hsintein City, Taipei, Taiwan.
www.comprousa.com

Table of Contents
Table of Contents.................................................... 1
About This Guide .................................................... 2
About VideoMate S350 DVB-S Tuner Card........... 2
VideoMate S350 PCI Card Contents...................... 3
Software Installation............................................... 8
Remote Wake Up..................................................... 9
Remote Control Key Definition and Use
ComproDTV ........................................................... 10
ComproDTV ........................................................... 11
Troubleshooting.................................................... 20

2
About This Guide
This manual tells you how to install and use your VideoMate S350 DVB-S PCI
Tuner Card. More information is available on the User’s Guides in the
programs or on the CD.
About VideoMate S350 DVB-S Tuner Card
VideoMate S350 lets you watch and record Satellite TV broadcast on your PC.
It features a TV tuner for Satellite TV broadcast, Remote Power On/Off, Power
Up Scheduling, Digital Video Recording (DVR) functions, scheduled recording
at anytime, crystal video quality, intelligent TV viewing, and a multi-function
Remote Control.
Additionally, VideoMate S350 also provides a Video capture function so that
you can transfer videos from video devices, such as video cameras, to your
PC.
MINIMUM SYSTEM REQUIREMENTS
Your PC must meet or exceed the following system requirements to watch TV
on your PC.
zPIII 1.7 GHz CPU for SDTV viewing
z512 MB RAM
zSound card or on-board sound chip
zGraphics card or on-board graphics chip supports DirectX 9.0
zOpen PCI slot
zCD-ROM drive for software installation.
zWindows XP SP2, Vista 32/64 bit
z50 MB free disk space for basic software installation.
zDigital Satellite TV Dish and LNB
RECOMMENDED SYSTEM REQUIREMENTS
To use all the features of VideoMate S350 PCI card, your PC should meet the
following requirements.
zP4 2.6 GHz CPU for HDTV viewing, recording, and PIP/POP feature
z1.0 GB RAM
zSound card or on-board sound chip

3
zGraphics card or on-board graphics chip supports DirectX 9.0
zOpen PCI version 2.2 slot
zCD-ROM for software installation
zWindows XP SP2, Vista 32/64 bit
zUpdate the latest drivers of VGA, motherboard, and soundcard from
vendors.
z50 MB free space for software installation
z600 MB (VCD-quality) to 3 GB (DVD-quality) per hour of recorded video
zATX power supply and a computer case with a separate power switch
cable from power on button.
VideoMate S350 PCI Card Contents
Wireless Remote Control
(batteries included)
VideoMate S350
PCI card
IR Receiver
Software CD
Start Up
Guide
External audio
patch cable
Power Up Cable
(Power switch
patch cable)

4
VideoMate S350 Connectors
Item Function Description
1 Loop Through Connect to Satellite input device for TV output
2 Satellite TV -In Connect to a Satellite TV cable feed.
3 IR Connect the IR receiver here.
4 External
Audio-In
Use an audio patch cable to connect to an audio
source, such as a VCR. (For analog video capture
only)
5 External
Audio-Out
Use the supplied audio cable to the Line-In port of
your sound card.
6 S-Video-In Use an S-Video patch cable to connect to a video
source.
7 Composite-In Use a Composite video patch cable to connect to a
video source.
8 To Case Power
Switch
Connect the ATX Power Switch cable of your
computer case here.
9 To Mainboard
Power Switch
Connector
Use the supplied power switch patch cable to
connect to the ATX Power Switch pins on the
mainboard.
2
4
3
1
8
5
6
7
9

5
Hardware Installation
Warning !!
Unplug your PC’s main power cord before installing VideoMate S350.
Failure to do so may cause damage to your VideoMate S350 TV tuner card
and void your warranty.
1. Shut down your computer and unplug main power cord.
2. Remove the computer case cover.
Power Up Connections
3. Locate the ATX power switch pins on
your computer case and trace the wires
to the power switch connector on your
mainboard. The ATX power switch cable
is normally a twisted pair cable with a
two-pin connector as shown above.
Note
On the mainboard, the ATX power switch pins are usually labeled “POWER
SW” or similar. It is vital to remember the position of these pins for a later step
in the installation process.
4. Unplug the ATX power switch cable from the mainboard and connect it to
the connector J2 on the VideoMate PCI TV Tuner Card, as shown on the
right.

6
5. Connect the black socket of Power Up
power patch cable to the power switch
connector on the mainboard.
6. Connect the white socket of Power Up
patch cable to the connector J3 on the
VideoMate PCI TV Tuner card.
Note
Double check your work. If you plug the cables into the incorrect pins, your PC
may not start or otherwise function improperly.
Connect the white end of the Power Up patch cable to the TV tuner card and
the black end to the mainboard.
Power Up Scheduling is not a required for using VideoMate S350. If you don’t
want to use Power Up Scheduling from the Windows Shut down state, you
can skip the power switch circuit connections, in other words, you can skip
Power Up Connections in steps 3 through 6. You can still use scheduled
recording from Standby mode or powered on state.
7. Verify that the power cord to your PC case is unplugged.
8. Insert VideoMate S350 in an open PCI slot. Compro recommends installing
the card in the third or fourth PCI slot from AGP away from the AGP slot.
9. Before closing your PC case, plug in main power cord of the PC case. You
should see a green LED light on the PCI TV tuner card. If you don't see the
green light, please read the notes on the following page.
10.Replace the computer cover.

7
TV signal cable
11.Connect your Satellite TV dish signal to the TV connector.
This completes hardware installation. Please read the following notes and
proceed to install the software.
Note
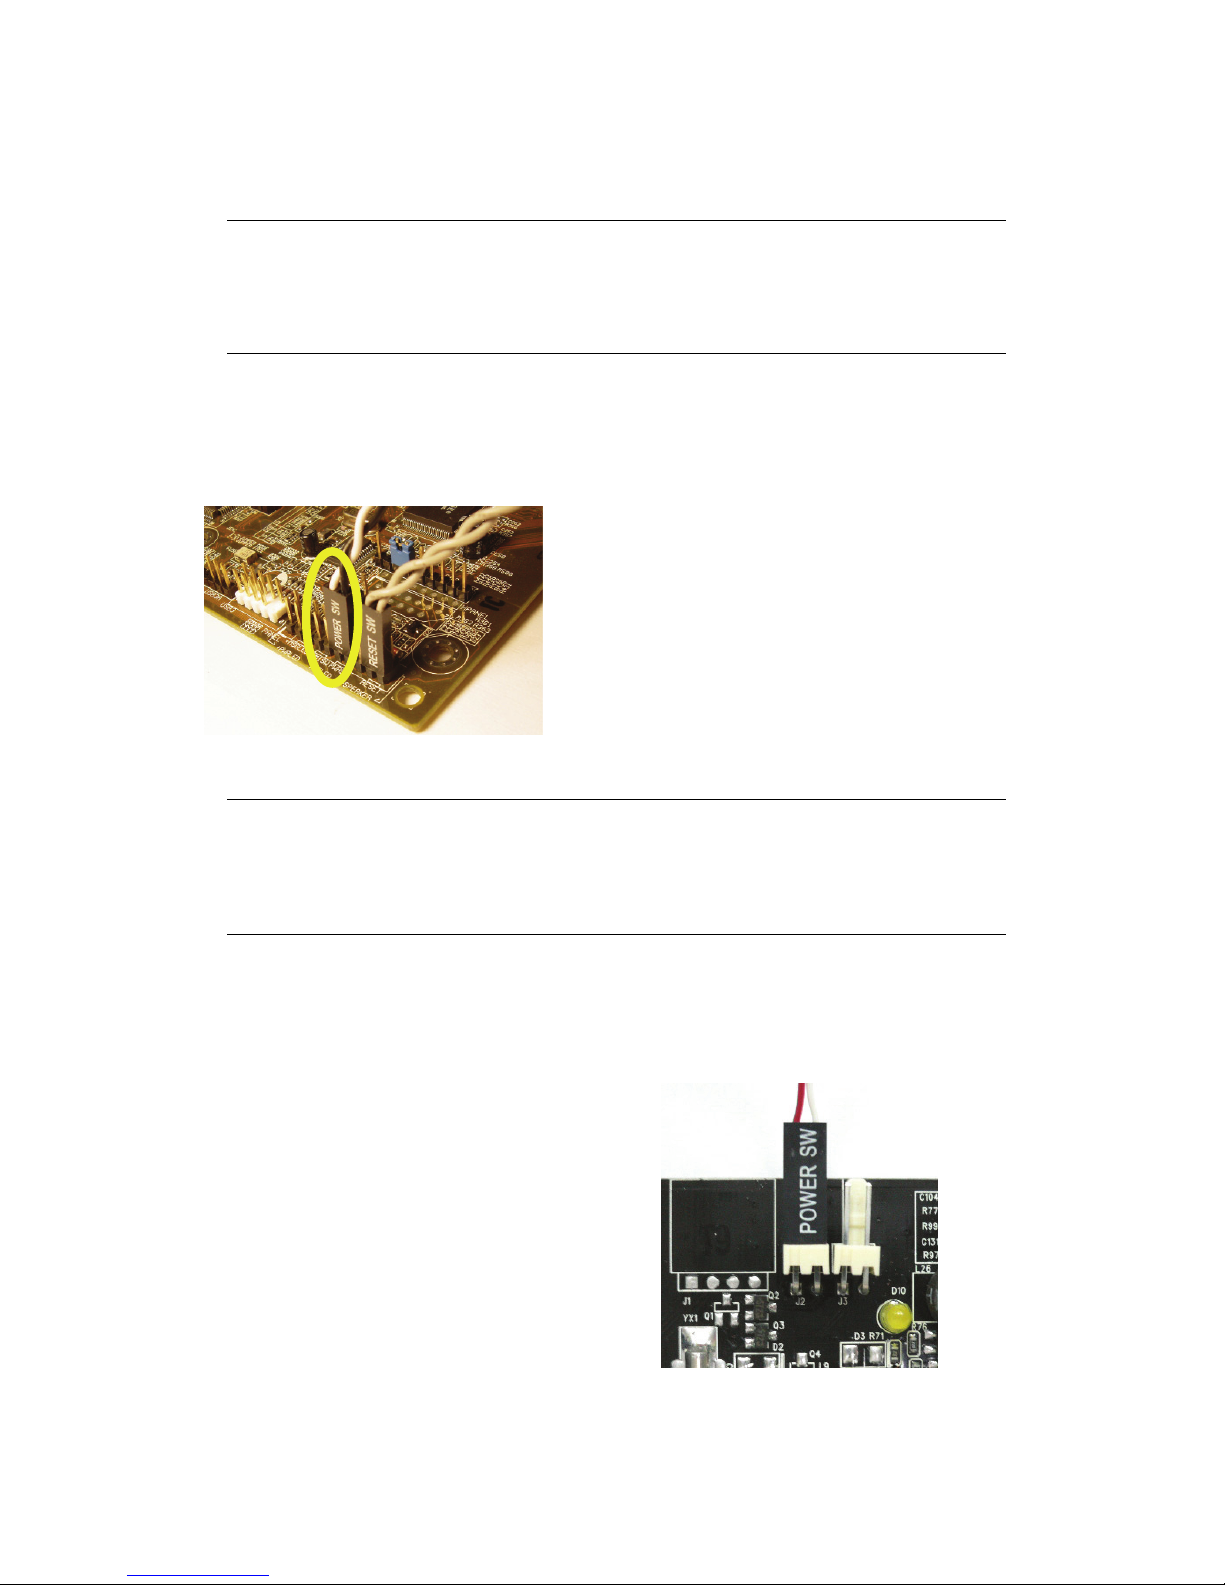
If the computer cannot be turned on, verify the position of the power patch
cable on the mainboard. Consult the mainboard documentation to determine
the position of the ATX power switch connector. Also, double check that the
AC power cable is properly connected to your PC.
Power Up will start your computer 5 minutes in advance of the scheduled
recording time, for example, if you have set ComproDTV to record a program
at 4 o’clock, it will start your computer at 3:55. Therefore, you need to shut
down the computer before 3:54 in order to let Power Up start the computer.
Power Up from Windows Shutdown mode, i.e., ACPI S5
state, requires:
zAn ATX power supply in your PC.
zMotherboard support for PCI version 2.2 in order to
have 3.3V standby power.
zAn ATX power switch cable, which is a pair of twisted
wires with a two-wire connector, as shown to the
right.
If you don't have the above items, you can still use Power-Up Scheduling with
Windows Stand by mode, i.e., ACPI S1/S3 state, if your system supports it.
If your ATX power switch cable in your PC case cannot reach the TV Tuner
card Power Up socket, you cannot use the Power Up function with system
shutdown mode. You can try moving the card to another PCI socket.
You can use VideoMate TV without using Power Up Scheduling. If you don’t
want to use Power Up Scheduling from the Windows Shut down state, you
can skip the power switch circuit connections, in other words, you can skip
Power Up Connections in steps 3 through 6. You can still use scheduled
recording from Standby mode or leave your PC powered on.
The ATX power switch cable is not polarized. You can plug it in either
direction.

8
Software Installation
After installing the S350 PCI card and cables in your computer, you should
restart it and follow these steps to install the software.
Step 1. After restarting, Windows will detect your VideoMate S350 card and
start the Add/Remove Hardware Wizard, prompting you to install the
VideoMate TV drivers. Please press Cancel and go to the next step.
Step 2. Insert the installation CD into your CD drive. If you have Autorun
enabled, the installer will start automatically. (If Autorun is disabled,
double-click on “setup.exe” on the installation CD.) You can choose
Complete to install all necessary software (VideoMate TV drivers,
ComproDTV 2, ComproDVD 2, Ulead PhotoExplorer 8.5 SE) or
choose Custom to select item by item. Compro recommends you
choosing Complete.
Step 3. If you see the Windows Logo testing message as below, please press
“Continue Anyway” to proceed.
Step 4. Press Next to install ComproDTV 2, ComproDVD 2, Ulead
PhotoExplorer 8.5 SE.
Step 5. When installation completes, press Finish to restart computer.
Continue
Questo manuale è adatto per i seguenti modelli
1
Indice
Altri manuali COMPRO Sintonizzatore TV

COMPRO
COMPRO U750F - START UP GUIDE Manuale utente

COMPRO
COMPRO E600F Guida utente

COMPRO
COMPRO S500 - STARTUP Manuale utente

COMPRO
COMPRO U880 - START UP GUIDE Manuale utente

COMPRO
COMPRO U900 - START UP GUIDE Manuale utente

COMPRO
COMPRO S300 - STARTUP Manuale utente

COMPRO
COMPRO H900F - STARTUP Manuale utente

COMPRO
COMPRO U700 - START UP GUIDE Manuale utente

COMPRO
COMPRO X100 - START UP GUIDE Manuale utente

COMPRO
COMPRO M505 - STARTUP Manuale utente


