COTLIN HX-90BR Manuale utente

Outdoor Refrigerator / Drawer Refrigerator
Instruction Manual
HX-90BR HX-160BR HX-160DDR
Be sure unit is standing upright 24 hours prior to plug-in.

1
IMPORTANT SAFEGUARDS
Read all instructions before using this appliance. Use this appliance only for its intended purpose as
described in this instruction manual. Always exercise basic safety precautions, as described below.
After reading the instruction manual, store it in an accessible place where the user(s) of this product
can easily find it.
The purpose of these safety precautions is to ensure safe and correct use of the product to minimize
risks that could cause serious damage and injury to you or others. The safety precautions are divided
into WARNINGS and CAUTIONS. Cases where improper handling of the unit could lead to death
or serious injury are listed under the WARNING heading. However, the cases listed under
CAUTION could also lead to serious results. To ensure safety, adhere strictly to both types of safety
precautions.
1. All repairs, disassembly and modifications should be performed only by qualified technicians.
Attempting to perform these yourself could result in fire, malfunction or injury.
2. Never splash water directly onto the product or wash it with water without unplugging, as a short
circuit could result. In a rainy environment, a water-proof covering is recommended.
3. Never put flammable or volatile substances into the unit as explosion and fire could result.
4. Do not damage, modify, excessively bend, strain, twist or bundle the power cord. Avoid hot,
sharp, or aggressive surfaces. Also, placing heavy objects on the power cord or binding it could
damage the cord, possibly resulting in electrical shock or fire.
5. Use a dedicated wall outlet. Do not use an extension cord or multiple-outlet adaptor as this could
result in electrical shock, overheating and fire.
6. Never use flammable spray cans or leave flammable substances near the unit. Sparks from
electrical switches could result in explosion or fire. If a combustible gas is present near the
appliance, turn off the source of the gas, then open the windows and doors to allow the gas to
dissipate. To avoid an explosion, do not pull the plug or switch off the unit.
7. The electrical socket must have good grounding. The ground wire cannot be connected with a
gas pipe, heating pipe, water pipe, telephone line or lightning rod. It cannot be replaced with the
neutral wire of single-phase power. In addition to the ground wire, an electrical leakage circuit
breaker is also required.
8. Use an electrician installed ground fault circuit interrupter (GFCI) electrical outlet. If no GFCI is
installed, electrical shock could result.
9. Never climb onto the unit. The unit could tip over or fall and cause material damage or personal
injury.
10. Disconnect the power cord plug from the wall outlet before moving the unit and make sure that
the power cord is not damaged during transport. A damaged power cord could result in electrical
shock and/or fire.
2
11. Never unplug the unit by pulling on the power cord. Always grip the plug firmly and pull
straight out from the outlet. Pulling the cord could cause wire breakage, possibly resulting in
overheating and fire.
12. Repair or replace any cord that is frayed or damaged. Do not use a cord that shows cracks or
abrasions along its length.
13. Do not use electrical appliances inside the food storage compartments, unless
they are of the type recommended by the manufacturer.
14. Keep ventilation openings, in the appliance enclosure or in the built-in
structure, clear of obstruction.
15. Do not use mechanical devices or other means to accelerate the defrosting
process, other than those recommended by the manufacturer.
16. Do not damage the refrigerant circuit.
1. This unit must be properly installed in accordance with the installation instructions along with all
local codes before it is used. See grounding instructions in the Installation section.
2. This model can either be built-in or free-standing. Built-in units vent at the bottom front and
airflow at the front of this vent must be unimpeded.
3. Install the unit in a location where the floor is sturdy enough to support the load of the unit. If the
floor is not sturdy enough or installation is incorrectly performed, the unit could tip over and
cause personal injury. If the unit is placed on a stand, the front surface must be 3” or more back
from the edge of the stand in order to avoid accidental tipping of the appliance during normal
usage.
4. Never place heavy objects or items containing water on top of the unit. Objects could fall and
cause injury and spilled water could cause the deterioration of the insulation of electrical
components and result in electrical shock.
5. Disconnect the unit if it is behaving abnormally, and do not reconnect until the situation is
corrected.
6. Pull out the plug before doing any maintenance on the unit to avoid electric shock.
7. Never pull out plug when hands are wet!
8. This unit is not intended for the storage of medicines or chemical reagents.
9. Keep packing materials away from children.
10. Condenser water from evaporator drains into a hole in the floor of the storage compartment and is
channeled into a drain pan located at the back of the unit on the compressor. Heat transferred
from the compressor evaporates any water that has collected in the pan. Be sure the drain hole in
the floor of the unit is clear and unobstructed.
11. During long absences, remove the unit’s contents, unplug the unit, clean it and leave the door
open slightly to avoid possible formation of condensation, mold or odors. Use a cover to protect
the unit and prolong its lifespan.
12. Leave disassembly and disposal of the unit to qualified experts.

3
SAVE THESE INSTRUCTIONS!
DANGER!
Risk of child entrapment! Before discarding your old refrigerator:
• take off the doors
• leave the shelves in place so that children may not easily climb inside.
This appliance is intended to be used in household and similar applications such as
- staff kitchen areas in shops, offices and other working environments;
- farm houses and by clients in hotels, motels and other residential type environments;
- bed and breakfast type environments;
- catering and similar non-retail applications.

4
Table of Contents
IMPORTANT SAFEGUARDS ........................... 1
Technical Specifications ...................................... 5
Location of Parts .................................................. 5
Installation ........................................................... 7
Operating Your Refrigerator .............................. 11
Cleaning and Maintenance ................................ 14
Troubleshooting ................................................. 15

5
Technical Specifications
Model: HX-90BR HX-160BR HX-160DDR
Description: 15'' Outdoor
Refrigerator
24'' Outdoor
Refrigerator
24'' Dual Drawer
Outdoor Refrigerator
Electrical Input: 115VAC ~ 60Hz
Current Rating: 1.1A
Unit
Dimensions:
14-5/8”W × 25-1/16”D ×
33-1/2”H 23-5/8”W × 25-1/4”D × 33-1/2”H
Unit Weight: 63 lbs 87 lbs 104 lbs
Ambient
Temperature
Range:
50ºF - 100ºF
Compartment
Temperature
Range:
34ºF - 65ºF
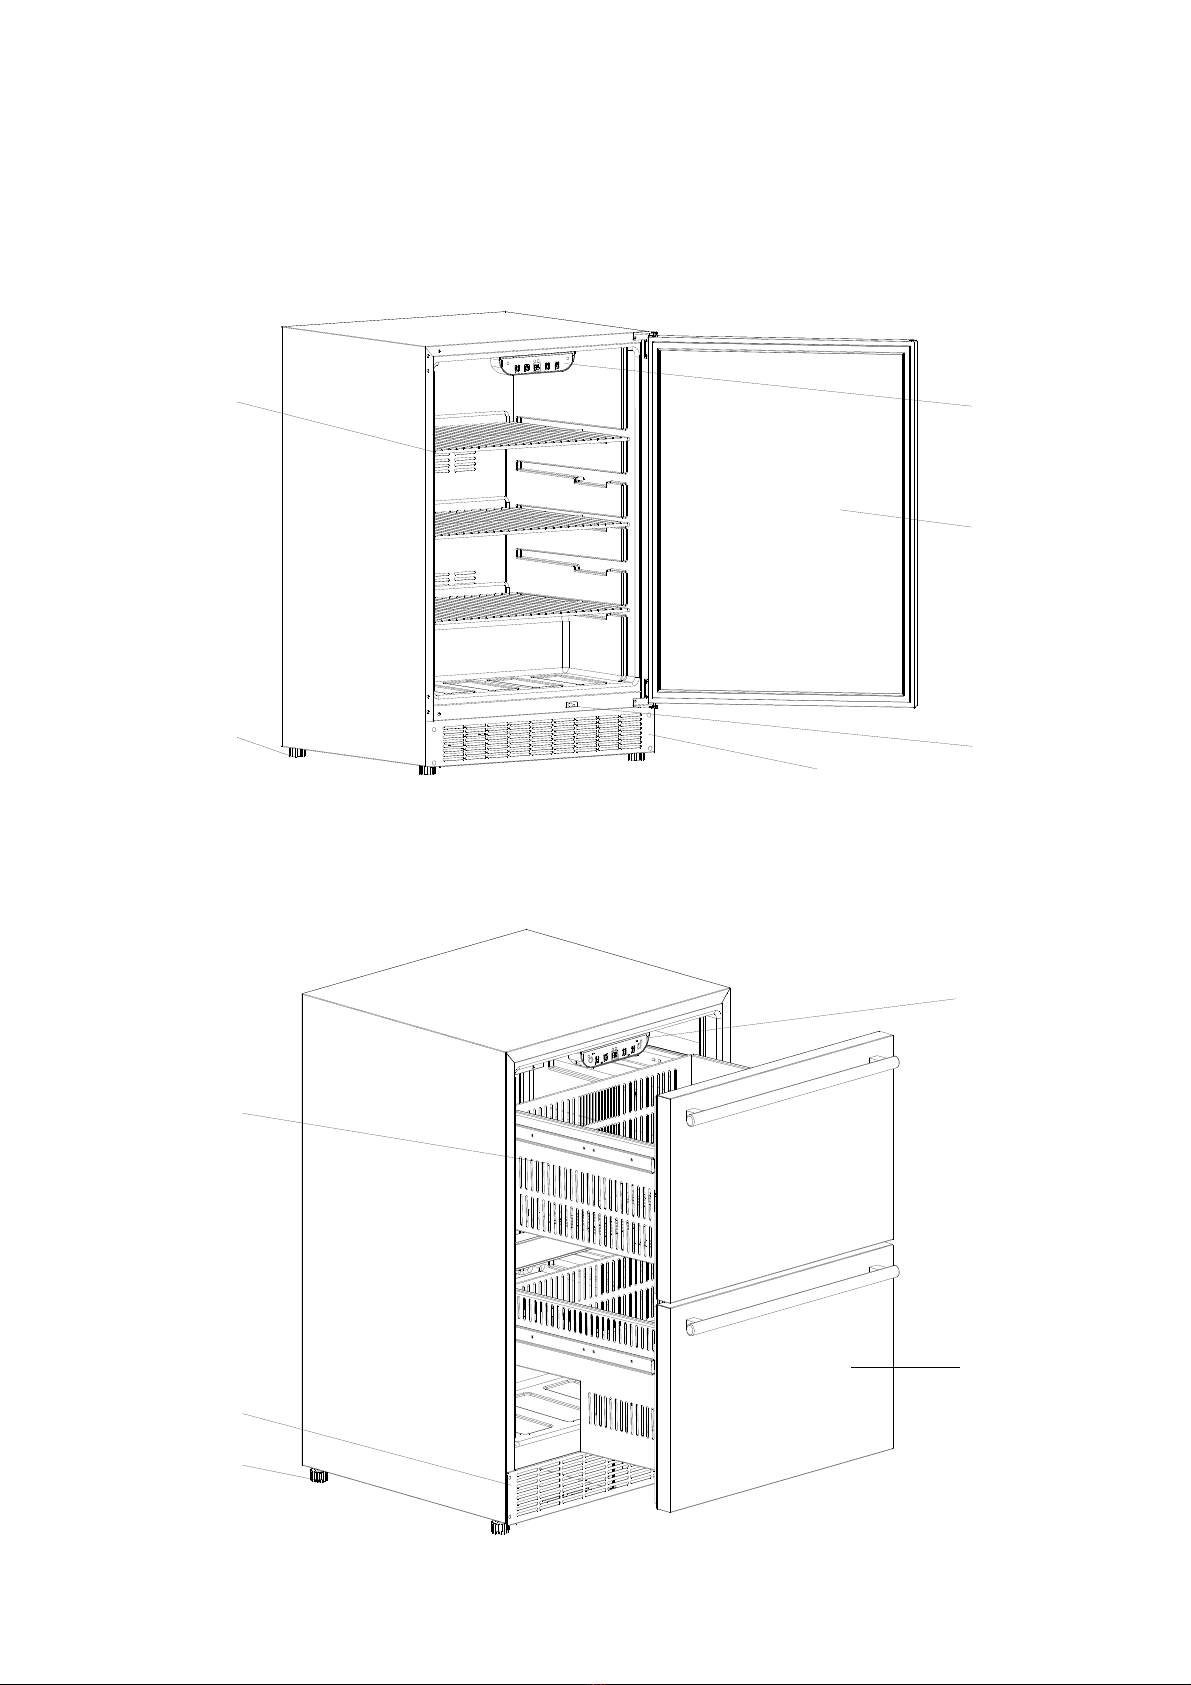
PARTS AND FEATURES
HX-90BR
Shelevs(2)
Leveling Feet
Control Panel
Door
Light Switch
Front Grill
e
6
HX-160BR
Shelevs(3)
Leveling Feet
Front
G
rille
Door
Light Switch
Control Panel
HX-160DDR
Control Panel
Door
Front Grille
Leveling Feet
Drawer

7
Installation
Remove the exterior and interior packaging. Use a soft dry cloth to wipe down the outside of the
refrigerator thoroughly. Use a clean cloth dampened with lukewarm water to wipe down the inside of
the refrigerator.
The unit should be located in a well-ventilated area. Avoid placing it near any source of heat or
moisture, or in direct sunlight. Direct sunlight may affect the finish, and nearby heat sources will
cause higher electrical consumption.
The Refrigerator is designed to be either free-standing or built-in. It has motorized fans at the back of
the unit that direct compressor-generated heat away from the compressor and through the front of the
unit. Keep the front vents unobstructed. If the unit is built-in, allow minimum clearances of 1/4” at
the sides, 2” at the back and 1” at the top.
Once the Refrigerator is positioned, the adjustable legs should be turned to level the appliance. This
will reduce vibrations.
NOTE: the appliance shall not be exposed to rain.
BUILT – IN CABINET INSTRUCTIONS
This unit is designed for both built-in or free standing installation. If you plan to use this unit in a
built-
in application, please follow the requirements shown below.
D
H
W
Model: HX-90BR HX-160BR HX-160DDR
Unit Dimension 14-5/8”W × 25-1/16”D
× 33-1/2”H 23-5/8”W × 25-1/4”D × 33-1/2”H
Cut-out Dimension 15-1/8”W × 27-1/16”D
× 33-3/4”H 24-1/8”W × 27-1/4”D × 33-3/4”H

8
ANTI-TIP BRACKET INSTALLATION [HX-160DDR]
To reduce the risk of tipping the unit by abnormal usage or improper loading, the appliance must be
secured by properly installing the anti-tip device packed with the appliance.
• Place the anti-tip bracket on the floor as shown in the figure. An anti-tip bracket must be installed at
both sides.
• Mark the locations of the 4 holes of the anti-tip bracket on the floor, refer to the location drawing.
• Use a masonry drill bit and insert plastic anchors.
• Secure bracket to floor using screws.
• Slide appliance into position and make sure the leg engages the anti-tip bracket.
NOTE: If the unit is relocated, the bracket must be removed and installed in the new location.
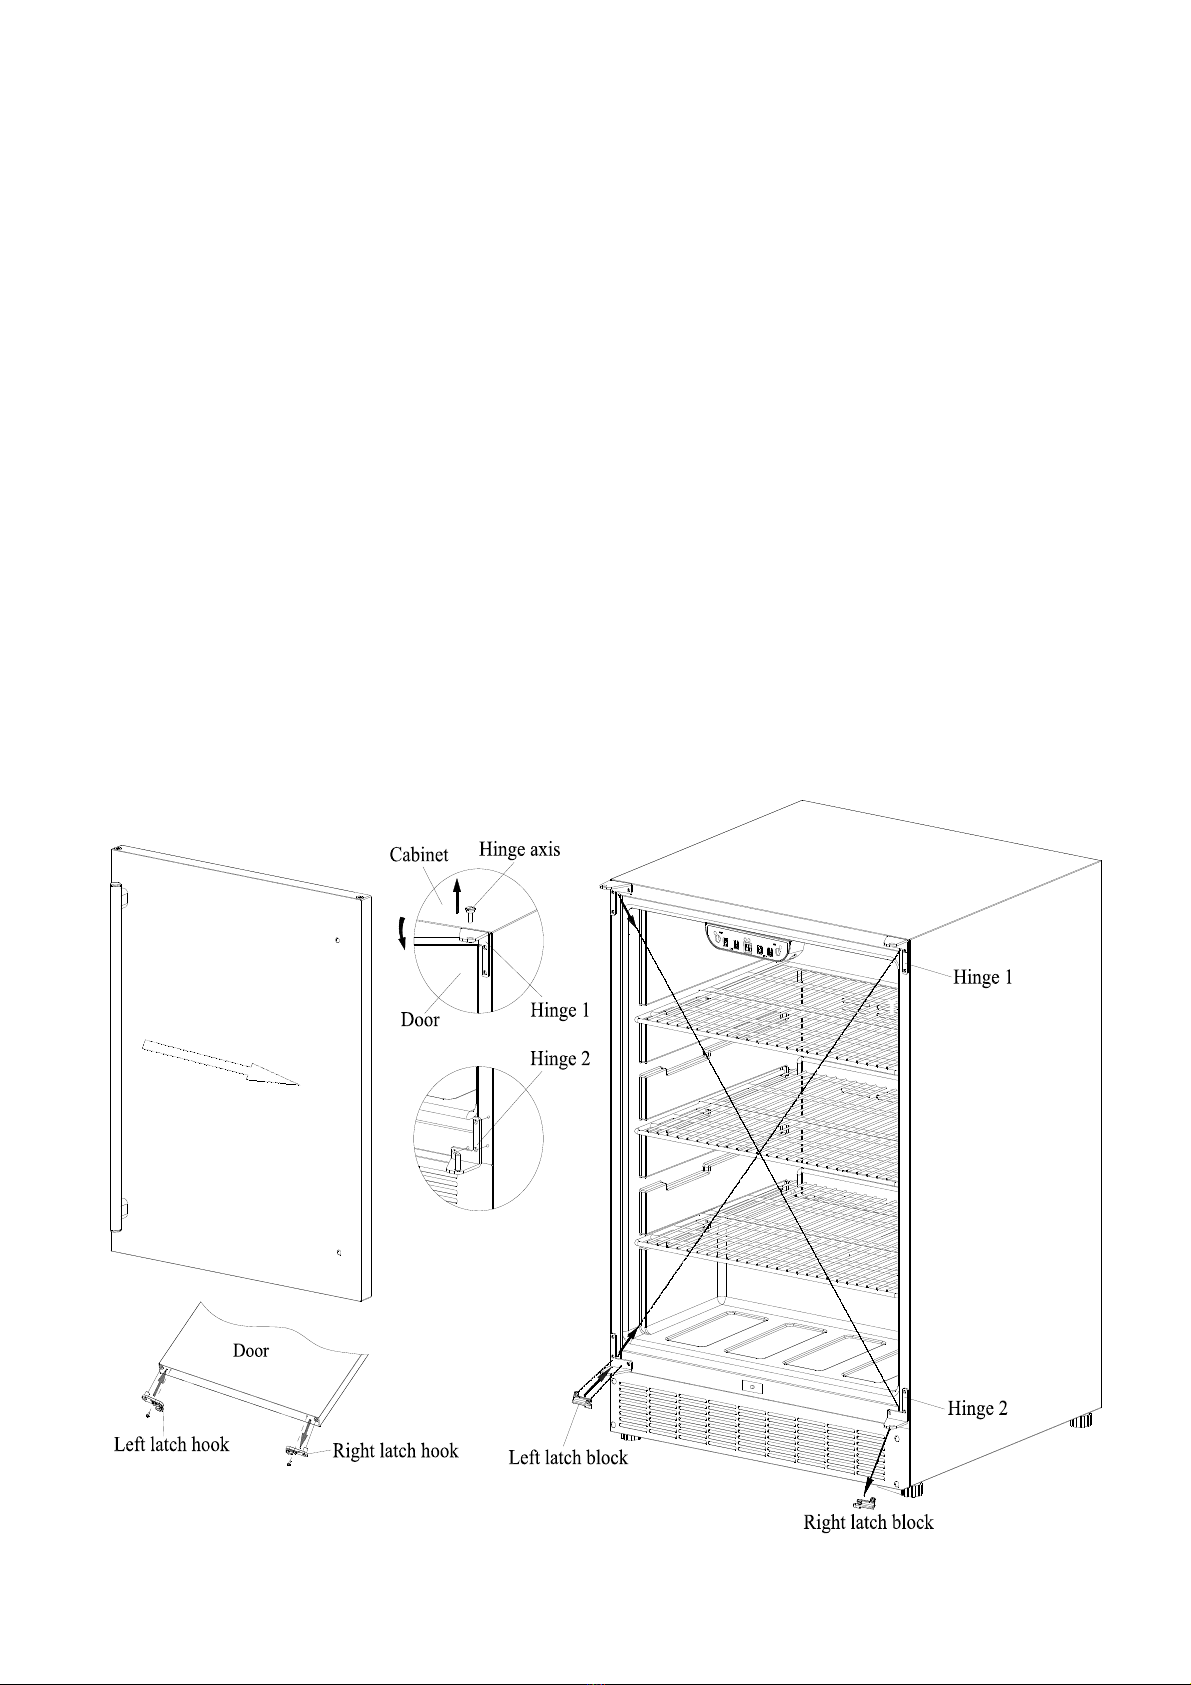
Reversing the Door Swing [ HX-90BR/160BR]
Tools needed: flathead screwdriver, Phillips screwdriver
Important: Before you begin, unplug the ice maker or disconnect power.
To remove the door from hinges:
1. Using a flathead screwdriver, separate the hinge axis from Hinge 1. Set aside.
2. Open the door about 20°around the axis of Bottom Hinge 2, then lift the door off Bottom Hinge 2.
9
To replace the door latch
1. Remove the right latch hook located in the right bottom of the door and the sleeve in the Top of the
door.
2. Install the left latch hook ( in the accessory bag ) on the bottom right and insert the sleeve to the
top right. use the cap to cover the open holes. Please keep the right latch hook&block for later use.
To reposition the door handle
1. Remove the two buttons from the front of the door.
2. Pull off the door gusket on the back side of the door and uncrew the two bolts to release the door
handle.
3. Install the door handle on the oppsite side of the door, tighten the two screw firmly.
4. Insert the door gustket to the slot and use two new buttons to cover the previous mounting hole.
To replace the door on hinges:
1. Using a flathead screwdriver, remove the plug buttons from the screw holes opposite the door
hinges, top and bottom. Set aside.
2. Replace the axis on the Hinge 1 and tighten it firmly. Remove Hinge 1 and install it with left latch
block ( in accessory bag ) on the opposite bottom side.
3. Remove Hinge 2 and take down the right latch block, place Hinge 2 on the opposite top side.
Separate the axis from Hinge 2 and set it aside.
4. Install and align the door on Bottom Hinge 1 and replace axis on Hinge 2. Tighten it firmly.
Questo manuale è adatto per i seguenti modelli
2
Indice


