
DèLonghi GHS 261 ST Istruzioni operative

GHS 261 ST
gas hob
Users Operating Instructions
Before operating this hob,
please read these instructions carefully
GB

2
CE Declaration of conformity
✓
This hob is intended to come into contact with food products and conforms with
European Directive 89/109/EEC.
✓
This hob (Class 3) has been designed for use only as a cooking appliance. Any other
use (e.g. heating rooms) should be considered incorrect and therefore dangerous.
✓
This hob has been designed, constructed and put on to the market in conformity
with
✓
Safety requirements of the "Gas" Directive 90/396/EEC;
✓
Safety requirements of the "Low Voltage" Directive 73/23/EEC;
✓
Protection requirements of the "EMC" Directive 89/336/EEC;
✓
Requirements of Directive 93/68/EEC.
These instructions are only valid for those countries whose identification
symbol appears on the cover of the instruction booklet and on the appli-
ance.
Dear Customer
Thank you for choosing one of our appliances which has been carefully designed and
built by our specialist staff and thoroughly tested to satisfy your cooking requirement.
We suggest that you read this Instruction Booklet so that you will understand fully how
to operate the appliances.
Please keep the booklet handy. You may wish to refer to it at a later date.
De Longhi

WARNINGS FOR THE USE OF ELECTRICAL APPLIANCES
When using any electrical appliance some important rules must always be followed.
In particular:
✓
do not touch the appliance with wet or damp hands or feet
✓
do not use the appliance with bare feet
✓
this appliance should only be used by responsible adults.
3
IMPORTANT WARNINGS AND TIPS
✓
When unpacking the appliance make sure that it is not damaged. If you have any
doubts, do not use the appliance but consult your supplier or an engineer.
✓
The packing materials (plastic bags, expanded polystyrene, nails, bands etc.) must
not be left within easy reach of children, as these may result in serious injury.
✓
The packaging material is recyclable and is marked with the recycling symbol .
✓
Do not try to alter the technical properties of the appliance, because this could be
dangerous.
✓
The manufacturer cannot be considered responsible for damage caused by
improper, incorrect or irresponsible use of the appliance.
✓
Before disposing of any unwanted appliances it is recommended that all potentially
hazardous parts be made harmless.
✓
The appliance should be installed and all the gas/electrical connections made by a
qualified engineer in compliance with local regulations in force and following the
manufacturer's instructions.
TIPS FOR THE USER
✓
During and immediately after use some parts of the hob can reach very high
temperatures. Do not touch them.
✓
Keep children away when the hob is in use.
✓
After using the hob make sure that all of the knobs are turned off. Turn off the
main tap of the gas supply pipe or the cylinder tap if appropriate.
✓
When you are not using the hob it is a good idea to turn off the gas supply
tap.
✓
Regular lubrication of the gas taps must only be performed by qualified
engineers. If the gas taps are not working properly call the After-Sales Service.
This appliance is class 3
NOTE:
✓The electric ignition is incorporated in the knobs
3
8
765
2
1
4
COOKING POINTS
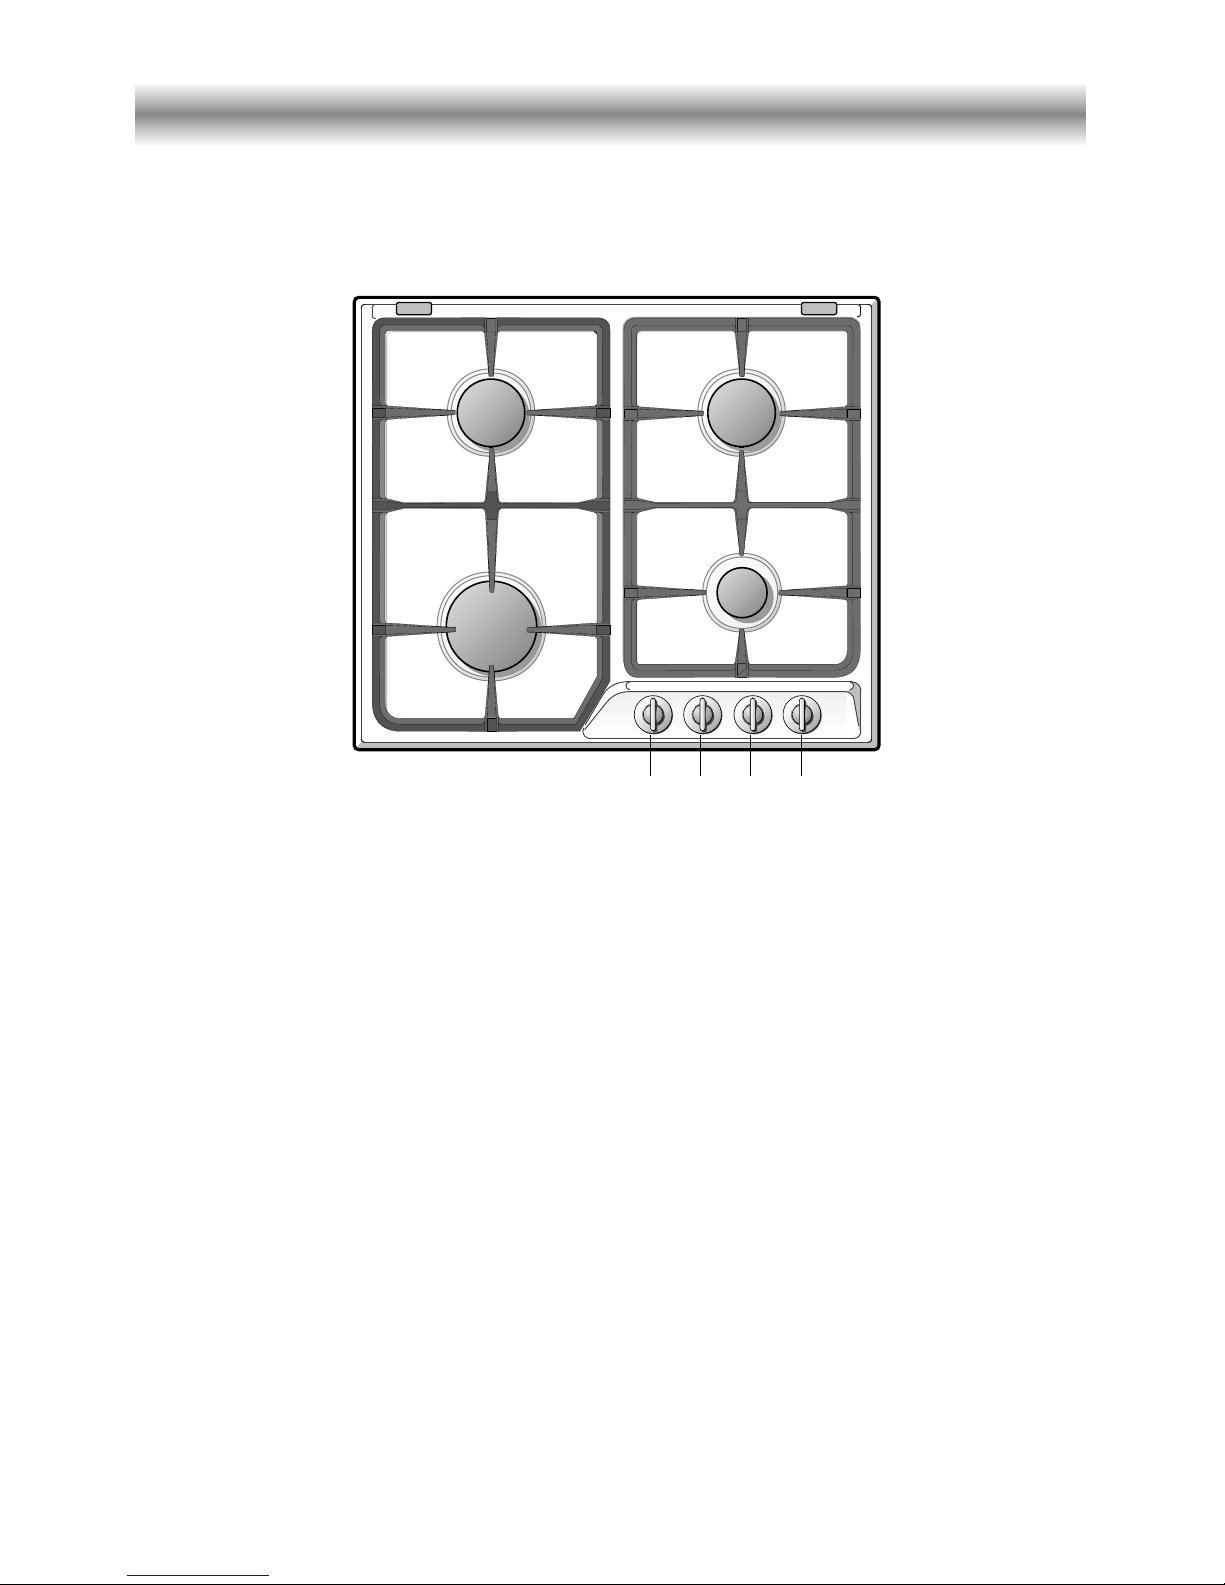
1. Auxiliary burner (A) - 1,00 kW
2. Right medium-speed burner (SR) - 1,75 kW
3. Left medium-speed burner (SR) - 1,75 kW
4. Rapid burner (R) - 3,00 kW
CONTROL PANEL
5. Rapid burner control knob (4)
6. Left medium-speed burner control knob (3)
7. Right medium-speed burner control knob (2)
8. Auxiliary burner control knob (1)
Figure 1
4
How to use your gas hob
GAS BURNERS
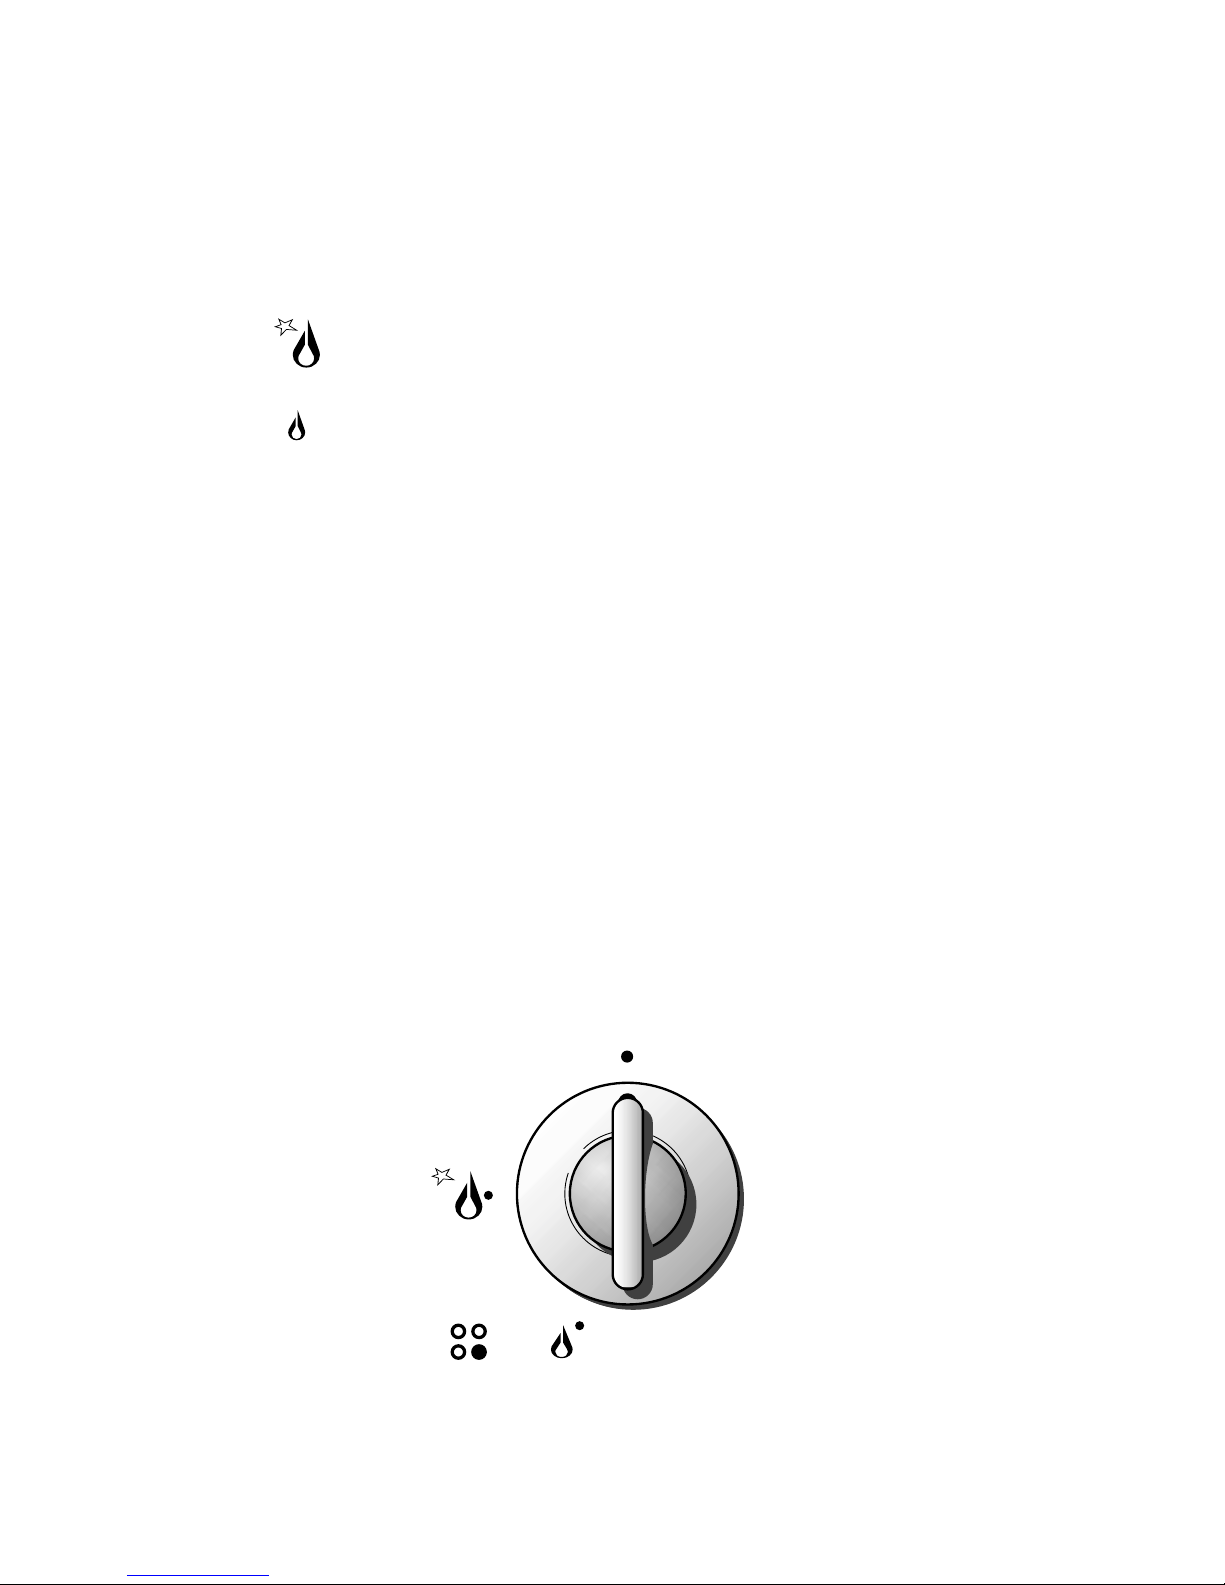
Gas flow to the burners is adjusted by turning the knob illustrated in fig. 2 which con-
trols the safety valves.
Turning the knob so that the indicator line points to the symbols printed on the panel
achieves the following functions:
✓
full circle ●= closed valve
✓
symbol = maximum aperture or flow
✓
symbol = minimum aperture or flow
The maximum aperture position permits rapid boiling of liquids, whereas the minimum
aperture position allows slower warming of food or maintaining boiling conditions of liquids.
To reduce the gas flow to minimum, rotate the knob further anti-clockwise to point
the indicator towards the small flame symbol.
Other intermediate operating adjustments can be achieved by positioning the indicator
between the maximum and minimum aperture positions, not between the maximum
aperture and closed positions.
To switch off, turn the knob clockwise to the off position.
Note: If you are using a burner at the minimum setting, you turn the knob clockwise
past the maximum setting before reaching the off position.
Figure 2
5

6
LIGHTING OF BURNERS
To ignite the burners follow these instructions:
– Lightly press the knob (fig. 3) in an anti-clockwise direction up to the maximum
aperture (symbol ); press the knob right down to prime the electric ignition
until the burner lights.
In case of power cut manually light the burner.
– Adjust the burner according to the power required.
If the burner fails to ignite repeat the ignition with the knob on “minimum” position.
Figure 3
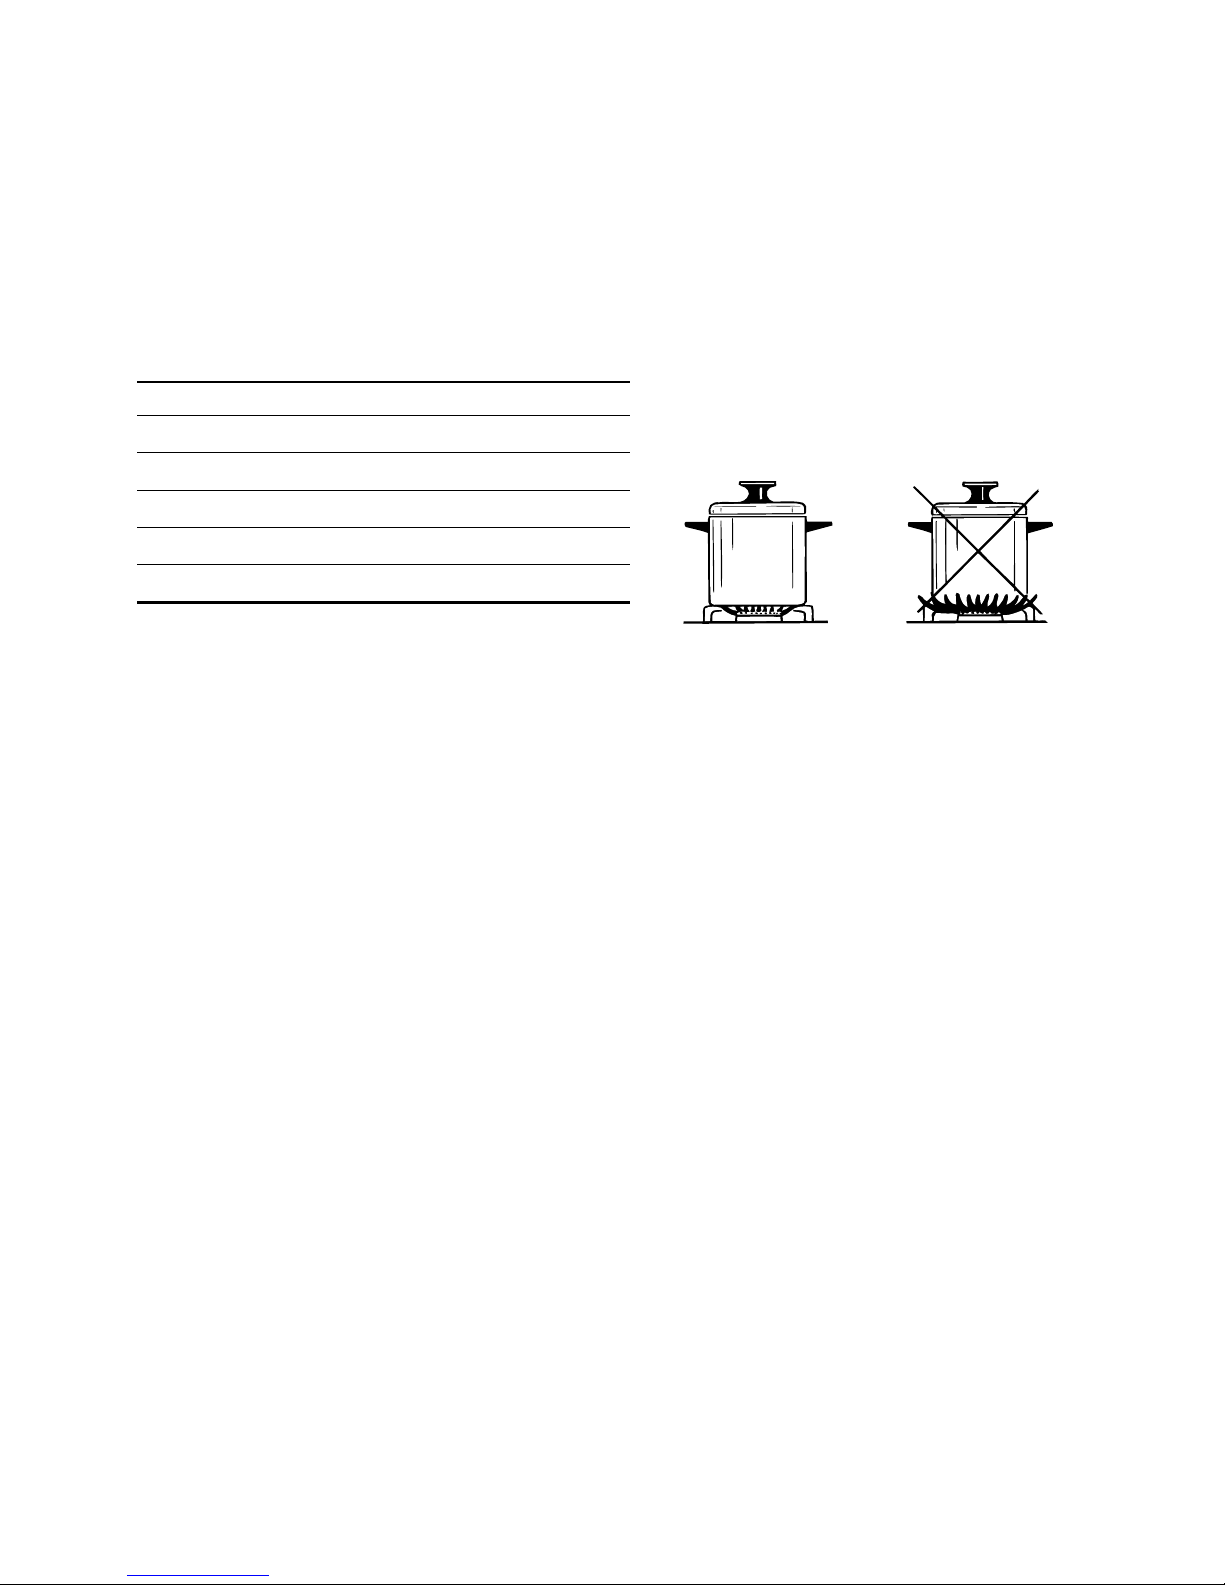
PAN DIAMETER
BURNER MINIMUM MAX.
Auxiliary 6 cm 14 cm
Medium-speed 16 cm 20 cm
Rapid 20 cm 24 cm
do not use pans with concave or convex bases
CHOICE OF BURNER
The burner must be choosen according to the diameter of the pans and energy required.
Attention: During use the hob becomes very hot under the cooking zones.
Keep children away.
Figure 4
Saucepans with handles which are excessively heavy, in relationship to the weight of the
pan, are safer as they are less likely to tip.
Pans which are positioned centrally on burners are more stable than those which are
offset.
It is far safer to position the pan handles in such a way that they cannot be accidentally
knocked.
When deep fat frying fill the pan only one third full of oil.
DO NOT cover the pan with a lid and DO NOT leave the pan unattended.
In the unfortunate event of a fire, leave the pan where it is and turn off all controls.
Place a damp cloth or correct fitting lid over the pan to smother the flames.
DO NOT use water on the fire.
Leave the pan to cool for at least 30 minutes.
7

8
GENERAL TIPS
✓Before cleaning the hob switch it off and wait for it to cool down.
✓Clean with a cloth, hot water and soap or liquid detergent.
✓Do not use products which are abrasive, corrosive or chlorine based.
✓Do not use steel pads.
✓Do not leave acid or alkaline substances (vinegar, salt, lemon juice, etc.) on the hob.
ENAMELLED PARTS
✓All the enamelled parts must be washed only with a sponge with soapy water or
other non-abrasive products.
✓Dry carefully.
STAINLESS STEEL HOB
✓Clean with special products which are available on the market.
✓Dry preferably with chamois leather.
✓Note: regular use will cause discolouring around the burners, because of the high
flame temperature.
BURNERS AND GRIDS
✓These pieces can be removed and washed with suitable products.
✓After cleaning burners and spreaders dry them well and replace them correctly.
✓In appliances with electric ignition keep the electrode clean so that the sparks
always strike.
✓Note: To avoid damage to the electric ignition do not use it when the burners
are not in place.
CONTROL KNOBS
✓The control knobs may be removed for cleaning but care should be taken not to
damage the seal.
GAS TAPS
✓Regular lubrication of the gas taps must only be performed by qualified engineers.
✓If the gas taps are not working properly call the After-Sales Service 0870 5425425.
Cleaning and Maintenance

9
CORRECT POSITIONING OF THE BURNERS
It is very important to check that spreader F and cap C of the burner (see Figures 5
and 6) are perfectly in place because if they move out of place serious problems could
arise.
Make sure that electrode "S" (Fig. 5) is kept clean so that the sparks always strike.
Figure 5 Figure 6
S
F
C
10
Important notes
Installation, and any demonstration, information or adjustments are not included in
the warranty and, if requested, the customer must pay the after-sale service
according to the standard fees.
BEFORE CALLING FOR ASSISTANCE
If any burner does not light, check the ignition is working, if not check the 3 amp
fuse, make sure gas is turned on make sure burner caps are in Position correctly.
After Sales Service
Should you require to book a service call telephone 0870 5425425.
For product information and advise telephone 0113 2793520
Attention
The appliance gets very hot, mainly around the cooking areas. It is very
important that children are not left alone in the kitchen when you are
cooking.
Indice
Altri manuali DèLonghi Piano cottura


