Daewoo DMF-4010S Manuale utente

Mist Fan
DMF-4010S
Instrucon Manual
GB

2
General Safety Instrucons
The following regulaons must be obeyed to prevent the dangers
to yourself or others.
1. Wet hands cannot be used to contact power plugs. In order to
avoid risk of electrical shock
2. When to start the fan, do not tough the film in the tank, or else
you will feel painful or be in danger.
3. When the tank is dry, the water levels switch automacally cut
to protect. To connue, just pour in some water.
4. Protect against debris falling into the grill and mouth of fan to
avoid damage to fan while working
5. If the body is lted for cleaning or other purposes, first cut off
the power supply.
6. 40 °C or above temperature water should not be used into
water tank.
7. Do not put any metals, chemicals or others should not be put
into water bole holder to avoiding abnormal atomizaon and
danger.
8. Please replace the mosquito mat when switch it off 5 minutes
later to make it cool.
9. The inflammable should not be put on the surface of mosquito
repellent.
10.For infants the elderly or infirm, do not stay directly to the mist
fan for a long me when it works.
11.The mist fan should work under the condion of rated power.
12.If the power line damages, must use components from the
manufacturer or maintenance department to replace.
13.The mist fan should be put more than 30cm away from wall
and far away from curtain and cloth.
14.Mist fan should not be used when on the incline ground.
15.Finger or others should not be put into air outlet or inlet to
avoid machine broken easily.

3
16.Do not lean mist fan or turn over or will let the water spilt out.
17.Pull out power line if not use mist fan.
18.Do not let children play with ice box.
19.Do not let Children, disabilies and common sense absence
man to use this product unless under the guidance of
professionals.
Technical Parameter
Product Name Mist stand fan Model Daewoo
DMF-4010S
(TSP40-EA)
Rated power 220 -240V~ Rated frequency 50Hz
Consumpon power 90 W Water tank
capacity
3.1L
Installaon diagram
1. decoraon ring
2. front guard
3. blade lock
4. leaf
5. guard lock
6. rear guard
7. guard circle
8. motor shell
9. motor
10. connector
11. stanchion pole
12. connecon terminal
13. handle screw 18. base
14. control panel 19. castor
15. body forward shell 20. base lock
16. water tank 21. mist pole
17. body rear shell 22. remote control

4
According to above installaon diagram, please follow the installaon:
First check every part is ready before installaon.
Step1: First install the five castors (19) on the base (18).
Step2: Install the body (15) into the base (18), then use the base lock (20) to screw
on the base ghtly.
Step3: Put stanchion pole (11) into fan body (15), and fix connecon terminal (12),
then fasten by handle screw (13).
Step4: Install the rear guard (6) onto the motor sha (8) then use guard lock (5) to
fasten.
Step5: Install the fan leaf (4) onto the motor sha, then screw it.
Step6: Install decoraon ring (1) on the front guard (2) and screw.
Step7: Put the front guard (2) and rear guard (6) together, and use screw to fasten
decoraon ring.
Step8: Pull the mist pole through into decoraon ring (1). Installaon is complete.
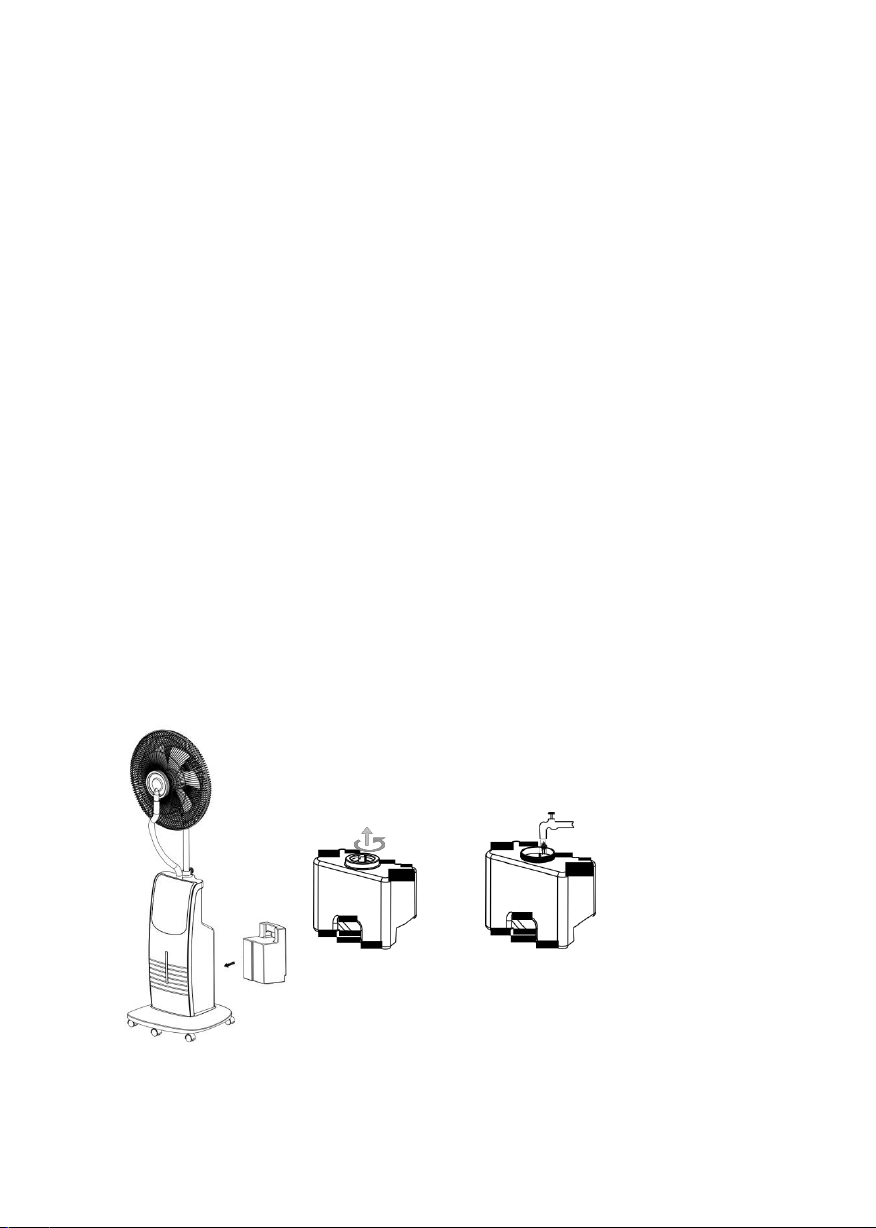
Humidifier
Push the water tank upward, remove tank, unscrew the cap and fill with water to a
suitable level, the temperature of water should not above 40°C, screw the cap and dry
the tank surface.

5
Product instrucon
Insert the power cord into plug socket with rated power 220-240V~ 50Hz before use
Control Panel Remote control
1. Insert the power cord into plug socket, and hear “beep” sound aer power is
connected work as shown above, use remote control point to receive window and
push any buon, various funcons work accordingly.
2. ON/OFFBuon
First me push ON/OFF buon, the indicator light is on and push it again, the
speed is in the low Level.
3. SPEEDBuon: This buon can control fan speed by low/Mid/High.
4. TIMER Buon: first push, the environment temperature shows 01H then goes
to 12H in turn, then mer stops working aer push it again. When mer works,
room temperature displays.
5. ION Buon: Push this buon, light of Ion funcon is on, push it again ION funcon
off.
6. Mode buon: first push the buon, nature mode light is on. Push again, light of
sleep mode Is on, push it third mes, normal mode works.
7. Mosquito Buon: push the buon, red light of mosquito repellent on. Press again
light off.
8. 0SC Buon: Push the buon, light of OSC on. Press again light off.
9. MIST Buon: Push the buon at first me, light of humidifier on, push again,
medium light on, large light on then light off and so on (indicator light of body shell
is blue when is normal, when lack of water light is red.)
10. Aer power on, first push ON/OFFthen MISTbuon, it works same as point 9.

6
11. Aer power on, first press ON/OFF then Mosquito buon, it works same as point
10.
12. Aer power on, first press ON/OFFthen ION buon, it works same as point 5.
Ice box
First, take out ice box from the refrigerator aer freezing.
And put it on water holder to make temperature lower. It can be reused.
The aroma tray
Take aroma case out firstly then put several drops aroma liquid, the aroma will
evaporate slowly and be full of room when the mist fan works. The ideal space of aroma
is about 12 square meters with well venlated room.
Cleaning and Maintenance
Cut off power before cleaning
Clean
When cleaning, if there is dirty things inside use a detergent to clean and put 2~3 drop
machine oil into motor bearing
Please use so cloth to dry the body part and base.
Water bole holder cleaning
First cut power off, take out water tank then pull mist tube appropriately. Clean it if it’s
dirty. Use clean water to wash mist control box.
Pour out the rest water from water bole holder and use so cloth
to make it dry. Note that no scraping on atomizer film.

7
Troubleshoong
Fault Reason Approach
1.no rotaon
power on
1.motor no working
2.too low voltage
3.motor sha gets stuck
4.circuit board broken
1.push on high wind
2.turn to rated power
3.Strike motor shell to
make spindle smoothly or
repair it.
4.repair it(the same model
circuit board))
2.Apparent
vibraon
1.Rear guard loosens
2.Blade screw loosens
3.blade broken or imbalance
4.blade imbalance
1.Lock net hoop ghtly
2.screw fan blade ghtly
3.replace fan blade
4.turn over fan blade180º
then install
3.Atomizer
working,
no mist
1.Water tank includes other
liquid(like aroma and
mosquito repellent)
2.water tank broken and full
of water
1.Clean water tank, mist
tank several mes.
2.put clean water in water
tank.
4.Atomizer no
working
1.The floater 1.Make floater float
5.Indicator light
off, no wind no
mist
1.Power plugs in not well
2.Power switch is off
1.Plug in well
2.switch it on
6.Indicator light
on, wind no mist.
1.water tank lacking water
2.Humidifier no working
1.put water in water tank
2.switch humidifier on
3.make floater pressure
plate ghtly

8
7.mist with odors 1.Odors will disappear aer
use for a period of me.
2.The water tank interior part
is no clean.
1.Open water tank cap in a
cool venlated place
2.change the water in
water tank
8.other problems 1.Motor with burning smell
2.Exposed Metal part charged
insulaon damage
3.Motor rear shell
overheang
4.Motor rear shell and net
hoop broken
1.Stop using and repair
2.Stop using and repair
3.Use it again aer stop
using temporarily
4.use it aer repairing
Correct Disposal of this product
This marking indicates that this product should not be disposed
with other household wastes throughout the EU. To prevent
possible harm to the environment or human health from
uncontrolled waste disposal, recycle it responsibly to promote the
sustainable reuse of material resources. To return your used
device, please use the return and collecon systems or contact the
retailer where the product was purchased. They can take this
product for environmental safe recycling.

9
Venlateur brumisateur
DMF-4010S
Mode d'emploi
FR

10
Instrucons générales de sécurité
Les consignes suivantes doivent être respectées pour garanr la
sécurité des autres et de vous-même.
1. Ne pas manipuler les prises électriques avec les mains
mouillées, pour éviter les risques d’électrocuon.
2. Lorsque vous démarrez le venlateur, ne touchez pas le film
dans le réservoir, car cela peut être douloureux et dangereux.
3. Le réservoir est équipé d’un interrupteur de sécurité qui se
déclenche lorsque le niveau d’eau est trop bas. Pour connuer
à uliser la machine, remplissez le réservoir d’eau.
4. Évitez que des débris ne tombent dans la grille et dans les
pales du venlateur, pour éviter que ce dernier ne subisse des
dommages.
5. Si le venlateur tombe, débranchez-le avant de le remere
d’aplomb pour le neoyer ou d’autres tâches de maintenance.
6. Ne pas uliser d’eau dont la température dépasse 40 °C dans le
réservoir d’eau.
7. Ne pas mere d’objet métallique, de produits chimiques ou
autres dans le réservoir d’eau pour éviter les problèmes
d’atomisaon, et autres dangers.
8. Aendez cinq minutes avant de remplacer la mousquaire,
pour lui laisser le temps de refroidir.
9. Ne pas uliser de produit an-mousque inflammable.
10.Éviter que les bébés, les personnes âgées ou les personnes
handicapées ne soient exposées à la brume pendant des
périodes prolongées.
11.Veillez à brancher le venlateur brumisateur sur une prise
murale délivrant le type de courant correct.
12.Si le cordon d’alimentaon est endommagé, faites-le
remplacer par le fabricant ou prenez contact avec un
professionnel.
13.Placez le venlateur brumisateur à une distance d’au moins 30
cenmètres des murs, et aussi éloigné que possible des
rideaux ou autres objets de ssu.
Indice
Lingue:
Altri manuali Daewoo Fan

Daewoo
Daewoo COL1568 Manuale utente

Daewoo
Daewoo COL1540 Manuale utente

Daewoo
Daewoo DI-9411 Manuale utente

Daewoo
Daewoo BLADELESS FAN & HEATER Manuale utente

Daewoo
Daewoo YF-40A Manuale utente

Daewoo
Daewoo DCool 3601TR-S Manuale utente

Daewoo
Daewoo Dcool 1203 Manuale utente

Daewoo
Daewoo COL1066 Manuale utente

Daewoo
Daewoo DTF-2936 Manuale utente

Daewoo
Daewoo Dcool 0901 Manuale utente