DVDO PrecisionSDI Manuale utente

BY ANCHOR BAY TECHNOLOGIES
Installation Guide
How to install, set up, and use your module
precision
SDI
Serial Digital Interface
DVDO PrecisionSDI™
Serial Digital Interface Video Input Module for
the iScan™ HD/HD+Video Scaling Engine

Introduction 3
Installation and Set-Up 4
Updating your Software 7
Troubleshooting 13
Appendix - Error Codes 14
Warranty Information 15
TABLE OF CONTENTS
DVDO PrecisionSDI™ Video Input Module
Installation Guide

3
Thank you for purchasing the DVDO PrecisionSDI™Serial Digital Interface
Video Input Module. Upgrading your iScan™HD/HD+ for SDI digital video
input capability is simple, and this Installation Guide will step you
through the process.
This installation process is in two parts: hardware and software. For the
hardware installation, you will need a few basic tools, including a Phillips-
head screwdriver and a pair of long-nose pliers. For the software installa-
tion, you will need a PC or laptop computer running the Microsoft
Windows operating system, and this computer must also have an RS-232
serial data port on a 9-pin connector.
Should you have any issues or problems during installation, please
contact your Authorized DVDO Reseller for assistance.
You can also contact DVDO directly for help:
Email: Help@DVDO.com
Toll-Free (USA only): 1-866-423-DVDO
INTRODUCTION

4
• SDI Card
• Bulkhead BNC connector with nut and washer
• Stand-offs (qty. 2)
• BNC-to-BNC Cable
• Hole-plug screws (qty. 2)
• RS-232 serial data cable
1Remove the iScan HD/HD+ top cover. To do this,
a. Remove three screws on each side of the unit.
b. Remove two screws on the top of the unit.
c. Remove one screw at the rear
of the unit.
d. Lift the top cover from the rear of
the unit and set it aside.
2Remove the metal plate
that covers the hole for
the SDI BNC connector.
INSTALLATION AND SET-UP
Installing the PrecisionSDI module into your iScan HD/HD+
Contents
Step 1a Step 1b
Step 2
Step 1c
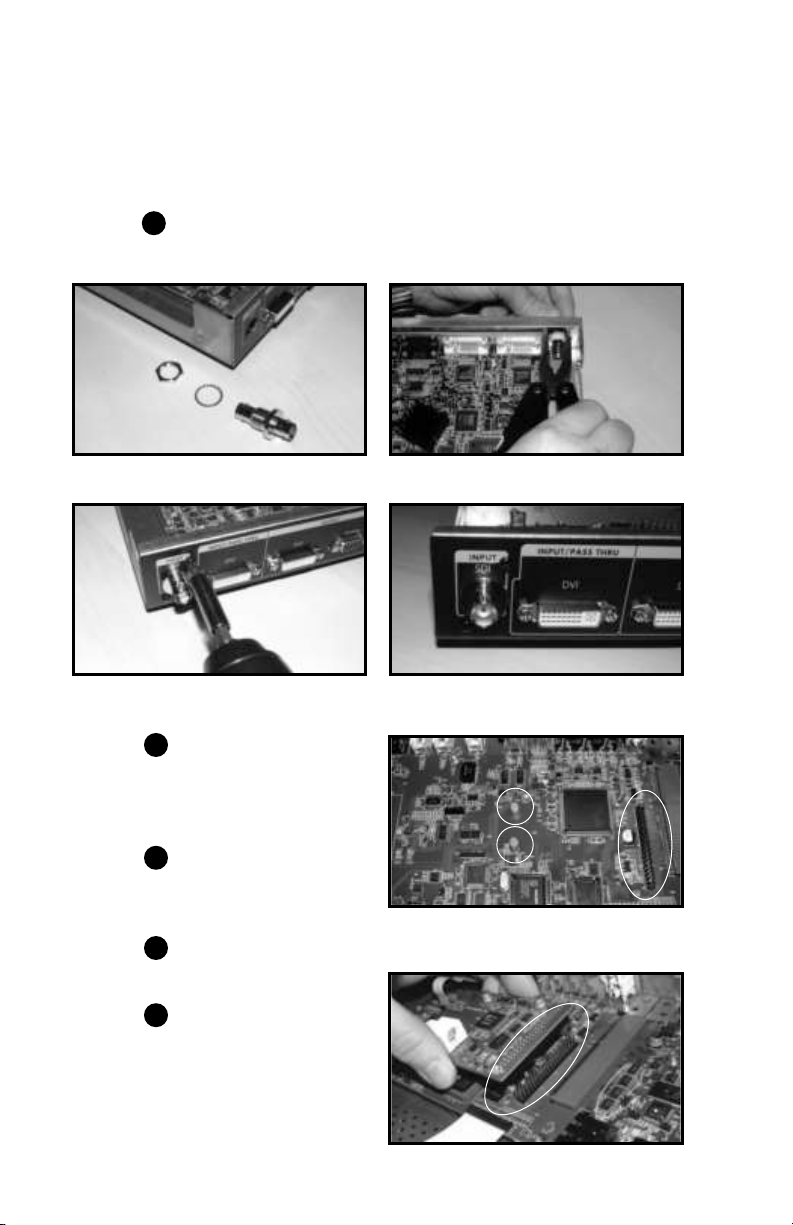
3Mount the bulkhead BNC connector. (a,b) Then plug the two screwholes
left after the plate removal, with round-head screws from the SDI kit.
4Locate the Expansion
Module connector (40 pin
IDC-type header) on the
Video Input board.
5Locate the mounting holes
to the right of the Expan-
sion Module connector.
6Snap the stand-offs into
each mounting hole.
7 Mount the SDI module
onto the Expansion
Module connector. Make
sure that the stand-offs
are lined up exactly with
the two mounting holes
on the SDI module. Steps 7 & 8
Installation and Set-Up (continued)
Steps 4 & 6
Step 3a Step 3b
Step 3c Step 3d
5

6
8 Make sure the 40-pin con-
nector on the SDI card is
aligned with the connector
on the Video Input board.
9Push the module down to
ensure a proper mate
with the stand-offs.
10 Connect one end of the BNC cable to the SDI module BNC connector.
11 Connect the other end of the BNC cable to the
bulkhead BNC connector inside the enclosure.
12 Mount the top cover back onto the unit.
13 Power up the iScan HD and upgrade the software, if required.*
Step 9
Step 11
Step 10
Installation and Set-Up (continued)
* Only iScan HDs with software versions earlier than 3.4-1.09A require
a software update to support the PrecisionSDI Video Input Module.
The iScan HD+is shipped with software that supports the
PrecisionSDI™ Video Input Module. No software update is necessary.

Display
PC
Serial CableiScan HD
VideoSources
PC
Serial CablePower Adaptor
iScan HD
Power Adaptor
7
The iScan HD firmware can be updated using a PC with a serial port.
We recommend a serial port terminal program called Tera Term Pro
(Version 2.3) that we provide on our website.
What’s needed:
• DB9 Male to Female extension (1:1) Serial Cable
• iScan HD with Power Supply
Set up the iScan HD as shown below.
Bring your PC to your iScan HD and
set up as shown here.
• Connect Serial Port cable between PC and iScan HD.
• Turn the PC and iScan HD on.
UPDATING YOUR SOF TWARE
iScan HD Software Update instructions
Hardware setup
If you have NOT already installed your iScan HD into
your home theater system:
If you HAVE already installed your iScan HD into your
home theater system:
for iScan HD only, see note on page 6

8
The CD that comes with your SDI kit includes the Tera Term Pro software
(teraterm_ext) and the .abt file that is needed to update your iScan HD.
You may want to check the www.dvdo.com website for the latest
software release.
1Double click on ‘tera_term.exe’.
2Click ‘Unzip’.
3This action upzips the program to a temporary folder.
4Click ‘OK’. This starts the Tera
Term Pro setup program.
5Select the preferred lan-
guage and click ‘Continue’.
6Click ‘Continue’ unless an
old version of Tera Term
Pro is currently running.
Software Update (continued)
To install Tera Term Pro on your PC

9
7Click ‘Continue’ to install
Tera Term Pro in the
default Program directory.
8Close this window and click ‘OK’ to exit the setup program.
Make sure that no other program is using the serial port that’s connected
to the iScan HD.
1Run Tera Term
Pro from the
Program Menu.
2Select ‘Serial
Port’ from the
Setup menu.
Software Update (continued)
Using Tera Term Pro

10
3Tera Term Pro has been configured to communicate directly with the
iScan HD through the serial port COM1. See below. Select the correct
COM port if the serial cable is not connected to COM1.
4Click ‘OK.’ Now the serial port
setup is completed.
5Tera Term Pro is now ready
to send the new software file
to the iScan HD.
There are two ways to perform software update: using the Front Panel
buttons or using the remote control and On-Screen Display (OSD).
If the iScan HD has not been installed in your home theater system,
just use the Front Panel buttons as described below.
Using the Front Panel buttons
1Press the Configuration button repeatedly until the display shows
“SWUP” (SoftWare UPdate).
2Press the Up or Down arrow buttons until the display shows “YES”.
3Press the Enter/Exit button to confirm the software update.
4The Front Panel Display will show ‘LOAD’.
Using OSD and Remote Control
1Press Menu button.
2Select Configuration -> Software Update -> Yes.
3Confirm by pressing the Enter button.
4The Front Panel Display will show ‘LOAD’.
Software Update (continued)
Setting up the iScan HD for software update
Indice
Manuali Sistema I/O popolari di altre marche

WAGO
WAGO 750-344 Manuale utente

Teknim
Teknim TWM-1887 Manuale di istruzioni

Intelligent Appliance
Intelligent Appliance IA-2662-E Manuale utente

BERGHOF
BERGHOF ECC DIO 16/16 Manuale di istruzioni

Advantech
Advantech PCM-27J3AU Manuale di installazione e funzionamento

Festo
Festo CP-E08-M12-CL Manuale utente


