EBN SPPC70-5B-C1G Manuale utente

User’s Manual
SPPC70-5B-C1G
SPPC70-5B-C15G
SPOS70-5B-C1G
SPOS70-5B-C15G


Copyrights i
Copyrights
©2007 EBN Technology Corp. All rights reserved. The
information in this document is subject to change without
prior notice in order to improve reliability, design and
function and does not represent a commitment on the
part of the manufacturer.
This document contains proprietary information
protected by copyright. All rights are reserved. No
part of this manual may be reproduced by any
mechanical, electronic, or other means in any form
without prior written permission of the manufacturer.
All trademarks are property of their respective
owners
Liability Disclaimer
In no event will the manufacturer be liable for direct,
indirect, special, incidental, or consequential
damages arising out of the use or inability to use the
product or documentation, even if advised of the
possibility of such damages.
Regulatory Information
FCC Notices
This equipment has been tested and found to comply
with the limits for a Class A digital device, pursuant to
Part 15 of the Federal Communications Commission
(FCC) Rules. These limits are designed to provide
reasonable protection against harmful interference in
a residential installation. This equipment generates,
uses, and can radiate radio frequency energy and, if
not installed and used in accordance with the
instructions, may cause harmful interference to radio
communications. However, there is no guarantee
that interference will not occur in a particular
installation. If this equipment does cause harmful
interference to radio or television reception, which
can be determined by turning the equipment off and
on, the user is encouraged to try to correct the
interference by one or more of the following
measures:
• Increase the separation between the equipment
and the receiver.
• Connect the equipment into an outlet on a circuit
different from that to which the receiver is connected.
• Consult the dealer or an experienced radio or
television technician for help.
This device complies with Part 15 (A) of the FCC
Rules. Operation is subject to the following two
conditions:
1) this device may not cause harmful interference
and
2) this device must accept any interference received,
including interference that may cause undesired
operation.
NOTE: THE MANUFACTURER IS NOT
RESPONSIBLE FOR ANY RADIO OR TV
INTERFERENCE CAUSED BY UNAUTHORIZED
MODIFICATIONS TO THIS DEVICE. SUCH
MODIFICATIONS COULD VOID THE USER'S
AUTHORITY TO OPERATE THE DEVICE.
CE Notice
This device complies with EMC Directive
2004/108/EC issued by the Commission of the
European Community.

Contents
ii
WEEE Notice
The WEEE mark applies only to countries within the
European Union (EU) and Norway.
This appliance is labeled in accordance with
European Directive 2002/96/EC concerning waste
electrical and electronic equipment (WEEE). The
Directive determines the framework for the return
and recycling of used appliances as applicable
throughout the European Union. This label is applied
to various products to indicate that the product is not
to be thrown away, but rather reclaimed upon end of
life per this Directive.

Contents iii
Contents
Copyrights.................................................................................................i
Liability Disclaimer ...................................................................................i
Regulatory Information.............................................................................i
FCC Notices.......................................................................................................... i
CE Notice.............................................................................................................. i
WEEE Notice........................................................................................................ ii
Contents...................................................................................................iii
Introduction..............................................................................................1
Unpacking the Box...................................................................................2
Hardware Setup........................................................................................3
3.1. Quick Tour............................................................................................... 3
Front View...................................................................................................... 3
Back Panel I/O............................................................................................... 4
3.2. Battery Pack Installation.............................................................................. 4
3.3. Peripherals Installation................................................................................ 7
Power Adapter ............................................................................................... 7
USB Mouse, USB Keyboard and USB ODD.................................................. 7
LAN Cable...................................................................................................... 8
Cash Drawer.................................................................................................. 8
PS2/COM....................................................................................................... 8
MSR Installation............................................................................................. 9
3.4. Wall mount Kit installation .........................................................................11
3.4. Turn on the Device......................................................................................11
Driver and Utility Installation ................................................................12
4.1. Before the installation................................................................................ 12
4.2. Chipset Software Installation .................................................................... 12
4.3. VGA Driver Installation .............................................................................. 14
4.4. LAN Driver Installation............................................................................... 16
4.5. Audio Driver Installation............................................................................ 17
4.6. Wireless LAN Driver Installation............................................................... 18
Power Management ...............................................................................20
5.1. Enter Power Option Properties Sheet ...................................................... 20
5.2. How to Set Power Options ........................................................................ 21
Power Schemes........................................................................................... 21
Alarms.......................................................................................................... 22
Power Meter................................................................................................. 24
Advanced..................................................................................................... 25
Hibernate ..................................................................................................... 25

Contents
iv
TouchKit Utility Quick Guide.................................................................26
6.1. Launch Touchscreen V7.3.COM................................................................ 26
6.2. User interface............................................................................................. 26
6.3. Serial Port Information .............................................................................. 27
6.4. Virtual Button Settings .............................................................................. 27
Virtual Button Option.................................................................................... 27
Right Button Function .................................................................................. 28
Right Button Automatic Mode....................................................................... 29
6.5. Feedback Sound ........................................................................................ 29
Feedback Sound Option .............................................................................. 29
Tone............................................................................................................. 30
Duration ....................................................................................................... 30
6.6. Screen Calibration ..................................................................................... 30
4 points, mode 1 .......................................................................................... 31
4 points, mode 2 .......................................................................................... 31
How to Use Event Selector.......................................................................... 32
I/O Definition...........................................................................................33
7.1. Power Connector ....................................................................................... 33
7.2. Serial Port................................................................................................... 33
7.3. PS2/COM..................................................................................................... 34
7.4. Cash Drawer............................................................................................... 34
Specification...........................................................................................36

Chapter 1 1
1.
Introduction
Features:
Intel® low power consumption and high performance technology
Durable ultra-slim & robust die-casting aluminum chassis
Smart Battery Backup - supply voltage more than one hour without any
external power supply
4 x USB 2.0,1 x RS-485/422/232, 3 x RS-232, Gigabit Ethernet port (RJ-45),
cash drawer port (RJ-11) and 1 X parallel port equipped
Video Module (Optional)
Wireless LAN supported
Microsoft Windows series operation system (Windows XP Home Edition,
Windows XP Professional Edition and WEPOS) and open-source Linux
operation system supported.

Chapter 3 2
2.
Unpacking the Box
Verify that the box contains the following items.
1 Device X 1
2 Power Adaptor X 1
3 Power Cord X 1
4 Driver and utility CD X 1
5 Wall mount Kit x 1

Chapter 3 3
3.
Hardware Setup
3.1. Quick Tour
Front View
LED Indicator
The Power indicator will glow green when power is on.
The HDD indicator will blink green when the HDD is accessed.
The LAN indicator will blink green when transferring data though the LAN.

Chapter 3
4
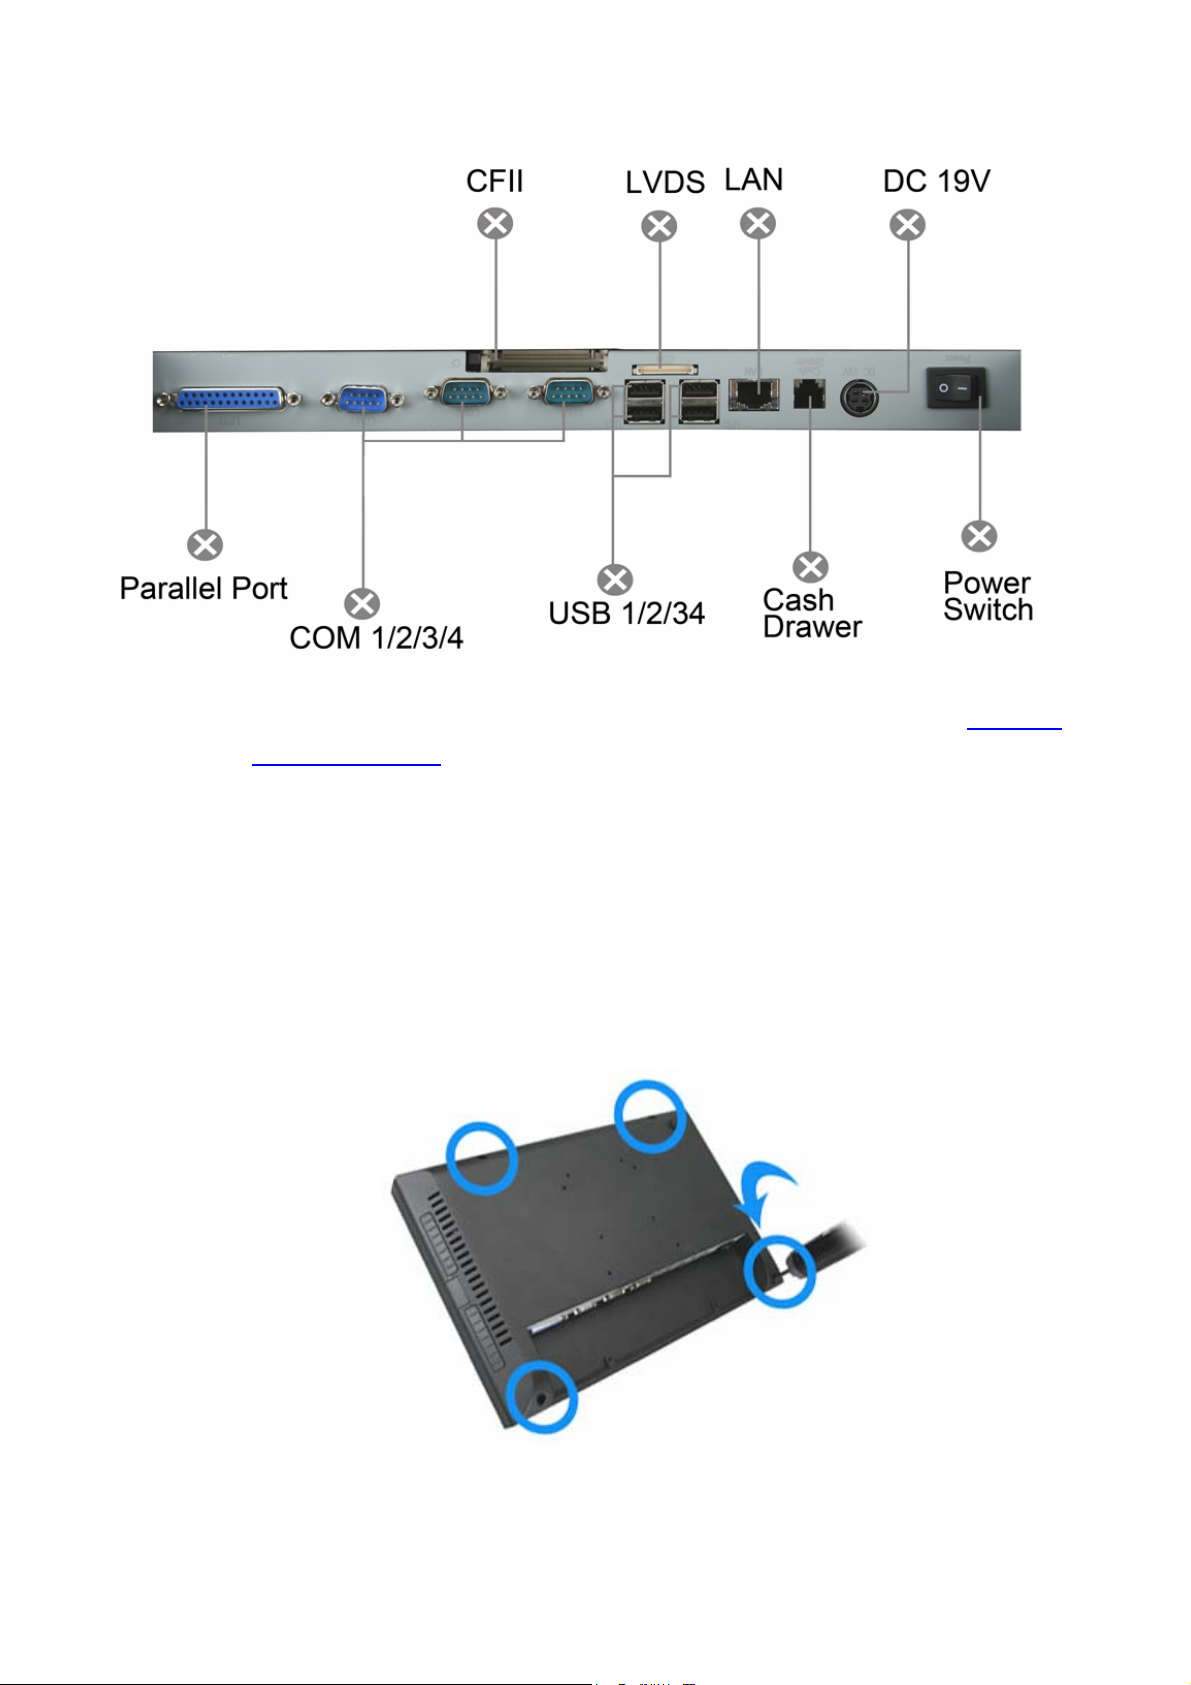
Back Panel I/O
Note: For details of I/O ports on the back panel, please refer to Chapter
7 – I/O Definition.
3.2. Battery Pack Installation
Before power-on the device, please install the battery (optional accessory) to the
mainboard:
1. Un-tighten four screws on the back panel anticlockwise.
Questo manuale è adatto per i seguenti modelli
3
Indice
Altri manuali EBN Terminale touch

EBN
EBN EZPPC70-2B-C1G Manuale utente

EBN
EBN X-POS956 Manuale utente

EBN
EBN XPOS72-5B-A16G Manuale utente

EBN
EBN Solid POS 70 Series Manuale utente

EBN
EBN DNPOS70P-5BTH-N3700 Manuale utente

EBN
EBN POS-7012EG-370 Manuale utente

EBN
EBN POS60-8B-C1G Manuale utente

EBN
EBN BPC65-B-A16G Manuale utente

EBN
EBN POS50A-5B-LX800 Manuale utente

EBN
EBN X-POS 850 Manuale utente