Ecoer EST01 Manuale utente
EST Install and User Guide
07 2022
0 of 29 ECOER INC.
Manufacturer reserves the right to change specifications or designs without notice.
Appearance of the product may vary.
EST01 Wi-Fi
Programmable Thermostat
Install and User Guide
1. Introduction--------------------------------------
2. Install your Thermostat-------------------------
3. Setup-----------------------------------------------
3.1 Time setting--------------------------------------
3.2 Working mode----------------------------------
3.3 Setup Wi-Fi----------------------------------------
3.4 Schedule set-------------------------------------
3.5 User setup-----------------------------------------
3.6 Factory set----------------------------------------
3.7 Clean screen------------------------------
3.8 Reset--------------------------------------------
4. Warranty ---------------------------------------
5. Regulatory info.---------------------------------
3
5
7
7
8
10
13
16
19
28
28
29
29

EST Install and User Guide
07 2022
1 of 29 ECOER INC.
Manufacturer reserves the right to change specifications or designs without notice.

EST Install and User Guide
07 2022
2 of 29 ECOER INC.
Manufacturer reserves the right to change specifications or designs without notice.
Features
•Compatible with most 24V controlled heating, cooling, and
heat pump systems
•Set your temperature remotely from your smart phone
•Wi-Fi connectivity through App
•4.3’’ touch screen LCM display
•Quick connecting terminals to save installer’s time
•Be able to control fan speed of E Series Air Handler for better
dehumidification control
•3-year limited warranty
Caution
ELECTRICAL HAZARD
Can cause electrical shock or equipment damage. Disconnect power before beginning installation.
EQUIPMENT DAMAGE HAZARD
Compressor protection is bypassed for Ecoer condensing units. To prevent equipment damage,
set compressor protection accordingly for other brand condensing units.
MERCURY NOTICE
If this product is replacing a control that contains mercury in a sealed tube, do not place the old
control in the trash. Contact your local waste management authority for instructions regarding
recycling and proper disposal.
REQUIRED: 24 VAC POWER (“C” WIRE)
EST Install and User Guide
07 2022
3 of 29 ECOER INC.
Manufacturer reserves the right to change specifications or designs without notice.
1. Introduction
Power supply AC 24V
Temp. Setting range 50°F to 90°F
Display Tempered touch sensitive screen
Dimensions (W x H x D) 4in. x 4in. x 0.79in.
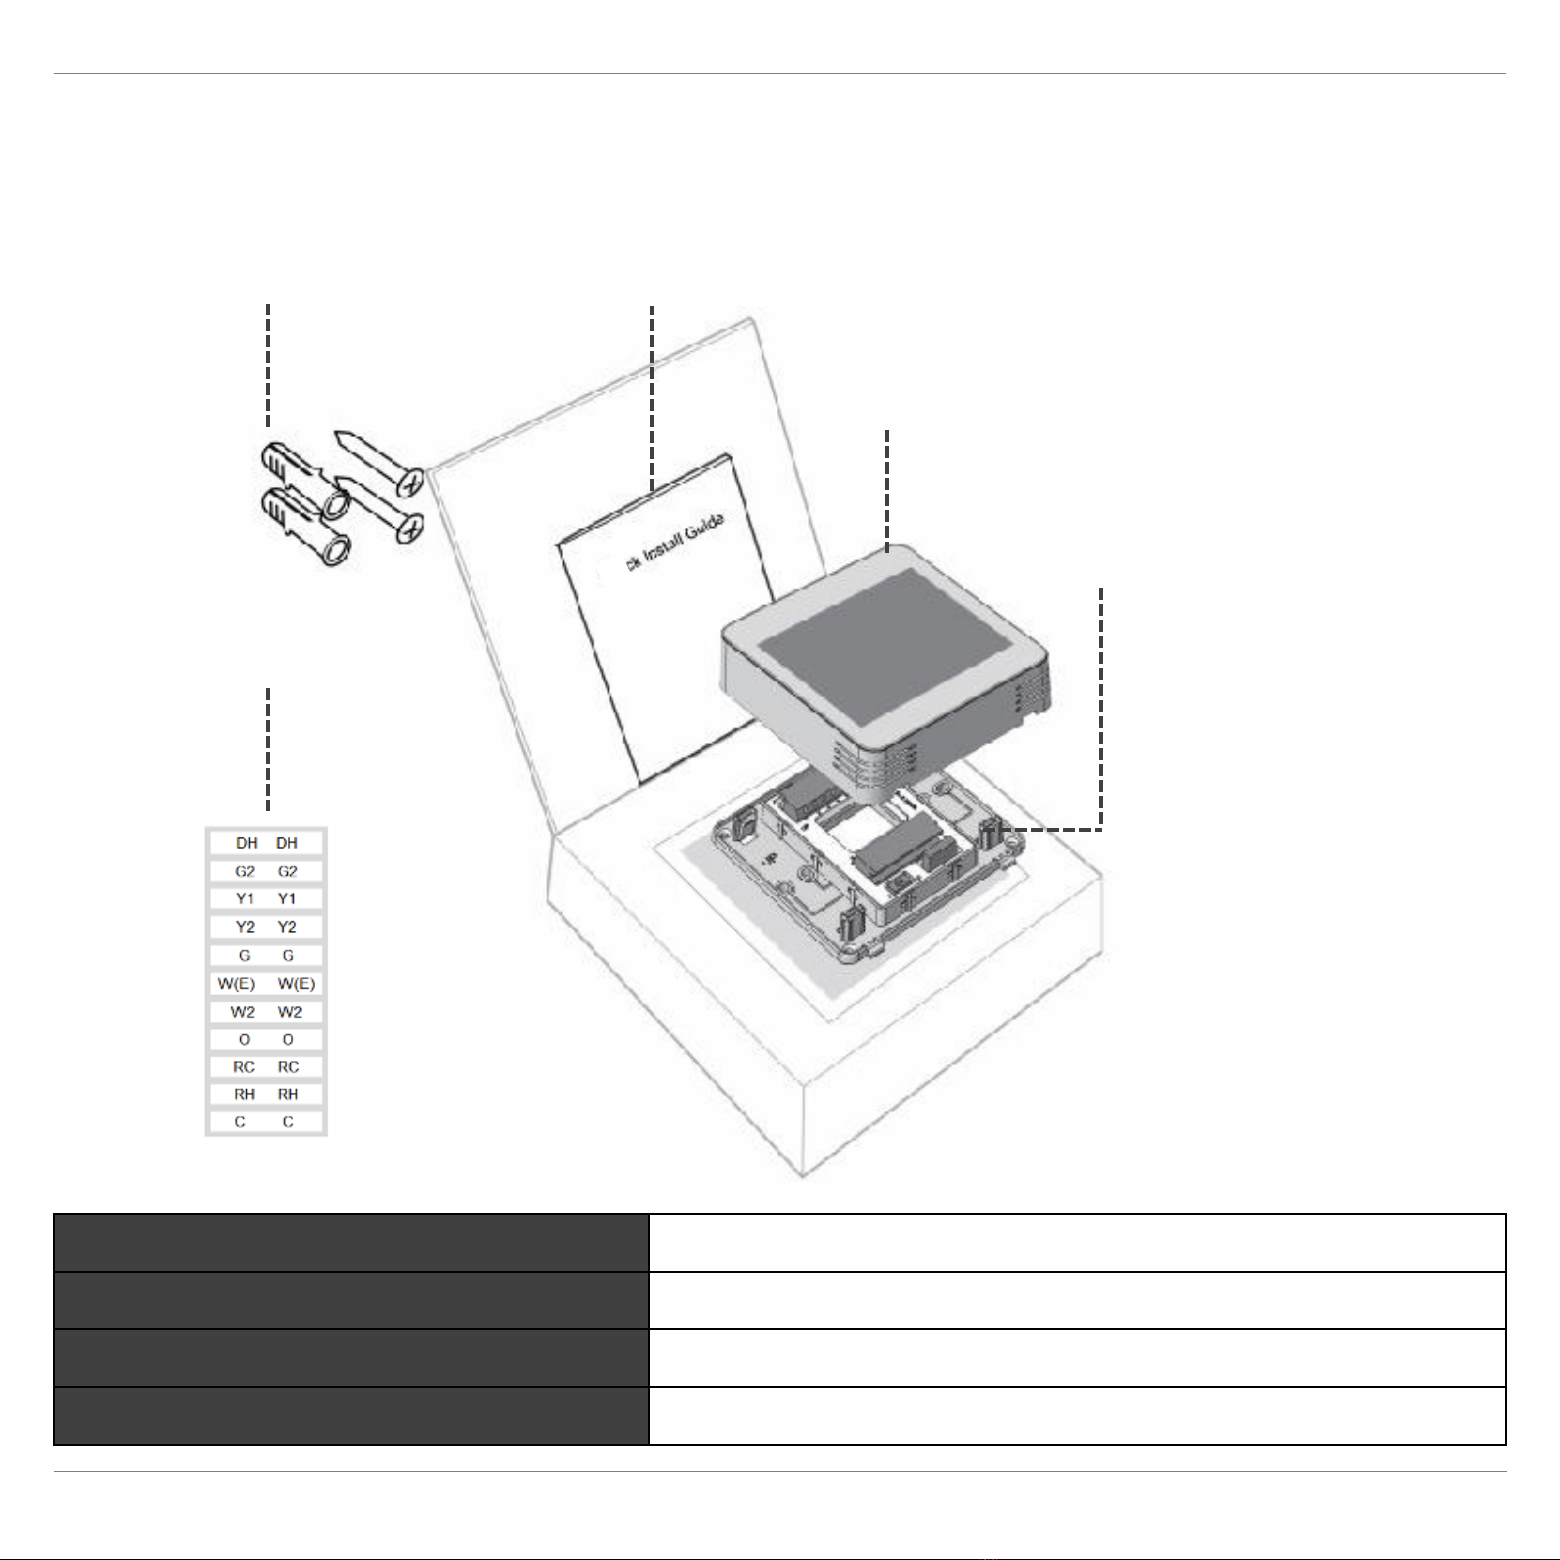
Parts in the packaging box
Screws and anchors Install and User Guide
EST01 Wi-Fi Thermostat
Mounting System
Stickers
EST Install and User Guide
07 2022
4 of 29 ECOER INC.
Manufacturer reserves the right to change specifications or designs without notice.
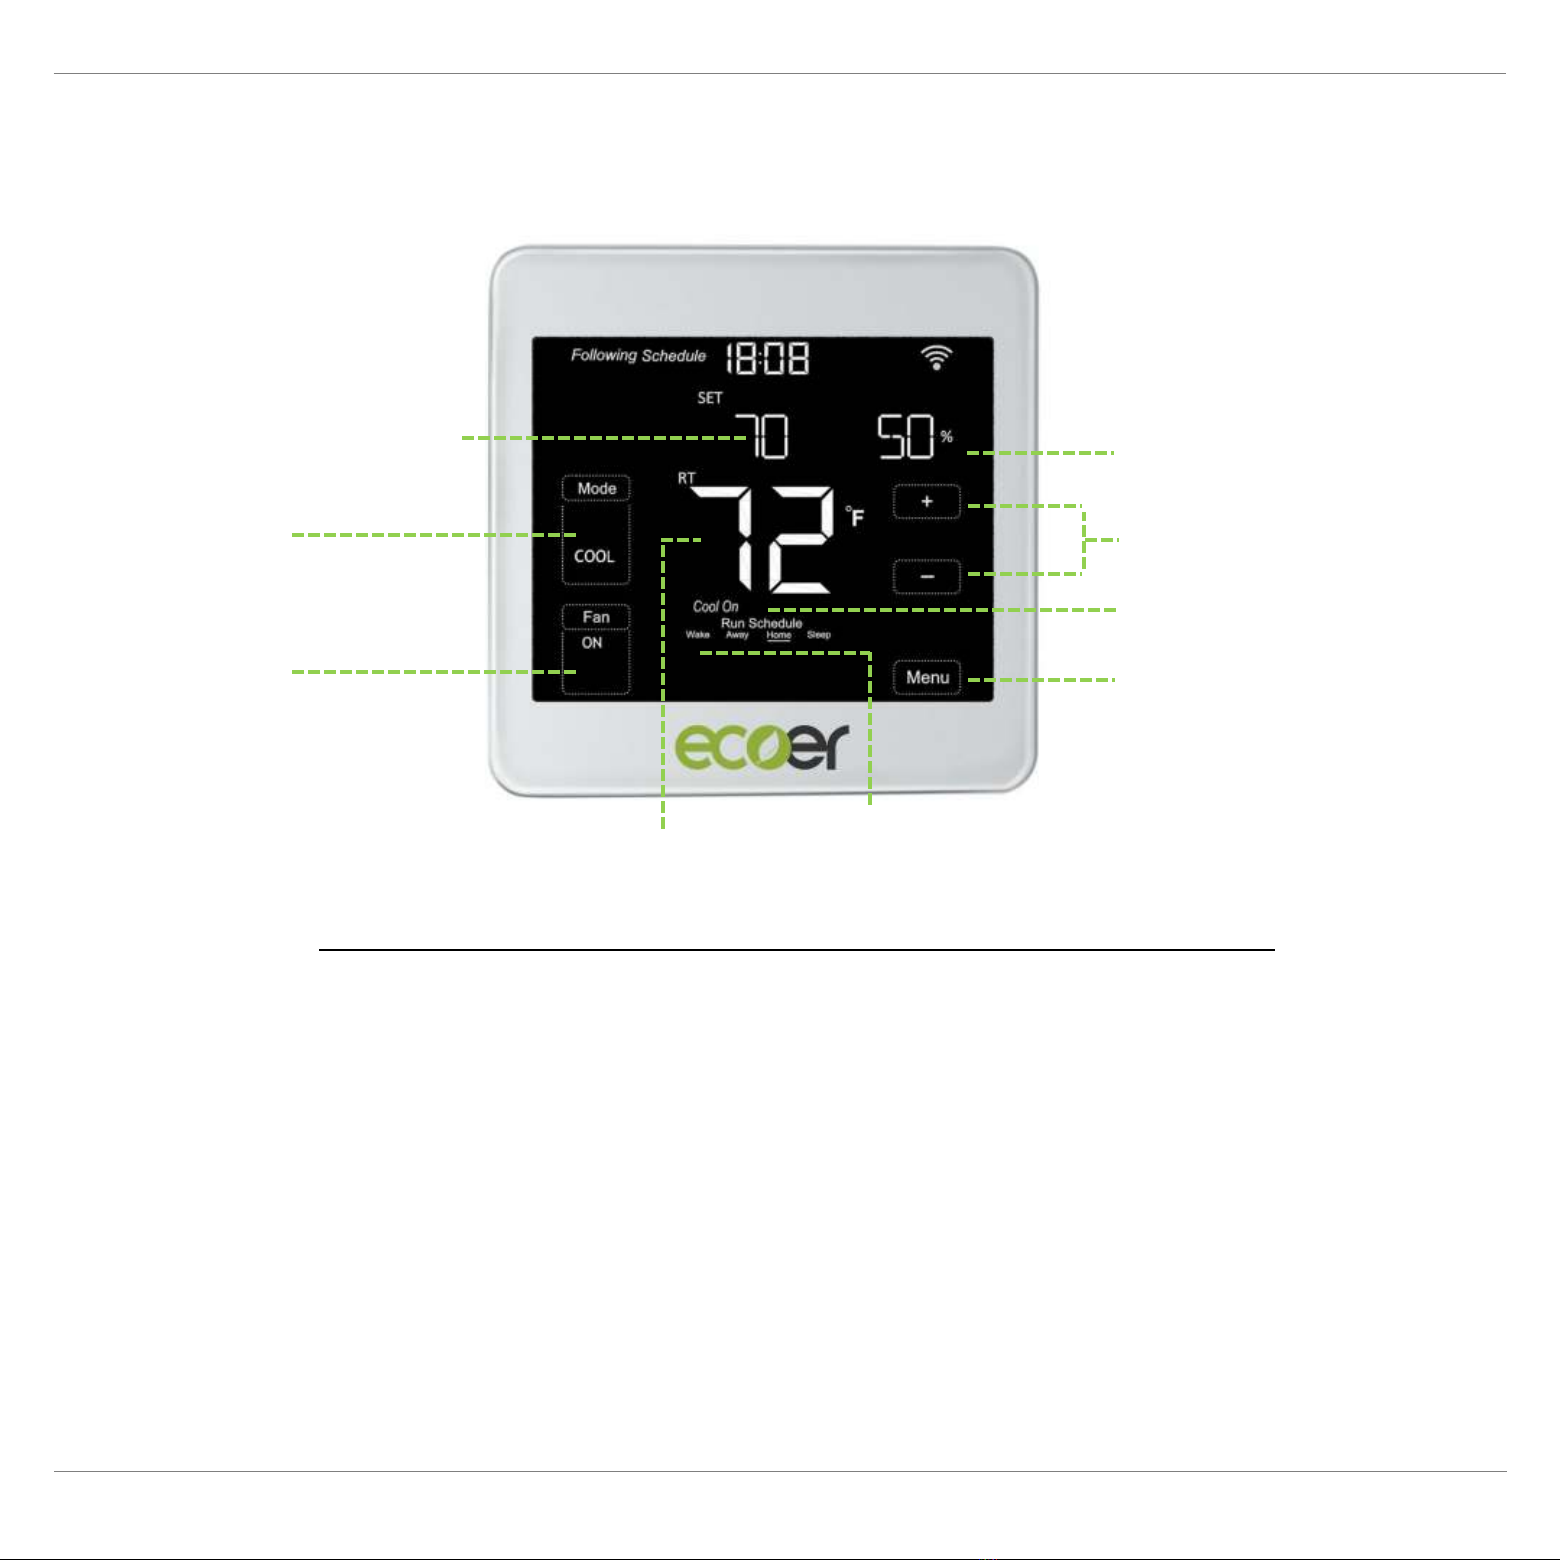
Mode: Select system mode OFF, COOL, AUTO, HEAT and EM HEAT.
Fan: AUTO Runs based on working condition of the compressor.
ON: Keeps running all the time.
CIRC: Circulate the air of indoor periodically when AC/HP stops.
Adjust temperature: Touch +or –icon to set your desired temperature.
Menu (Back Button): Time setting, working mode, Wi-Fi, Schedule and other settings.
Thermostat Layout
Desired temperature Indoor humidity
Adjust temperature
Indoor temperature *
Working status
Fan
(ON/AUTO/CIRC)
Mode
Menu
(Back button)
Schedule
Wake/Away/Home/Sleep
* The screen will wake up by touching the indoor temperature area
EST Install and User Guide
07 2022
5 of 29 ECOER INC.
Manufacturer reserves the right to change specifications or designs without notice.
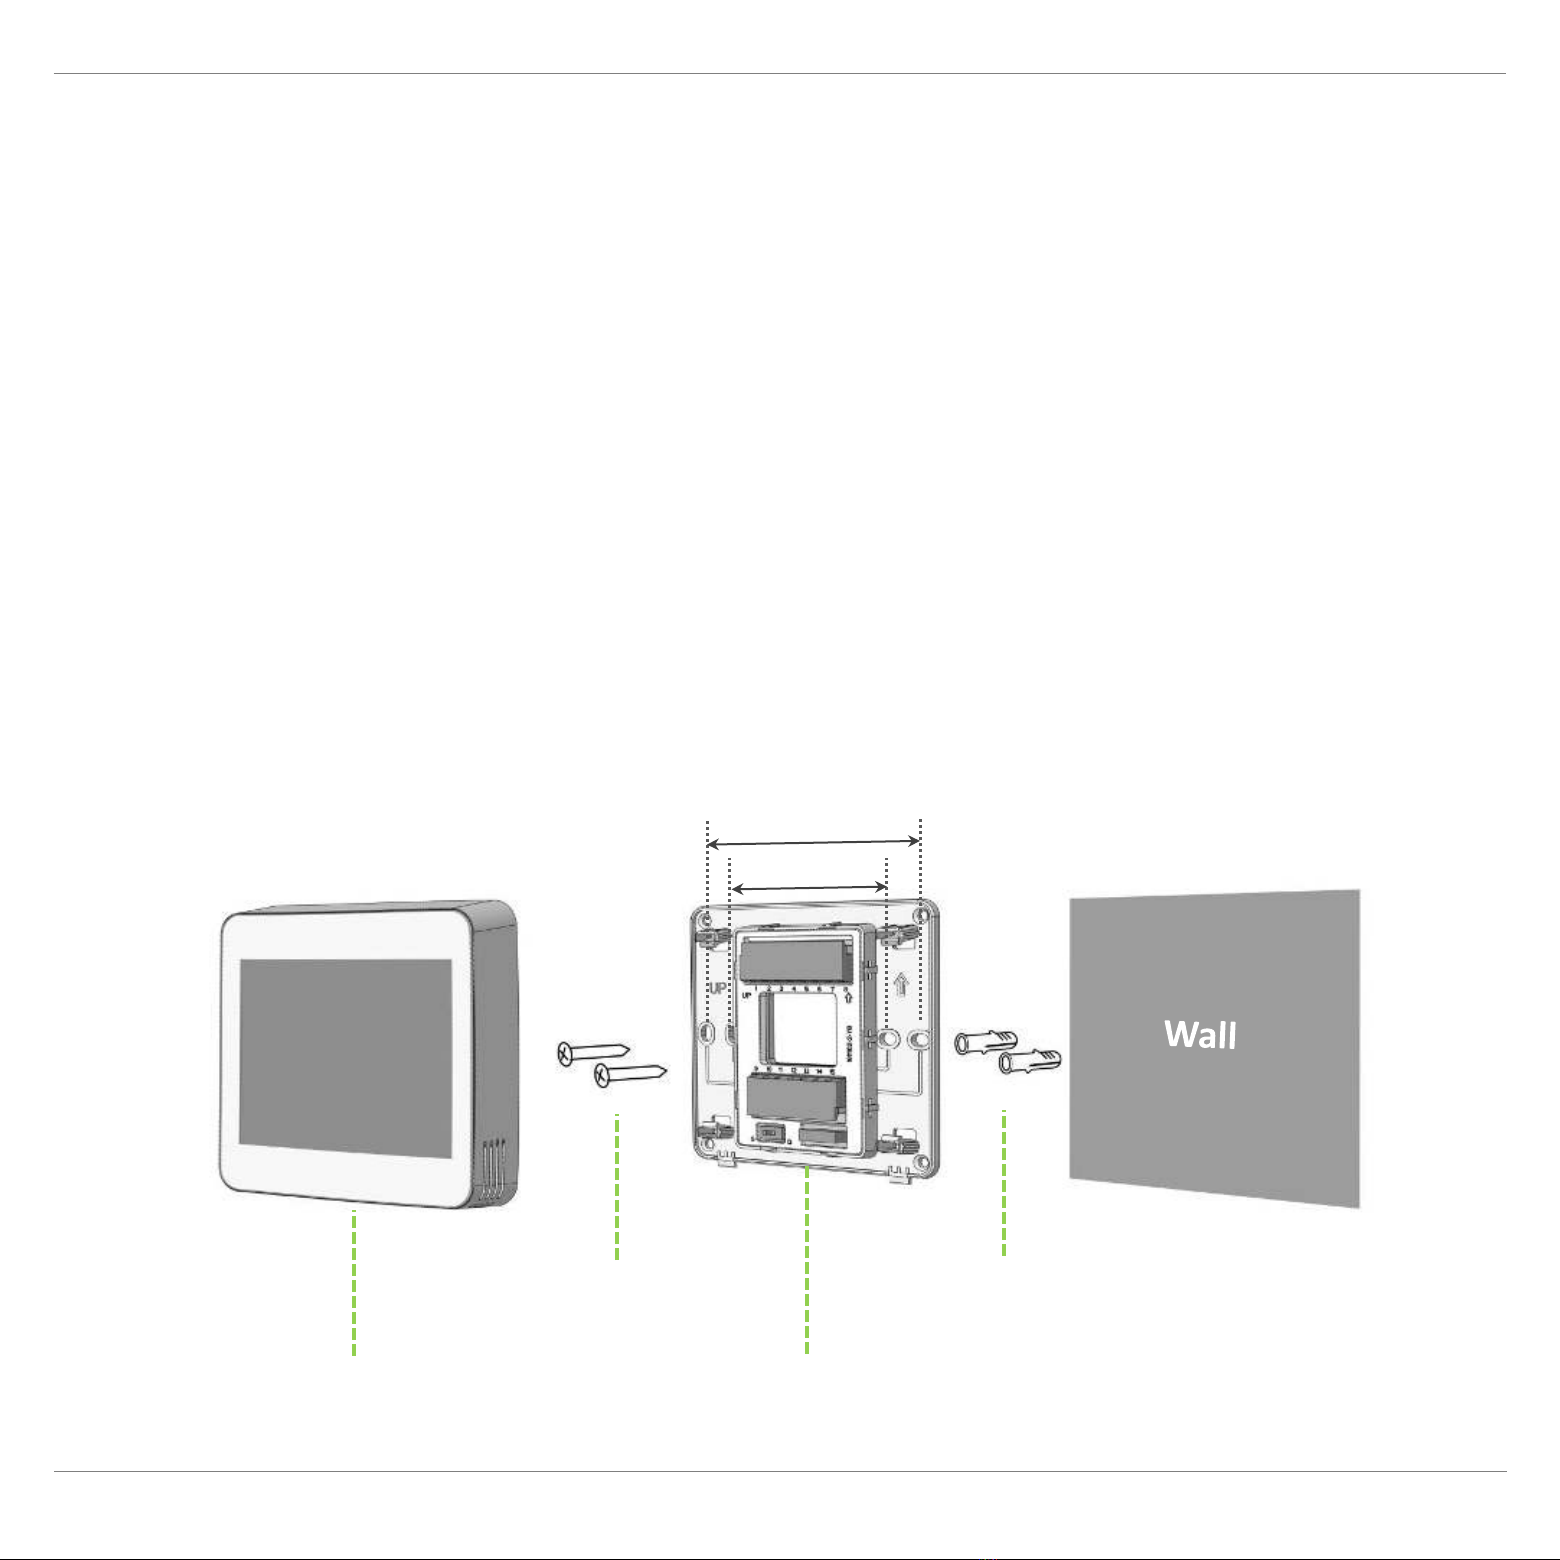
2. Install your Thermostat
Power off the system before remove your old thermostat.
Look at the wires going out of the wall and take a photo for reference. Label each wire going into
your old thermostat with the provided stickers.
The EST01 Wi-Fi thermostat
•Does not work for 120-240V systems.
•Does not work with millivolt systems.
•Required 24 VAC power supply (“C” wire)
•Does not need jumpers because RC and RH are connected already.
•Does not support universal input (S terminals) for indoor and outdoor sensors.
•Does not support universal relay (U terminals) for ventilation.
AnchorsScrews
EST01 Wi-Fi Thermostat Mounting System
3.3in.
2.3in.

EST Install and User Guide
07 2022
6 of 29 ECOER INC.
Manufacturer reserves the right to change specifications or designs without notice.
Terminal Description
C Common
RH / RC 24 VAC power (RH and RC are already connected each other - Must Dial to S)
O Mode changeover
W (E) First stage of auxiliary heat or emergency heat for heat pump systems
G Fan for standard mode
Y1 First stage of cooling or first stage heat pump
DH (G2) Fan for dry mode
W2 Second stage of auxiliary heat for heat pump systems
Y2 Second stage of cooling or second stage heat pump
Wiring Terminals in Mounting System
CRH RC OW
(E) GY1 DH
(G2)
W2 Y2 RESERVED
S: Single transformer
D: Double transformers
S D
up
Connection to
touch screen
EST Install and User Guide
07 2022
7 of 29 ECOER INC.
Manufacturer reserves the right to change specifications or designs without notice.
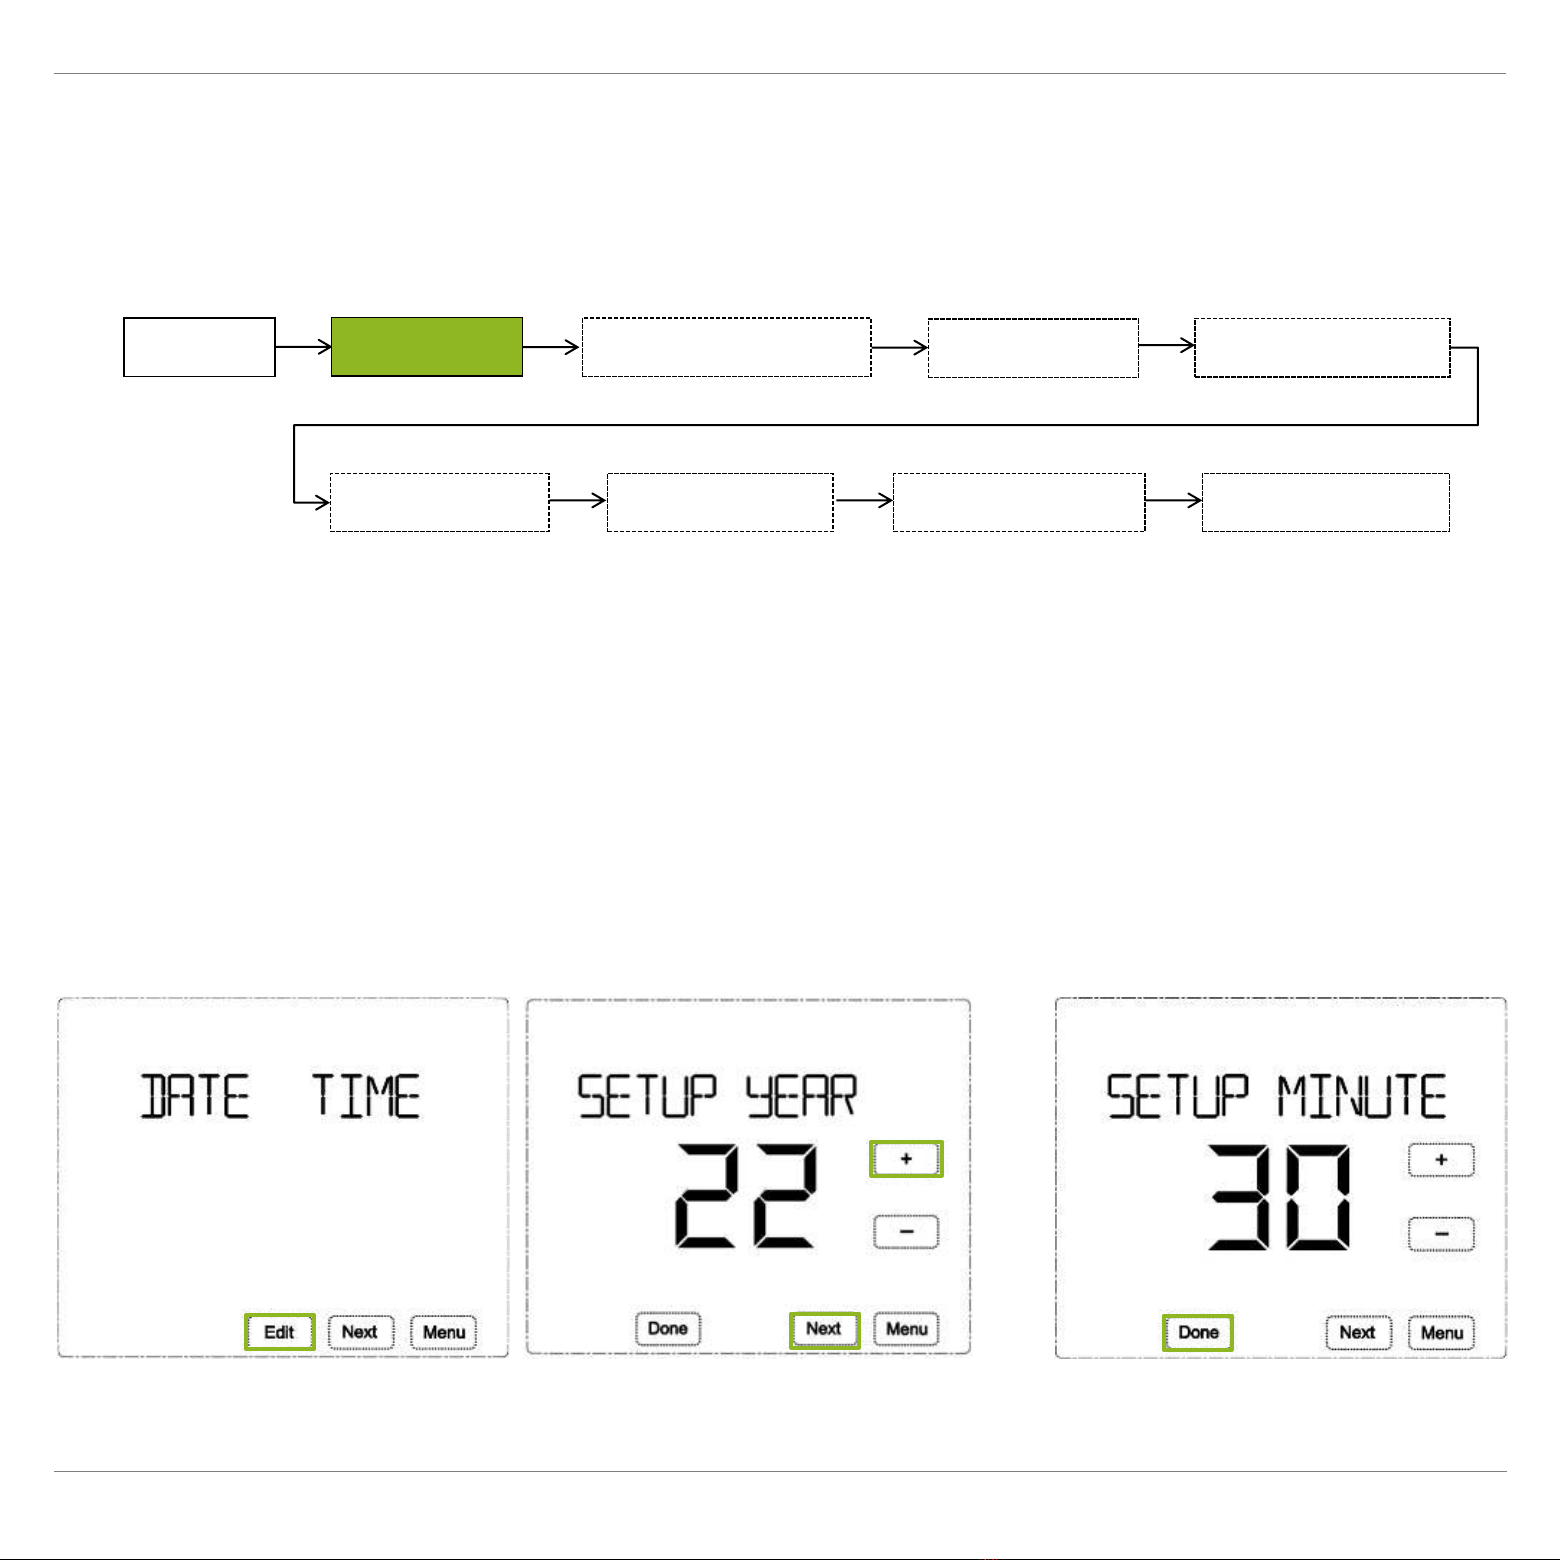
3.1 Time Setting
I. Press Menu at homepage, the screen will display DATE TIME.
II. Press Edit, the screen displays SETUP YEAR, press +or -to change.
III. Press Next to SETUP MONTH /DATE /HOUR /MINUTE, respectively.
IV. Press Done to save time setting.
NOTE: Press Menu during setting will exit you directly and nothing will be saved.
3. Setup
Menu DATE TIME WORKING MODE SCHEDULE SET
USER SETUP FACTORY SET CLEAN SCREEN RESET
SETUP WIFI
…

EST Install and User Guide
07 2022
8 of 29 ECOER INC.
Manufacturer reserves the right to change specifications or designs without notice.
3.2 Working Mode
I. Press Menu at homepage, the screen will display DATE TIME, then press Next to WORKING
MODE.
II. Press Edit, the screen displays HOLD, press or to switch between HOLD and
SCHEDULE.
III. Press Done to save.
NOTE: Press Menu during setting will exit you directly and nothing will be saved.
Menu DATE TIME WORKING MODE SCHEDULE SET
USER SETUP FACTORY SET CLEAN SCREEN RESET
SETUP WIFI
HOLD: Keeps the desired temperature set all the time.
SCHEDULE: Follows 7-day plan (4 time periods per day) *
*To activate the scheduling, it’s required to choose AUTO at thermostat homepage or on Ecoer
Home App control interface.
EST Install and User Guide
07 2022
9 of 29 ECOER INC.
Manufacturer reserves the right to change specifications or designs without notice.
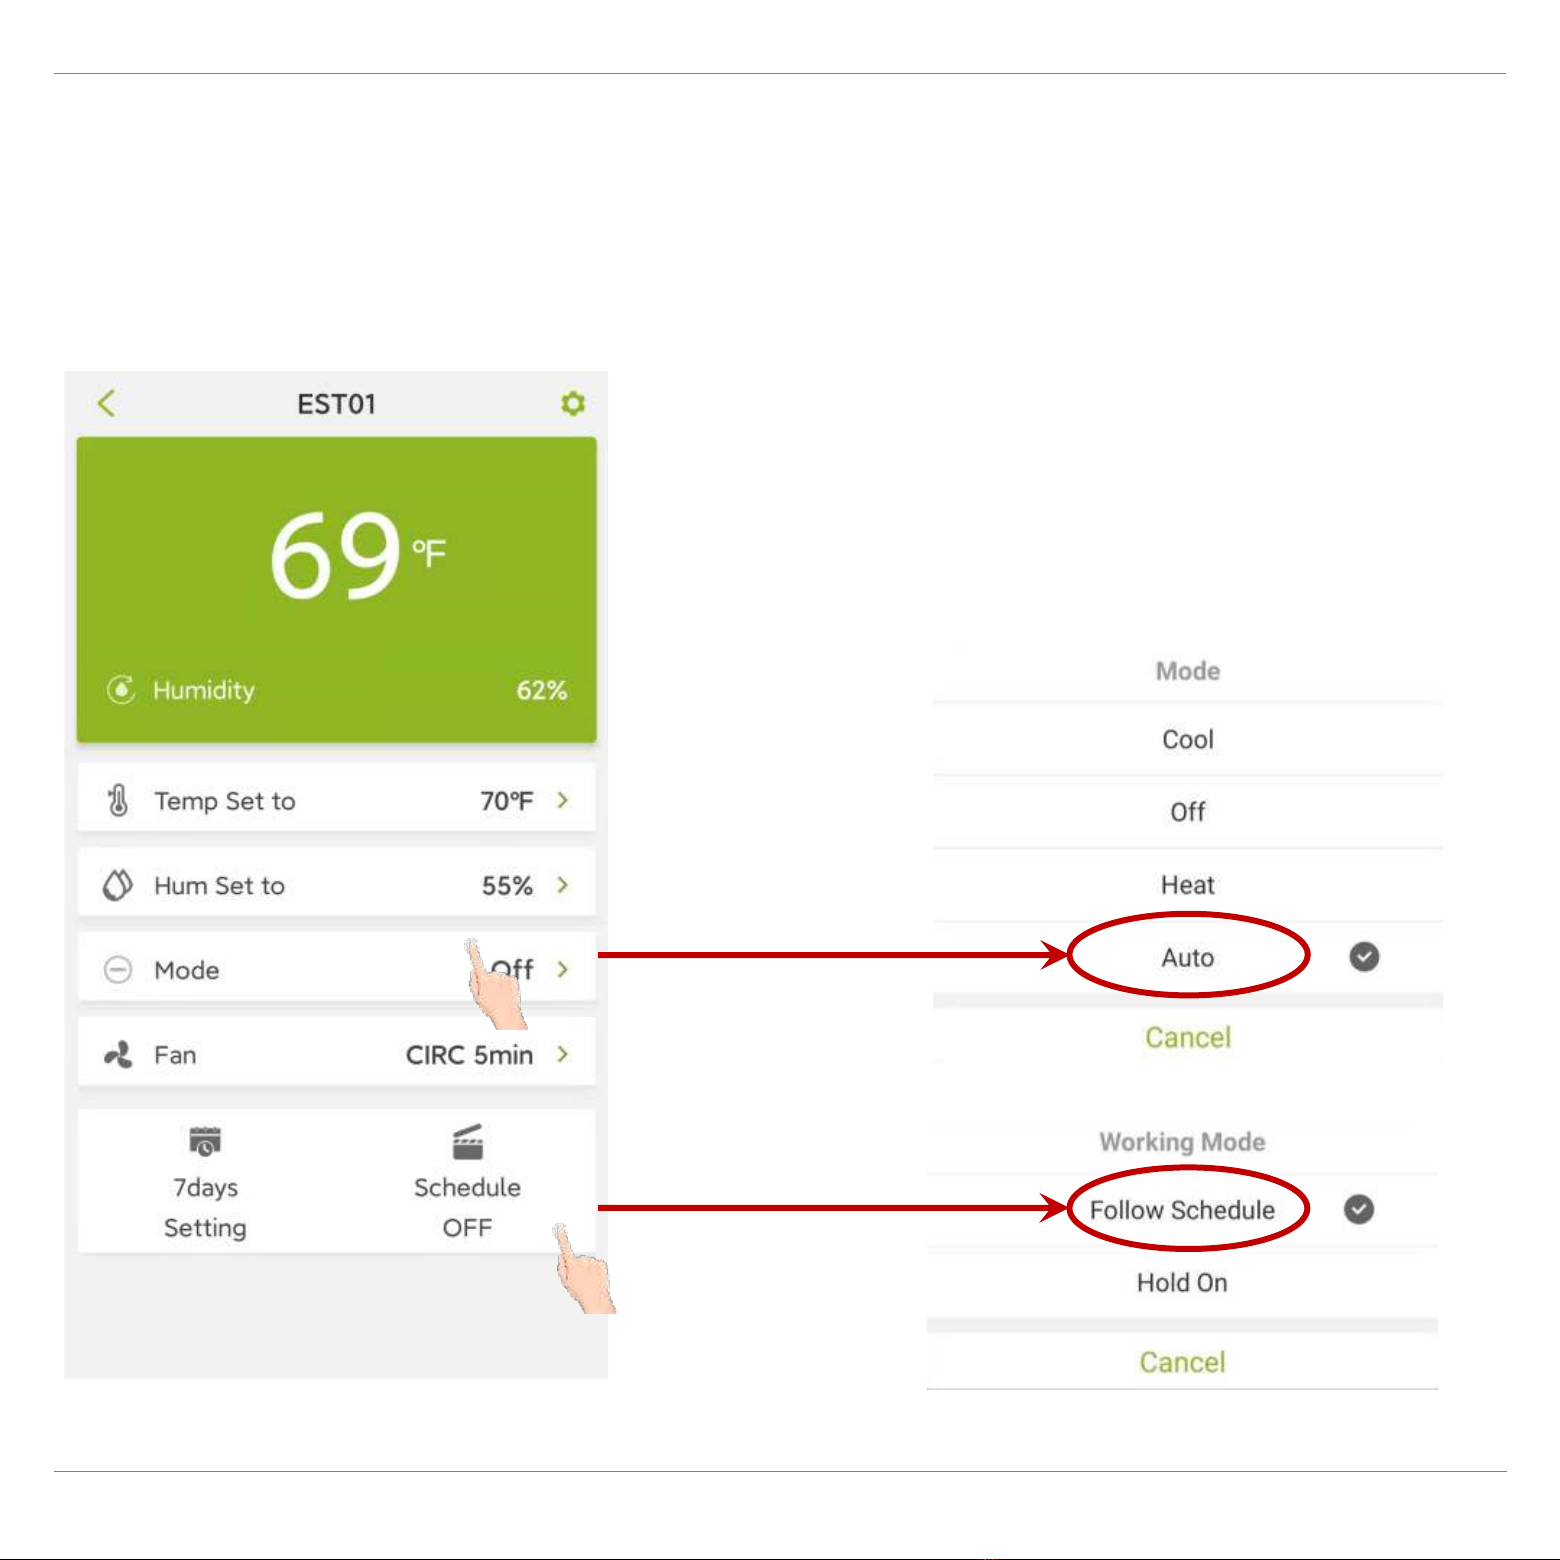
Activate 7-day Scheduling by Ecoer Home App
•Select Mode to Auto
•Turn ON Schedule (i.e. Choose ‘Follow Schedule’)
Altri manuali per EST01
1
Indice
Altri manuali Ecoer Termostato


