Ecoer EST02 Manuale utente

Smart Wi-Fi Thermostat
Bright color 4.0” Touch Screen
2.4/5G Wi-Fi Compatible
3-Year Limited Warranty
3
Year
7 Day / 8 Period Programming
Voice Command Control
Filter Change Alerts

Download the App
Several ways to download the Ecoer Home Plus App which helps to
control remotely:
Search for "Ecoer Home Plus" on Google Play Store or Apple App Store, then download.
Download the app by scanning the QR code below.
Download on the
APP Store
GET IT ON
Google Play
AndroidiOS
Ecoer Home Plus
WE ARE HERE TO HELP.
Model: EST02
Addr.: 43671 Trade Center Place, Suite 100 Dulles, VA 20166
Tel: (703) 348-2538
Website: www.ecoer.com
www.ecoer.com
EST02
01

ECOER Thermostat - A smart Choice for Smart Life!
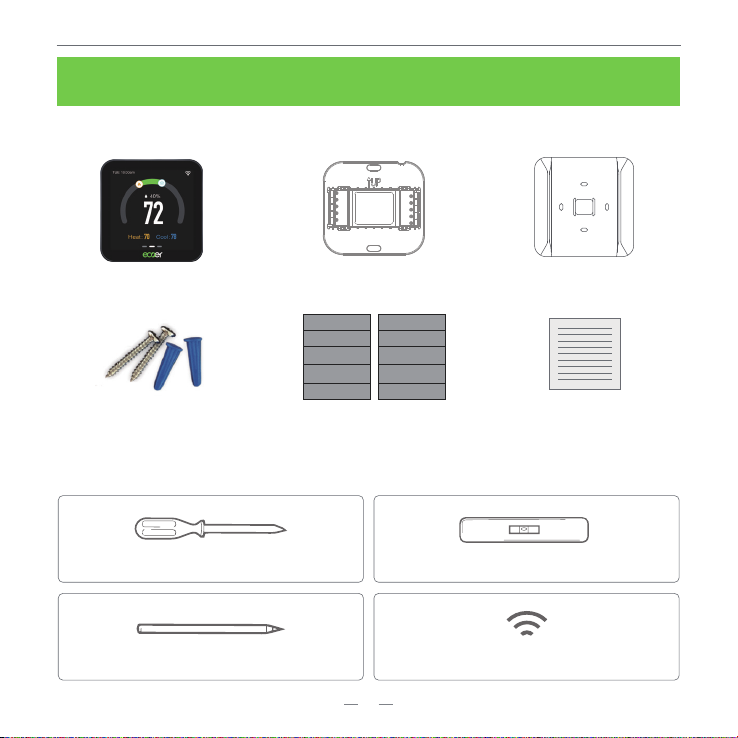
You may also need these tools:
Smart Wi-Fi Thermostat Wall Plate Large Trim Plate
Items included in box:
Screws Sets Wiring labels User Manual
Y/Y1 Y/Y1
C C
W/E W/E
Rh Rh
R/Rc R/Rc
Y2 Y2
Dh/H Dh/H
W2 W2
O/B O/B
G G
Phillips screwdriver
Pencil
Level
Home Wi-Fi Password
www.ecoer.com
EST02
02

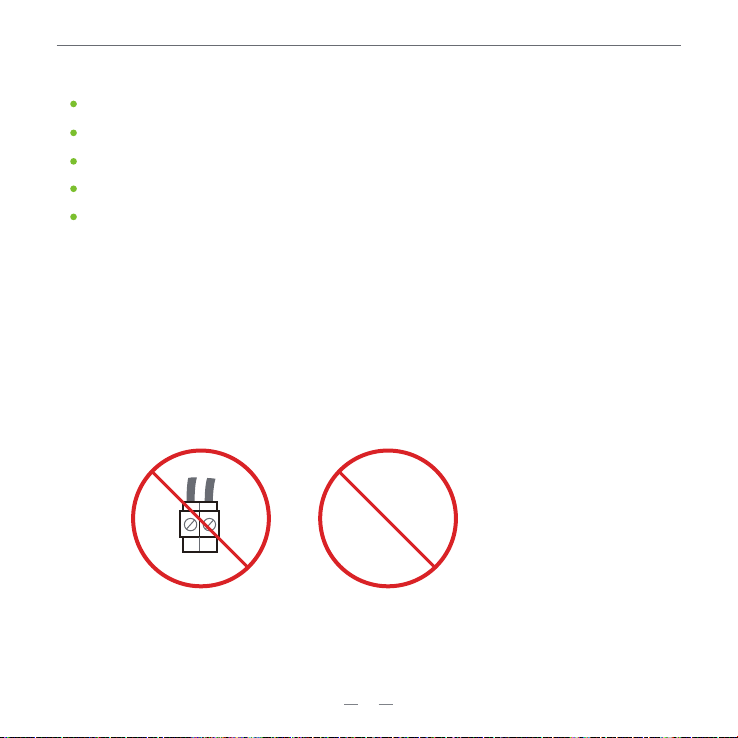
Incompatible wiring and voltage
Please check your old thermostat for compatibility to see if it:
·Does not work with electric baseboard heat (110VAC~240V AC)
·Does not work with millivolt systems
Note: If you are not sure, please contact a professional or call (703)348-2538
110 VAC
or
120 VAC
or
240 VAC
L1 L2
Compatibility
* Require C-Wire to power the thermostat(24V-AC)
Conventional
Gas, Oil, Electric
Dual Fuel Support
Humidification / Dehumidification
Heat Pump (Up to 4H2C) include auxiliary heat or emergency heat
www.ecoer.com
EST02
03

Installation
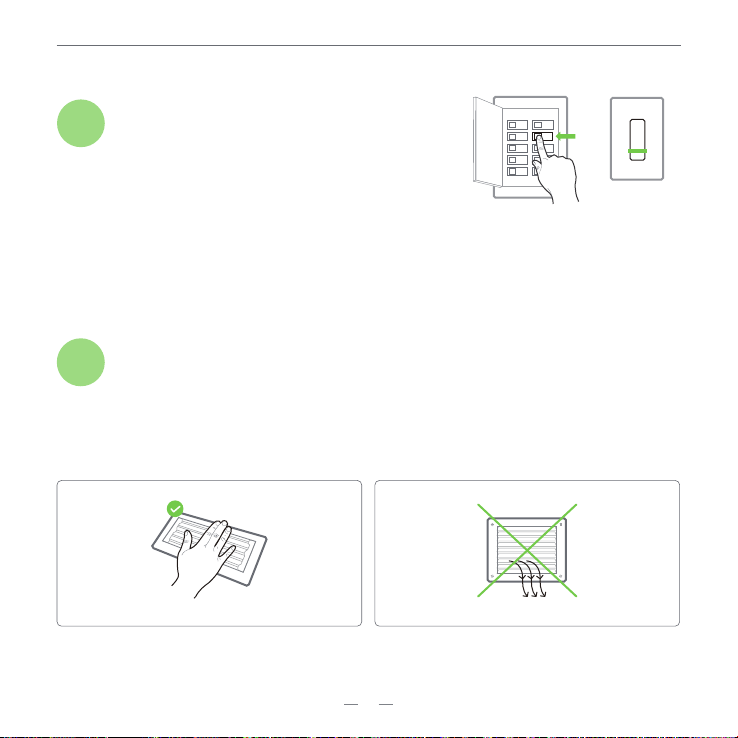
Switch off the power
IMPORTANT as this protects you from blowing a fuse in
your equipment. To make sure the power is off, change the
temperature with your current thermostat and wait for at
least 5 minutes to be sure that the system is OFF.
Step 1
Ensure the system is off
Step 2
Confirm that your system is turned off by turning off heating mode (winter) or cooling mode (summer).
Wait for a few minutes until you can't feel any air coming out of the vent.
NOTE :If you have a digital thermostat that has a blank display, skip this step.
www.ecoer.com
EST02
04
Breaker box
Switch
ON
OFF
OFF

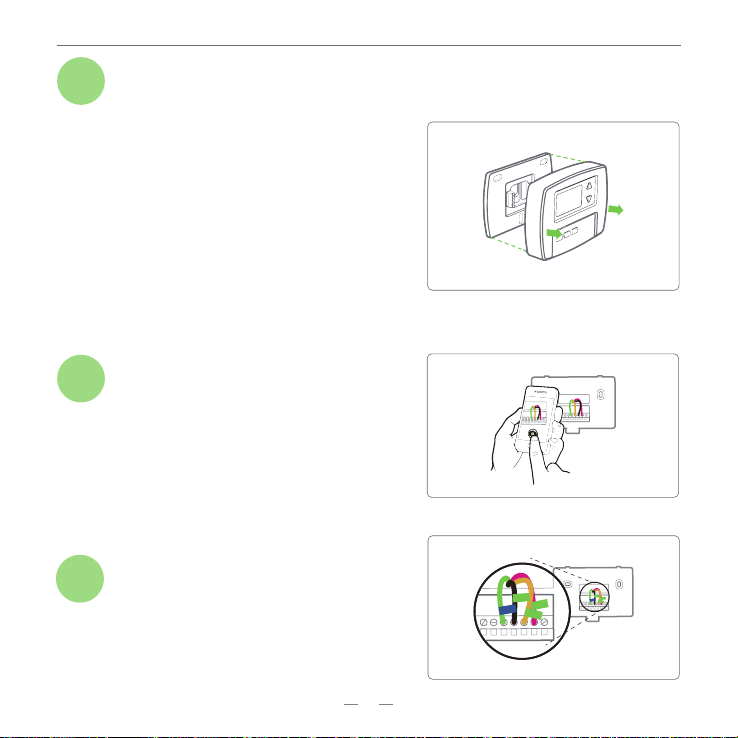
Most thermostats allow you to remove the main unit
and provide access to a wall plate which holds the
wiring terminals, you can take off the thermostat by
grasping and gently pulling. Some thermostats may
have screws, buttons, or clasps.
Take a picture of your existing wall plate’s wiring
and save it for reference. Make sure you can read
the wire terminal labels.
Note: Do not remove any wires from your thermostat
at this time!
Remove your old thermostat from the wall-plate
Step 3
Take a picture of the wiring
Step 4
Label the wires
Step 5
Label the old wall plate with our new thermostat
labels from packing box.
G
C
Y
R
G
C
Y
R
www.ecoer.com
EST02
05

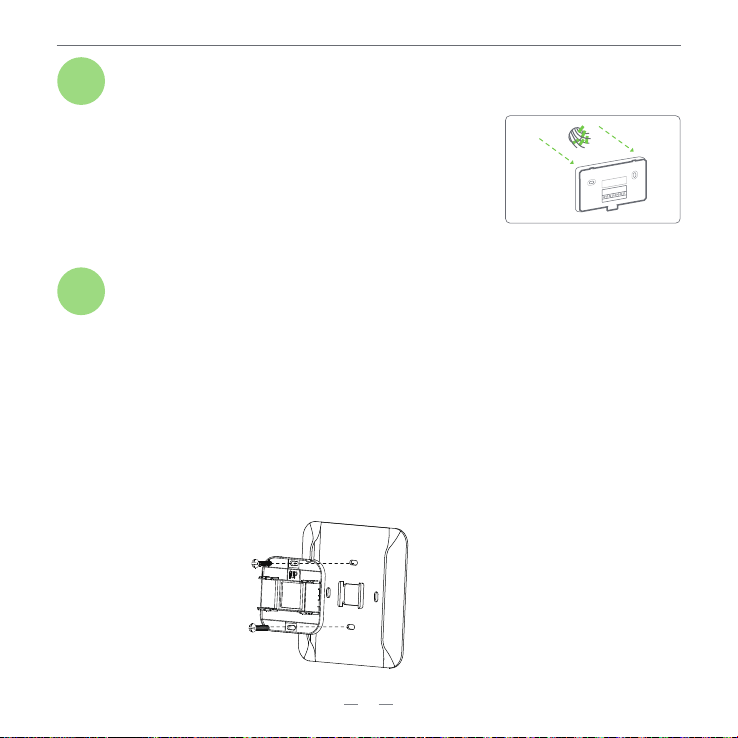
Disconnect the wires from the old thermostat one by one, you may
need a screwdriver to release wires from terminals. Unscrew and
take off the mounting plate of your old thermostat from the wall.
· You can choose to use the trim plate which comes along with your thermostat. The trim plate is
useful if you want to hide marks or holes left on the wall of your old thermostat.
· If the trim plate is to be used, then align the mounting holes on the trim plate and wall plate and
press them together.
· Pull the wires trough the hole in the middle of the wall plate and attach the wall plate to the wall by
using the screws sets (screw& anchor). Be sure to check the alignment of your wall plate before and
after the wall plate installation.
Note: Wrap the wires around a pen or pencil so they don’t fall back.
Disconnect the wires and remove the old wall plate
Step 6
Mount the new wall plate
Step 7
www.ecoer.com
EST02
06

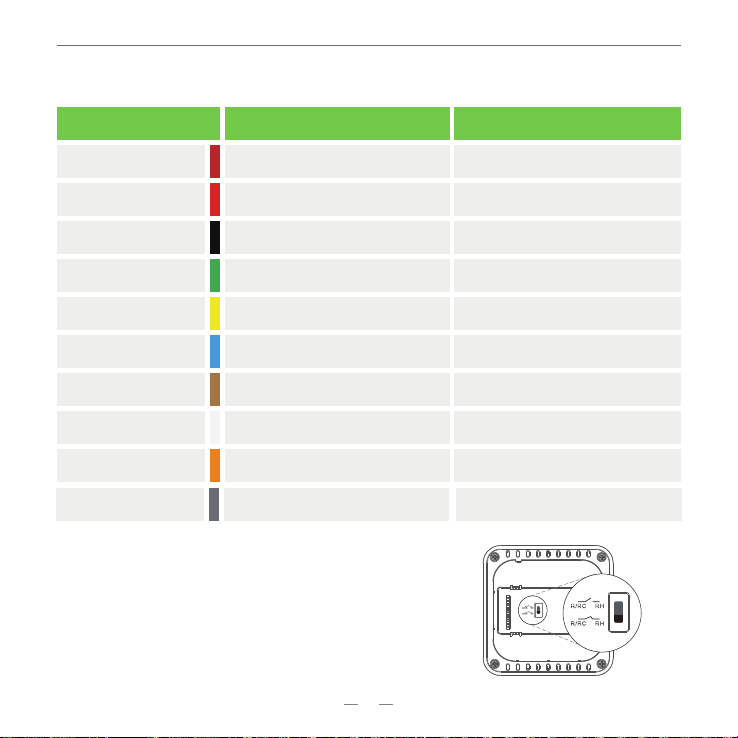
6.Use the picture you took before as reference for new thermostat wiring, the following chart is a wiring
diagram for common systems, please make sure that a C-wire exists in our old thermostat system.
The switch is used to connect R/RC with RH. If you have
two power wires (R/RC and RH), please flip the switch to
the disconnect side to disconnect R/RC with RH.
Terminal
R / Rc
Rh
C
G
Y/Y1
Y2
W2
W/E
O/B
Dh/H
Conventional System
Power for cooling, 24V
Power for heating, 24V
Common wire, 24V
Fan
Power for cooling, 24V
Power for heating, 24V
Common wire, 24V
Fan
1st Stage Cool
2nd Stage Cool
1st Stage Heat
2nd Stage Heating
1st outdoor Stage Heat
2nd outdoor Stage Heat
Auxiliary Hear activated at W2
Emergency Heat activated at W1
------ Changeover (reversing valve)
connection for heat pump
Heat Pump System
Disconnect
Connect
Disconnect
Connect
Humidification/DehumidificationHumidification/Dehumidification
www.ecoer.com
EST02
07

*
www.ecoer.com
EST02
08
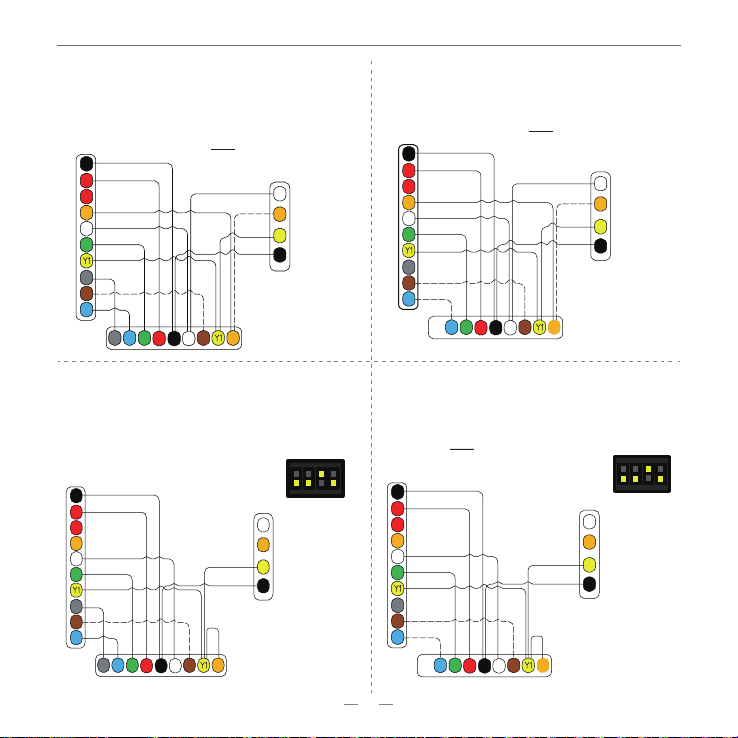
Air Conditioner + Electric Heater System
(AC+Electric)
Ecoer variable speed heat pump (AC option)
matches with Ecoer air handler and electric heater.
RC
GW1
W
O
Y
C
C
Rh
Rc
O
W
G
Y1
W2
Dh
Y2
W2
Dh
Y2 Y1 O
Ecoer Heat Pump
EST02
1 2 3 4
ON DIP
SW1
SW1-3 ON: AC
SW1-3 OFF: HP
Air Conditioner + Furnace System (AC+Furnace)
Ecoer variable speed heat pump (AC option)
matches with Furnace.
RC
GW1
W
O
Y
C
C
Rh
Rc
O
W
G
Y1
W2
Y2
W2
Dh
Y2 Y1 O
Ecoer Heat Pump
Gas Furnace
EST02
O Signal depends on Furnace
1 2 3 4
ON DIP
SW1
SW1-3 ON: AC
SW1-3 OFF: HP
O signal wiring can be omitted when
Ecoer heat pump is used
Optional
RC
GW1
W
O
Y
C
C
Rh
Rc
O
W
G
Y1
W2
Dh
Y2
W2
Dh
Y2 Y1 O
Ecoer Heat Pump
EST02
Heat Pump + Electric Heater System
(HP+Electric)
Ecoer variable speed heat pump matches
with Ecoer air handler and electric heater.
O signal wiring can be omitted when
Ecoer heat pump is used
Optional
Dual Fuel System (Dual Fuel)
Ecoer variable speed heat pump matches with
Gas Furnace.
RC
GW1
W
O
Y
C
C
Rh
Rc
O
W
G
Y1
W2
Y2
W2
Dh
Y2 Y1 O
Ecoer Heat Pump
Gas Furnace
EST02
O Signal depends on Furnace
O signal wiring can be omitted when
Ecoer heat pump is used
Optional
Ecoer Air Handler
Ecoer Air Handler

www.ecoer.com
EST02
09
Dh/H
Y2
W2
O/B
G
C
Y/Y1
W/E
Rh
R/Rc
Humidification
or
Dehumidification
Dh/H
Y2
W2
O/B
G
C
Y/Y1
W/E
Rh
R/Rc
Humidification
or
Dehumidification
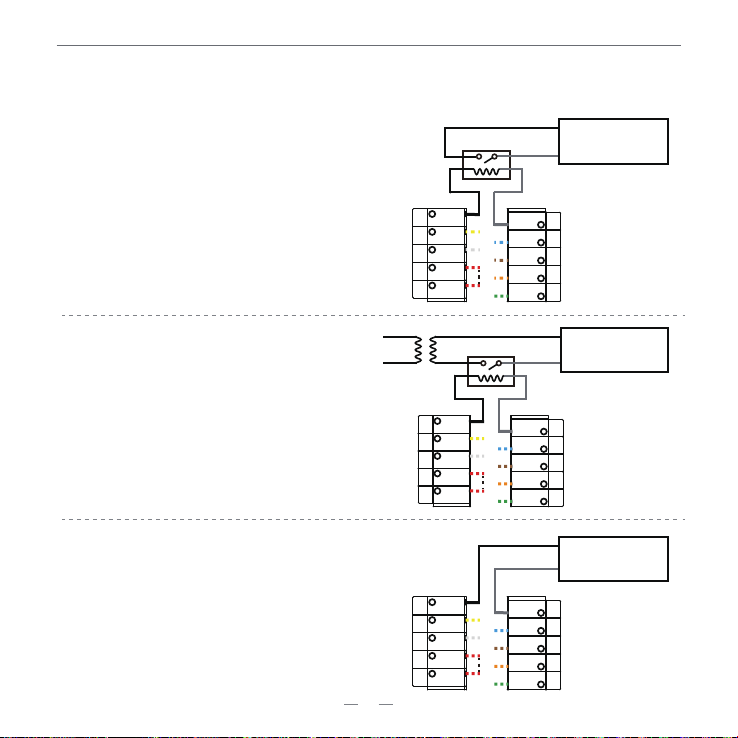
Dry contact
(When the machine adopts dry contact control)
24VAC contact A
(When power consumption is higher than 5VA)
24VAC contact B
(When power consumption is less than 5VA)
Dh/H
Y2
W2
O/B
G
C
Y/Y1
W/E
Rh
R/Rc
Humidification
or
Dehumidification
24VAC Relay
24VAC
If you need to connect humidification/dehumidification equipment, please
refer to one of the following wiring methods according to actual needs.
24VAC Relay
Indice
Altri manuali Ecoer Termostato