
EcoLet 25a Manuale utente

EcoLet 25a & 65a
Instruction Manual
IMEL-001-2023.06.05

2IMEL-001-2023.06.05
Table of Contents
What’s in the box? 4
Installation 5
EcoLet Components 6
EcoLet Diagram 7
Settings 7
Operation 8
Caution 11
Maintenance 11
Troubleshooting 12
Contact Details 13

3IMEL-001-2023.06.05
Congratulations on the purchase of your new EcoLet compost toilet system!
The Ecolet 25a and 65a models are fully automatic, continuous composting systems (as
opposed to batch systems). This means the waste can nish composting within the unit
without having to be set aside in a warmer position. Compost falls towards the collection tray
at the base of the unit for removal.
The 25a has a 50L volume, suitable for up to 3 people. The 65e has a 72L volume, suitable for
up to 4 people.
The EcoLet is a self-continued biological toilet that composts waste and toilet paper, and
evaporates liquid. The composting process takes place using nature’s own microorganisms,
without the need of any chemicals. Controlled air supply and heat, as well as regular mixing of
the compost accelerates the composting process and converts toilet waste into eco-friendly
humus. This makes a nutrient rich supplement for your garden.
UNIT DIMENSIONS
25a: 710mm L x 550mm W x 650mm H
65a: 810mm L x 650mm W x 660mm H
Foot print (including compost drawer): 1100mm L x 650mm W (minimum)
THREE IMPORTANT THINGS TO REMEMBER
1. When the toilet is used, room temperature should be at least 18°C. If your room
temperature is lower than this, composting could stop as the microorganisms die or go
dormant.
2. If you are away for more than two days, always turn the power off and put the cover in the
seat opening, otherwise the compost will become dry.
3. The heating element in the room can also be switched off, the composting toilet will not be
damaged by freezing.

4IMEL-001-2023.06.05
What’s in the box?
The box contains:
• The toilet
• The manual
• Bulking agents (peat moss and wood
shavings/hemp)
• Nature Flush enzymes
• Nature Quick microbes
• Toilet Paper
• Spray with trigger
• Warranty Sheet
• Bowl cover
• A rake
• How-to-use sign
The vent kit contains:
• Ventilation pipes, white pipes, 6pcs x 675mm
• Outside pipe, black 2pcs x 675mm
• Insulation, 2pcs x 675mm
• Reduction coupling, 55/110mm
• Roof ashing
• Insect netting
Optional wall installation kit (not included):
Extra accessories (not included):
• 30˚ and 45˚ Pipebends
• Insulation
• Additional vent piping
• Bulking agent (peat moss, hemp/wood-shavings)
• Microbes
• Enzymes

5IMEL-001-2023.06.05
Instructions
1. Position the unit on a level surface leaving enough space in front of the unit to remove the
compost tray.
– Minimum distance from the back wall to the front of the tray is 1100mm.
– Keep in mind you will need a 240V power point available somewhere near the unit.
– Be mindful of how the vent is to be installed as this may impact windows, etc.
2. Install the vent pipe either straight up through the ceiling or out through the wall and up
the exterior of the building.
– An optional vent wall kit is available.
– Do not use bends over 45˚.
3. Install the roof ashing and seal as required.
4. Insulate all parts of the vent pipe in roof cavities or outside the building using the insulation
provided and shield with 100mm pipe provided. Note: You may need to source extra
insulation.
5. Fit the insect netting cap to the top of the vent.
Installation
Tools required
SILICONE
DrillMeasuring
tape Sealant/
adhesives Saw Ladder 55mm Hole saw
or Jigsaw
Fit insect netting
onto reducing
coupling
Must be insulated

6IMEL-001-2023.06.05
Main Chamber The main chamber holds the composting pile. No need for any chemicals, just
microorganisms aka microbes.
Compost tray The base of the compost pile slowly falls into the collection tray for removal after it has
been processed by the microbes.
Mixers When the lid is lowered after each use, the automatic mixer rotates the compost pile.
Mixing helps to aerate the compost and sift it into the compost tray.
The mixer arm will turn a full revolution:
• When switched on
• When a user places the lid down
• When a user gets up from the seat
Ventilation pipes
and fan
The ventilation pipes and built-in fan promotes airow - drawing away odours, reducing
the build-up of moisture, and providing oxygen for the microorganisms.
Heater There is a heater on the top near the fan and a heater on the bottom under the compost
tray.
The adjustable heater combined with recirculation of the heated air results in a very low
energy cost to warm up the pile to optimum temperature for composting.
It will also help to evaporate any liquid that hasn’t been absorbed into the compost pile.
Chamber screen The chamber screen opens up only when there is pressure on the seat, so you do not
need to see any fresh waste.
The chamber screen will also open when the seat is lifted, if you need to access the pile
easily or if you want to urinate standing up.
Tray liquid hose The tray liquid hose is on the right hand side (when you’re facing the toilet), it shows how
much liquid there is in the tray.
Overow hose The liquid overow hose on the left side shows if there is liquid pooled in the base of your
unit, outside of your collection drawer.
The hose at the back can be converted into an outlet that leads to an underground
leachate drain.
Hot tip: don’t open the drawer if you see liquid in this hose.
EcoLet Components

7IMEL-001-2023.06.05
Settings
Capacity settings
Adjust capacity by turning the dial.
The recommended start setting for 2 people:
Green light: Only fan is operating (see Heater Settings below).
After 1 week in operation, you might have to adjust the setting depending on usage and the
liquid level in the tray liquid hose (RHS).
Heater settings
Set the heat according to load. Check the tray liquid hose (RHS, seen from the front).
1
2 3 4
EcoLet Diagram
Main chamber
Compost tray
Chamber screen
Lid
Motor
Microswitch
Mixer
Cable
Ventilation pipes
Fan
Heater switch
Top heater
Bottom heater
Tray liquid hose (RHS)
Overflow hose (LHS)
1 Green light Only fan is operating
2 One amber light Fan + 50% top heater
3 Two amber lights Fan + 50% top heater + 100% bottom heater
4 Three amber lights Fan + 100% top heater + 100% bottom heater

8IMEL-001-2023.06.05
Operation
Starting with empty toilet
1. Combine your bulking agents to create a very absorbent mix. We recommend 40% peat
moss and 60% hemp or wood-shavings.
2. Add a 15 cm layer of bulking agent mix into the main chamber. Some of the mix will fall
down into the compost tray, add this back to the main chamber.
3. Connect the mains plug into a grounded wall socket. Switch the system on. Turn the dial to
the rst position so that only the green light is on - for just the fan, not the heater. Always
have the fan on (green light) by default.
4. Make sure the bowl cover is not in place when the fan is running. It is only to seal the
system when it is off and not in use for more than several days.
Add a 15cm layer of
bulking agent.
Bulking agent will fall
into the tray.
Example of bulking agent volume estimation

9IMEL-001-2023.06.05
In the rst week
The compost tray will be full of the dry bulking agent that you rst added. Empty this back
into the main chamber.
Once you have some solid waste in your main chamber you can start to introduce your
microbes.
After every solid deposit
Add a handful of bulking agent mix.
Tray liquid hose
Regularly monitor the tray liquid hose on the right hand side of the unit. This hose should
never be full as this means the tray is full of liquid. Half full is alright, but should be monitored.
Remember, it is best for the compost pile to have a moisture level of about 60%. The pile in
the main chamber should appear to have a porous and moderately moist consistency. You can
use a permanent marker to mark the liquid hose at your ideal level during different seasons.
Too wet or too dry will hinder the composting process. If liquid stays on top of the compost
and seeps into the tray slowly, then the compost is too wet. Increase the heater and add a few
litres of bulking agent.
On the other hand, the compost is too dry if there are hard lumps, or if toilet paper remains
on top when it does not get soaked and mixed in properly during mixing. If so, make sure the
heater is off, and sprinkle about half a litre of water over the composting pile. Check the tray
liquid hose regularly and adjust the heater accordingly.
Overow hose
Be careful not to open the front cover if your overow hose (LHS) is showing that there is
liquid pooled in the base of your unit, outside of your compost drawer. The tray liquid hose
(RHS) needs to be unplugged to remove the tray fully, so make sure to turn the heater up and
reduce the liquid level as low as possible.
10IMEL-001-2023.06.05
Compost tray
In the right conditions, the composting process can take at least three to four months to
complete. It will take about this much time for the top of the composting pile to reach the
compost tray. The tray can be emptied about every 6 to 12 weeks. When there is mainly
bulking agent in the tray for the rst few times you go to
empty it, add this back to the main chamber.
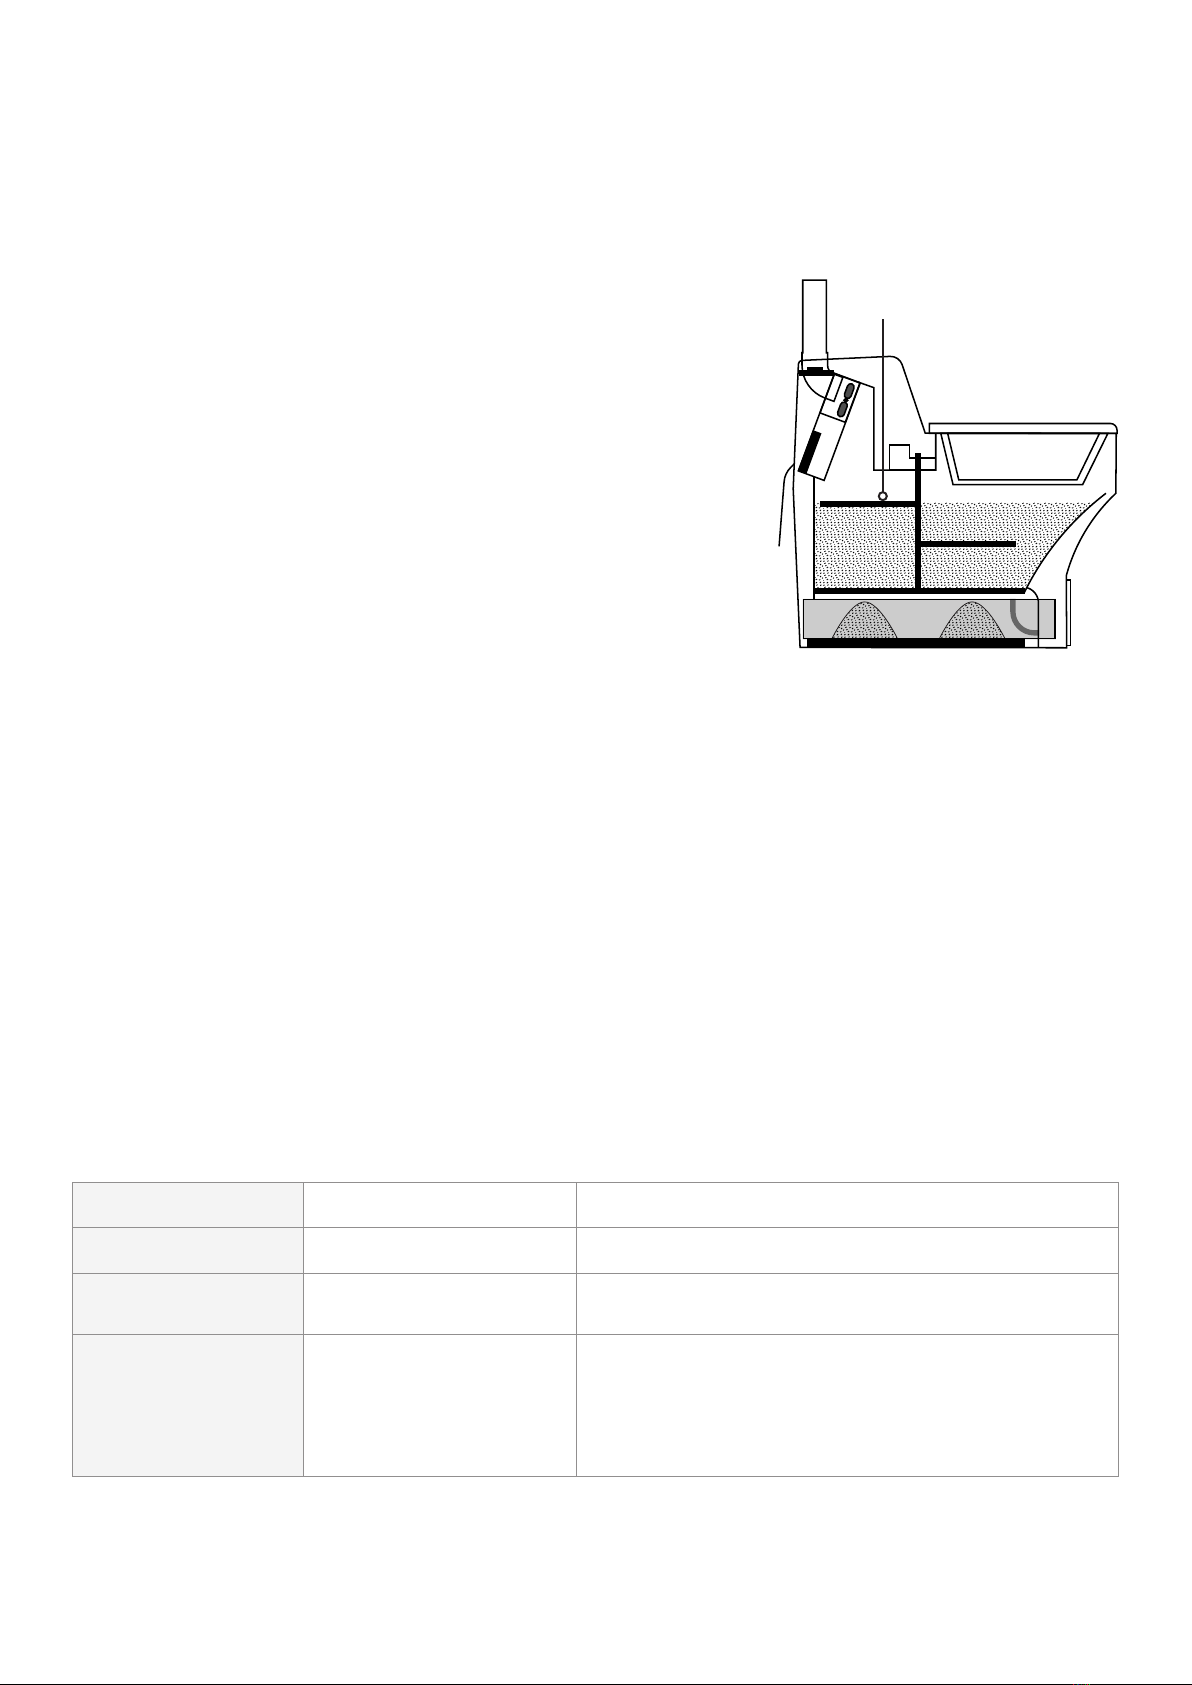
Empty the compost tray BEFORE it is full. Most people
empty it once a month to avoid overlling. As a general
rule, you can empty the tray once the pile in the main
chamber reaches the top mixing arm (see image). Always
wear safety gear when handling compost - gloves, dust
mask.
It is recommended to turn the dial up to the highest setting
for a couple of hours in order to evaporate all uids before
emptying the tray.
Completed compost
If you’re at the stage of seeing completed compost, you can use this in your garden. We
recommend burying it like a fertiliser in a non-edible garden. Burying it will reduce the
likelihood of contact with animals or people. Even though fully composted waste will be
pathogen free, it’s better to be safe than sorry. Contact your local council for any restrictions
or requirements about using composting toilet waste around your property. Every local council
may have slightly different requirements about waste disposal.
Recommended Heater Settings
Remember, the optimum temperature range for most compost toilets is 18°C to 45°C.
Green light Only fan is operating By default, the fan should always be on.
One amber light Fan + 50% top heater During cold winter days.
Two amber lights Fan + 50% top heater +
100% bottom heater When the liquid tray is more than half full.
Three amber lights Fan + 100% top heater +
100% bottom heater
When the compost pile is too wet.
When there is indication of overow.
Before opening the collection drawer to remove the
compost tray.
Top mixer arm
Questo manuale è adatto per i seguenti modelli
1
Indice
Altri manuali EcoLet Toilette


Manuali Toilette popolari di altre marche


Better Bathrooms
Better Bathrooms BUN/BeBa 27555/78725 Manuale utente

American Standard
American Standard CONCEPT Cube TF-2704 Manuale utente

BIOLAN
BIOLAN ECO Manuale elenco delle parti

Thetford
Thetford C260 Series Manuale utente

KELISS
KELISS T162A Series Manuale utente

Kohler
Kohler K-22241K Istruzioni per il montaggio


