Eonon E0858 Manuale utente
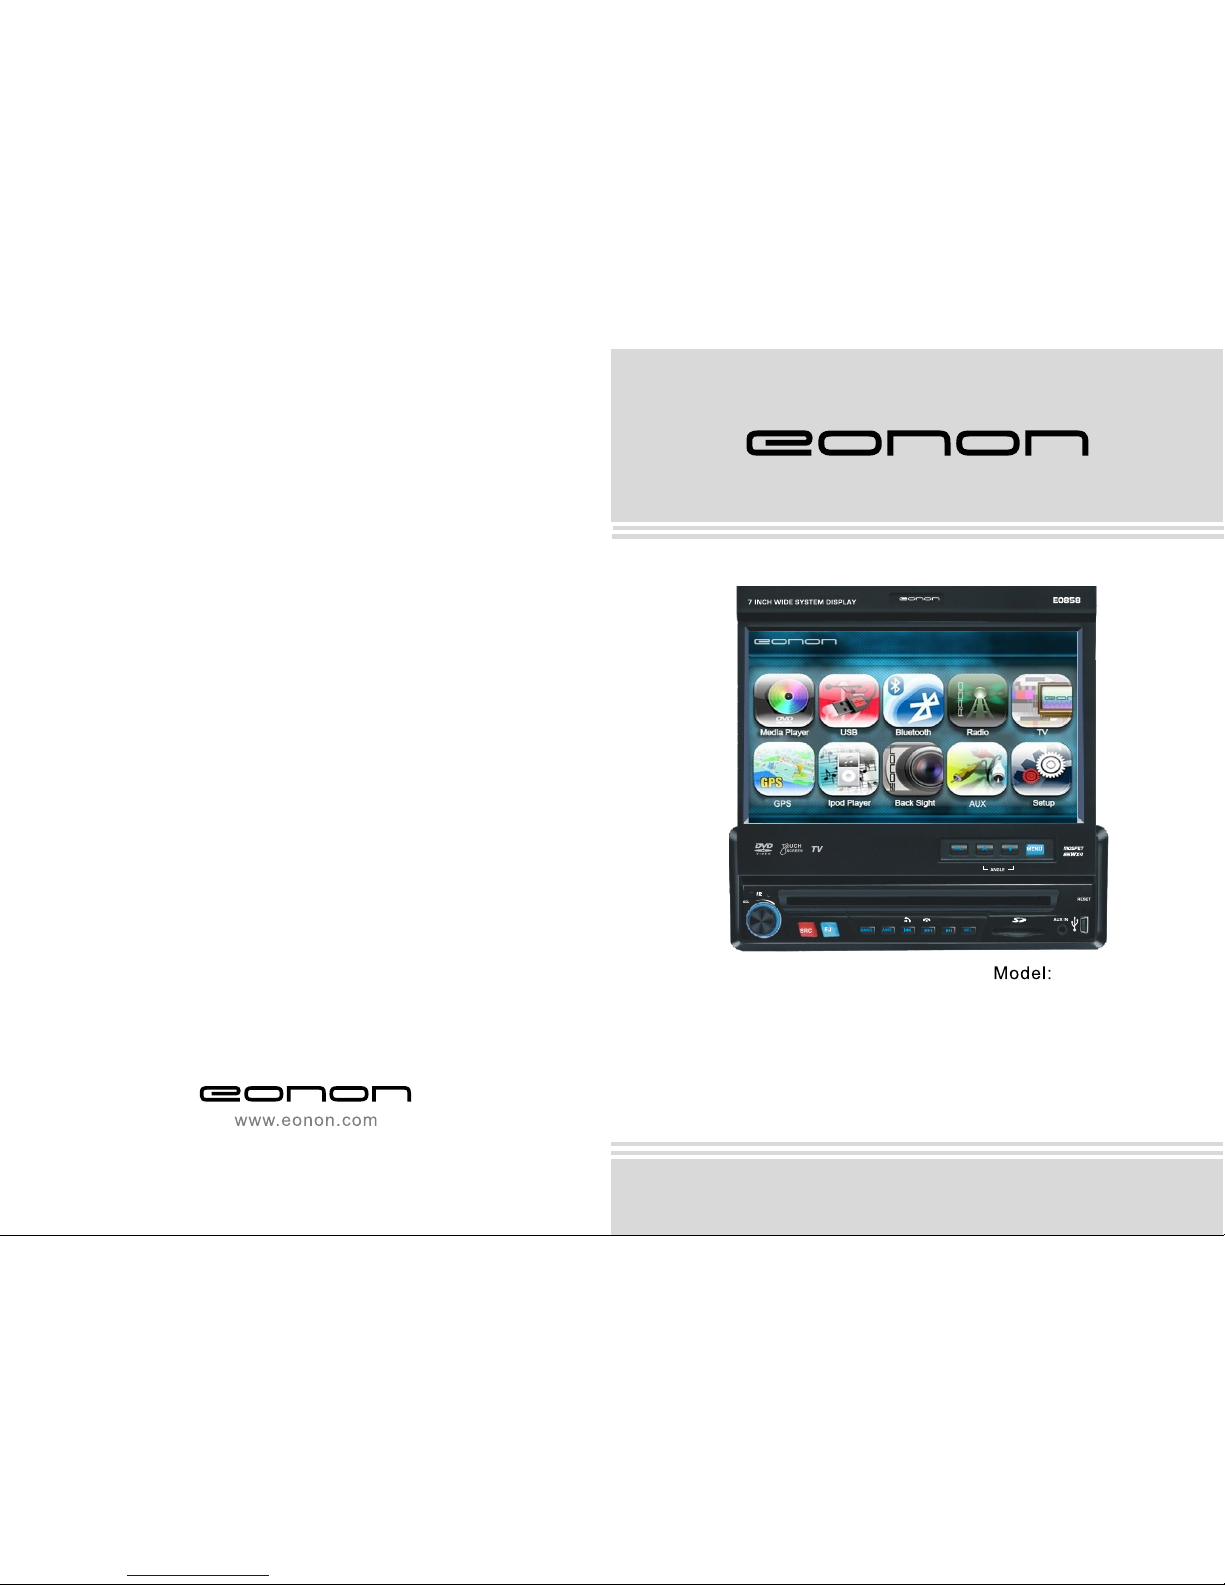
E0858
User Manual
Pleare read this manual before using and
save this manual for future reference.


1
WELCOME
Thank you for enjoying our series of digital car A/V product.
To properly use this product, please go through this instruction manual for installation
and operation, put it in a safe place for future use!
WARNING
1.Please keep the disk slot clean, wipe it off when there is some dirty on it, please wipe
off the dirty on disk before slot it into the unit. If dirty on disk go into the slot with disk,
that will lead unit to slow slot or cannot read disk. In fact ,that is not quality problem.
Please ask professional to clean the laser. That will bring you some inconvenience.
2.Playing disk for long time or high volume level will influence the lift of unit. To protect
this unit, please work with radio, middle level volume level during long time use.
3.This unit is set up by precision parts. Please do not open the unit or adjust any parts
inside unit by yourself.
4.Please do not touch LCD display by hard object to protect in form scratch.
5.To avoid accident caused by scatterbrain, driver should not operate this unit or watch
its screen. If needed, please park the car in a safe play before operation.
6.This unit is for 12V and negative ground system car, please do not connect it directly in
24V truck or bus.
NOTE: We keep improving this product, if there is any change, forgive us do not
announce.
SPECIFICATIONS:
Power supply..........................................................................................................DC 12V
Power range...............................................................................................10.8-16.0V DC
Max operate current.....................................................................................................10A
Ground system.........................................................................................Negative ground
FM tuner
Frequency range...........................................................................................87.5-108MHz
Signal/Noisse ratio......................................................................................................55dB
Stereo separation............................................................................................(1KHz)30dB
Search station volt.............................................................................................20-30dBuv
Distortion rate.............................................................................................................1.5%
AM tuner
Frequency range..........................................................................................522-1620KHz
Limit noise sensitivity..................................................................................................32dB
DVD PLAYER
Signal/Noise ratio.......................................................................................................70dB
Frequency response......................................................................................20Hz-20KHz
247
MODE
Sound,image 12CM
12CM
12CM
12CM
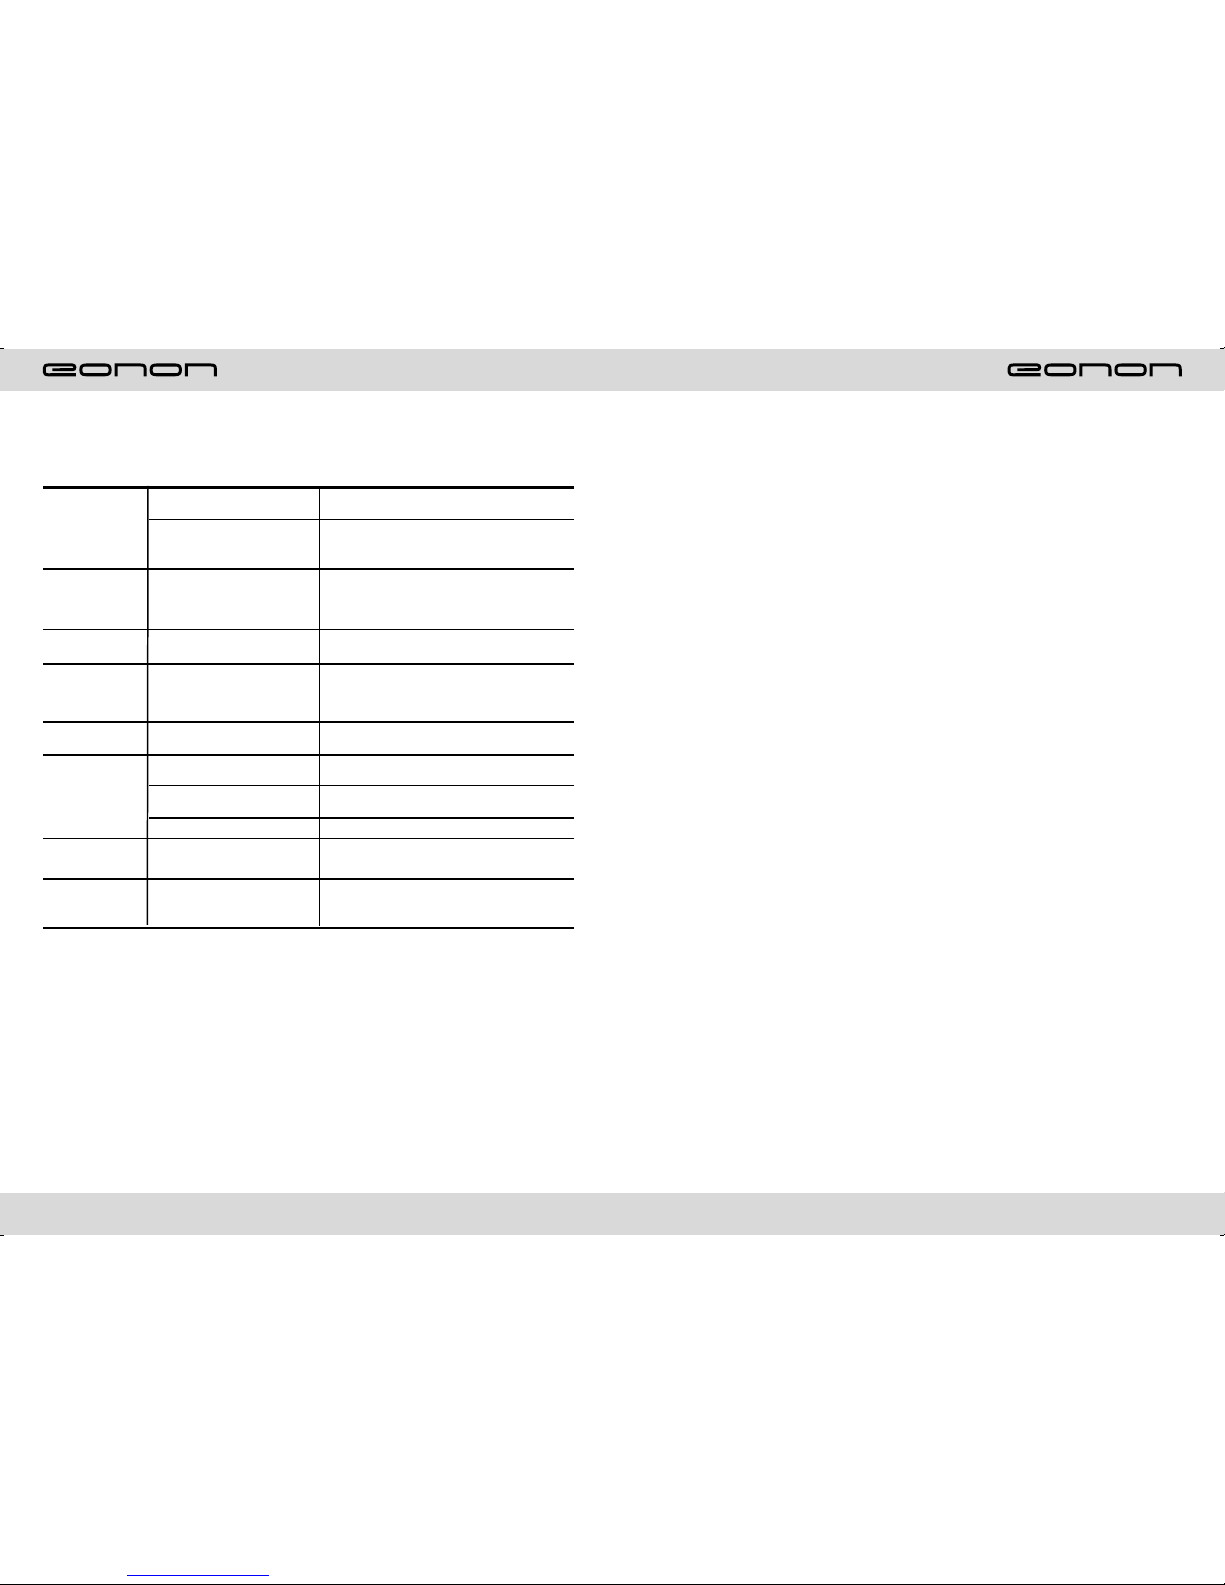
DVD
VCD
MP3
CD
Note: 1. This unit is compatible with MP4/DVD/VCD1.0/2.0/3.0 version,
DVD, CD-R, CD-RW, MP3, WMA, JPEG.
2. When play DVD, VCD, MP3, CD disc, display will auto identify
the disk and show corresponding word. When appear on
display, that means no that function, please choose other function.
Detailed operation please refer to other related instructions.
NOTE
● This unit can play the following disc:
ICON CONTENT DISC SIZE
Sound,image
Sound only
Sound only
●It may lead to accident if you are going to change unit.
●Playing disk during car run on bumpy road will damage laser. Playing substandard disk
or damage disk will damage laser.
●The environment of inside car is not good, too much dirty, please clean the laser by
laser cleanser timely.
●Do not work under terribly hot or cold environment, please ensure the temperature in
car is in -20℃~60℃.
●During operation, if appear on LCD, that means unit do not support that function,
operation is invalid.
●When unit is showing some abnormal, please refer to TROUBLE SHOOTING in this
instruction manual, If you cannot find any solution, please press RESET to resume to
initial status.
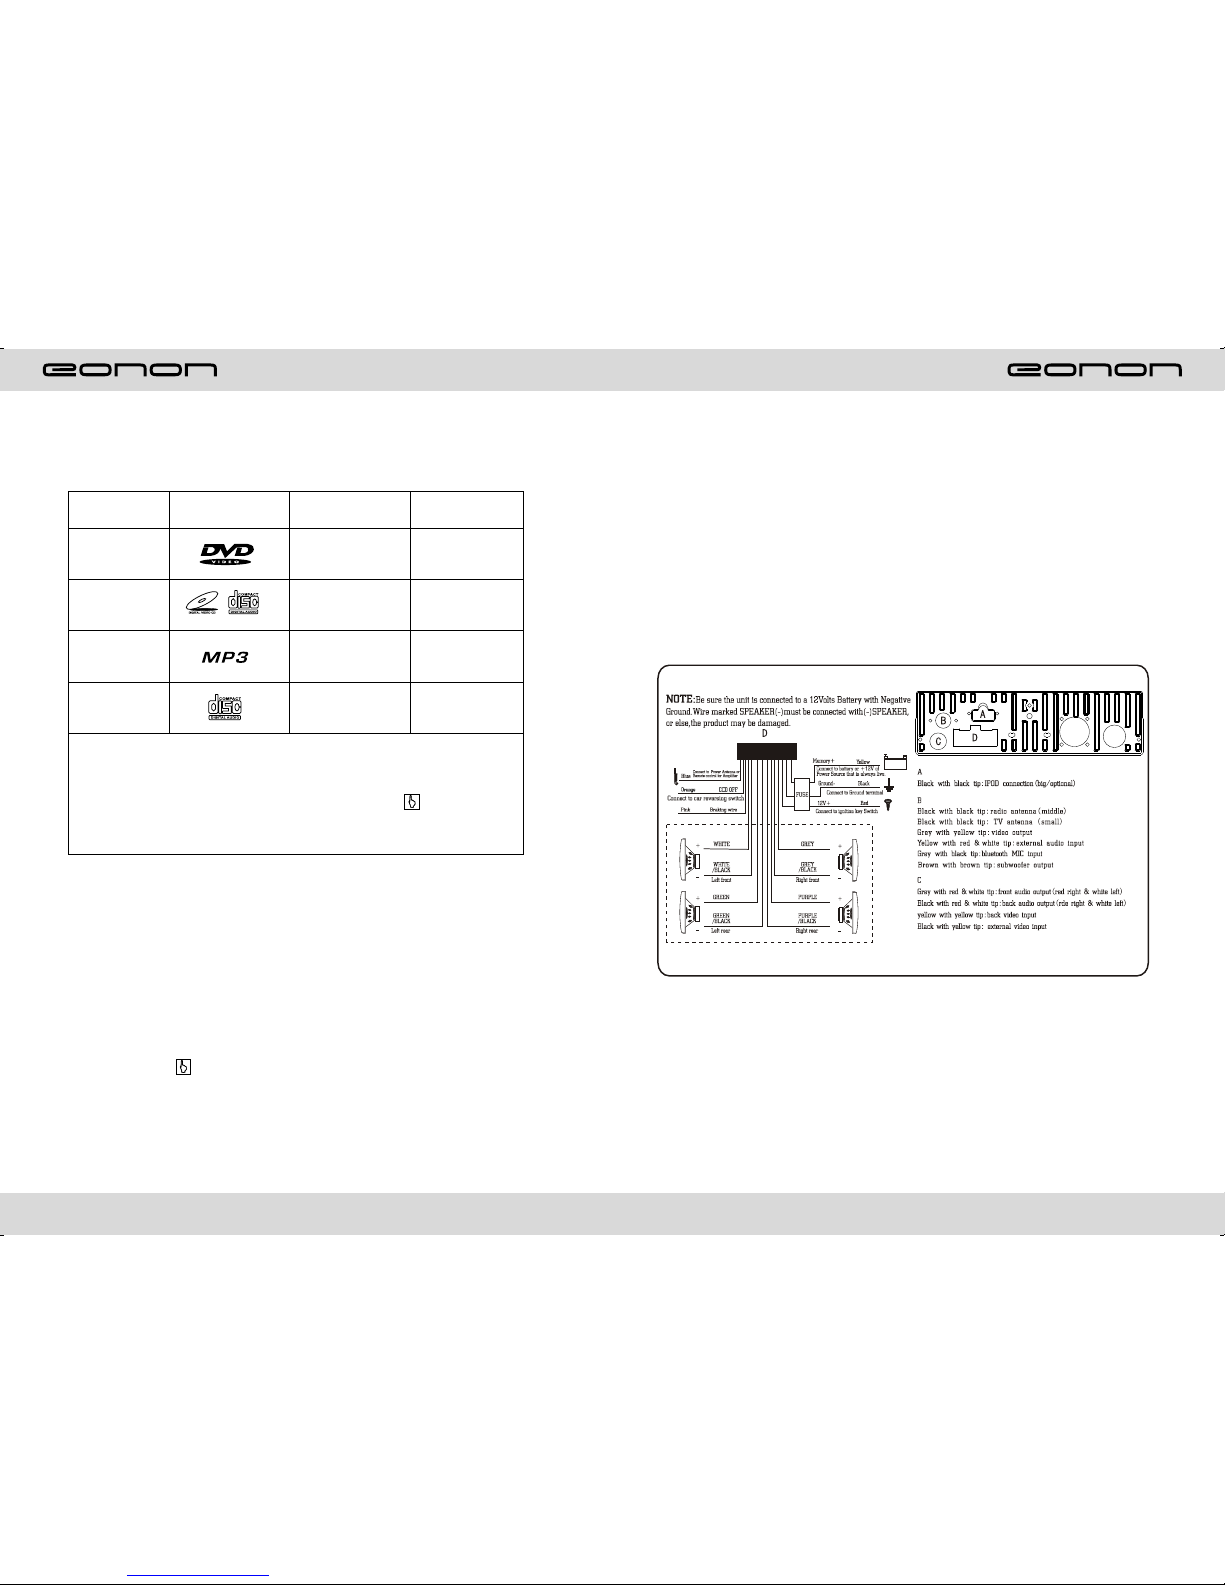
WIRING DIAGRAM
This player is equipped with ISO standard connector, please follow below instruction:
● Red - ACC ON (+12V) ● Grey/Grey black - Right front speaker anode/cathode
● Yellow - Battery anode (+12V) ● White/White black - Left front speaker anode/cathode
● Black - Ground line ● Purple/Purple black - Right rear speaker anode/cathode
● Blue - Power Antenna Control line ● Green/Green black - Left speaker anode/cathode
● Orange - Backsight camera power
control line
● Pink - Braking line
3
46
FEATURES
DVD PLAYER
1. International advanced MPEG-4 DECODE TECHNOLOGY
2. COMPATIBLE WITH MP4 (AVI/DIVX/5.X), DVD(DVD-R/DVD-RW),
VCD, SVCD, CD-RW, WMA, MP3 JPG
3. Multiple subtitles, angles, languages supporting, Child lock function
4. 4 CHANNEL AUDIO OUTPUT MODE
5. PAUSE, PLAY, UP/DOWN, STOP, ZOOM, PBC FUNCTION
6. FM/AM RADIO TUNER
30 RADIO STATION (18FM, 12AM)
BLUETOOTH FUNCTION
1. Bluetooth wireless transfers
2. Support displaying bluetooth paring and connection status, call status and caller's ID
3. Robust performance, fast connection, accurate and sensible search of devices in range
4. Support A2DP, AVRCP, HS/HF for handing calls and playing music.
LCD DISPLAY
1. 7inch, 16:9 TFT LCD display
2. Touch screen
3. Auto adotoried panel
4. Angle of turn adjustable
TROUBLE SHOOTING
PROBLEM CAUSE SOLUTION
Can not power on
Check whether power fuse
melt or not
Some factor cause MPU wrong
operation
Change fuse same as the old one
Press RESET button on the panel by pen
point, then, power on
After ignition
switch off, setting
information all lose
Wrong connection between
ignition line ACC and power
line anode pole BAIT
Reconnect line
Remote control no
function No enough power supply
from battery Change battery of remote control
Poor performance
of radio station
Improper set of length of
antenna, poor connection of
antenna grounding
Check whether antenna is connected or not,
or poor connection
Can not load disc There is a disc in deck Check grounding is connected or not
Can not play disc
Disc is scratched
Put wrong side of disc into unit
Lens has dirty
Change new disc
Clean lens by lens clean disc
Slot in the disk with sign side up
Can not switch
language/subtitle There is only one language/
subtitle in disc If disk is not with multi-language/subtitle, it
cannot switch language/subtitle
No image Video line between unit and
TV is not properly connected Reconnect lines
445
BASIC OPERATION
1.SOURCE ON/OFF
Press SOURCE button on panel or PWR button on remote control shortly to power on,
Press SOURCE button on panel or PWR button on remote control longer to power off.
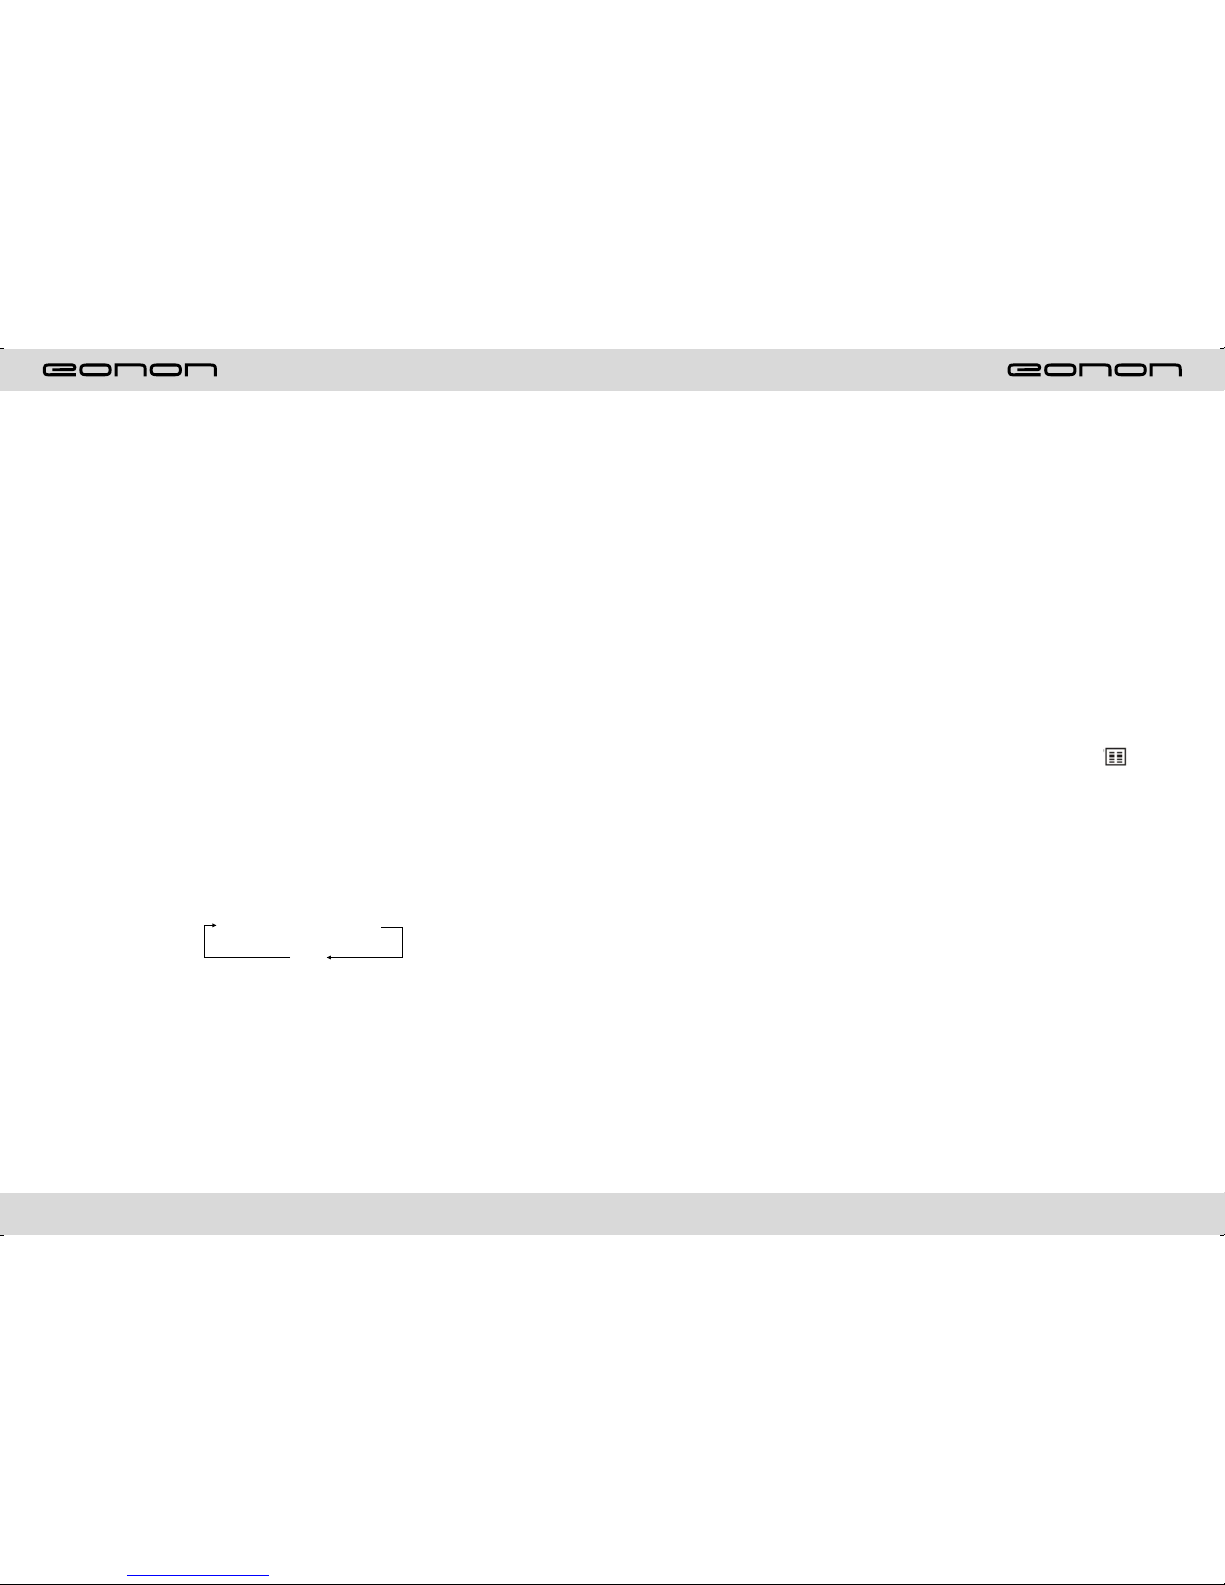
2.PLAYING SOURCE CHOOSE
Press SOURCE button on remote control, unit will switch source of playing as
following sequence:
RADIO → DVD → AUX → TV→Bluetooth
1)During switch mode, TFT LCD display will show the name of mode in English;
2)You can't switch to CDC and GPS mode by SOURCE button, content as follows:
RADIO
DVD
AUX
TV
Bluetooth
3.MUTE CONTROL
Press MUTE button on panel or MUTE button on remote control shortly to turn off
sound output, press again to back to sound output.
4.VOLUME ADJUSTMENT
1)Press VOL+/VOL- button on panel, VOL+/VOL- button on remote control or touch
button on display to adjust volume level.
2)The tone of volume is 0-39.
TONE MODE ADJUSTMENT (SEL)
Press SEL button on remote control shortly or touch area or SEL button on panel to
choose your desired tone mode:
VOL→BAL→TRE→L/R
F/R
NOTE:
1)At DVD playing state, MBP & User will be automatically activated.
2)After 5 seconds you choose desired mode, do not adjust volume button, the mode
will auto to back to status before adjustment.
OTHER PLAY MODE
AUX IN:
AUX IN OPERATION
1) Press “Source” button on remote control or touch “AUX” on the touch screen, switch
to
AUX mode.
2) Make video input plug connect to AUX video input outlet, audio input connect to
AUX audio input outlet.
3)This unit only supply 1pcs video input & 1 pair audio input.
CCD (Car backsight function)
1) If there is a car back
camera on your car, please connect car back control line “BACK” to your car camera
control terminal, and connect video input line to the video output terminal of your car
camera.
2) When car is back, the unit will auto switch to CCD mode, and there is a “ ”
appeared on the screen.
3) You can set CCD image according to your car's own position in general setting mode.
5
44
5.RESET
1) If unit is dad abnormal status appear because of wrong operation, press RES
button on panel by penpoint, unit will resume work.
2) After reset, all setting will resume to setting before leaving factory.
PANEL ARRANGEMENT
Operations and Settings for the Bluetooth Function
1.Features of the Bluetooth function
1)You can use the function buttons on the unit to receive a call or dial a phone number.
2)You can directly use the hand-free microphone to talk on the phone.
3)You can use the build-in volume control switch to adjust the volume at will.
4)You can switch between the Bluetooth hand-free mode and the cell phone mode.
5)You can use your voice to dial a new number (valid only for cell phones with voice
dialing function).
6)With the Bluetooth function, you can use the Bluetooth microphone in the car to talk
with your folks and friends without having to hold your cell phone, so that your hands
are dedicated for driving, which is safer and law-observing. In the mean time, magnetic
radiation from the cell phone is avoided.
2.Bluetooth match conditions
You can shortly touch the Bluetooth function key under the main menu to directly
access the Blueetooth interface.
With a cell phone that supports the function of Blueetooth wireless connection, you can
establish a connection between your cell phone and the automobile-loaded unit under the
Bluetooth mode to achieve date exchange and synchronization.
3.Matching and connections between the cell phone and the Bluetooth of the unit
Set your cell phone to the Bluetooth mode, and use the cell phone to search equipments.
After the Bluetooth equipment of the unit is searched, the cell phone will ask you for the
Bluetooth password. Press the unit matching setup button , and enter the Bluetooth
password (0000) and confirm it, and then the cell phone will ask you whether you
authorize
the connection with this equipment or not. Please select “YES”, and the cell phone will be
automatically connected with the said Bluetooth equipment within 30 seconds. “OK LINK”
will be displayed on the Bluetooth interface to show that a connection between the cell
phone and the Bluetooth device has been successfully established. Under and mode
(radio, TV, DVD, etc.), if there is an incoming call to your cell phone which has been
stably
connected to the Bluetooth device of the unit, the unit will switch from other mode to the
Bluetooth mode after the cell phone rings for about 10 seconds. Current mode will be
automatically restored after hang-up.
643
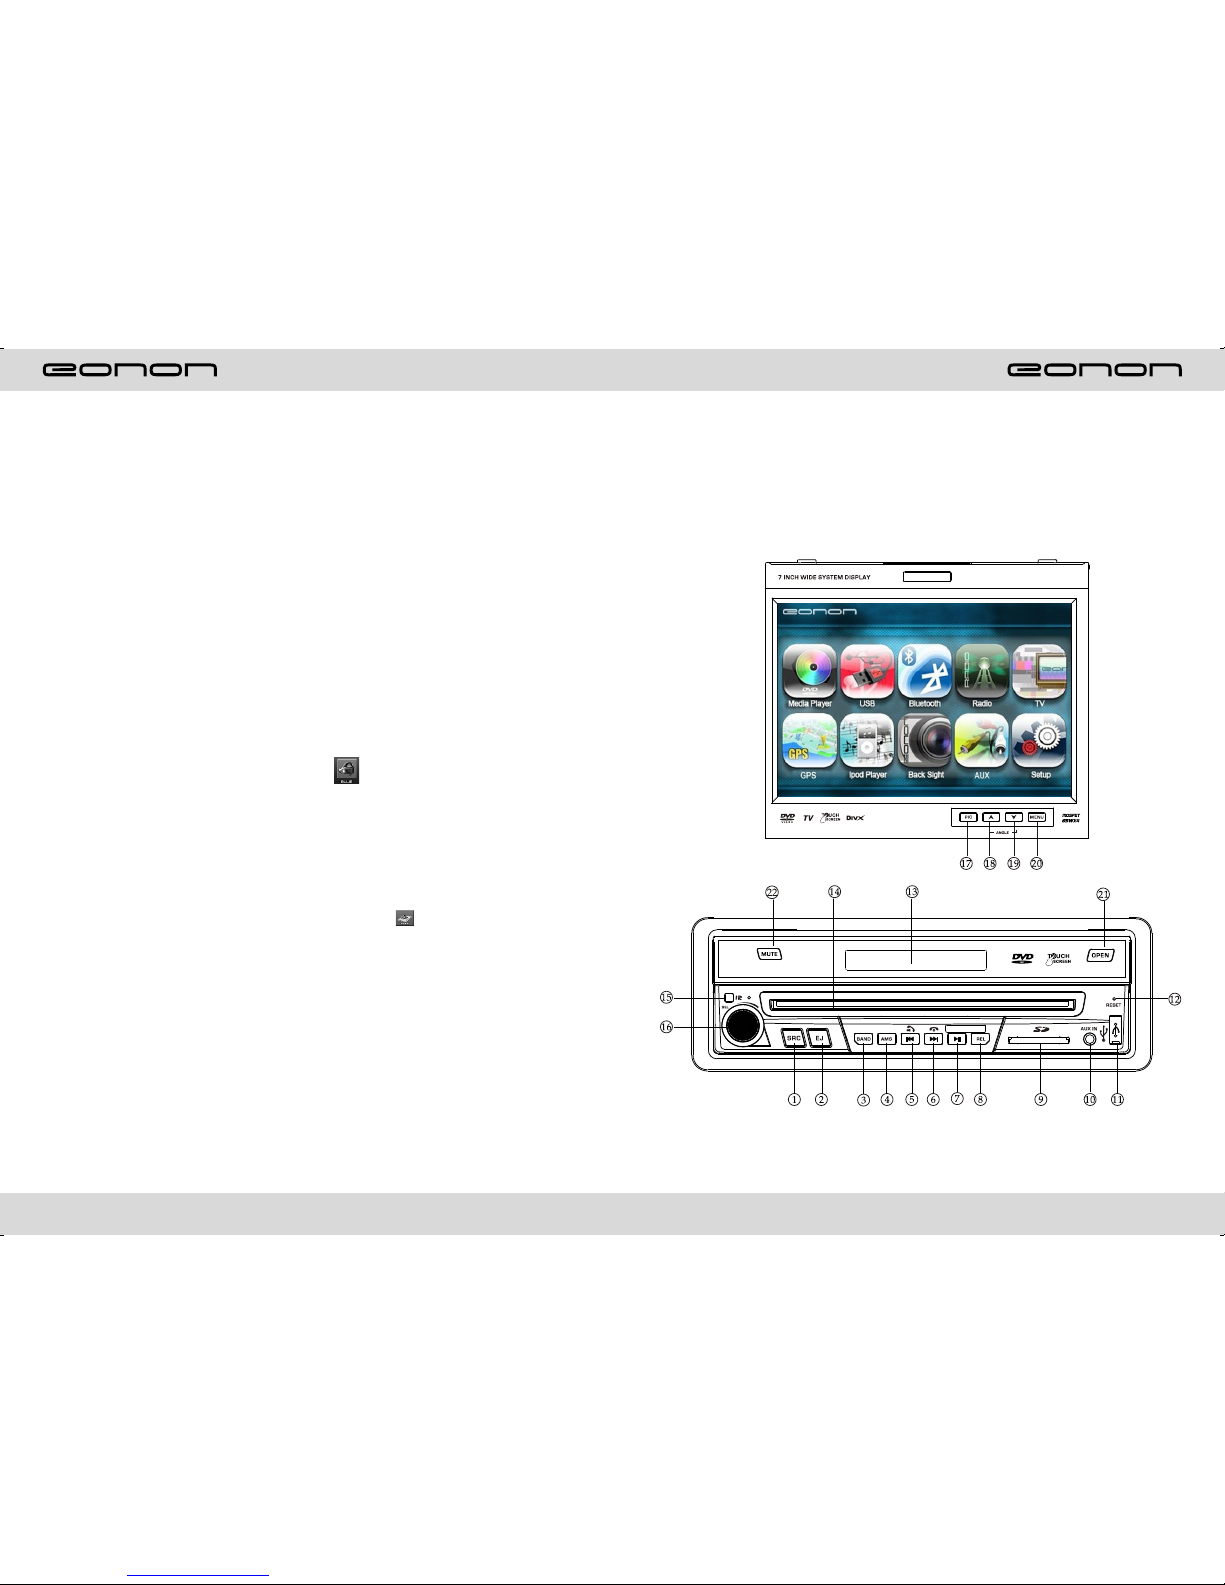
PANEL BUTTON CONTROL INSTRUCTION
1.Power on/off/function MODE button
2.2.Disk out button
3.Band button
4.AMS program Preset /TV Auto Save/Play Repeat button
5. Selection/Previous/hand-free
6. Selection/Next/Hang-up
7. Pause button
8.Release button
9.SD socket
10.AUX External input
11.USB Socket
12.Reset button
13.LCD Display window
14.Disk load slot
15.Remote controller receiving window
16.(VOL/SEL)Volume adjustment mode
17.PIC color selection button
18. UP adjustment (TFT screen)/Hand-free
19. DN Adjustment (TFT SCREEN) /hand up
20.MENU button
21.TFT screen extend/retreat
22.MUTE/TFT ON / OFF button
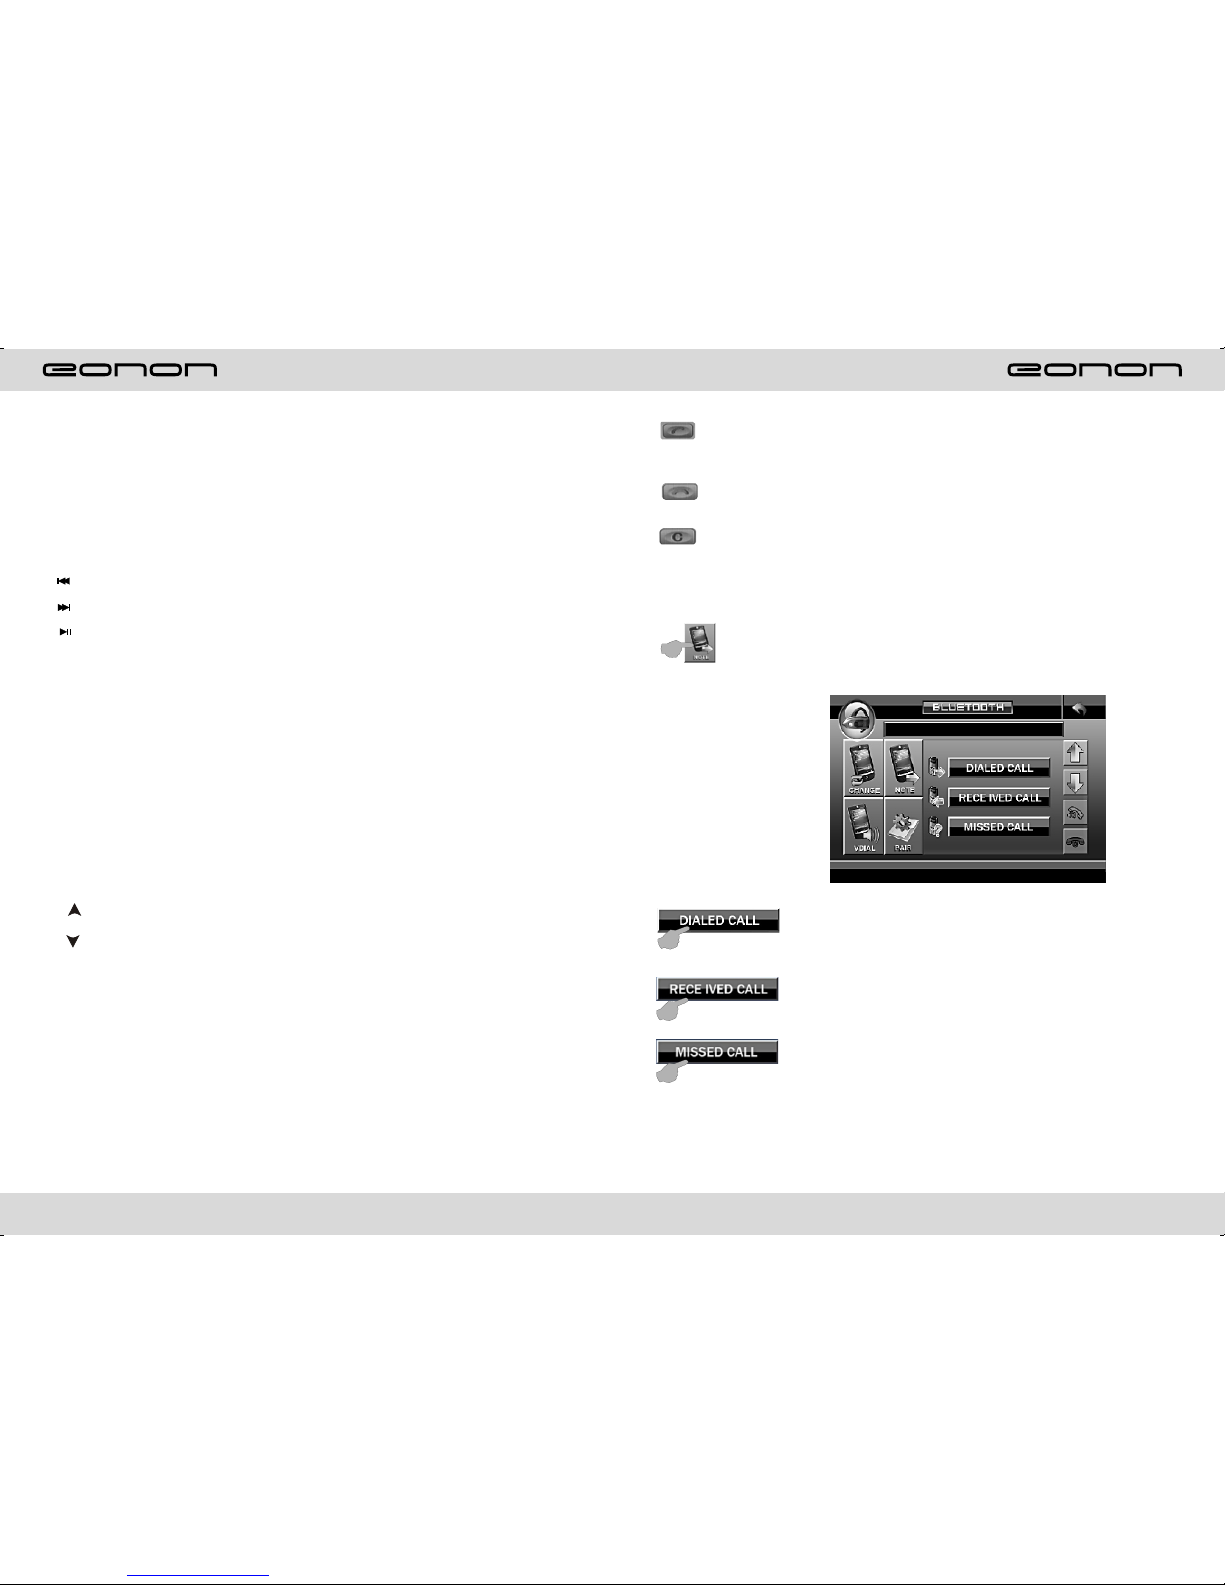
Hand-free button: After a phone number is keyed in, press this button to call
the user of this phone number. When there is an incoming call. Press this button
to connect this call.
Hang-up button: When there is an incoming call, press this button to hang up
or refuse to connect it.
Delete button: When a wrong digit is keyed in, press this button to delete the
wrong digit.
Number keys: You can use these number keys to enter a phone number.
Phone number display: The phone number that you have just entered is Displayed
here.
Contact book mode switching
You can touch this button under the Bluetooth mode to select the next mode.
Touch this function key to search the dialed numbers. Each time
This key is touched, the cursor will move to the next dialed number.
Touch this function key to search the received numbers. Each time
This key is touched, the cursor will move to the next received number.
Touch this function key to search the missed numbers. Each time
This key is touched, the cursor will move to the next missed number.
7
42
2.Panel button control instruction
1.Power On/Off / Function MODE button
Press this button for a short moment to turn on power, and long press it to turn off
power. Every button-press activates mode change as follows:
Every button-press activates mode
change as follows:Note:When the
device without connecting to USB.
SD,CDC or DVD no Disc inside,
the system will automatically skip
These related wording mode.
2.Disc Out button
Press this button can eject the disc.
3.BAND/SYS /P.N
In radio mode, press this button to switch bank, every time to choose band, the
sequence is as follows:
In TV mode, shortly press this button to switch TV sound system. The sequence is as
In play state:Short press this button can select following 3 video system
4.AMS Program preset/TV Auto Save/Play Repeat button
Under radio mode,Press this button for a short moment to start scanning preset
programs.
Under TV mode,Press this button for a short moment to activate auto search and TV
Channels will be automatically saved . Under PLAY mode,press it to repeat playing a
single song, and press it again to turn off this function.
RADIO
DVD
AUX
USB
SD
TV
GPS
CDC
(Optional)
(Optional)
FM1 FM2 FM3
AM1
AM2
SECAM PAL MPAL N
NTSC
PAL I
PAL AUTO NTSC
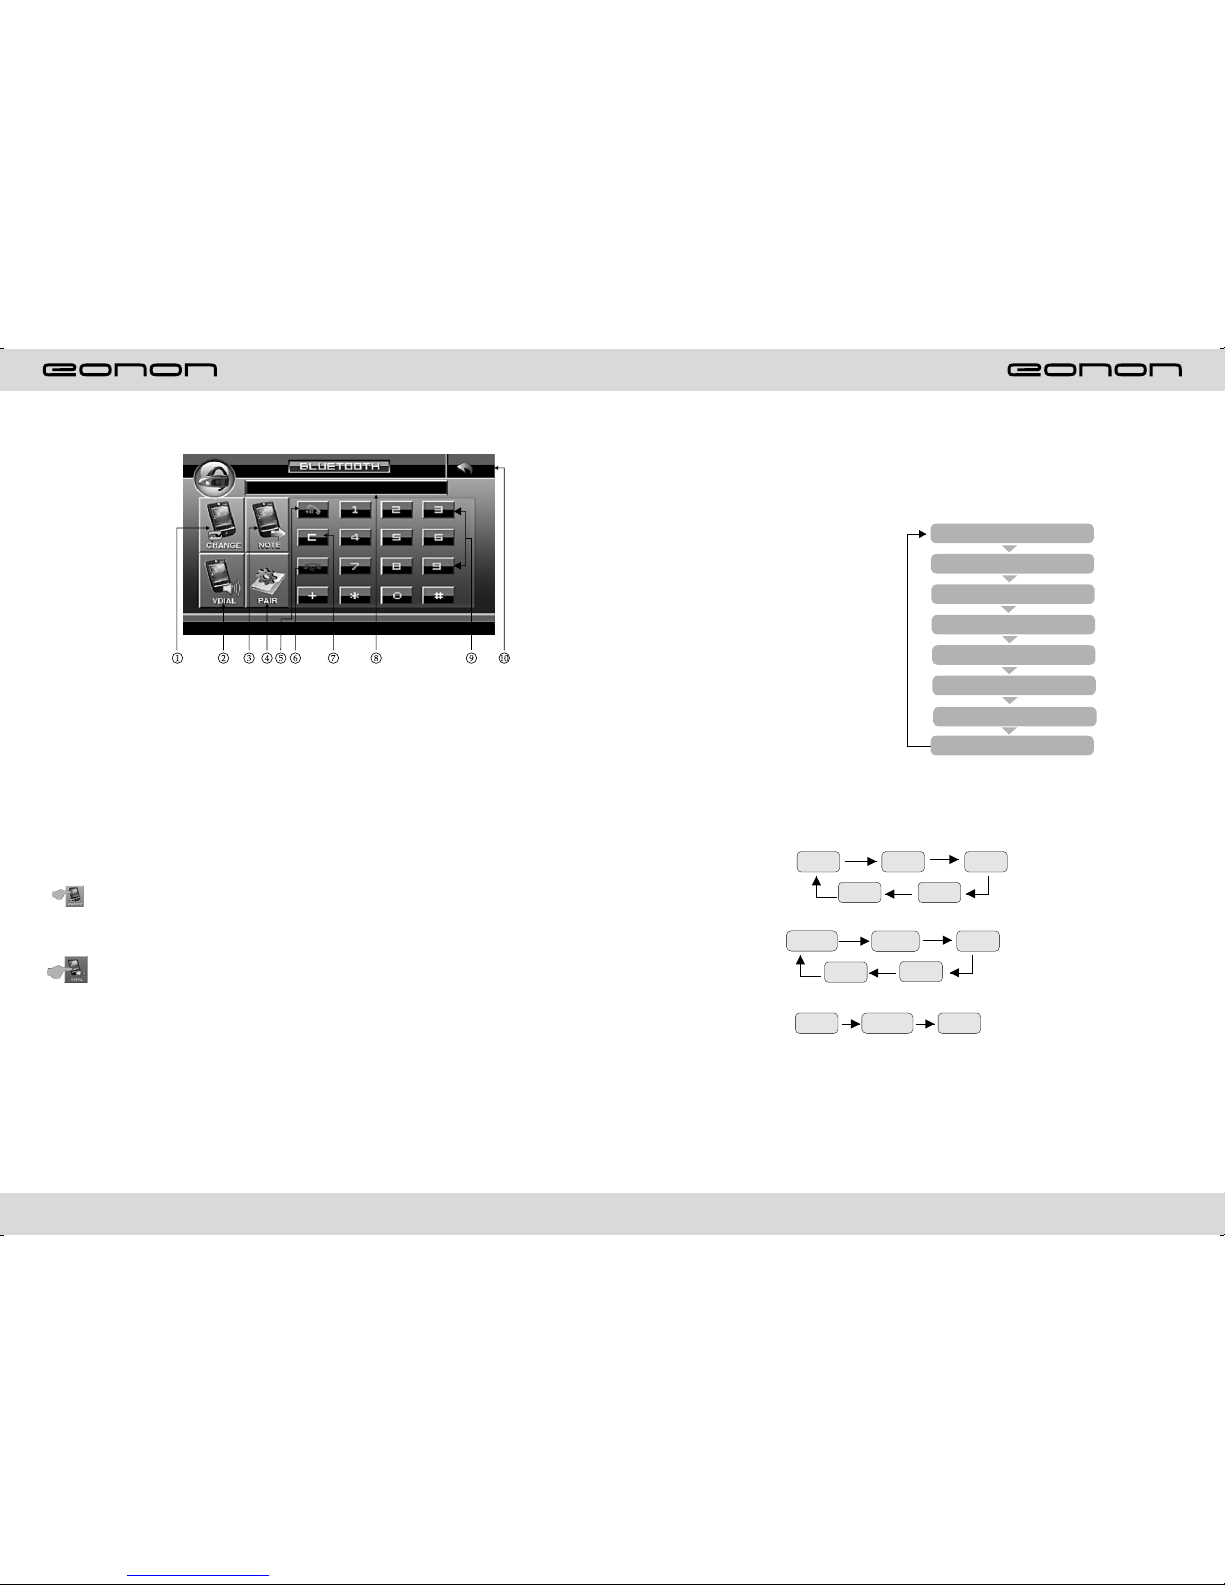
1.Bluetooth hand-free/cell phone switching
2.Voice dialing function
3.Contact book mode switching
4.Matching function during Bluetooth connection
5.Hand-free key
6.Hang-up key
7.Delete key
8.Phone number display
9.Number keys
10.Return to the main screen
BLUETOOTH TOUCH OPERATION
Functions and Descriptions
Bluetooth hand-free/cell phone switching
If you touch this switching button at the upper-left corner of the screen under the
Bluetooth hand-free mode, the speaker will beep and the hand-free mode will be
switched to the cell-phone mode.
Voice dialing function
If you touch the “Voice dial” button at the lower-left corner of the screen under the
Bluetooth hand-free mode and the cell-phone mode, you will hear the keying tone, and
you can go ahead with the voice dialing function according to the cell-phone instructions.
Eg, if you wish to call someone, you can pronounce his/her name stored in the cell
phone, then ,the name of the person to be called will be played by the speaker, and the
telephone number of this person will be displayed on the screen and automatically dialed.
To cancel voice dialing
If you wish to disable the voice dialing function in the voice dialing mode, you can press
the “Voice dialing” key again, and this function will be disabled after you hearing the
keying tone.

841
TV
Touch TV mode of the menu or press SOURCE button on remote control to switch to
TV mode, auto scan and store channels.
Press AMS/RPT button on remote control or SCAN touch button on display to auto
scan TV channels. The range of scan if full TV channel. The channels will auto store into
number button in sequence.
1. Switch channel
1) Press SEEK + / SEEK- button on panel or SEEK + / SEEK- on remote control or /
touch button on display, unit will skip to previous or next stored channel.
2) Press number button on remote control, unit will skip to appointed channel, for
example, press 6 button, unit will skip to 6 channel. Press 10+, “_ _” will appear on left
top corner of display, press number button 3,9, unit will skip to 39 channel.
2.Manual tuning TV channel
1) Press and hold SEEK + button on panel, SEEK + button on remote control, or
touch button on display to scan TV channel in increase direction.
2) Press and hold SEEK - button on panel, SEEK - button on remote control, or
touch button on display to scan TV channel in descending direction.
3.TV sound system switch
Press the AUDI button on the touch screen to switch TV sound system. The sequence is
as follows:
PAL I→PAL DK →PAL BG →PAL I
4.Blue screen
The display will be blue when there is no signal.
5. Selection/Previous/hand-free
At the Radio state:short press this button can adjust the radio frequency by single
step.Long press the button can seek up the radio station automatically.At TV state:short
press this button to select previous channel.Long press it can adjust the frequency step
by step.In the play state::short press this button to select the previous song .Long press it
can do fast backward at X2.X4.X8.X16.X20's speed,At bluetooth state:When a phone
come in, press this button can answer the phone.
6. Selection/Next/Hang-up
At the Radio state:short press this button can adjust the radio frequency down by single
step,Long press the button can seek down the radio station automatically.At TV state:
short press this button to select next channel.Long press it can adjust the frequency step
by step.In the play state:short press this button to select the next song.Long press it can
do fast forward at X2.X4.X8.X16.X20's speed,At bluetooth sate:When a phone come
in,press this button can hang up the phone.
7. Pause button
In playing state,press this button to execute play/pause.
8.Release button
Press this button can take off the control panel
9.SD socket
This is a high-spees transmission interface,which can read high-capacity date in MP3 or
MP4 format.
10.Aux External Input
External connected audio input.
11.USB socket
Connect the USB memory to this socket, and the unit can play music format files supported
by this unit in the USB memory
12.Reset button
Press this button can back to default mode.
13.LCD Display Window
Under radio mode:Channel and frequency are displayed,Under PLAY mode,the directory
of the song and time elapsed are displayed.
14.Disk load slot
Opening for disks to enter or retreat.
15. Remote Controller Receiving Window
It receives infra red signals from the remote controller which fits this device.
16.(VOL/SEL) Volume adjustment mode
Repeat pressing this button can select the VOL. BAS. TRE. FAD adjustment mode. Then
can rotate the button to adjust VOL. BAS. TRE. FAD as your likes.
Indice
Altri manuali Eonon Sistema video per auto

Eonon
Eonon E1102 Manuale utente

Eonon
Eonon E1013 Manuale utente

Eonon
Eonon D5103 s Manuale di installazione e funzionamento

Eonon
Eonon D2203D Manuale utente

Eonon
Eonon M2 Manuale utente

Eonon
Eonon E1015 Manuale utente

Eonon
Eonon D1305 Manuale utente

Eonon
Eonon D3108M Manuale utente

Eonon
Eonon D3101M Manuale utente

Eonon
Eonon L0305M Manuale utente

Eonon
Eonon D2205 Manuale utente

Eonon
Eonon DB Series Manuale utente

Eonon
Eonon G2202 Manuale utente

Eonon
Eonon E0853 Manuale utente

Eonon
Eonon E0805 Manuale utente

Eonon
Eonon E1057 Manuale utente

Eonon
Eonon D5109 Manuale utente

Eonon
Eonon E1010 Manuale utente

Eonon
Eonon E1009 Manuale utente

Eonon
Eonon E1060 Manuale utente


