Everbilt 22042226 Manuale utente

USE AND CARE GUIDE
2 IN. DUAL FLUSH CONVERSION KIT
Questions, problems, missing parts? Before returning to the store,
call Everbilt Customer Service
8 a.m. – 7 p.m., EST, Monday-Friday, 9 a.m. – 6 p.m., EST, Saturday
1-800-305-1726
HOMEDEPOT.COM
THANKYOU
tinuallycreate
qualityproducts designed to enhance your home. Visit us online to see our full line of products available for your home improvement needs.
Thank you for choosing Everbilt!
Item #1005 094 086
Model #22042226

WARNING
3YEAR WARRANTY
2
Table of Contents
Safety Information
Warranty
Table of Contents ...................................................................... 2
Safety Information ..................................................................... 2
Warranty.................................................................................... 2
3Year Warranty ................................................................... 2
Pre-installation .......................................................................... 2
Parts Overview..................................................................... 2
IncompatibleApplications ................................................. 3
Tools Required .................................................................. 3
Pre-installation ....................................................................... 3
Installation ............................................................................. 4
Package Contents ............................................................ 3
In-tank toilet bowl cleaners are not to be used with this product. Use of cleaning products containing chlorine or bleach pose the risk of
damaging toilet components and can lead to excessive water loss. Evidence of in-tank cleaning chemicals usage in conjunction with this
product voids the manufacturer’s one year guarantee.
The 2 in. Dual Flush Conversion Kit provides a guarantee for three years following purchase of the product. The guarantee is limited to product
defects that arise through normal product usage and are the result of manufacturing error or faulty material. Under these circumstances,
manufacturer will provide a replacement product at no charge. The customer will be responsible for sending the product to manufacturer,
providing evidence of purchase date and reinstalling the replacement product. The guarantee will be void if the product has not been
installed or maintained properly or if the product has been exposed to in-tank toilet bowl chemicals.
Contact the Customer Service Team at 1-800-305-1726 or visit www.HomeDepot.com.
Pre-installation
PARTS OVERVIEW
Adjust Screw
Float Cup
Lock Ring
Torque Limit Nut
Rubber Washer
Joint Nut
Tube
Black Rubber Base
Cap
Release-push
Control Box
Locknut
Washer(T)
Handle
Control Cable

3
Pre-installation
HOMEDEPOT.COM
Please contact 1-800-305-1726 for further assistance.
PACKAGE CONTENTS
Part Description Quantity
AFILL VALVE 1
BCONVERTOR 1
CTRIP LEVER ASSEMBLY 1
C
B
A
INCOMPATIBLE APPLICATIONS
TOOLS REQUIRED
Bucket Level
PencilTowel
Sponge
3'' Flush Valve 1-piece Toilets
(tanks less than
9'' in height)
Flush Valves
American Standard
Actuato Flush
valves
Kolher
Side-Mount
Valves
Push Button Style/This device
is not intended to be used as
gpf ) water closet

4
Installation
MARK WATER LEVEL TURN OFF WATER
MARK WATER LEVEL DRAIN WATER
1 2
3 4
□Mark the water level (WL1) in the bowl with apencil
□Use a pencil to mark the water level 2A(WL2A).
□Turn off the water supply(1).
□Remove the water supplylinefrom the bottom of the
□Flush the toilet and mark residual water level 2B (WL 2B).
□Measure and record the distance “L” from WL2A toWL2B.
□Remove excess water from the tank with a sponge.
WL 1
2
1
WL 2A
WL 2B
L
WL 2A

HOMEDEPOT.COM
Please contact 1-800-305-1726 for further assistance.
5
Installation (continued)
REMOVE OLD COMPONENTS CLEAN AND DRY
RELEASE THE HANDLE SEATING THE CONVERTOR
5 6
7 8
□
□Press to release handle.
□Clean the tank and surface of thepedestal with a towel
and soapy water, then dry.
□Seat theblack rubber base of the convertor (B) into the
NOTE: Convertor should sit completely and vertically.
Release-push
C
B
6
Installation (continued)
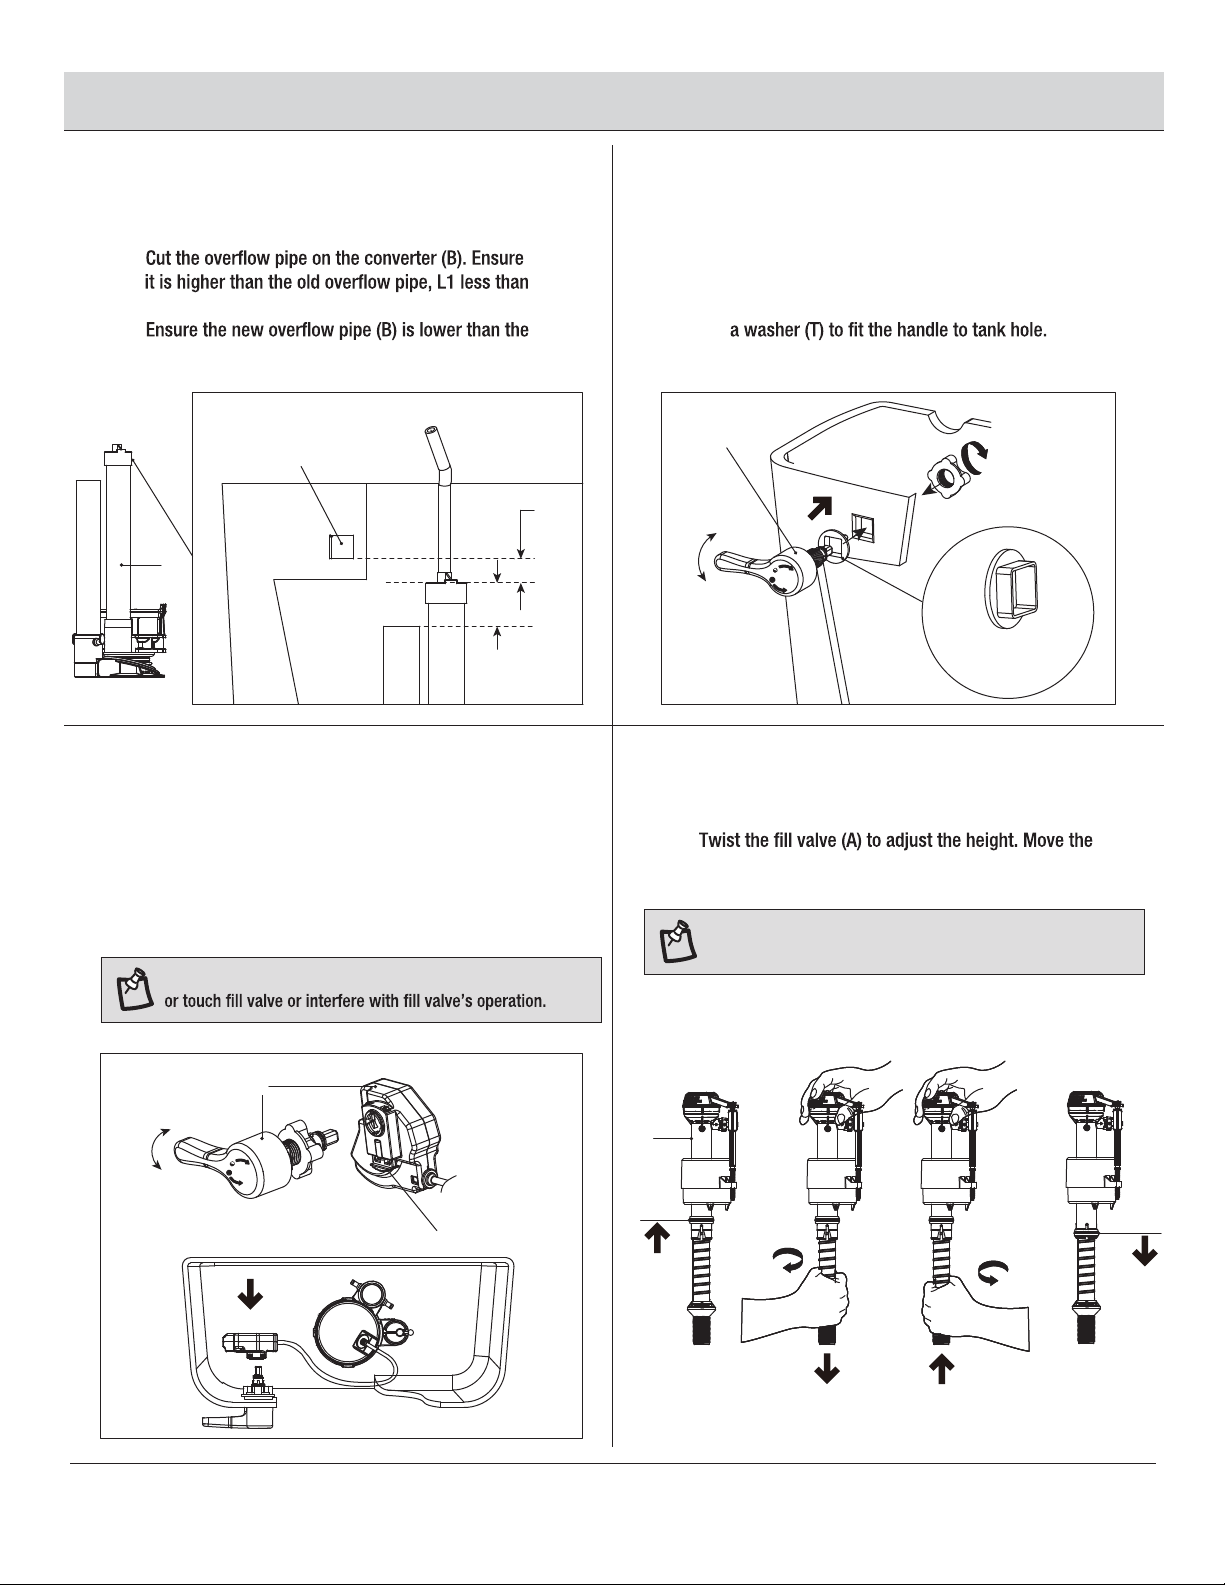
CUT NEW OVERFLOW PIPE POSITION THE HANDLE
9 10
11 12
□Position and hand tighten thehandle of the trip
lever assembly(C) in the tank hole.
□When the tank hole diameter is greater than 17.5 mm,
use
□
1in.
□
tank hole, L2 greater than 1 in.
ATTACH CONTROL BOX ADJUST HEIGHT OF NEW
FILL VALVE
□Push in the blackrelease of the trip lever assembly(C).
□Attach the control box of the trip lever assembly (C)
to the handle until you hear aclick. This ensurethe
clip has secured the control box to thehandle.
□
lock ring up. After setting theheight, move the lock
ring down.
NOTE: Control box and control cable MUST NOT kink
NOTE: Increase height – twist lower shank clockwise
Decrease height – twist lower shank counter clockwise.
A
L1
O.L
Tank hole
L2
B
Full
Half
Release-push
C
C
Full
Half
Optional
Washer(T)
Lock
Ring Lock
Ring

HOMEDEPOT.COM
Please contact 1-800-305-1726 for further assistance.
NOTE: Hand-tighten the torque limit nut until it makes
an audible click.
7
Installation (continued)
INSTALL NEW FILL VALVE ATTACH NEW REFILL TUBE
1413
15
□□
□Install the torque limitnut. Itcan prevent leaks and cracks.
□
RECONNECTWATER
SUPPLY
□Clean and reconnect the water supply lineto the
□Turn on the water supply and check for leaks (2).
CAUTION: Do not over tighten the nut.
WARNING
A
3"
A
1
2

8
Installation (continued)
FULL FLUSH WATER
ADJUSTMENT
17
□Turn off the water supply.
□Flush the tank tominimum residual water level.
□Measure "L" from WL 3Atomark WL 3B in tank.
□Turn on the water supply.
□
the setting tothenext lower number and repeat. Until the
residual water level reaches WL 3B.
□Use a pencil tomark the water level (WL3A). Ensure itis
□
a. If the water level ishigher than WL3A, turn the tank water
to reset water level.
b. If the water level islower than WL3A, turn the tank water
water level.
16 CHECK TANK WATER
LEVEL
NOTE: “L” is measured in step 4.
NOTE: Make sure water level in the bowl reaches W1 for
WL 3A
L3
Float
WL 1
Full
L
WL 3B
HOMEDEPOT.COM
Please contact 1-800-305-1726 for further assistance.
9
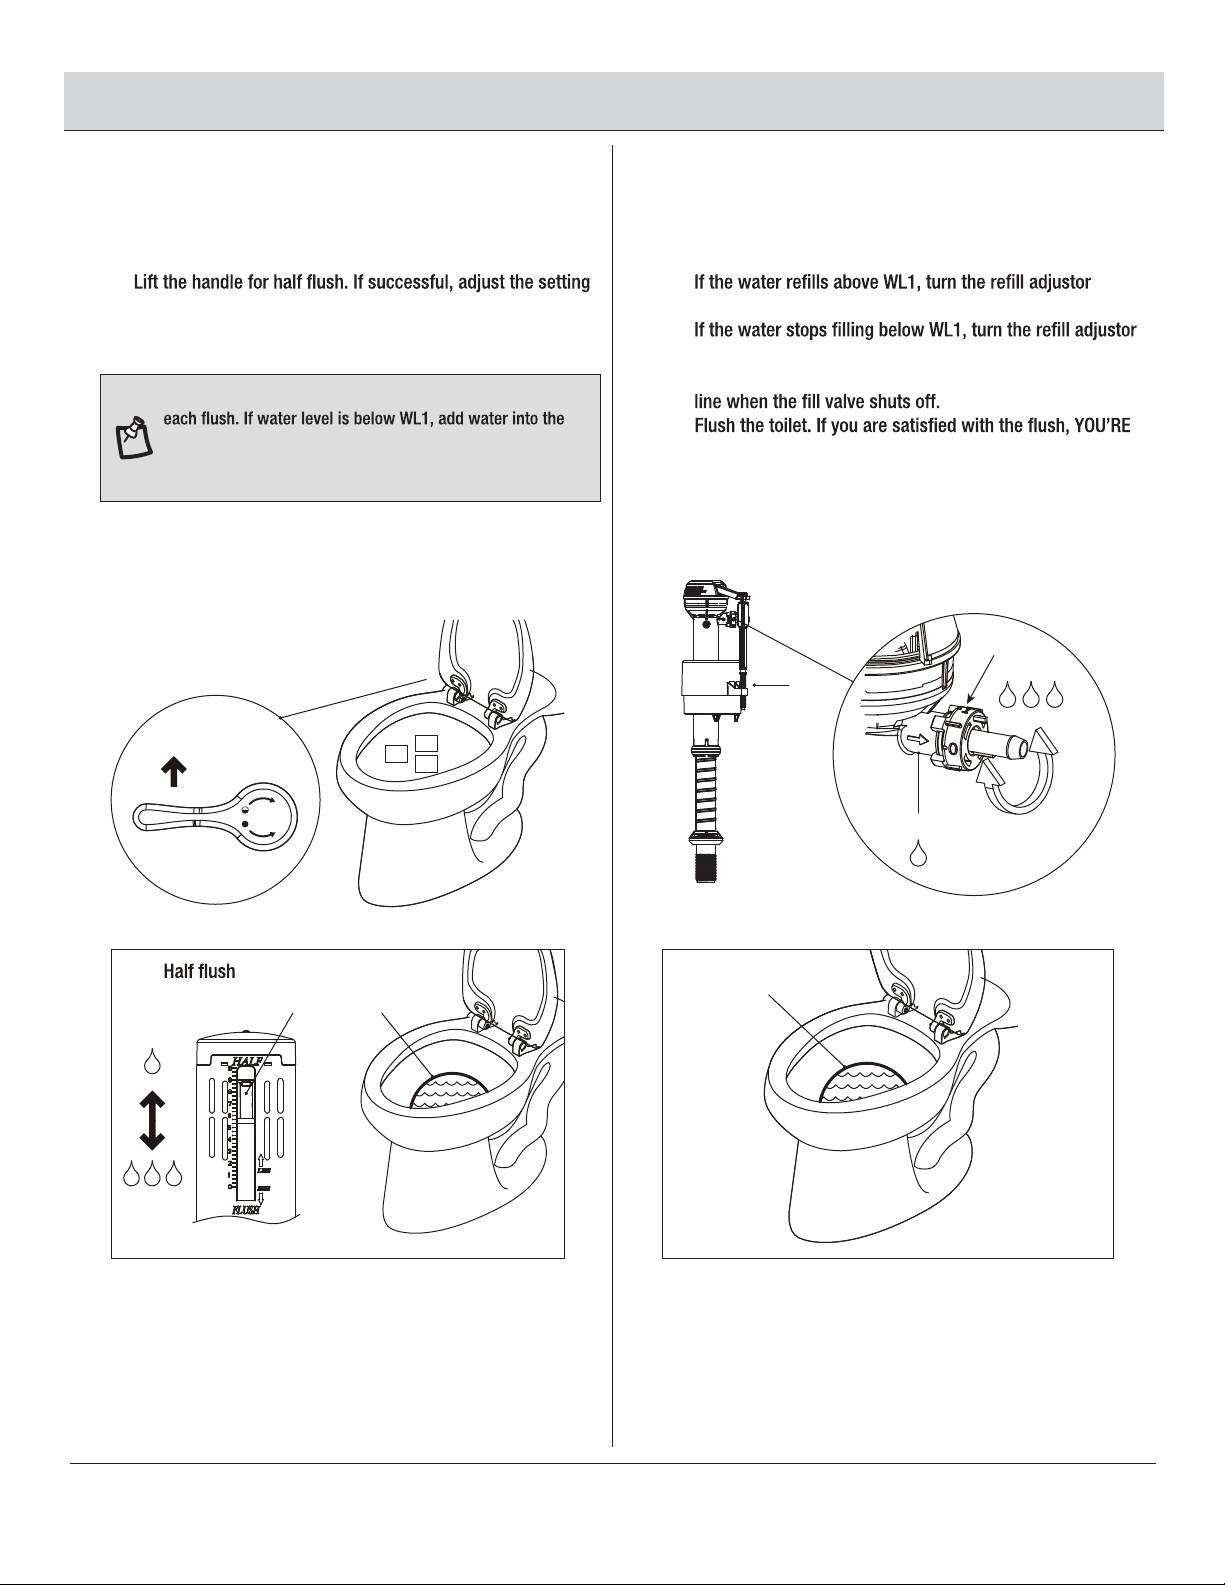
NOTE: Make sure water level in the bowl reaches W1 for
bowl.
Performance may vary since product was not tested on all
water closet models.
Installation (continued)
HALF FLUSH WATER
ADJUSTMENT
FULL FLUSH WATER
ADJUSTMENT
1918
□Drop three pieces of toilet paper in the bowl.
□
to the next lower number and repeat. Ifunsuccessful, adjust
the setting to the next higher number.
□Flush toilet, check bowl water level.
□
clockwise.
□
counterclockwise.
□Repeat steps until the water level in the bowl matches the
□
DONE!
A
Half
FloatWL 1
WL 1
Decrease
Increase

1-800-305-1726
HOMEDEPOT.COM
Questions, problems, missing parts? Before returning to the store,
call Everbilt Customer Service
8 a.m. – 7 p.m., EST, Monday-Friday, 9 a.m. – 6 p.m., EST, Saturday
Retain this manual for future use.
Questo manuale è adatto per i seguenti modelli
1
Indice
Lingue:
Manuali Toilette popolari di altre marche


Better Bathrooms
Better Bathrooms BUN/BeBa 27555/78725 Manuale utente

American Standard
American Standard CONCEPT Cube TF-2704 Manuale utente

BIOLAN
BIOLAN ECO Manuale elenco delle parti

Thetford
Thetford C260 Series Manuale utente

KELISS
KELISS T162A Series Manuale utente

Kohler
Kohler K-22241K Istruzioni per il montaggio


