Fortis FS20FDMTBBA Manuale utente

20" FOLDING MOUNTAIN
BIKE
FS20FDMTBBA


Read all of the instructions in this guide before using this product. Retain this guide for future
reference. Do not skip, substitute or modify any steps or procedures in this guide, as doing so
could result in personal injury or product damage.
Before First Ride
• Before first use, please double-check the function of all the parts of your bike. If you have
any doubts or if you detect a problem, please contact Kogan.com for support.
• Respect local and national road traffic regulations.
• For your safety, it is highly recommended that you wear a certified helmet.
• When used during heavy rain, snow, in slippery conditions or in the case of low visibility,
be careful and adjust your speed.
• Some state and local traffic laws may require that your bicycle be equipped with a
warning device, such as a horn or bell and a light, if the bicycle is to be ridden after dark.
When you are riding on the road, make sure that you are always visible to other vehicles.
Please respect the rules of the road in all circumstances.
• The following user guide is only a guide to assist you and is not a complete or
comprehensive manual of all aspects of maintaining and repairing your bicycle. If you
are not comfortable, or lack the skills or tools to assemble the bicycle yourself, you
should take it to a qualified mechanic at a bicycle shop. Additionally, you can contact
Kogan.com for support.
• This product is designed for consumer use. Follow directions and use only as described.
• Once fully assembled, inspect to ensure all hardware parts such as bolts, nuts and
washers are positioned correctly and tightly secured.
• The kickstand is designed to support the bicycle only. Not the rider.
• Always inspect the seat post, seat slider, pedals and handlebar to make sure they are in
safe and stable position before using the bike.
• It is recommended to lubricate all moving parts on a regular basis.
• Do not remove feet from the pedals while they are in motion. Wear running shoes or
other footwear suitable for exercise.
• Dry after each use to remove moisture. Wipe regularly with a mild, non-abrasive cleaner
and water solution. To avoid damaging the finish, never use a petroleum-based solvent.
• Do not dismount the bike until the pedals are at a complete stop.
• Prior to assembly, ensure you have all the components and tools listed. Some
components are pre-assembled to help with the assembly process.
• Always use the product as intended. If you find any defective components while
assembling or checking the equipment, or if you hear any unusual noises coming from
the equipment during use, cease use immediately and contact help.kogan.com for
assistance. Do not use until resolved.
• Do not place fingers or any other objects into moving parts of the bike.
SAFETY & WARNINGS

• Adjust the seat height and handlebar height, rider must be able to straddle bicycle with
at least 1-inch (2.54cm) clearance above the horizontal bar when standing.
• Check tyre pressure. The tyre pressure range of this bike is 40psi as shown on the tyre.
Ensure that the tyre pressure is within the range to avoid accidents. (1psi=6.895kPa)
• Children below 14 years old should not play with the product.
• Do not allow children to inflate tyres.
• Recommended torque requirements in Newton metres for the following:
o Front axle nuts. 15-25 N m
o Back axle nuts. 20-30N m
o Handlebar clamp nut/bolt. 8-12N m
o Handlebar stem expander bolt. 35-45N m
o Seat pillar clamp nut/bolt. 18-22 N m
o Pedal. 35-40N m
o Brake cable anchor bolt. 1.5-4N m
o Brake mounting bolt. 8-12N m
o Seat clamp nuts. 18-22N m
o Crank attachment systems. 40-60N m
• Maximum rider weight: 100kg
• This bike is intended to be used on urban roads. It is not intended for use on unpaved
ground or for off-road use. Failure to follow these warnings could result in an accident,
serious personal injury and permanent damage to your bicycle.
• Do not ride at night without a headlight, taillight, a white front reflector, a red rear
reflector and yellow wheel reflectors.
• Avoid the following hazards: drain grates, potholes, ruts, soft road edges, gravel and
leaves especially when they are wet.
• It is strongly recommended to develop a regular maintenance schedule, which will be
determined by the frequency and length of your rides, your style of riding, as well as the
terrain on which you most often ride.
• As with all mechanical components, the bicycle is subjected to wear and high stresses.
Different materials and components may react to wear or stress fatigue in different
ways. If the design life of a component has been exceeded, it may suddenly fail possibly
causing injuries to the rider. Any form of crack, scratches or change of colouring in highly
stressed areas indicate that the life of the component has been reached and it should
be replaced.

To o l s:
M5 Allen key &
screwdriver
M6 Allen key
M8/M10 spanner
M13/M15 spanner
OVERVIEW
Seat
Seat post
Freewheel
Rear wheel
Rear
derailleur
Crank
Chain
Pedal
Crank
wheel
Folding
clamp
Front wheel
Fork
Rear brakes
Front
brakes
Bicycle frame
Handlebar
Brake lever
Gear lever
Front
fender
Rear
fender

Remove the bike from the packaging. DO NOT dispose of the original packaging until
assembly is complete. Check all packaging to ensure all necessary components are found
before beginning assembly.
Step 1: Front wheel
1. Tu r n t h e f o r k u nt i l t h e fork plates are facing the front of the bicycle.
2. Insert the wheel into the fork.
3. Secure the wheel in place using an axle nut on either side of fork plates. Tighten the
axle nuts by hand.
4. Ensure the wheel is centred equally between the fork before tightening the axle
nuts using the M15 spanner.
ASSEMBLY

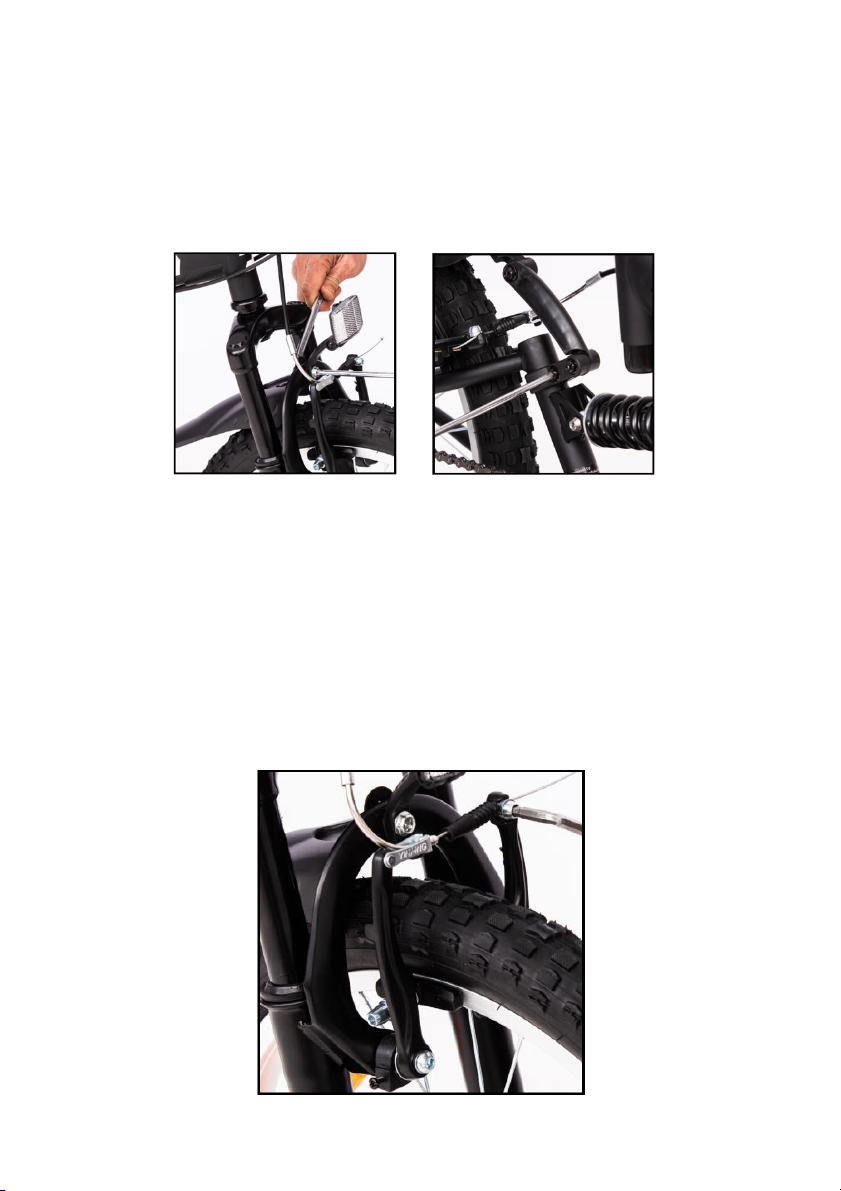
Step 2: Front and rear fenders
1. Attach the front fender hanger and the front reflector to the fork crown.
2. Attach the rear fender hanger to the mid tube of the frame.
3. Make any necessary adjustments to the fenders and front reflector, then tighten
the screws to secure them in place.
Step 3: Front brake adjustment
Note: The front V-brakes have been pre-installed at the factory, however they will need to be
adjusted after assembling the front wheel and fender.
1. Use the M5 Allen key to loosen the brake cable bolt and adjust the tension in each
brake arm. Ensure both sides are equally and properly tensioned.
2. After ensuring that the clearance between both brake pads and the rim is between
2-3mm, tighten the brake cable bolt.
Note: Do not ride the bike unless the brakes have been properly tested.

Replacing brake pads:
When the brake pad wear grove is no longer visible, the brake pads will need to be replaced.
1. Use the M6 Allen key to release the brake mounting bolt on the brake pad.
2. Replace the brake pads and ensuring they are properly adjusted to fit the rim
perfectly.
3. Use M6 Allen key to tighten the bolt.
WARNING: If the brake pads are not replaced it can lead to an accident,
serious personal injury and cause permanent damage to your wheels.

Step 4: Handlebar & stem
1. Insert the stem into the fork tube to the minimum insertion line, as indicated on the
stem pillar.
2. Face the handlebar stem forward directly in line with the front wheel. Torque the
handlebar stem pillar bolt to 12-15 ft. lb. or 17-19 N m.
3. Use the stem quick release to lock the stem in place.
4. Adjust the handlebar position and ensure that the stem minimum insertion mark is
completely inserted into frame and not visible. Lock the handlebar in place using
the handlebar quick release clamp.
WARNING: If the handlebars can forward or backward, the quick release
clamp bolts are not tight enough and should be adjusted.
WARNING: Overtightening the quick release bolt can cause damage to the
handlebar stem assembly and lead to potential injury of the rider.

Gear adjustment:
The right shifter controls the 7 speeds (freewheel) of the bicycle. Turn the shifter to switch
between different gear ratios in order to change pedal speed.
Pedal
lighter
Pedal
heavier
Indice
Altri manuali Fortis Bicicletta

Fortis
Fortis FSMFEXR200A Manuale utente

Fortis
Fortis FS27HCMEBKB Manuale utente

Fortis
Fortis 700C URBAN MASTER ROAD BIKE Manuale utente

Fortis
Fortis FS2N1KB12WA Manuale utente

Fortis
Fortis FSBKE20FLDA Manuale utente

Fortis
Fortis FS26LDEBKPA Manuale utente

Fortis
Fortis FS26LDEBKSA Manuale utente

Fortis
Fortis FS700CALRBA Manuale utente

Fortis
Fortis FS26FLDMBKA Manuale utente

Fortis
Fortis 700C CITY BREEZE LADIES BIKE Manuale utente