Fortis FS26LDEBKSA Manuale utente

FORTIS 26" CITY LADIES
ELECTRIC BIKE
FS26LDEBKSA

2
Safety & Warnings
3
Overview
6
Assembly
7
Before First Use
14
Operation
16
Charging
17
Cleaning & Care
19
Troubleshooting
20

3
Electric Assisted Bike Regulations
The EN 15194 EU standard or EPAC (Electric Power Assisted Cycle) conforms to the
following characteristics for electric power assisted bikes:
• Motor assistance only starts when the cyclist pedals.
• The assistance cuts out as soon as the cyclist stops pedalling.
• The assistance cuts out as soon as the speed exceeds 25km/h.
Adherence to this standard enables the use of the electric bikes in the same conditions as
any other bicycle, particularly on bicycle paths and bicycle-specific lanes.
Recommendation before First Ride
• Before first use, double-check the function of all the parts of your electric bike. If you
have any doubts or if you detect a problem, contact Kogan.com for further support
assistance.
• If you lend your bicycle to a third party, give them this user guide with the bicycle and
ensure that they read it before the first ride.
• Respect local, state and national road traffic regulations.
• For your safety, it is highly recommended that you wear a certified helmet. Ensure you
are always following local helmet laws while operating the bicycle.
• When used during heavy rain, snow, in slippery conditions or in the case of low visibility,
be careful and adjust your speed.
• At night, ensure the bicycle headlights are activated while operating.
• Trying to repair anything that implies removing technical or electrical components is
strongly advised against. If maintenance or repair is necessary, contact Kogan.com for
support assistance.
• The manufacturer declines any responsibility due to overloading or items that are not
correctly attached to the baggage rack.
• Using high pressured water jets to clean the bike is strongly advised against.
• Check the battery level before each use. Ensure the battery is fully charged prior to first
use.
• In order to extend battery performance and lifespan, do not commence operation when
the battery is only half-charged.
SAFETY & WARNINGS

4
• The battery life will vary depending on where you ride it (inclines will reduce power
rapidly) and how you ride (assistance mode chosen). The greater the assistance used,
the more you'll use the battery and the shorter it will last. This bike is fitted with gears;
remember to use them accordingly relative to riding conditions in order to extend
battery life. The amount of weight carried will also have an impact on battery lifespan.
Extreme low temperatures can also impact battery lifespan.
• It is recommended that you charge the battery at least every 2 months when the bike is
not used; during winter, for example.
• Store the battery in a dry place after having completely recharged it. Avoid extreme
temperatures (both low and high) as they can damage the battery. Optimal operating
range: -10°C to 35°C.
Cleaning and Maintenance
• Use a damp cloth with neutral detergent to clean the bike frame. Do not use any
detergents or cleaning liquids liable to deteriorate the frame or components.
• Use a dedicated bicycle cleaner or hot soapy water to clean your bike and its
components, such as wheels, hubs, rims, brakes and pedals. Rinse well with clean
water before use.
• Do not use high pressure water jets to clean your bike, especially on the electrical
components (such as the battery), as this may result in short circuiting or system
malfunctions.
• All the components and parts of your bicycle are subject to normal wear and fatigue.
• Keep a close eye on any change in the shape or colour of a component or traces of
oxidation (rust) on your bicycle. If this occurs, do not use the product until the
component has been replaced.
Warning
• Do not ride after consuming alcohol or drugs (prescribed or not), or while under the
affects of medication which might make you drowsy.
• Do not ride while you feel unwell, nor after consuming alcohol or drugs. This product
has the potential to endanger yourself and others if not operated responsibly.
• Pedal-assisted bicycles are not designed for 2 or more people. Do not ride carry
passengers as these bicycles are not designed to carry the additional load of a second
rider.
• Do not put batteries in normal waste bins. Dispose of used batteries in a certified
recycling facility.

5
• Do not over-lubricate; if oil contacts the wheel rim, brake pads or brake disks, this will
result in loss of braking performance and an increase in stopping distances. This could
potentially cause loss of control, accidents, and injury.
Transport
It is highly recommended that you do not overload your pedal-assisted bicycle, as this may
damage the electrical components or cause malfunctions, such as overheating of the
battery or the motor. Do not store the battery in excessively hot or cold places.
• Maximum transport weight on the bicycle must not exceed 75kg.
• Regularly check battery brackets and mountings.
• Always wear a helmet when riding your pedal-assisted bicycle.
• If a rack is not already fitted to your bicycle, please do not attempt to fit one yourself.
• Do not carry anything on the rack that might hide lights or reflectors.

6
Tools Supplied
Multifunction Wrench
6mm Allen &
Phillips Head Key
3mm, 4mm & 5mm
Allen Key (x3)
OVERVIEW
Bell
Headlight
Front wheel
Pedals
Crankset
Chain
Rack
Seat
Seatpost clamp
Bike frame
Handlebar stem
Fork
Rear wheel
Front brakes
Handlebars
Battery
Rear sprocket
Control pad
Handle grips
Brake lever

7
Stem & Handlebar Assembly
Figure 1
Remove the plastic shipping cap from the bottom of the stem; insert the stem and
handlebar assembly into the fork, making sure the stem wedge is loose.
Ensure the cables are not tangled and track smoothly on either side of the stem. The stem
should be pointing towards the front of the bike, aligned with the front tire.
Tighten the stem bolt with an Allen wrench (Figure 2)
Figure 2
ASSEMBLY
Minimum
insertion mark
WARNING:To p r ev e n t s t e e r i n g s y st e m d a m a g e a n d p o s s i b l e l o s s o f
control, the stem must be inserted enough so that the minimum
insertion marks are completely covered (Figure 1).

8
Wheel Mounting
1. Make sure the brakes are loose enough to allow the wheel to pass through the
brake pads easily. If not already loose, disconnect the front brake by detaching the
cable guide from the carrier.
2. Place wheel into fork dropouts (Figure 3a)
3. Install retaining washers with raised lip pointed towards the fork and insert into the
small hole of the fork blade.
4. Install axle nut and securely tighten (Figures 3a and 3b).
5. Make sure the wheel is centred between the fork blades. Spin the wheel to make
sure that it is centred and clears the brake shoes. Tighten the brakes if necessary.
6. If the wheel is out of alignment you will need to true the wheel; when spinning the
wheel and notice the gaps between the brake pads are not consistently the same,
the wheel needs truing. See a qualified bike technician to true wheels.
Figure 3a
Figure 3b
Axle nut
Axle
Hub
Retaining
washer
Cone nuts
Fork
dropout

9
Brake Adjustment (Figure 4a, 4b and 4c)
Pass the inner cable through the inner cable lead, making sure that the brake noodle is
properly seated in the outer cable lead (Figure 4a).
Set the cable with a clearance of 1mm between each brake pad and the rim, tighten the
anchor bolt using the 5mm Allen key (Figure 4b).
Adjust the balance with the spring tension adjustment screws (Figure 4a). Depress the
brake lever about 10 times as far as the grip to check that everything is operating correctly
and that the brake shoe clearance is correct before using the brakes (Figure 4c).
CAUTION:
Do not ride the bike until the brakes are functioning properly. To test, apply the brakes while
trying to push the bike forward to make sure they will stop the bicycle. Never ride a bicycle
that is not functioning properly.
Figure 4a
Figure 4b
Figure 4c
WARNING:Sudden or excessive application of the front brake may pitch
the rider over the handlebars, causing serious injury or death.
10
Checking your Brakes
Press each brake lever to ensure that there is no binding and that the brake pads press firm
enough on the rims to stop the bike.
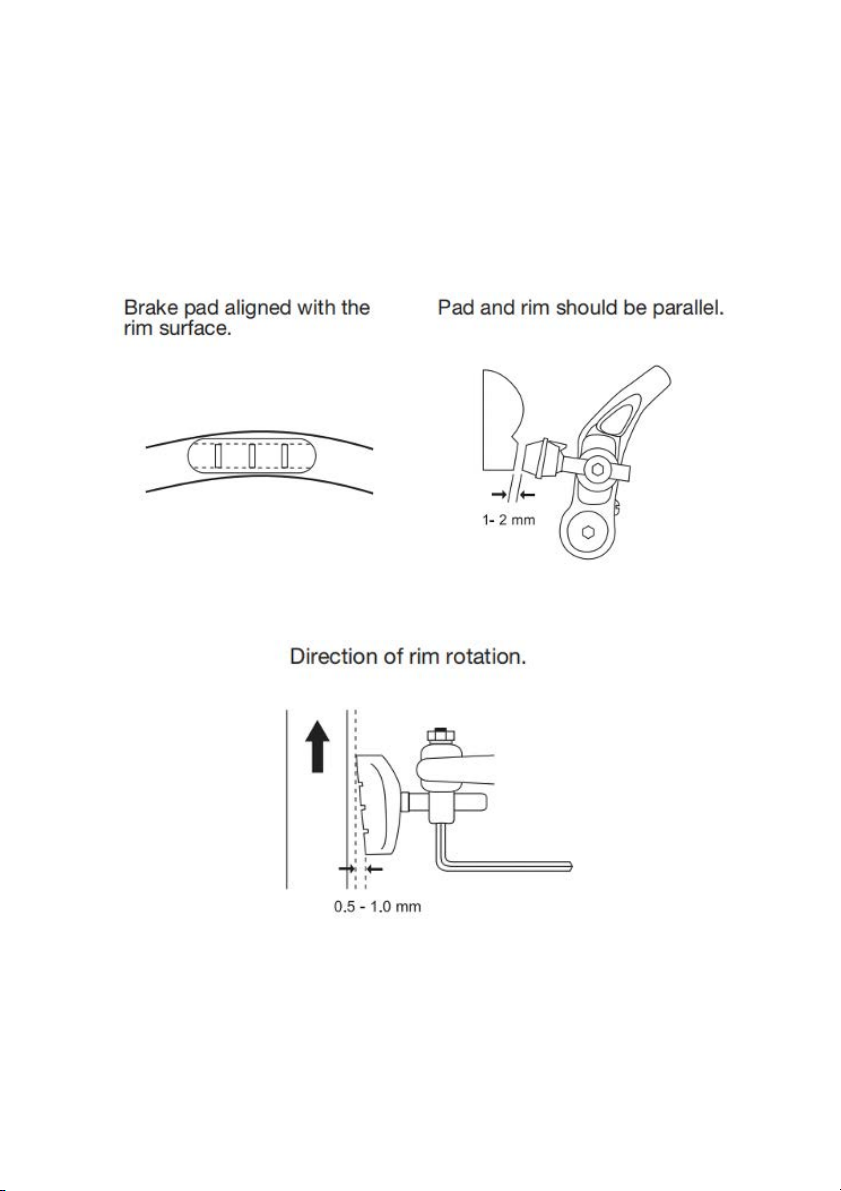
The brake pads should be adjusted so they are 1-2mm away from the rim when the brakes
are not applied (Figure 5a).
Brake pads should be centered on the rim and the rear portion of each brake pad should be
about 0.5-1mm farther from the rim than the front portion of the brake pad (Figure 5b).
Figure 5b
Figure 5a
Indice
Altri manuali Fortis Bicicletta

Fortis
Fortis FS27HCMEBKB Manuale utente

Fortis
Fortis FSMFEXR200A Manuale utente

Fortis
Fortis FS2N1KB12WA Manuale utente

Fortis
Fortis FS20FDMTBBA Manuale utente

Fortis
Fortis 700C URBAN MASTER ROAD BIKE Manuale utente

Fortis
Fortis 700C BAFANG Manuale utente

Fortis
Fortis 700C URBAN HYBRID Manuale utente

Fortis
Fortis FS700CALRBA Manuale utente

Fortis
Fortis 700C CITY BREEZE LADIES BIKE Manuale utente

Fortis
Fortis FS26LDEBKPA Manuale utente


