Garmin Fusion Wireless RGB LED Remote Control Manuale utente

Wireless RGB LED Remote Control Instructions
Important Safety Information
WARNING
Failure to follow these warnings and cautions could result in personal injury, damage to the vessel, or poor
product performance.
See the Important Safety and Product Information guide in the stereo box for product warnings and other
important information.
This device must be installed according to these instructions.
Disconnect the vessel's power supply before beginning to install this product.
CAUTION
Always wear safety goggles, ear protection, and a dust mask when drilling, cutting, or sanding.
NOTICE
When drilling or cutting, always check what is on the opposite side of the surface to avoid damaging the vessel.
You must read all installation instructions before beginning the installation. If you experience difficulty during
the installation, contact Fusion® Product Support.
What's in the Box?
• Wireless RGB LED remote control
• Remote control receiver
• Remote control cradle
• 7.5 A in-line fuse
• Important safety and product information document
Supplies and Tools Needed
• 2-conductor 22 AWG (0.33 mm2) wire to connect the remote control receiver to the power source
• 4-conductor 22 AWG (0.33 mm2) wire (or equivalent combination of 2-conductor wire) to connect the
receiver to the RGB LED speakers
• Cable ties or adhesive for mounting the receiver
• 4 gauge (3 mm) countersunk stainless-steel screws for mounting the remote cradle (optional)
• 3 mm flat screwdriver
• Wire cutters
• Drill and drill bits for mounting the remote cradle (optional)
GUID-EE2CF989-3621-4468-952F-F2FF10257458 v2July 2021

Mounting and Connection Considerations
When selecting a location for the remote control receiver and making the wiring connections, observe these
considerations.
• The receiver housing is not weather proof, and the receiver must be installed in a location that is not
exposed to the elements.
• You can connect a single receiver to up to 8 LED speakers (4 pair). You must use an additional receiver (sold
separately) to connect to additional LED speakers.
• You can pair a remote control with up to three receivers.
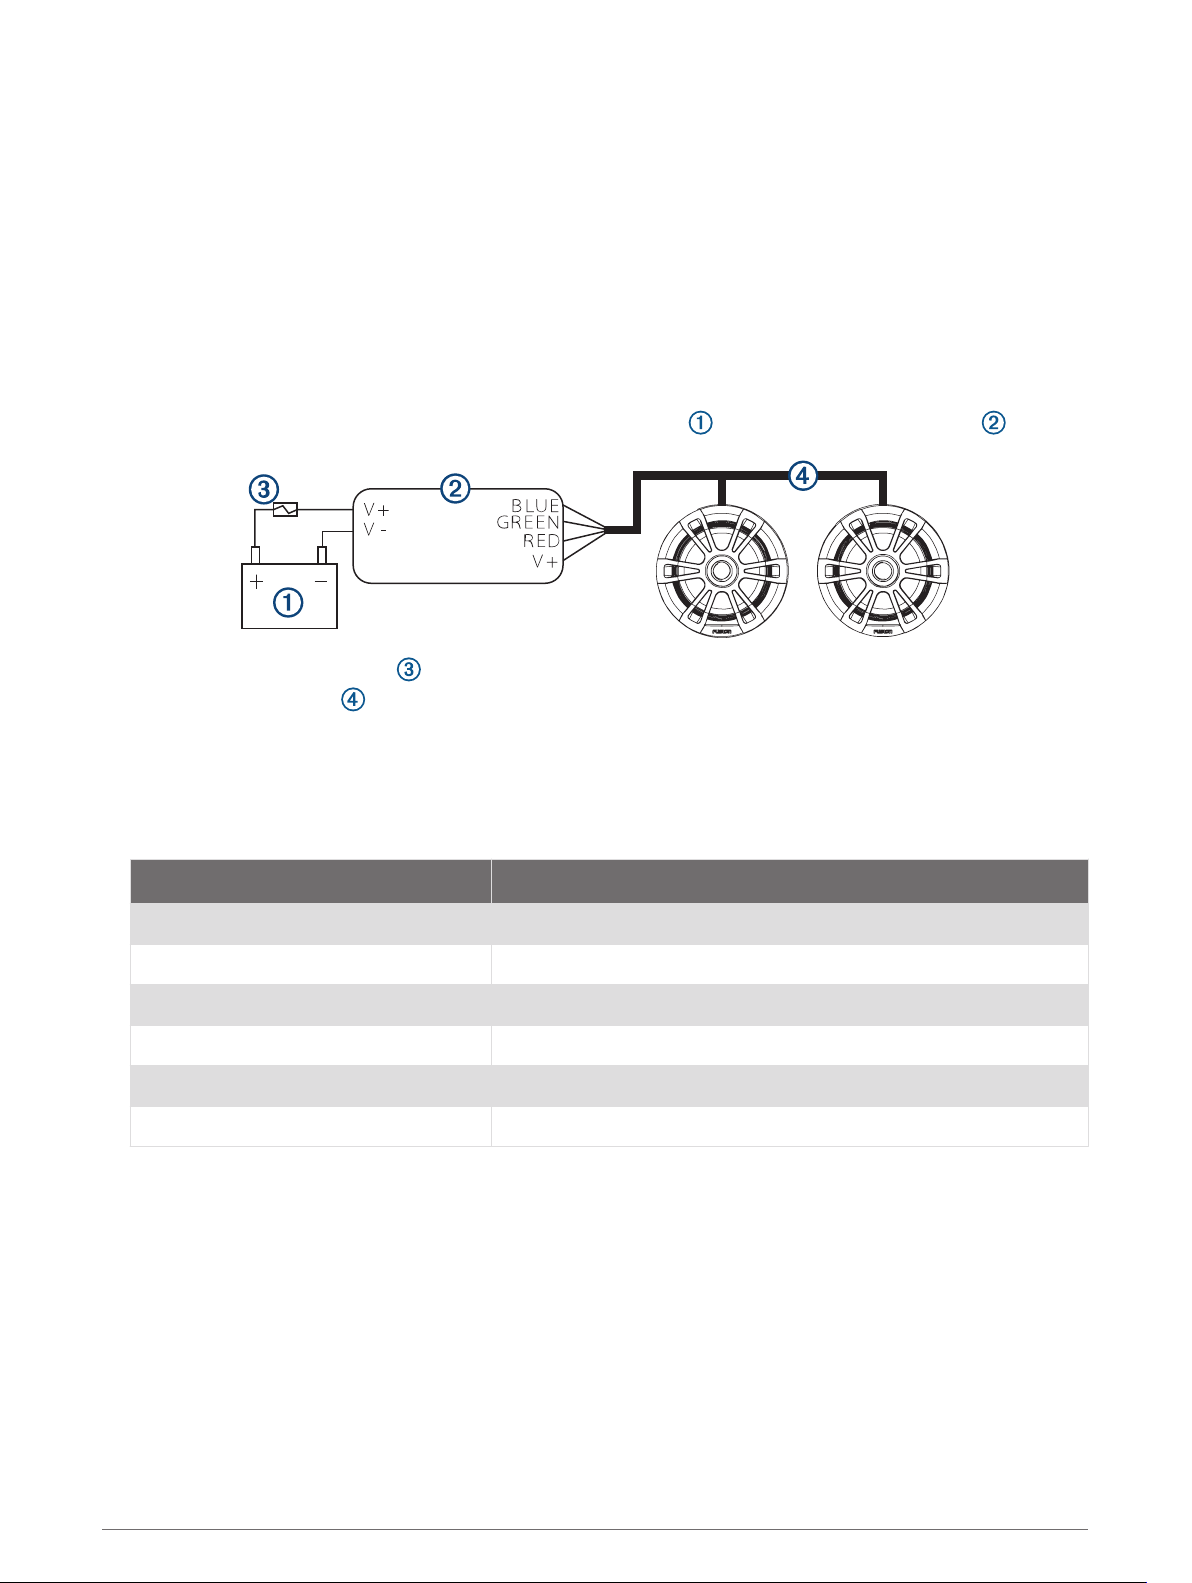
Connecting the Remote Control Receiver
You can connect up to 8 (4 pair) of RGB LED speakers to one remote control receiver.
1Route a power wire (not included) from a 12 Vdc power source to the location of the receiver .
2Install the included 7.5 A fuse on the power wire.
3Route 4-conductor wire (not included) from the receiver to the speakers you want to control, joining the
wire where needed to connect up to 8 speakers.
4Connect the 4-conductor wire to the RGB connectors on the speakers according to the installation
instructions provided with the speakers.
5Loosen the wire terminal screws on the bottom of the receiver using a 3 mm flat screwdriver.
6Connect the power and RGB speaker wires to the wire terminals on the sides of the receiver.
Letter on receiver label Wire color or function
V+ (left side) 12 Vdc positive (+)
V- (left side) 12 Vdc negative (-)
BLUE RGB blue wire
GREEN RGB green wire
RED RGB red wire
V+ (right side) RGB 12 Vdc positive (+) (common) wire
7Tighten the wire terminal screws on the bottom of the receiver.
8Secure the receiver to the mounting location using cable ties or adhesive (not included).
2 Wireless RGB LED Remote Control Instructions

Installing the Remote Control Cradle
You can install the included remote cradle to store the remote when not in use. Mounting hardware for the
cradle is not included.
NOTICE
This remote control is not weatherproof. Failure to install the cradle in a location that is not exposed to the
elements could result in damage to the remote control.
1Using the cradle as a template, mark the two pilot holes.
2Remove the cradle from the mounting surface and drill the pilot holes.
NOTICE
Do not drill through the cradle when drilling the pilot holes. This may damage the cradle.
3Secure the cradle to the mounting surface using two 4 gauge (3 mm) countersunk stainless-steel screws.
Installing the Batteries
You must install AAA alkaline batteries (not included) in the remote control.
1Slide the battery door to the back of the remote, and pull up to open it.
2Insert two AAA batteries, observing polarity.
3Slide the battery door back onto the remote to close it.
Wireless RGB LED Remote Control Instructions 3

Remote Control Operation
LED power on (Turning the LEDs On and Off, page 4)
LED power off
LED color-selection wheel (Changing the Color of the LEDs, page 5)
Light: activates when the remote sends a signal to the receiver
LED brightness (Changing the Brightness of the LEDs, page 5)
LED mode speed (Changing the Speed of a Display Mode Pattern, page 6)
LED display mode (Changing the Display Mode of the LEDs, page 5)
1 2 3 Remote control receiver selection (Pairing Additional Receivers to the Remote, page 6)
Turning the LEDs On and Off
After you connect the remote control receiver to the speaker LEDs, you must use the remote control to turn the
LEDs on and off.
1If you installed more than one receiver, press the group number to select the receiver to control (Pairing
Additional Receivers to the Remote, page 6).
2Press .
The LEDs connected to the receiver turn on with the same color and mode settings applied before the last
time you turned them off.
3Press to turn off the LEDs connected to the receiver.
4 Wireless RGB LED Remote Control Instructions

Changing the Color of the LEDs
1If you installed more than one remote control receiver, press the group number to select the receiver to
control (Pairing Additional Receivers to the Remote, page 6).
2If necessary, turn on the LEDs for the speakers you want to change.
3Select an option:
• Touch the color wheel to select a new color, and slide your finger to fine-tune it.
• Hold to change the LED color to white.
NOTE: If you installed more than one remote control receiver, you can hold the group number to change the
LED color for that group to white.
Changing the Brightness of the LEDs
1If you installed more than one receiver, press the group number to select the receiver to control (Pairing
Additional Receivers to the Remote, page 6).
2If necessary, turn on the LEDs for the speakers you want to change.
3Select an option:
• To increase the LED brightness, press above .
• To decrease the LED brightness, press below .
Changing the Display Mode of the LEDs
You can cycle through a pre-defined set of LED flashing, breathing, or color-changing effectsDisplay Mode
Options, page 5.
1If you installed more than one remote control receiver, press the group number to select the receiver to
control (Pairing Additional Receivers to the Remote, page 6).
2If necessary, turn on the LEDs for the speakers you want to change.
3Select an option:
• To select the next mode in the sequence, press above (Display Mode Options, page 5).
• To select the previous mode in the sequence, press below .
4Touch a color on the color wheel to stop the display mode and return to a solid color.
Display Mode Options
You can select among 12 different color and transition patterns. When you reach the end or beginning of the
cycle of display modes by pressing or , the cycle loops to the beginning or end.
Display mode 1 RGB jumping change
Display mode 2 RGB fading change
Display mode 3 7-color jumping change
Display mode 4 7-color flashing change
Display mode 5 7-color fading change
Display mode 6 7-color gradient change
Display mode 7 White only, fades in and out
Display mode 8 Red only, fades in and out, then flashes 3 times
Display mode 9 Green only, fades in and out, then flashes 3 times
Display mode 10 Blue only, fades in and out, then flashes 3 times
Display mode 11 White only, fades in and out, then flashes 3 times
Display mode 12 Automatically cycle through the previous 11 display modes
Wireless RGB LED Remote Control Instructions 5

Changing the Speed of a Display Mode Pattern
You can adjust the speed of the effects when using a display-mode pattern.
1If you installed more than one remote control receiver, press the group number to select the receiver to
control (Pairing Additional Receivers to the Remote, page 6).
2If necessary, turn on the LEDs for the speakers.
3If necessary, select a the display mode (Changing the Display Mode of the LEDs, page 5).
4Select an option:
• To increase the speed of the display-mode-pattern effect, press above .
• To decrease the speed of the display-mode-pattern effect, press below .
Pairing Additional Receivers to the Remote
You can install more than one remote control and receiver combo to control additional sets of speakers. You
can then pair and control up to 3 receivers with 1 remote control.
NOTE: Individual receivers are not sold separately, but you can purchase and install multiple remote controls
and receivers on the boat, and pair any of the remote controls with the additional receivers.
A remote control is paired at the factory with the included receiver as group 1.
1Disconnect power from the receiver you want to pair with the remote.
2Reconnect power to the receiver.
3Within 6 seconds, hold for at least 2 seconds the group number (1, 2, 3) to assign to the receiver.
The light in the center of the color wheel flashes 3 times to indicate a successful pairing.
4Release the group number to complete the pairing.
Disconnecting a Receiver Group from the Remote
If you no longer want to control a remote control receiver you paired to a remote control, you can disconnect
the group number on the remote from the paired receiver.
1Disconnect power from the receiver you want to disconnect from the remote.
2Reconnect power to the receiver.
3Within 6 seconds, hold for at least 2 seconds the group number on the remote (1, 2, or 3) to disconnect the
receiver.
The light in the center of the color wheel flashes 9 times to indicate a successful disconnection.
4Release the group number to complete the disconnection process.
Specifications
Input voltage 10.8 to 16 Vdc
Fuse 7.5 A
Max. capacity Up to 8 RGB LED speakers (4 pair)
Operating temperature 0 to 50°C (32 to 122°F)
Storage temperature -20 to 70°C (-4 to 158°F)
Battery type 2 AAA (not included)
Radio frequency 2.4 GHz @ 10 dBm nominal
Range Up to 10 m (30 ft.)
Water resistance Remote control receiver and remote control are not water or dust resistant.
© 2018–2021 Garmin Ltd. or its subsidiaries
Garmin®, the Garmin logo, Fusion®, and the Fusion logo, are trademarks of Garmin Ltd. or its subsidiaries, registered in the USA and other countries. These trademarks
may not be used without the express permission of Garmin.
6 Wireless RGB LED Remote Control Instructions


© 2018–2021 Garmin Ltd. or its subsidiaries support.garmin.com
Questo manuale è adatto per i seguenti modelli
1
Indice
Altri manuali Garmin Telecomando

Garmin
Garmin GHC 10 Manuale utente

Garmin
Garmin GRID Manuale utente

Garmin
Garmin DELTA CANINE REMOTE Manuale utente

Garmin
Garmin Fusion Apollo MS-ERX400 Manuale utente

Garmin
Garmin FUSION MS-ARX70 Manuale utente

Garmin
Garmin 010-11146-00 - GPS Receiver Remote Control Guida di riferimento

Garmin
Garmin Meteor Manuale utente

Garmin
Garmin GPSMAP 5000 Series Manuale utente

Garmin
Garmin Meteor Manuale utente

Garmin
Garmin 010-11146-00 - GPS Receiver Remote Control Manuale utente


