Gigabyte GA-EG45M-DS2H Manuale utente

Rev. 1001
12MD-STPM-1001R
•We recommend that you download the latest version of the Smart TPM utility from GIGABYTE's
website.
•If you have installed Ultra TPM earlier, you can install the Smart TPM utility directly without unin-
stalling Ultra TPM rst. The original settings in Ultra TPM will be kept.
Smart TPM
User's Manual

- 2 -
Table of Contents
TPM Conguration Procedure.........................................................................................3
1. Conguring the System BIOS .......................................................................... 3
2. Installing the Inneon TPM Driver and the Smart TPM Utility .......................... 4
2.1. Installing the Inneon TPM Driver ............................................................................4
2.2. Installing the Smart TPM Utility ................................................................................4
3. Initializing the TPM chip ................................................................................... 5
3.1. Initializing the TPM Chip with the Smart TPM Utility.................................................5
3.2. Advanced Mode........................................................................................................8
4. Conguring the Smart TPM Utility.................................................................. 18
4.1. Creating a USB Key ...............................................................................................18
4.2. Creating a Bluetooth Cell Phone Key .....................................................................19
4.3. Other Bluetooth Settings ........................................................................................21
4.4. Other Features .......................................................................................................21
- 3 -
To enable the TPM, follow the steps below in sequence:
1. Conguring the system BIOS
2. Installing the Inneon TPM driver and the Smart TPM utility
3. Initializing the TPM chip
4. Conguring the Smart TPM utility
1. ConguringtheSystemBIOS
To use the TPM functionality, rst enter the system BIOS Setup to activate the TPM chip.
Step 1:
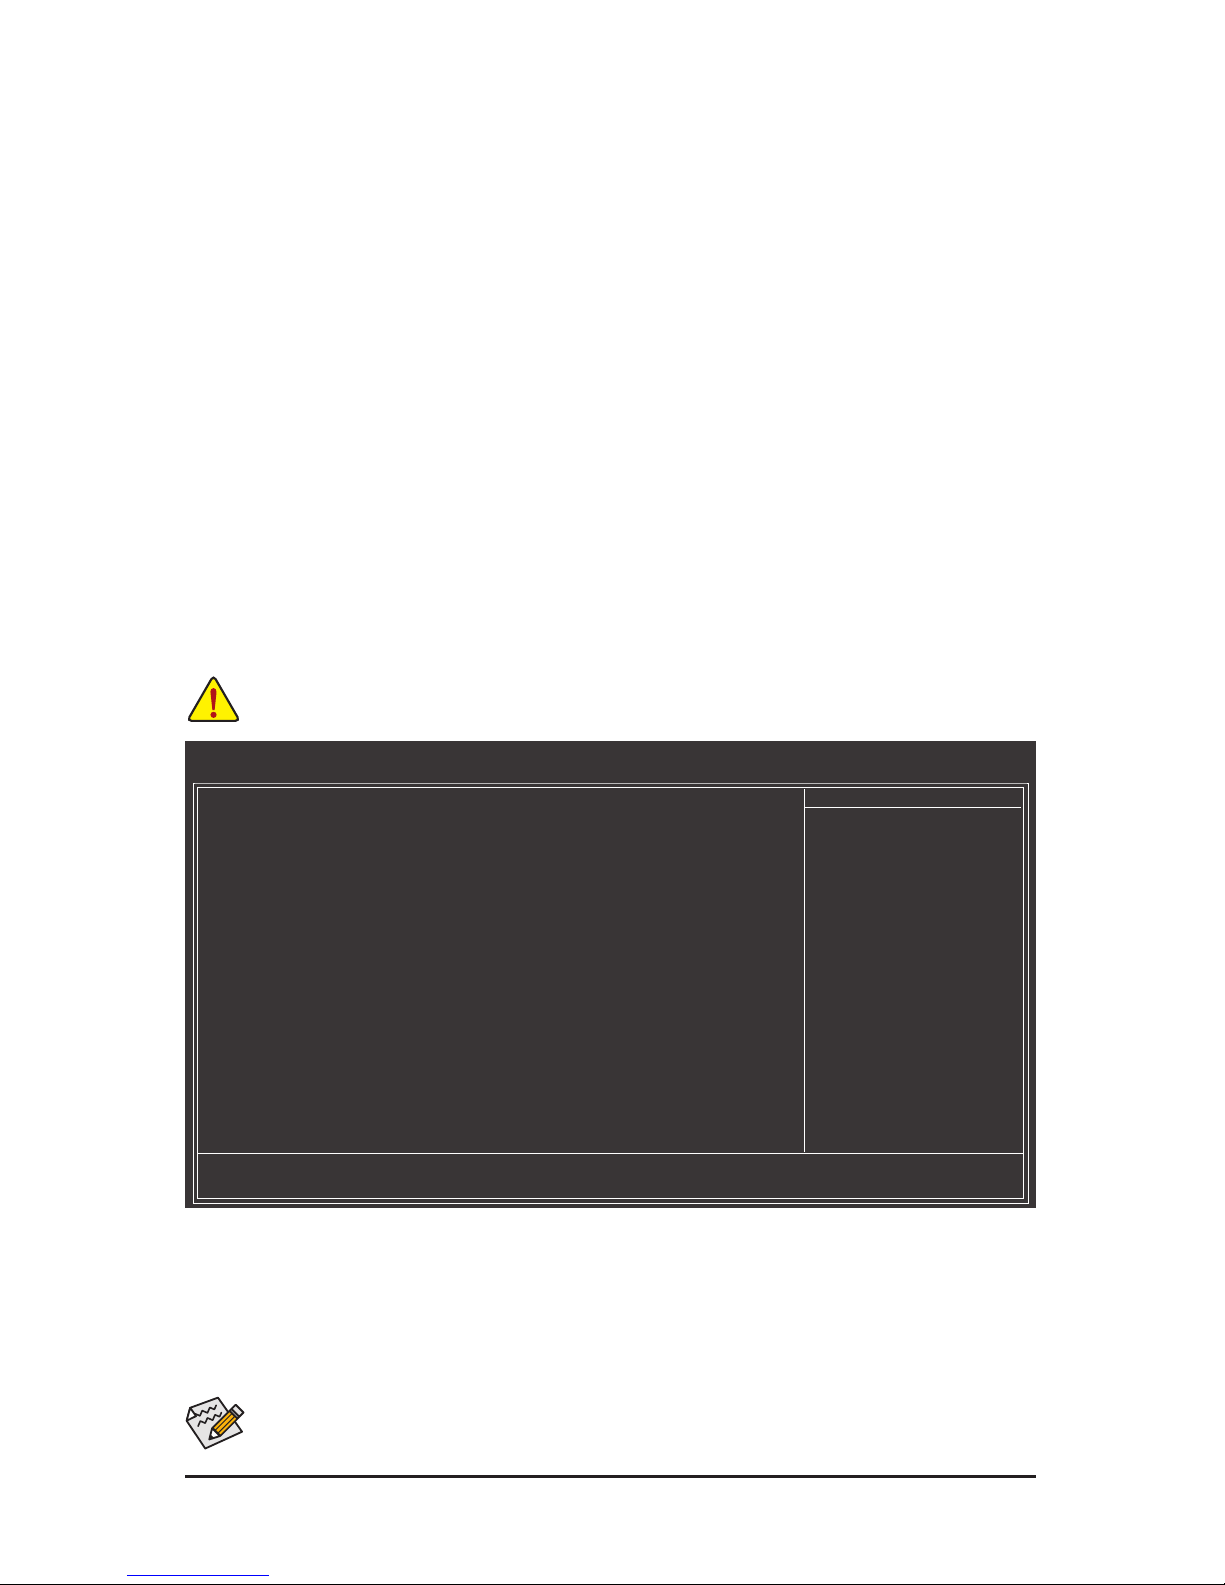
As the computer starts, enter the BIOS Setup program. Go to the SecurityChipConguration menu and
the following screen will appear. To activate the TPM chip, set SecurityChip to Enabled/Activate. It's rec-
ommended that you use the ClearSecurityChip setting (press <Ctrl> + <F1> in the BIOS main menu to
display this setting) to clear the TPM chip.
TPMCongurationProcedure
CMOS Setup Utility-Copyright (C) 1984-2009 Award Software
Security Chip Conguration
Security Chip [Enabled/Activate]
Clear Security Chip [Enter]
Security Chip State Enabled/Activated
: Move Enter: Select +/-/PU/PD: Value F10: Save ESC: Exit F1: General Help
F5: Previous Values F6: Fail-Safe Defaults F7: Optimized Defaults
Item Help
Menu Level
Step 2:
After completing the settings, press <F10> to save changes and then exit the BIOS Setup program.
PreviouslyencryptedleswillbecomeinaccessibleaftertheTPMchipiscleared.Besuretobackupthe
encryptedlesrst.
TopreventtheTPMsettingsbeingclearedbyotherusers,werecommendthatyousettheUserPassword
intheBIOSSetupprogram.
- 4 -
2. InstallingtheInneonTPMDriverandtheSmartTPMUtility
Before you use the Smart TPM utility, ensure that the Inneon TPM driver and the Smart TPM utility have
been installed.
2.1. InstallingtheInneonTPMDriver
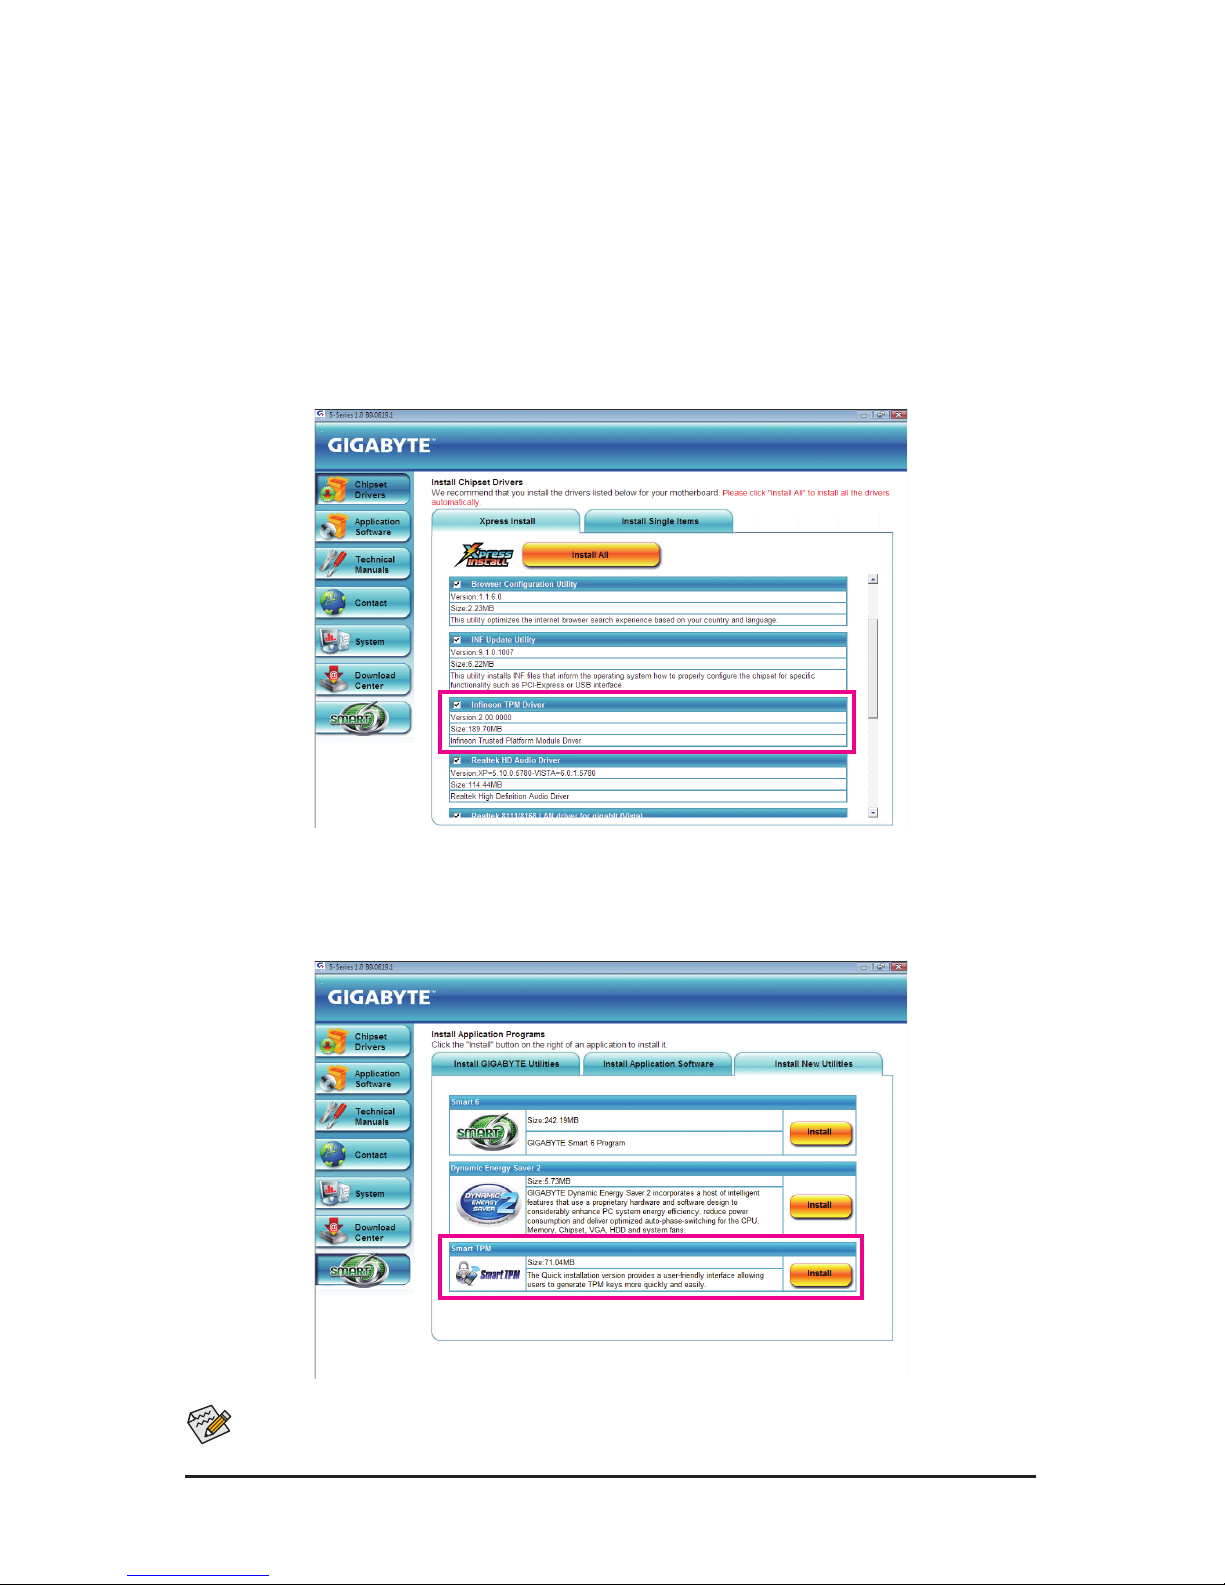
Insert the GIGABYTE motherboard driver disk. "Xpress Install" will automatically scan your system and list all
of the drivers that are recommended to install. Click the InstallAll button and "Xpress Install" will install all of
the selected drivers, including the Inneon TPM driver.
2.2. InstallingtheSmartTPMUtility
Click the tab at the bottom of the left pane of the autorun screen and you'll be directed to the InstallNew
Utilities menu. Click the Install button on the right of Smart TPM to install it.
SomemotherboarddriverdisksincludetheSmartTPMutilityin"XpressInstall."Clickthe"InstallAll"button
onthe"XpressInstall"mainmenutoinstalltheInneonTPMdriverandtheSmartTPMutilityaltogether.

- 5 -
3. InitializingtheTPMchip
After configuring the system BIOS and installing the driver software, the Infineon Security Platform icon ,
which indicates that the Inneon Security Platform is not yet initialized, will appear in the notication area.
Double-click the icon or right-click the Smart TPM icon and select InitializationWizard to access Smart
TPM. With the Smart TPM utility, you can initialize the TPM chip, set up a TPM User Password, congure a
Personal Secure Drive (PSD), and create a portable user key (refer to the instructions in Section 3.1). Or you
can select Advancedmode (refer to the instructions in Section 3.2) to launch the Inneon Security Platform
Initialization Wizard to congure advanced settings in the Inneon Security Platform.
3.1. InitializingtheTPMChipwiththeSmartTPMUtility
The easy-to-use Smart TPM interface allows you to easily initialize the TPM chip, set up a TPM User Pass-
word, and congure a Personal Secure Drive.
• SmartTPMsimpliesthecongurationprocedureoftheInneonSecurityPlatforminitializationandits
functions.Tomakefurthersettings,pleaseselect"Advancedmode."
• SmartTPMprovidesthe"Fileandfolderencryption-PersonalSecureDrive(PSD)"settingsonly.Touse
the"Securee-mail"or"Fileandfolderencryption-EncryptingFileSystem(EFS)"functions,pleasese-
lect"Advancedmode."
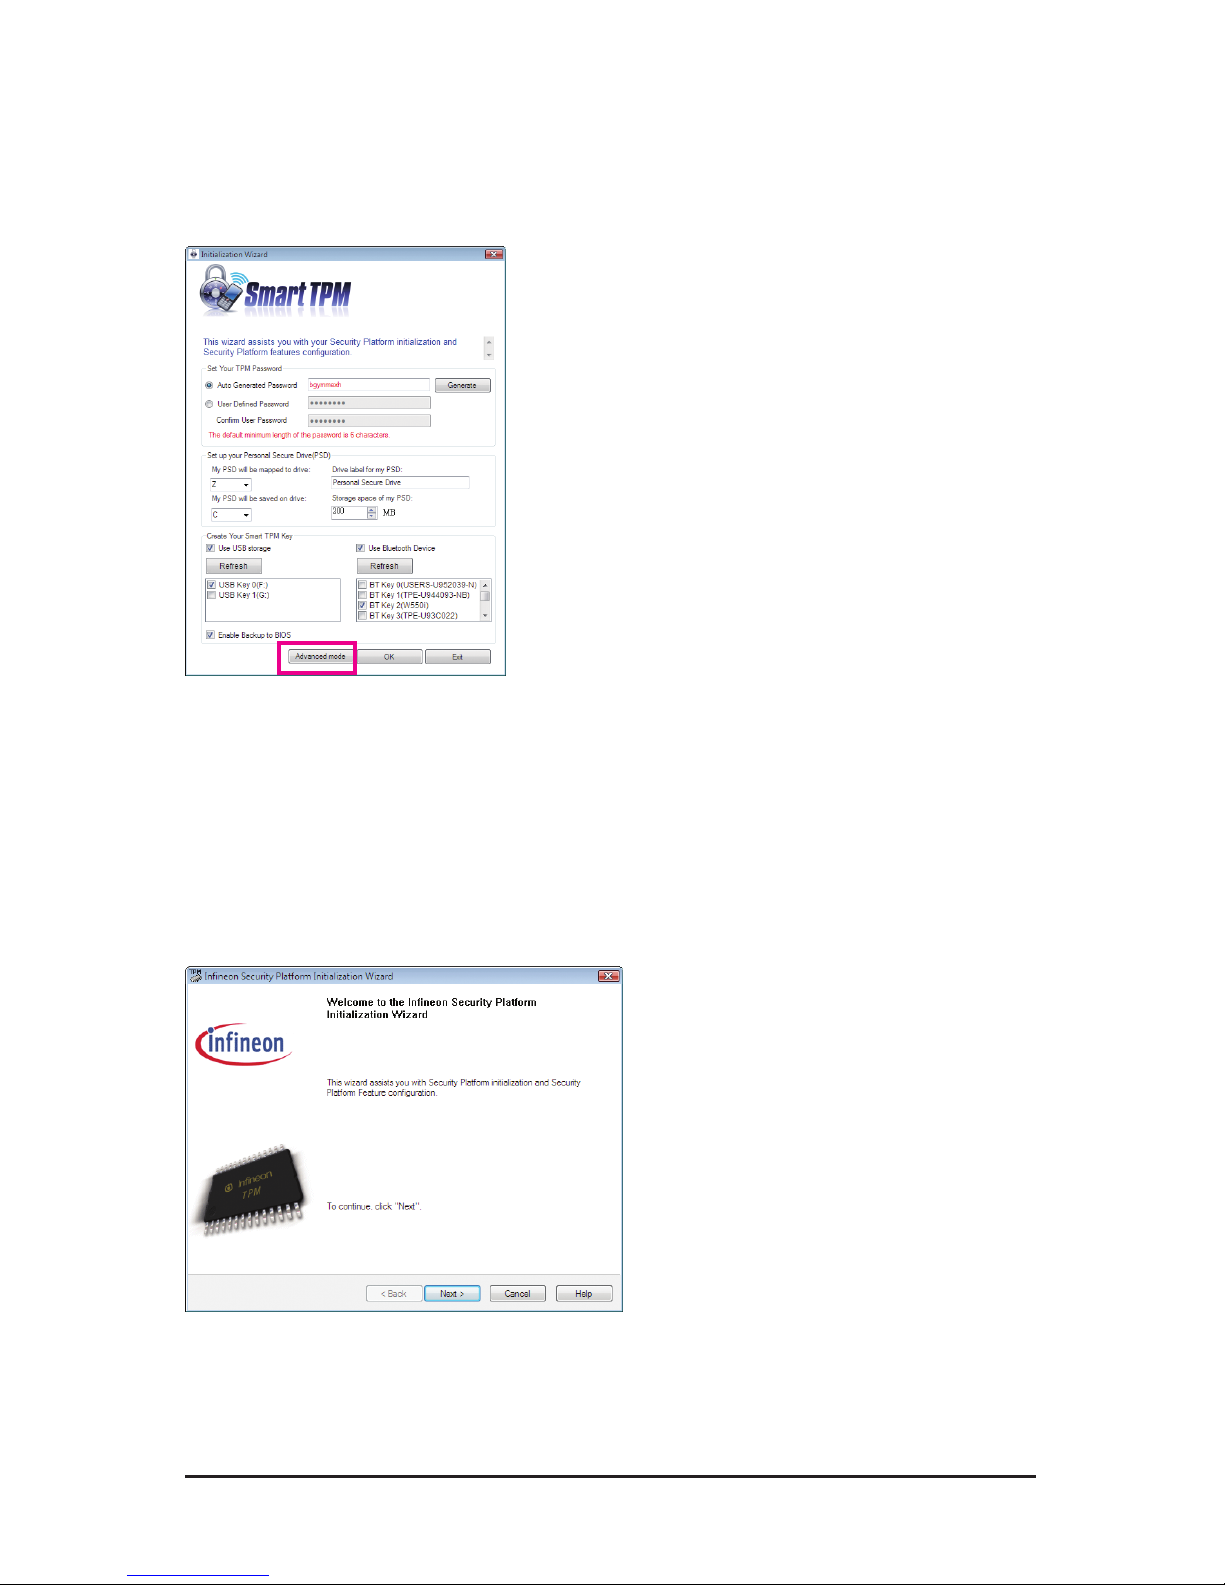
3.1.1. TheSmartTPMInterface
SetYourTPMPassword
A password is automatically provided. You can change it to your
own password. Be sure to memorize this password because it
allows you to create a portable user key using your Bluetooth
cell phone or USB ash drive.
SetupyourPersonalSecureDrive(PSD)
Configure a Personal Secure Drive (PSD) here. Specify the
PSD drive letter, drive label, size, and a local drive on which
your PSD will be saved.
CreateYourSmartTPMKey
Set your Bluetooth cell phone/USB flash drive as the Smart
TPM user key. You will be able to access/close your PSD data
when connecting to the Bluetooth cell phone or when plugging
in the USB ash drive that is congured as the Smart TPM user
key.
- 6 -
3.1.2. InitializationProcedureofSmartTPM
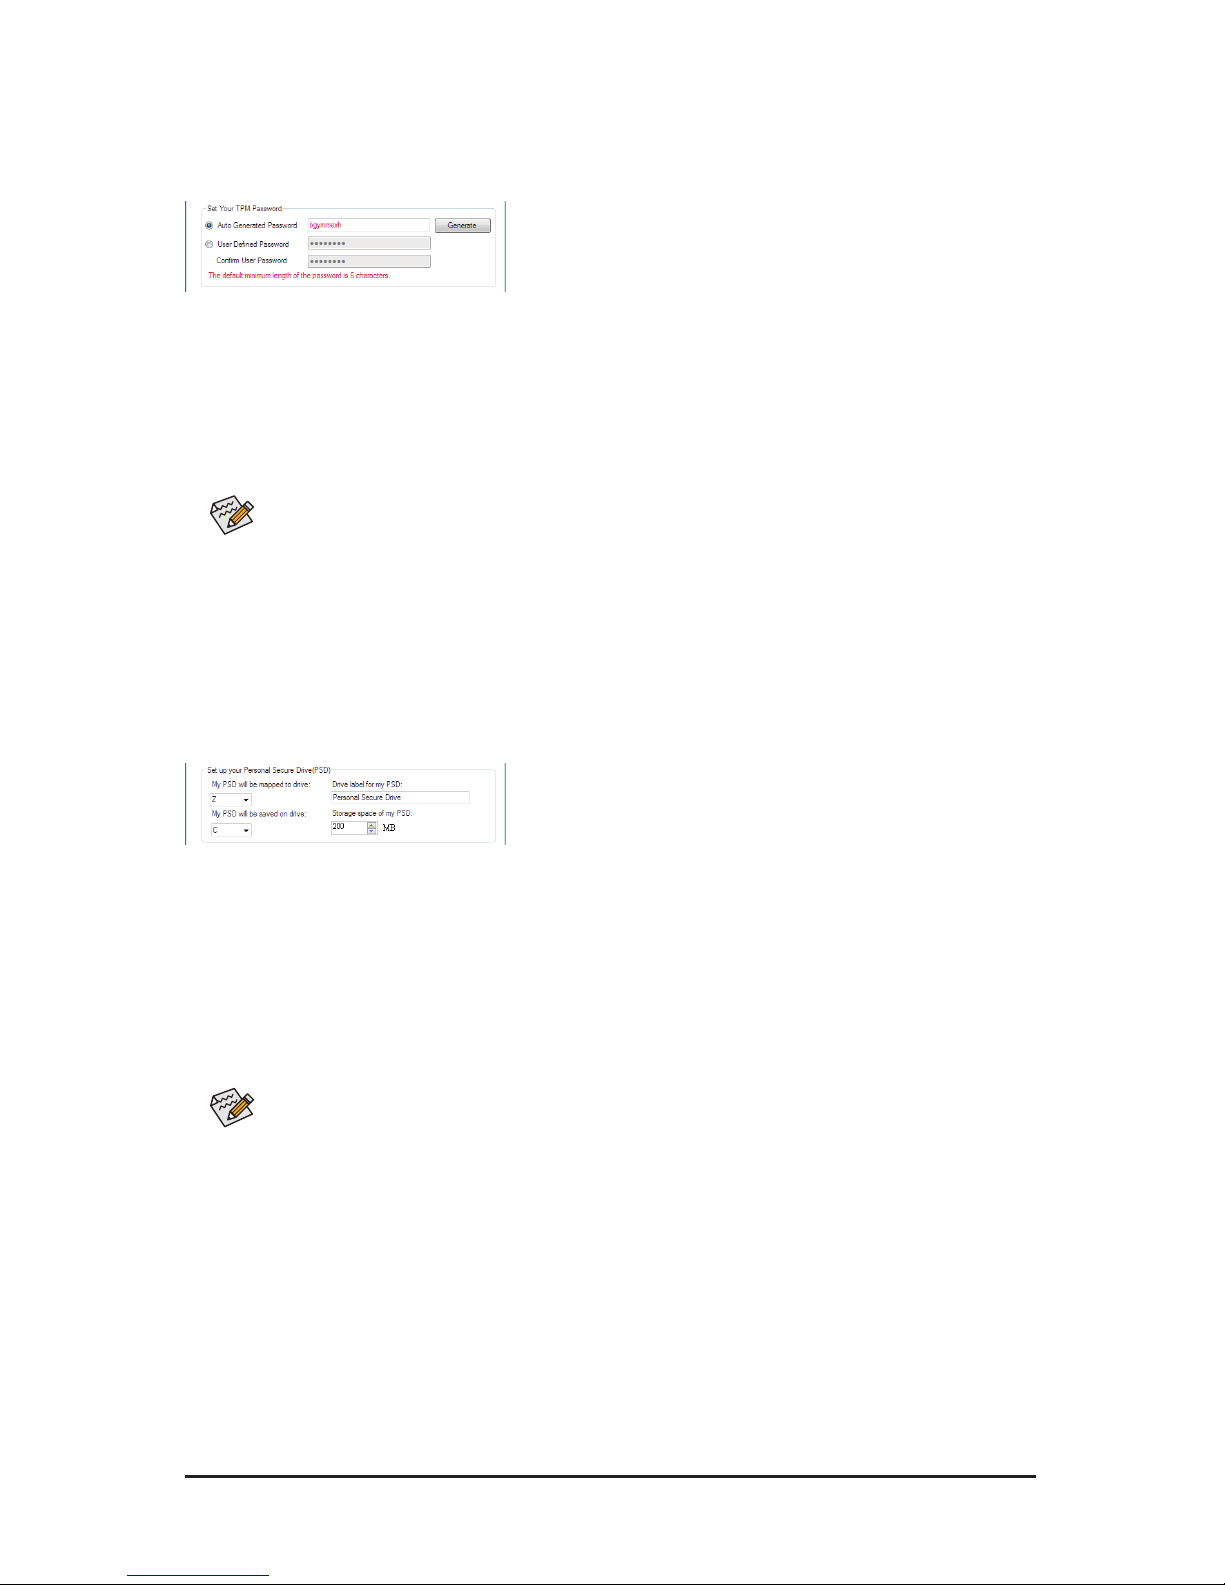
Step1:SetYourTPMUserPassword
Step2:SetupYourPersonalSecureDrive(PSD)
1.AutoGeneratedPassword
A password will be automatically provided after Smart TPM is launched. To generate a new password,
click Generate.
2.UserDenedPassword/ConrmUserPassword
You can dene your own password in the UserDenedPassword box (the maximum length is 16 char-
acters). Enter the password in the ConrmUserPassword box again to conrm.
1.SpecifyadriveletterandlabelforyourPersonalSecureDrive
To specify the drive letter for your Personal Secure Drive, select an unused letter from the MyPSDwillbe
mappedtodrive drop-down list of available letters. To specify the drive label, enter the label in the Drive
labelformyPSD box. The label should be no more than 32 characters in length.
2.SpecifyyourPersonalSecureDrivesizeandalocaldriveonwhichyourPersonalSecureDrivewillbesaved
Select a local drive from the MyPSDwillbesavedondrive drop-down list for saving your Personal Se-
cure Drive and enter the Personal Secure Drive size in the StoragespaceofmyPSD box.
• TopreventtheTPMsettingsbeingclearedbyotherusers,werecommendthatyousettheUserPass-
wordintheBIOSSetupprogram.
•This password incorporates the functionalities of the "Owner Password," "User Password," "Emer-
gencyRecoveryToken Password," and "Password Reset Token Password"of the Inneon Security
Platform. Be sure to memorize this password to administrate and use the SecurityPlatform in the fu-
ture. For details on the rules of the Inneon SecurityPlatform passwords and their usage,please refer
to the Inneon SecurityPlatform accompanyingdocumentation.
YourPersonalSecureDrivesizecannotbechangedaftersetup,sopleaseensurethatthesizeyou
specifyislargeenoughtomeetyourneeds.Pleasenotethatyoucannotusethefulldrivesize,sincethe
lesystemallocatessomespace.Thisdependsontheoperatingsystemandmaybesignicantforsmall
drivesizes.PleasealsonotethatthemaximumPSDdrivesizeislimited:
ThemaximumPSDdrivesizeonFAT16volumesis2GB.
ThemaximumPSDdrivesizeonFAT32volumesis4GB.
- 7 -
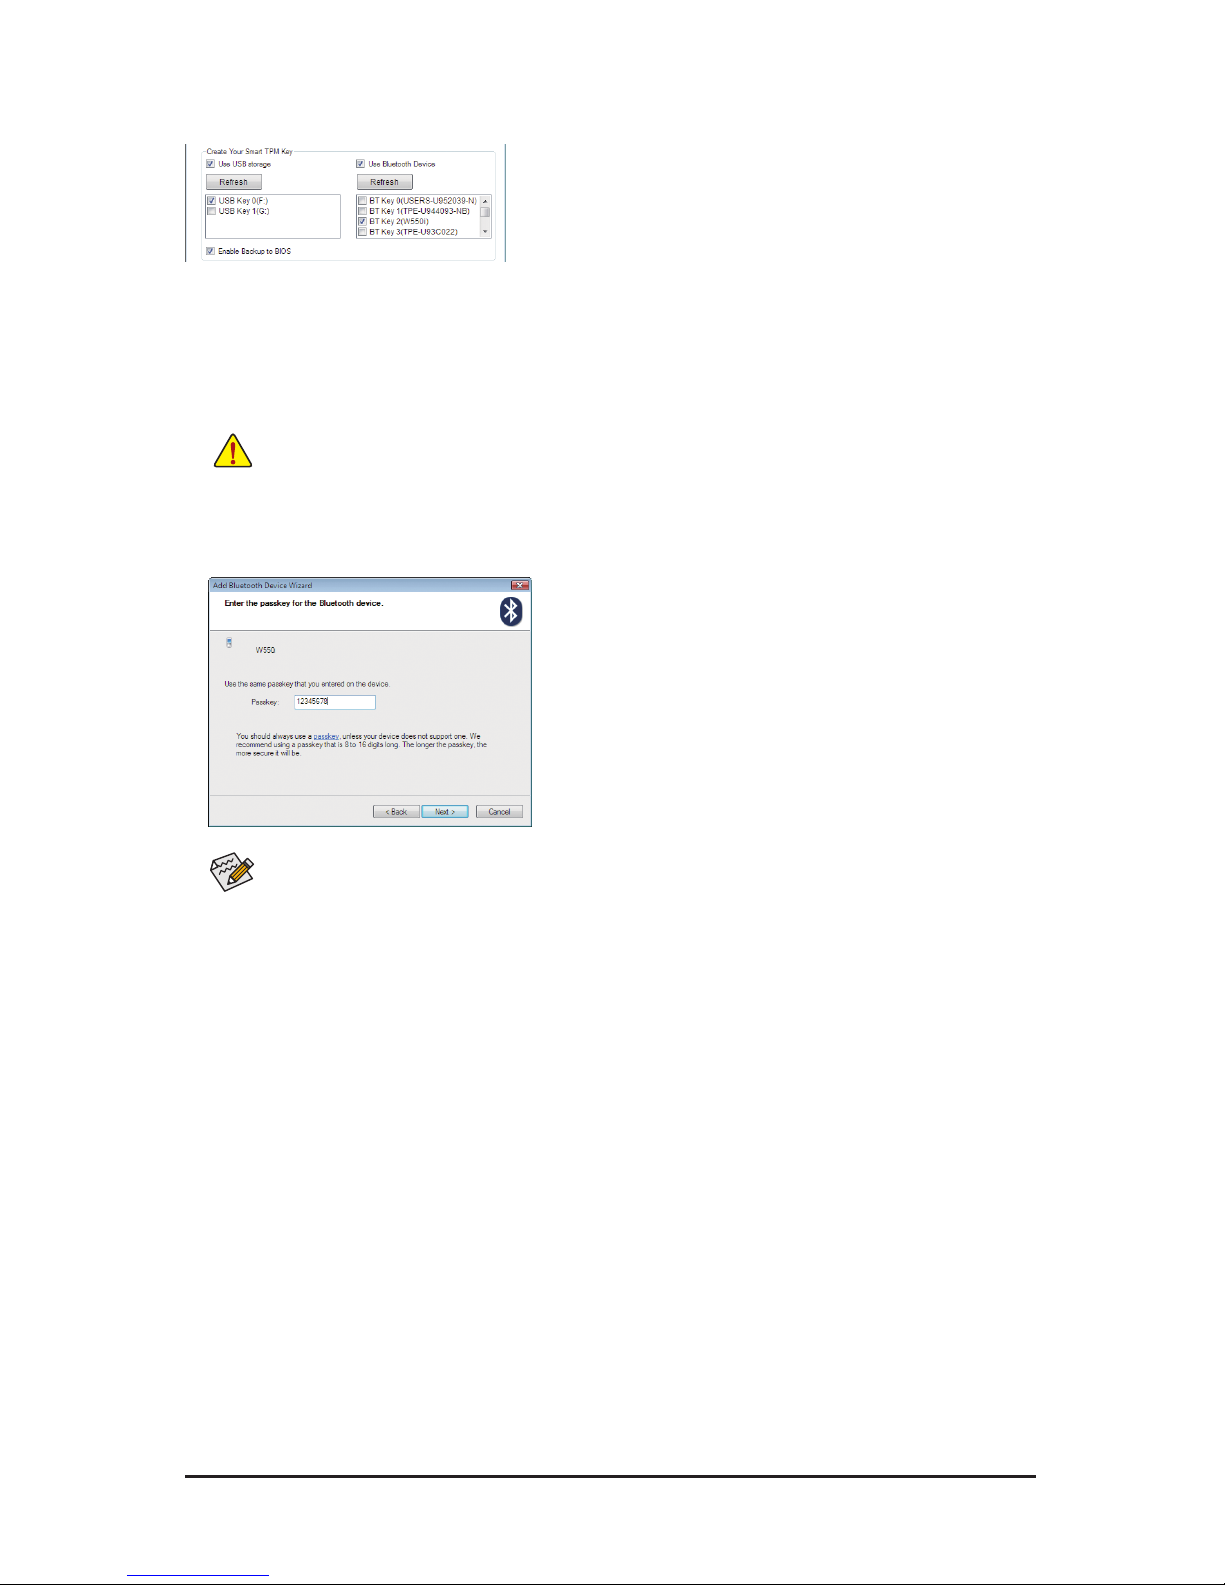
2.CreateaBluetoothcellphonekey:
Select the UseBluetoothDevice check box and click Refresh
to search for the Bluetooth enabled cell phone(s). Then select
the cell phone that you want to use as the portable Smart TPM
user key and a screen similar to that on the left will appear. En-
ter a passkey (8~16 digits recommended) in Passkey which will
be used for pairing with your cell phone. Then enter the same
passkey on your cell phone for pairing.
BeforecreatingaBluetoothcellphonekey,makesureyourmotherboardincludesaBluetoothreceiver
andturnonthesearchandBluetoothfunctionsonyourphone.
Upon completing the steps above, click OK to begin the initialization of the TPM chip and the setups of the
TPM User Password, your PSD, and the Smart TPM user key(s).
Step3:CreateYourSmartTPMKey
1.CreateaUSBkey:
Select the UseUSBstorage check box and click Refresh to search for the USB ash drive(s) that you
plug in. Then select the USB ash drive that you want to use as the portable Smart TPM user key. You can
select more than one USB ash drive at the same time. Selecting the EnableBackuptoBIOS check box
will store the encrypted TPM User Password in the system BIOS.
IfmorethanoneuserstorestheirencryptedTPMUserPasswordsintheBIOS,thelatterwilloverwritethe
former.
- 8 -
3.2. AdvancedMode
On the Smart TPM main screen, click Advancedmode to access the Inneon Security Platform Initialization
Wizard.
A.InneonSecurityPlatformInitializationWizard-Owner
Click Advanced mode to launch the Inneon Security Platform Initialization Wizard. Follow the on-screen
instructions to initialize the Security Platform Owner and to congure Security Platform Features (backup
including Emergency Recovery, Password Reset, Enhanced Authentication, BitLocker). This wizard provides
the basis for all further activities on the Inneon Security Platform.
A-1. When the Inneon Security Platform Initialization Wizard appears, click Next to continue.
- 9 -
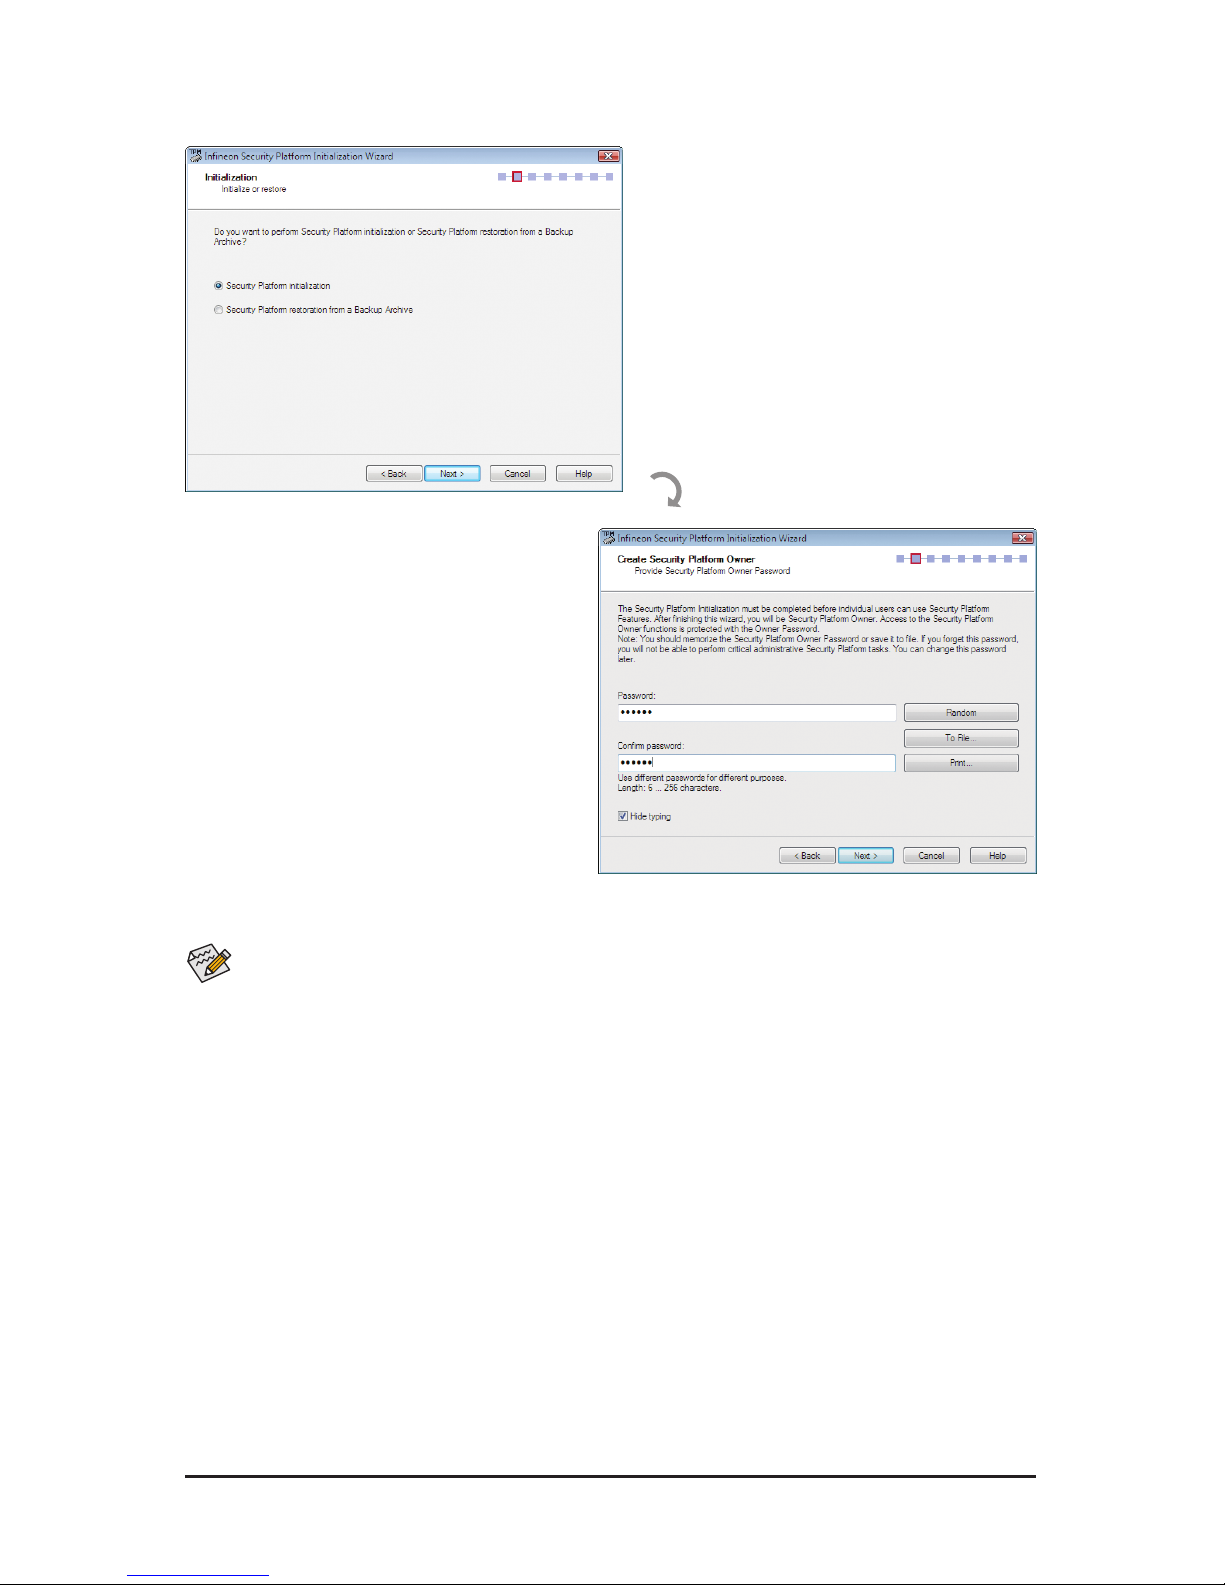
A-2. Select SecurityPlatforminitialization and click Next to create the Security Platform Owner Password.
TheInneonSecurity Platform Owner key is createdandstoredintheInneonTrustedPlatformModule
togetherwiththeInneonSecurityPlatformOwnersecret.ThiskeyisprotectedbytheOwnerPasswordthat
mustbedenedhere.YoumustmemorizethispasswordinordertoadministratetheSecurityPlatform.
ExplanationsonsettingtheOwnerPassword
1. Enter the Owner Password in the Password
box or click Random to randomly generate a
password.
2. Enter the password again to conrm (not neces-
sary if you use a random password).
3. You must uncheck the Hidetyping check box if
you decide to use the random password. Save
this password or print it to prevent the loss of
the password.
- 10 -
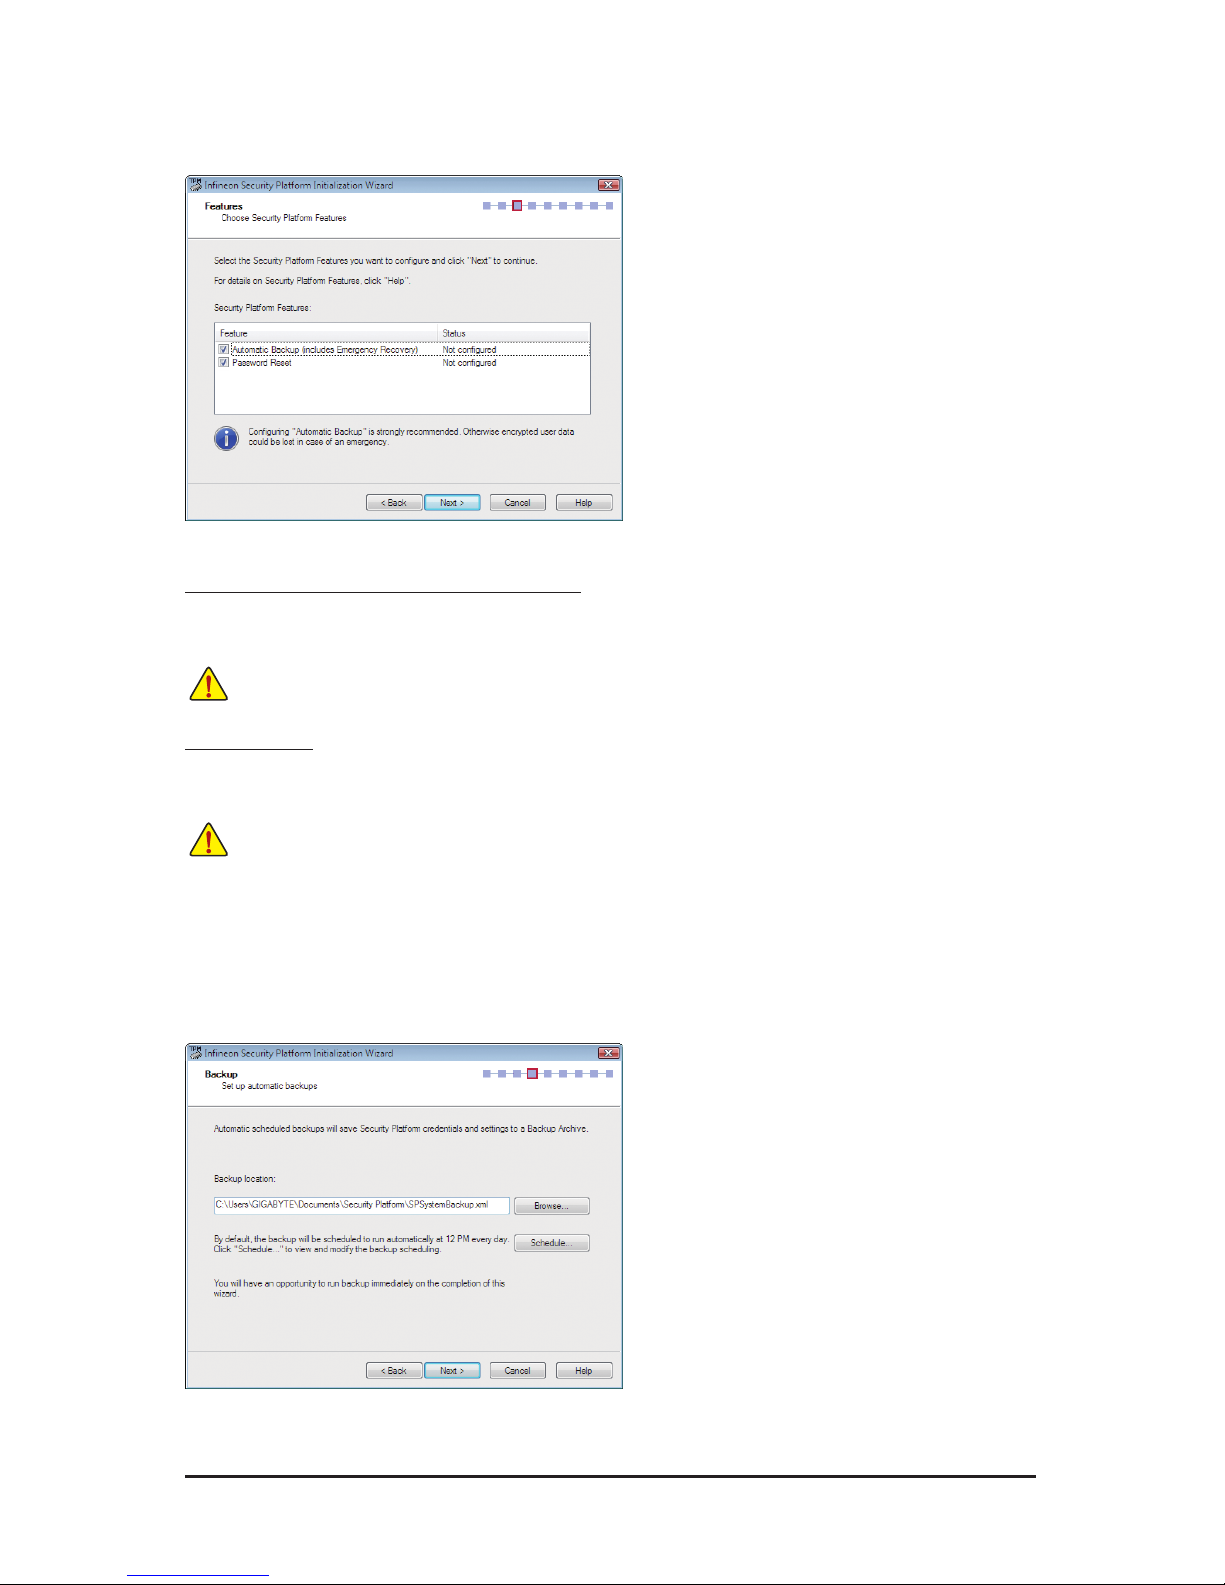
A-3. Select Security Platform Features, which comprises AutomaticBackup (includes Emergency Recovery)
and PasswordReset. Click Next.
A-4. With this page you can congure automatic Security Platform backups. The Security Platform backups
comprise the Security Platform Credentials and Settings and the PSD encrypted data, etc. This can prevent
if a hardware or storage media failure occur, the backups could restore for the certain users settings. Click
Next.
DetailsonFeatures
Automatic Backup (includes Emergency Recovery)
Check this feature, if you want to congure automatic Security Platform backups. Conguring Backup is
strongly recommended. Otherwise all user data will be lost in case of emergency.
Password Reset
Check this feature, if you want to create a Password Reset Token for all users. Conguring Password Reset
is strongly recommended. Otherwise Basic User Passwords can not be reset.
Youcannotuncheckthisfeature,ifthepolicyEnforcecongurationofBackupincludingEmergencyRecovery
isenabled.
Youcannotuncheckthisfeature,ifthepolicyEnforcecongurationofPasswordResetisenabled.Thisfea-
turecanbeconguredonlyonce.Theselectionisdisabled,ifPasswordResethasalreadybeencongured.
Altri manuali per GA-EG45M-DS2H
2
Questo manuale è adatto per i seguenti modelli
21
Indice
Altri manuali Gigabyte Software


Manuali Software popolari di altre marche


PS Audio
PS Audio PowerPlay Manuale del proprietario

Brady
Brady LOCKOUT PRO 3.0 Manuale di servizio

Avaya
Avaya Interaction Center Manuale utente

Texas Instruments
Texas Instruments TI-83 Plus Silver Edition Manuale

Novell
Novell GROUPWISE 8 - INTERNET AGENT Manuale utente

Oracle
Oracle Application 9i Manuale utente

Acer
Acer RDM Manuale utente

Canon
Canon Vixia HF21 Manuale utente

Canon
Canon ZR950 Manuale utente

Samsung
Samsung Auto Backup Manuale utente

Polycom
Polycom Vortex EF2201 Istruzioni per l'installazione e il funzionamento

Brocade Communications Systems
Brocade Communications Systems Brocade 8/12c Manuale utente