Gira System 3000 Manuale utente

System 3000
Room temperature controller Display, Room temperature controller BT
Room temperature controller Display
Order no.: 5393 ..
Room temperature controller BT
Order no.: 5394 ..
Operating instructions
1 Safety instructions
Electrical devices may only be mounted and connected by electrically skilled persons.
Serious injuries, fire or property damage possible. Please read and follow manual fully.
Danger of electric shock. Always disconnect before carrying out work on the device or load. In
so doing, take all the circuit breakers into account, which support dangerous voltages to the
device and or load.
These instructions are an integral part of the product, and must remain with the end customer.
2 Device components
Figure1: Display and operating area
(1) Programming menu icons
(2) Setpoint temperature, actual temperature or cur-
rent time
(3) active mode
(4) Operating area
Icons in the display
ƴManual mode is active.
ƵTemperature value is regulated to comfort temperature
ƶTemperature value is regulated to reduction temperature
ƾCooling icon lights up: no cooling is taking place
Cooling icon flashes: cooling is taking place
ƿHeating icon lights up: no heating is taking place
Heating icon flashes: heating is taking place
Icons of the operating area (4)
ƧStep back / display current time
1 / 15
32401502 10867379 02.07.2020

System 3000
Room temperature controller Display, Room temperature controller BT
ƨConfirm input / display current time
ƘSwitch between manual operation and automatic operation
With Bluetooth version: boost function (press 4 s)
– / + Increase or reduce the displayed temperatures or times / navigation in menu
ƣCall up and terminate the programming menu
With Bluetooth version: Activate coupling mode (pairing) prior to commissioning
(press 4 s)
3 Intended use
– Manual and time-controlled regulation of the room temperature
– Operation and programming with mobile end device (smartphone or tablet) via Bluetooth
with app (Bluetooth version only)
– Operation on room temperature controller insert or switch insert from system 3000
4 Product characteristics
– Timer with three memory areas
Comfort and reduction time for Mo-Fr and Sa-Su in each memory area
– Setting a comfort, reduction, cooling and frost protection temperature
– Current time can be saved as switching time, quick programming
– Automatic summer time changeover, can be switched off
– Illuminated segment display for easy reading
– Operating lock
– Optimised heating up (temperature is reached at the set time), can be switched off
– Adaptation to valves (deenergised open or deenergised closed)
– Cooling mode possible
– Supports internal and external temperature sensor
– Temperature drop detection (call-up of frost protection temperature when window is
opened)
– Offset adjustment (correction value for measured temperature)
– Controller output working method: pulse width modulation (PWM) or two-point
– Valve protection function (once a week opening and closing of valve, on Saturdays at 11
a.m.)
– Interrupts the heating process after 60 minutes for 5 minutes
– Display switch-off after 2 minutes or permanent display available
Additional functions with the Bluetooth version
– The entire operation and commissioning can be performed using an app via a connected
smartphone or tablet
– Weekly timer with 40 individually programmable switch points and temperatures
– Holiday mode (start, end, temperature)
– Boost function: fast heating up for max. 5 minutes
– Local operation can be disabled
– Integration of an external temperature sensor possible via Bluetooth
– Automatic date and time update when connecting with mobile device
– Minimum and maximum temperature values can be set
– Settings and time programs can be copied to other cover units
2 / 15
32401502 10867379 02.07.2020

System 3000
Room temperature controller Display, Room temperature controller BT
5 Functional description
Heating and cooling operating mode
Modern heat pump systems often also provide the option of cooling rooms. This function is sup-
ported by the cover by means of the "Heating and cooling" operating mode. In this operating
mode the system permanently regulates the temperature to the set cooling temperature. There
are no time programs in cooling mode. The only way to change the cooling temperature con-
sists in adjusting the temperature parameters, the +/- buttons cannot be used.
In conjunction with a room temperature controller insert, cooling mode is activated by applying
mains power to input terminal "C". With switch inserts, cooling mode is activated by applying
mains power to extension input "1".
Frost protection / temperature drop detection Ʒ
The frost protection temperature is the minimum temperature regulated by the controller in order
to avoid frost damage. In case of a significant temperature drop, e.g. after opening a window,
the system regulates to the frost protection temperature for a maximum of 30 minutes. This re-
quires the temperature drop detection parameter Ʒ to be activated.
Optimised heating up ƹ
Heating is started at most 4 hours before the switching time, so that the desired temperature
has been reached at the switching time rather than starting to heat up at that time. The display
icon ƹ flashes during the heat-up phase.
Note: Optimised heating up is designed for panel heating/radiators.
Offset Ƴ
If the system detects that the displayed actual temperature differs from the general room tem-
perature, this parameter can be used to enter a correction value. The actual temperature will
then be corrected by this offset value.
Controller adaptation Ƽ
The control principle should be adjusted depending on the heating system and the insert used.
Two-point control (2P): The output remains switched on until the selected setpoint temperature
has been exceeded by 0.5 °C. The output will not be switched on again until the setpoint value
is undercut by 0.5 °C. Since most heating systems respond very slowly, this type of control can
entail temperature overshooting.
Pulse width modulation control (PWM): Optimised for electrothermal valve drives, e.g. 2169 00.
The output is not permanently actuated, but only for a time period (pulse width) that depends on
the difference between setpoint and actual temperature. This method brings the actual temper-
ature gradually closer to the setpoint temperature. The cycle time is 15 minutes.
Valve adaptation Ƹ
This parameter is used to adapt to the electrothermal valve drives. There are drives that are
either open (deenergised open, setting NO) or closed (deenergised closed, setting NC) when no
power supply is applied.
Temperature sensor ƻƺ
The room temperature controller cover features a built-in temperature sensor, which is used to
detect the room temperature. With the Bluetooth version, an app can be used to integrate a
brightness/temperature sensor. In this case, the internal sensor will be deactivated.
In conjunction with a room temperature controller insert a remote sensor can be connected,
either to measure the room temperature or limit the maximum floor temperature.
The following settings are possible.
ƻ: The room temperature is measured using the internal temperature sensor or the BT
brightness and temperature sensor.
ƺ: The room temperature is measured using the remote sensor. The internal temperature
sensor is deactivated.
ƻ and ƺ: The room temperature is measured using the internal temperature sensor
and the floor temperature is measured using the remote sensor for monitoring the floor temper-
3 / 15
32401502 10867379 02.07.2020

System 3000
Room temperature controller Display, Room temperature controller BT
ature. If the maximum temperature is exceeded, the floor heating will be switched off until the
floor temperature is below the maximum value again. This way, an unpleasantly hot floor is
avoided.
Behaviour after a mains voltage failure
Voltage failure less than power reserve
– All data and settings are preserved
Voltage failure greater than power reserve
– Date and time are reset and need to be set again
– Temperature control is performed like before the power failure
– All times set in the weekly timer are retained
– All settings are retained
Default setting
Times for comfort Ƶ and reduction temperature ƶ
Mo - Fr Sa - Su
Ƶ ƶ Ƶ ƶ
ƙ06:00 08:30 07:00 22:00
Ʀ12:00 14:00 --:-- --:--
Ʊ17:00 22:00 --:-- --:--
– Automatic mode is active
– Automatic summer time changeover is active
– Controller output depending on insert: room temperature controller insert = pulse width
modulation, switch insert = two-point control
– Valve drive output is deenergised closed (NC)
– Optimised heating up is not active
– Temperature drop detection is active
– Heating and cooling mode is not active
–Ƶ Comfort temperature: 21 °C, ƶ reduction temperature: 18 °C
ƽ Frost protection temperature: 7 °C, ƾ cooling temperature: 24 °C
– Internal temperature sensor for room temperature measurement is active
– Display switch-off after 2 minutes of inactivity (no button actuation) is active
6 Commissioning
Setting date, time and other parameters
With the Bluetooth version of the device, commissioning can also be performed conveni-
ently via the app using a mobile end device. Before proceeding, the app must be installed
on the mobile end device and a connection to the room temperature controller cover must
be established (see 'Installing app on mobile end device' and 'Coupling mobile end device
via Bluetooth').
When the year is flashing on the display, you must set or confirm the data listed in the table.
– Briefly press the – or + button to change values or toggle between YES / No.
– A long press of the – or + button accelerates value changes.
– Press the Ƨ button to go back in the menu.
– Press the ƨ button to apply the setting and call the next value. After editing the last
parameter, all values will be saved and automatic mode will be invoked.
4 / 15
32401502 10867379 02.07.2020
System 3000
Room temperature controller Display, Room temperature controller BT
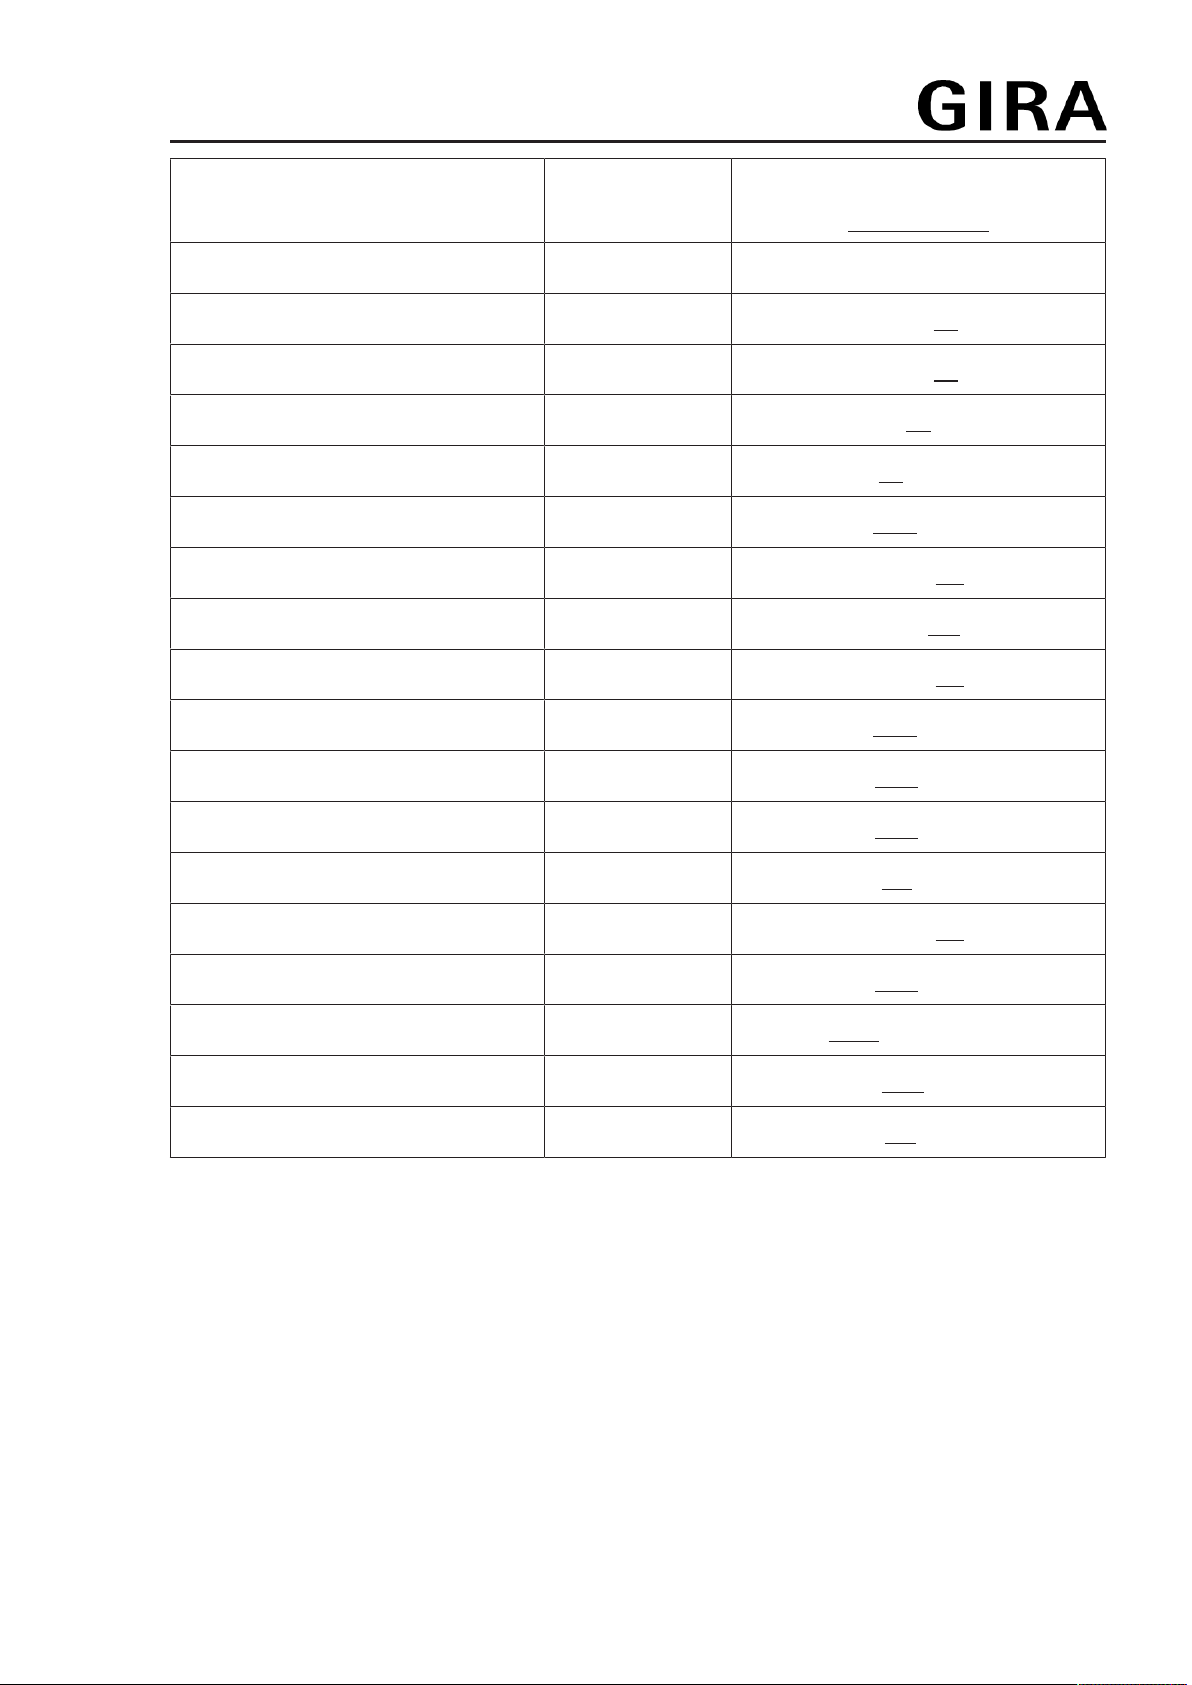
Parameters Display icon Setting option/
Default setting
Year ƛƜ 2019 or later
Month ƛƜ 01 ... 12
Day ƛƜ 01 ... 31
Hour ƛƜ 00 ... 12 ... 23
Minute ƛƜ 00 ... 59
Automatic summer time changeover ƛƜ Ơ YES / No
Controller output 1) ƼYES / No
Valve adaptation 2) ƸNO / NC
Optimised heating up ƹ Ʋ YES / No
Temperature drop detection Ʒ Ʋ YES / No
Comfort temp. Ƶ Ʋ 5 ... 21.0 ... 30 °C
Reduction temp. ƶ Ʋ 5 ... 18.0 ... 30 °C
Frost protection ƽ5 ... 7.0 ... 30 °C
Heating / cooling ƾYES / No
Cooling temp. 3) ƾ Ʋ 5 ... 24.0 ... 30 °C
Temperature sensor ƻroom, floor or both
Max. floor temp. 4) ƺ max. 10 ... 35.0 ... 45 °C
Offset Ƴ Ʋ -5 ... 0.0 ... +5 °C
1) Pulse width modulation (PWM) = No, two-point control = YES (see functional description).
2) NC: Valve is closed when deenergised.
NO: Valve is open when deenergised.
3) This parameter only appears if the device is set to "Heating and cooling".
4) This parameter only appears if ƻ and ƺ has been set for the temperature sensor.
Install app on a mobile end device (Bluetooth version only)
Requirement for operation via app is a mobile end device with Bluetooth interface, running the
Android operating system or iOS.
■ Download and install the Gira System 3000 App from the App Store (iOS) or Google Play
Store (Android).
Coupling mobile end device via Bluetooth (Bluetooth version only)
Prerequisite: The insert must be connected. The cover is placed on the insert and the mobile
end device is close to the cover.
5 / 15
32401502 10867379 02.07.2020

System 3000
Room temperature controller Display, Room temperature controller BT
In order to enter coupling mode (pairing) prior to initial commissioning, the ƣ button must
be pressed for more than 4 seconds until the Ʃ icon flashes in the display.
■ Activate coupling mode (pairing) after initial commissioning: Press the ƣ button.
ƙ flashes in the display.
■ Use the – or + button to select the Bluetooth Ʃ menu item and confirm with ƨ. Then se-
lect YES and confirm once again with ƨ.
The Ʃ icon flashes in the display. The coupling mode is active for one minute.
■ Start Gira System 3000 App and search for device to be coupled (paired).
"Thermostat" is displayed in the app.
■ Perform coupling.
The coupling mode is automatically exited after successful coupling. When the connection
between mobile end device and room temperature controller cover is active, the Ʃ icon in
the display lights up permanently.
If no coupling takes place, the coupling mode is automatically exited after approx. 1
minute.
A maximum of 8 mobile end devices can be coupled with a cover. When coupling the 9th
device, the least used device will be deleted.
When power is applied again, coupling can take place without a password within 2
minutes if a password has been configured via the app.
7 Operation
All settings and operations are also possible via the Bluetooth app.
Increasing or reducing the room temperature
■ Press the – or + button for less than 1 second.
With every brief press of a button the setpoint temperature changes by 0.5 °C. The set
value is retained in manual mode; in automatic mode it is retained until the next switching
time is reached.
In cooling mode the – or + buttons cannot be used to change the setpoint temperature.
If the display is switched off or has been set to indicate the actual temperature or time, the
– or + button will have to be pressed a second time or even more before a change in the
setpoint value takes place.
■ Press the – or + button for more than 1 second.
In heating mode, the saved setpoint temperature is retrieved:
– = reduction temperature
+ = comfort temperature
During a detected temperature drop, changing the setpoint temperature is not possible.
Activating the boost function (Bluetooth version only)
With the boost function, the output is switched on for a maximum of 5 minutes without temperat-
ure control action in order to obtain a temporary increase in temperature.
The boost function can only be activated while in heating mode and no temperature drop
has been detected.
■ Press the Ƙ button for longer than 4 seconds.
The boost function is active. The display counts down from 300 seconds and then
switches back to normal mode.
Press the Ƙ button once again for more than 4seconds to terminate the boost function
prematurely.
6 / 15
32401502 10867379 02.07.2020
System 3000
Room temperature controller Display, Room temperature controller BT
Activating the holiday mode (Bluetooth version only)
The holiday mode can only be set and activated via the app.
When the holiday mode is active, the display indicates the setpoint temperature for the holiday
period and switches between the ƶ and Ƶ icons.
Briefly actuating the – or + button interrupts the holiday mode and the temperature set at that
moment is maintained by the controller.
Briefly actuating the Ƙ button restarts the holiday mode.
8 Activate functions
Automatic operation/manual operation
Pressing the Ƙ button toggles between automatic mode and manual mode.
If all timer blocks are deactivated, the cover will automatically switch to manual mode.
Automatic mode cannot be activated.
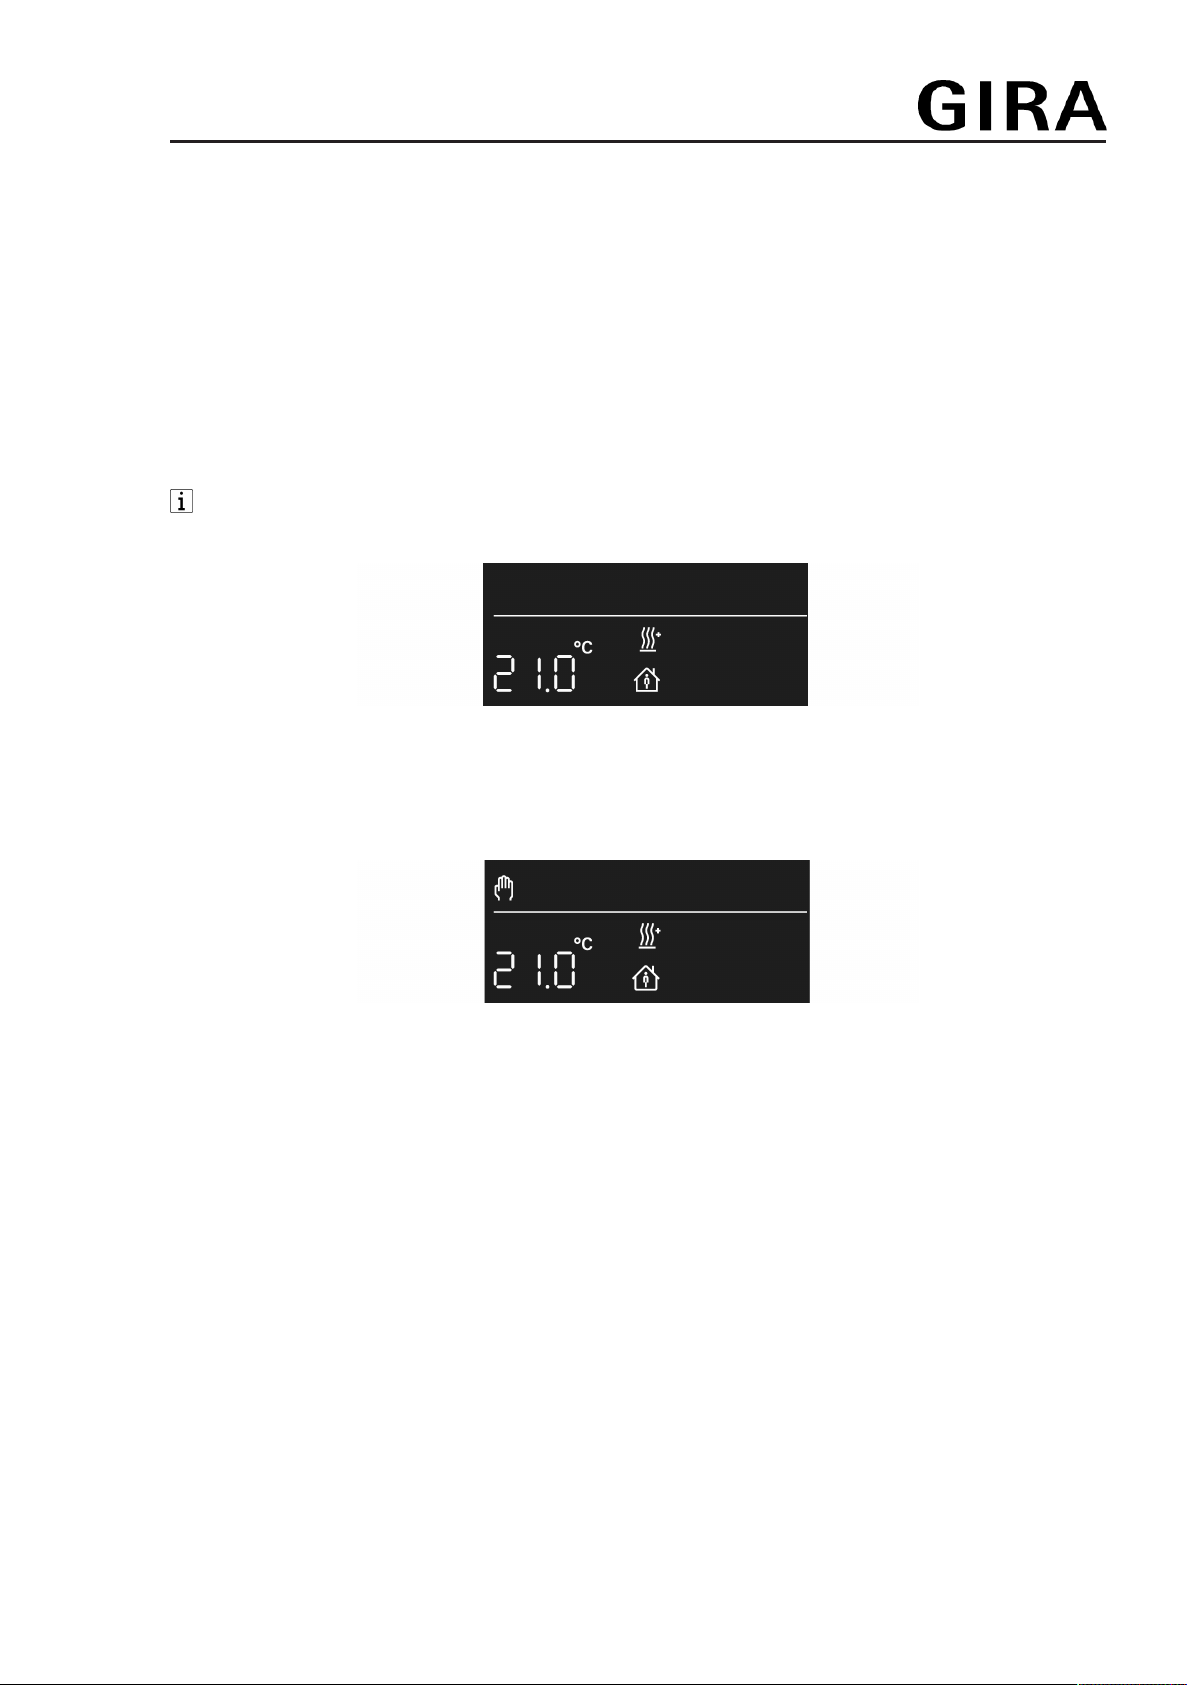
Figure2: Setpoint temperature display in automatic mode
The setpoint temperature is shown in the display. Active heating is indicated by the flashing
heating icon ƿ. If heating is not active, the ƿ icon lights up permanently. The Ƶ icon indicates
that the system is being regulated to the saved comfort temperature.
Figure3: Setpoint temperature display in manual mode
In manual mode, the Ƙ icon appears in addition to the normal display.
7 / 15
32401502 10867379 02.07.2020

System 3000
Room temperature controller Display, Room temperature controller BT
Programming menu overview
Figure4: Programming menu
ƙ Ʀ
Ʊ
Three memory areas for comfort and reduction temperature for the two weekday
blocks Mo - Fr and Sa - Su
ƩActivate coupling mode (see Commissioning section)
ƛƜ Setting date, time and automatic summer time changeover
ƲSetting the comfort temperature, reduction temperature and cooling temperature,
activating optimised heating up, temperature drop detection and setting an offset
value
Press the ƣ button to call up or exit the programming menu.
Navigate through the menu with the – or + button and confirm the selection with the ƨ button.
Bluetooth version only: If the extended operating mode has been activated via the app,
the three memory areas are hidden in the menu. Changes to the switching times can only
be made via the app then.
Setting switching times
■ Press ƣ button.
■ Select memory area ƙ, Ʀ or Ʊ.
■ Confirm with the ƨ button.
YES or No flashes in the display.
No is used to deactivate all times in the selected memory area.
The switching times of the memory areas (ƙ, Ʀ, Ʊ) must not overlap or be set to an
identical time. Otherwise, temperature control cannot be reliably performed.
The available memory areas are described in the table in the Default setting section.
■ Change selection with the – or + button and confirm with the ƨ button.
The first switching time for the comfort temperature appears in the display.
8 / 15
32401502 10867379 02.07.2020

System 3000
Room temperature controller Display, Room temperature controller BT
The flashing switching time can be changed with the – or + button and saved with the ƨ but-
ton. The times for comfort and reduction temperature can be saved consecutively for the week-
day blocks Mo-Fr and Sa-Su each.
The menu is exited upon saving the last time setting.
Set the clock - -:- - to deactivate individual switching times.
After one minute without any operation the menu is exited automatically without saving.
Set date and time
■ Press ƣ button.
■ Setting the ƛƜ
■ Confirm with the ƨ button.
The year flashes in the display.
■ Date, time and automatic summer time changeover can be edited as described in the
Commissioning section.
Changing temperature parameters
■ Press ƣ button.
■ Setting the Ʋ
■ Confirm with the ƨ button.
The setpoint value for the comfort temperature Ƶ flashes in the display.
■ Change the setpoint value with the – or + button and confirm with the ƨ button.
■ Use the same procedure to set the values for the reduction temperature ƶ and, if para-
meterised, the cooling temperature ƾ as well.
■ Activate/deactivate optimised heating up ƹ and temperature drop detection Ʒ.
■ Set the offset value Ƴ.
After value changes, the device will start with the saved setpoint values.
Activating/deactivating the operating lock
An activated operating lock prevents users from directly operating the system on the cover.
■ Press and hold the – and Ƙ buttons simultaneously for more than one second.
Ɨ appears in addition to the normal display. The operating lock is active.
Also press and hold the – and Ƙ buttons simultaneously for more than one second to
deactivate the operating lock.
Changing control parameters
Various settings are made during initial commissioning in order to adapt the temperature control
to local conditions. This menu item can be used to change the settings.
■ Press ƣ and Ƨ buttons simultaneously for longer than 10 seconds.
While actuating the buttons, a countdown from 9 to 0 is displayed.
The Ƽ and YES icons or No appear in the display.
The parameters can be confirmed (ƨ button) or changed (– or + button) as described in the
Commissioning section.
After value changes, the device will start with the saved setpoint values.
Saving current time as switching time, quick programming
Switching times can also be saved without calling up the programming menu. The current time
is saved as the switching time for Mo-Fr and Sa-So.
Quick programming overwrites the existing reduction or comfort temperature in the first
memory area ƙ. The switching times from memory areas 2 and 3 are deactivated.
9 / 15
32401502 10867379 02.07.2020

System 3000
Room temperature controller Display, Room temperature controller BT
■ Press and hold the ƨ button and additionally press the + button for the comfort temper-
ature Ƶ for more than 1 second.
or
■ Press and hold the ƨ button and additionally press the – button for the reduction temper-
ature ƶ for more than 1 second.
SAVE appears in the display. The current time is saved as the new switching time for the
comfort Ƶ or reduction temperature ƶ.
Bluetooth version only: If the extended operating mode has been activated via the app,
the quick saving option is not available.
Display: setpoint temperature, actual temperature or current time
After commissioning, the device indicates the setpoint temperature and switches off the display
after 2 minutes without any operation. Alternatively, the actual temperature or current time can
be displayed.
The display can also remain switched on continuously.
■ Press the ƨ and Ƙ buttons simultaneously for longer than 10 seconds.
A countdown runs in the display. When "0" is reached, the actual temperature is shown in
the display.
The active temperature sensor is shown in the display when the actual temperature indic-
ation is selected.
ƻ or ƻ and ƺ: The measured value is provided by the internal sensor or the
Bluetooth sensor.
ƺ: The measured value is provided by the remote sensor connected to the insert.
■ Press the ƨ and Ƙ buttons simultaneously again for more than 10 seconds.
A countdown runs in the display. When "0" is reached, the current time is displayed.
Use the same operating step to switch back to setpoint temperature display.
■ Press the ƨ and Ƨ buttons simultaneously for longer than 10 seconds.
A countdown runs in the display. When "0" is reached, the display is switched on continu-
ously.
Use the same operating step to switch the display off again after 2 minutes. The display
briefly turns dark to indicate confirmation.
In setpoint or actual temperature display mode, the ƨ or Ƨ button can be pressed for more
than 1 second to display the current time as long as the button is actuated.
Resetting the cover to the default setting
■ Press the Ƨ and Ƙ buttons simultaneously for 10 seconds.
A countdown runs in the display. The reset is performed with "0".
The default setting is restored. The year flashes in the display and the device must be re-
commissioned (see Commissioning section).
With Bluetooth cover version, resetting to default settings can only be performed during
the first 2 minutes after switching on mains voltage.
After resetting to the default settings, the Bluetooth device has to be removed from the
app. On iOS equipment, the device also has to be removed from the list of paired
Bluetooth devices (Settings/Bluetooth). Otherwise, re-pairing will not be possible.
9 Information for electrically skilled persons
This device includes an integrated battery. At the end of its useful life, dispose of the
device together with the battery in accordance with the environmental regulations. Do
not throw device into household waste. Consult your local authorities about
environmentally friendly disposal. According to statutory provisions, the end consumer is
obligated to return the device.
10 / 15
32401502 10867379 02.07.2020
Altri manuali per System 3000
12
Indice
Altri manuali Gira Regolatori di temperatura

Gira
Gira 0389 Series Manuale utente

Gira
Gira 2104 Manuale utente

Gira
Gira G1 Manuale utente

Gira
Gira KNX/EIB Manuale utente

Gira
Gira 396 Manuale utente

Gira
Gira 391 Manuale utente

Gira
Gira Room Temperature Controller Manuale utente

Gira
Gira 397 Manuale utente

Gira
Gira temperature controller Manuale utente

Gira
Gira 2370 Manuale utente


